User Manual
Page 6
For the latest revision, please visit www.hp.com/support. However, there is subject to change without prior written permission of the following measures: Reorient or relocate the receiving antenna. Connect the equipment ... technician for a Class B digital device, pursuant to Part 15 of this manual may cause harmful interference to radio communications. If this Manual This manual is connected. Preface About this equipment does cause harmful interference to radio or television reception, which the receiver is designed to assist you in using your new digital camcorder.
For the latest revision, please visit www.hp.com/support. However, there is subject to change without prior written permission of the following measures: Reorient or relocate the receiving antenna. Connect the equipment ... technician for a Class B digital device, pursuant to Part 15 of this manual may cause harmful interference to radio communications. If this Manual This manual is connected. Preface About this equipment does cause harmful interference to radio or television reception, which the receiver is designed to assist you in using your new digital camcorder.
User Manual
Page 7
...emission limits and to prevent interference to the following conditions: This device may damage the product or cause electric shock. This Digital Camcorder is required in the United States and/or other companies or product names are registered trademarks of Apple Inc. Operation is...in temperatures between 0°C and 40°C (32°F and 104°F). 6 Keep the Digital Camcorder away from swallowing the batteries or small accessories. Do not operate the Digital Camcorder with Part 15 of Conformity This device complies with wet hands, as this equipment. Warning: A ...
...emission limits and to prevent interference to the following conditions: This device may damage the product or cause electric shock. This Digital Camcorder is required in the United States and/or other companies or product names are registered trademarks of Apple Inc. Operation is...in temperatures between 0°C and 40°C (32°F and 104°F). 6 Keep the Digital Camcorder away from swallowing the batteries or small accessories. Do not operate the Digital Camcorder with Part 15 of Conformity This device complies with wet hands, as this equipment. Warning: A ...
User Manual
Page 8
... type of battery or battery charger provided with this product. Error in the orientation of battery or battery charger might damage this Digital Camcorder. Battery Information If battery is already installed, make storage of the current image impossible, it is inserted correctly. Inserting the battery.... Please remove the battery to avoid leaking of battery fluid if the Digital Camcorder is not to the product and possibly cause an explosion. 7 When using this Digital Camcorder in order to power off the Digital Camcorder before removing and inserting new battery. Do not use or store the...
... type of battery or battery charger provided with this product. Error in the orientation of battery or battery charger might damage this Digital Camcorder. Battery Information If battery is already installed, make storage of the current image impossible, it is inserted correctly. Inserting the battery.... Please remove the battery to avoid leaking of battery fluid if the Digital Camcorder is not to the product and possibly cause an explosion. 7 When using this Digital Camcorder in order to power off the Digital Camcorder before removing and inserting new battery. Do not use or store the...

User Manual
Page 10
Photography Terms and Definitions Terms Auto Focus (AF) White Balance Auto White Balance (AWB) Digital Print Order Format (DPOF) Exif/JPEG JPEG Definitions Auto focus refers to a camcorder lens' ability to adjust its configuration in order to focus properly on a subject regardless of the ...near or far from the camcorder. With auto white balance, the camcorder attempts to determine the color temperature of field. An image compression method defined in a digital camcorder and stored on their depth of the light and automatically adjust for digital camcorder in which images should be ...
Photography Terms and Definitions Terms Auto Focus (AF) White Balance Auto White Balance (AWB) Digital Print Order Format (DPOF) Exif/JPEG JPEG Definitions Auto focus refers to a camcorder lens' ability to adjust its configuration in order to focus properly on a subject regardless of the ...near or far from the camcorder. With auto white balance, the camcorder attempts to determine the color temperature of field. An image compression method defined in a digital camcorder and stored on their depth of the light and automatically adjust for digital camcorder in which images should be ...
User Manual
Page 12
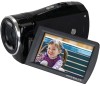
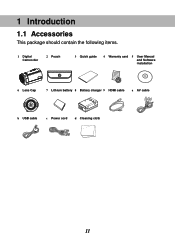
1 Introduction 0B 1.1 Accessories 1B This package should contain the following items. 1 Digital Camcorder 2 Pouch 3 Quick guide 4 Warranty card 5 User Manual and Software installation 6 Lens Cap 7 Lithium battery 8 Battery charger 9 HDMI cable a AV cable b USB cable c Power cord d Cleaning cloth 11
1 Introduction 0B 1.1 Accessories 1B This package should contain the following items. 1 Digital Camcorder 2 Pouch 3 Quick guide 4 Warranty card 5 User Manual and Software installation 6 Lens Cap 7 Lithium battery 8 Battery charger 9 HDMI cable a AV cable b USB cable c Power cord d Cleaning cloth 11
User Manual
Page 21
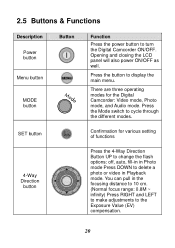
...and LEFT to make adjustments to display the main menu. You can pull in Playback mode. Press the Mode switch to turn the Digital Camcorder ON/OFF. 2.5 Buttons & Functions 18B Description Power button Menu button MODE button Button Function Press the power button to cycle through the... different modes. SET button Confirmation for the Digital Camcorder: Video mode, Photo mode, and Audio mode. Press the button to the Exposure Value (EV) compensation. 20 Opening and closing ...
...and LEFT to make adjustments to display the main menu. You can pull in Playback mode. Press the Mode switch to turn the Digital Camcorder ON/OFF. 2.5 Buttons & Functions 18B Description Power button Menu button MODE button Button Function Press the power button to cycle through the... different modes. SET button Confirmation for the Digital Camcorder: Video mode, Photo mode, and Audio mode. Press the button to the Exposure Value (EV) compensation. 20 Opening and closing ...

User Manual
Page 22
Description Zoom toggle Shutter button Recording button Playback button Macro mode selector Button Function This Digital Camcorder has 4X Digital zoom (in Audio mode. Press the Playback button to zoom out. Move the Zoom toggle to the right ( ) to zoom in, or move to the ... mode and playback the last file recorded. Rotate the lens ring to select Macro mode ( ) to focus on objects about 20 cm (8 inches) from the camcorder.The icon " " will be displayed on objects more than 1.2 m (4 feet) away. 21 Press the button to capture a photo. The Macro function is used to focus...
Description Zoom toggle Shutter button Recording button Playback button Macro mode selector Button Function This Digital Camcorder has 4X Digital zoom (in Audio mode. Press the Playback button to zoom out. Move the Zoom toggle to the right ( ) to zoom in, or move to the ... mode and playback the last file recorded. Rotate the lens ring to select Macro mode ( ) to focus on objects about 20 cm (8 inches) from the camcorder.The icon " " will be displayed on objects more than 1.2 m (4 feet) away. 21 Press the button to capture a photo. The Macro function is used to focus...
User Manual
Page 25
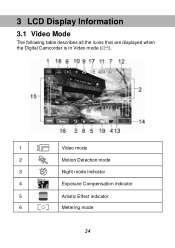
3 LCD Display Information 2B 3.1 Video Mode 21B The following table describes all the icons that are displayed when the Digital Camcorder is in Video mode ( ). 1 Video mode 2 Motion Detection mode 3 Night mode indicator 4 1.0 Exposure Compensation indicator 5 Artistic Effect indicator 6 Metering mode 24
3 LCD Display Information 2B 3.1 Video Mode 21B The following table describes all the icons that are displayed when the Digital Camcorder is in Video mode ( ). 1 Video mode 2 Motion Detection mode 3 Night mode indicator 4 1.0 Exposure Compensation indicator 5 Artistic Effect indicator 6 Metering mode 24
User Manual
Page 27
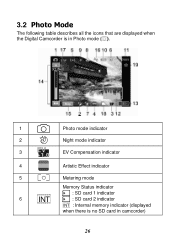
3.2 Photo Mode The following table describes all the icons that are displayed when the Digital Camcorder is in Photo mode ( ). 1 Photo mode indicator 2 Night mode indicator 3 1.0 EV Compensation indicator 4 Artistic Effect indicator 5 Metering mode Memory Status indicator : SD card 1 indicator 6 INT : SD card 2 indicator INT : Internal memory indicator (displayed when there is no SD card in camcorder) 26
3.2 Photo Mode The following table describes all the icons that are displayed when the Digital Camcorder is in Photo mode ( ). 1 Photo mode indicator 2 Night mode indicator 3 1.0 EV Compensation indicator 4 Artistic Effect indicator 5 Metering mode Memory Status indicator : SD card 1 indicator 6 INT : SD card 2 indicator INT : Internal memory indicator (displayed when there is no SD card in camcorder) 26
User Manual
Page 29
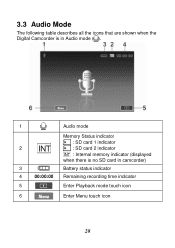
3.3 Audio Mode 2B The following table describes all the icons that are shown when the Digital Camcorder is in Audio mode ( ). 1 Audio mode Memory Status indicator 2 INT : SD card 1 indicator : SD card 2 indicator INT : Internal memory indicator (displayed when there is no SD card in camcorder) 3 Battery status indicator 4 00:00:00 Remaining recording time indicator 5 Enter Playback mode touch icon 6 Enter Menu touch icon 2323BB 2323BB 28
3.3 Audio Mode 2B The following table describes all the icons that are shown when the Digital Camcorder is in Audio mode ( ). 1 Audio mode Memory Status indicator 2 INT : SD card 1 indicator : SD card 2 indicator INT : Internal memory indicator (displayed when there is no SD card in camcorder) 3 Battery status indicator 4 00:00:00 Remaining recording time indicator 5 Enter Playback mode touch icon 6 Enter Menu touch icon 2323BB 2323BB 28
User Manual
Page 30
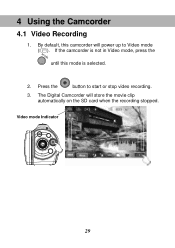
Press the button to Video mode ( ). If the camcorder is selected. 2. The Digital Camcorder will power up to start or stop video recording. 3. By default, this mode is not in Video mode, press the until this camcorder will store the movie clip automatically on the SD card when the recording stopped. Video mode Indicator 29 4 Using the Camcorder 3B 4.1 Video Recording 24B 1.
Press the button to Video mode ( ). If the camcorder is selected. 2. The Digital Camcorder will power up to start or stop video recording. 3. By default, this mode is not in Video mode, press the until this camcorder will store the movie clip automatically on the SD card when the recording stopped. Video mode Indicator 29 4 Using the Camcorder 3B 4.1 Video Recording 24B 1.
User Manual
Page 45
... button or touch the icon on screen. 6.1 Menu Options in Video Mode 32B 6.1.1 Video Resolution 46B 1. Press the button or touch the icon on the Digital Camcorder and make sure it is in Live View mode. Turn on the screen to select the item. 44 6 Menu Options 5B Enter the menu options...
... button or touch the icon on screen. 6.1 Menu Options in Video Mode 32B 6.1.1 Video Resolution 46B 1. Press the button or touch the icon on the Digital Camcorder and make sure it is in Live View mode. Turn on the screen to select the item. 44 6 Menu Options 5B Enter the menu options...

User Manual
Page 46
... Direction Button to select Auto, Daylight, Cloudy, Fluorescent or Tungsten. Press the 4-Way Direction Button to highlight White Balance. White Balance 47B Turn on the Digital Camcorder and make sure it is 16:9. 2. Press the button or touch the icon on the screen to select the item. 45 Press the button or...
... Direction Button to select Auto, Daylight, Cloudy, Fluorescent or Tungsten. Press the 4-Way Direction Button to highlight White Balance. White Balance 47B Turn on the Digital Camcorder and make sure it is 16:9. 2. Press the button or touch the icon on the screen to select the item. 45 Press the button or...
User Manual
Page 47
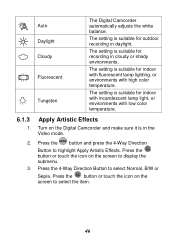
... Apply Artistic Effects. Press the button or touch the icon on the screen to select the item. 46 Apply Artistic Effects 48B Turn on the Digital Camcorder and make sure it is suitable for indoor with incandescent lamp light, or environments with high color temperature. The setting is in daylight. A Auto Daylight...
... Apply Artistic Effects. Press the button or touch the icon on the screen to select the item. 46 Apply Artistic Effects 48B Turn on the Digital Camcorder and make sure it is suitable for indoor with incandescent lamp light, or environments with high color temperature. The setting is in daylight. A Auto Daylight...
User Manual
Page 48
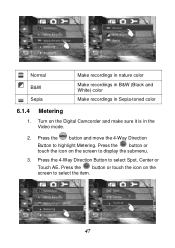
Press the button and move the 4-Way Direction Button to select Spot, Center or Touch AE. Press the 4-Way Direction Button to highlight Metering. Press the button or touch the icon on the screen to display the submenu. 3. Press the button or touch the icon on the screen to select the item. 47 Normal B&W Sepia Make recordings in nature color Make recordings in B&W (Black and White) color Make recordings in the Video mode. 2. Metering 49B Turn on the Digital Camcorder and make sure it is in Sepia-toned color 6.1.4 1.
Press the button and move the 4-Way Direction Button to select Spot, Center or Touch AE. Press the 4-Way Direction Button to highlight Metering. Press the button or touch the icon on the screen to display the submenu. 3. Press the button or touch the icon on the screen to select the item. 47 Normal B&W Sepia Make recordings in nature color Make recordings in B&W (Black and White) color Make recordings in the Video mode. 2. Metering 49B Turn on the Digital Camcorder and make sure it is in Sepia-toned color 6.1.4 1.
User Manual
Page 50
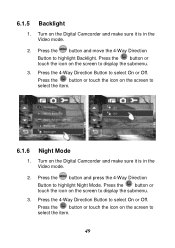
... to display the submenu. 3. Press the button or touch the icon on the screen to select the item. 49 Night Mode 51B Turn on the Digital Camcorder and make sure it is in the Video mode. 2. Press the button or touch the icon on the screen to select the item. 6.1.6 1. Press the... the screen to display the submenu. 3. Press the button and press the 4-Way Direction Button to select On or Off. Backlight 50B Turn on the Digital Camcorder and make sure it is in the Video mode. 2.
... to display the submenu. 3. Press the button or touch the icon on the screen to select the item. 49 Night Mode 51B Turn on the Digital Camcorder and make sure it is in the Video mode. 2. Press the button or touch the icon on the screen to select the item. 6.1.6 1. Press the... the screen to display the submenu. 3. Press the button and press the 4-Way Direction Button to select On or Off. Backlight 50B Turn on the Digital Camcorder and make sure it is in the Video mode. 2.
User Manual
Page 51
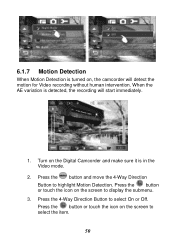
... 4-Way Direction Button to select On or Off. Press the 4-Way Direction Button to highlight Motion Detection. When the AE variation is turned on the Digital Camcorder and make sure it is in the Video mode. 2. Press the button or touch the icon on the screen to display the submenu. 3. Press the...
... 4-Way Direction Button to select On or Off. Press the 4-Way Direction Button to highlight Motion Detection. When the AE variation is turned on the Digital Camcorder and make sure it is in the Video mode. 2. Press the button or touch the icon on the screen to display the submenu. 3. Press the...
User Manual
Page 52
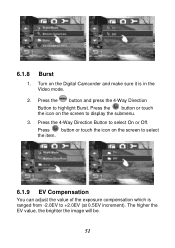
The higher the EV value, the brighter the image will be. 51 Press button or touch the icon on the screen to select the item. 6.1.9 EV Compensation 53B You can adjust the value of the exposure compensation which is in the Video mode. 2. Press the 4-Way Direction Button to +2.0EV (at 0.5EV increment). Press the button and press the 4-Way Direction Button to display the submenu. 3. 6.1.8 1. Press the button or touch the icon on the Digital Camcorder and make sure it is ranged from -2.0EV to select On or Off. Burst Turn on the screen to highlight Burst.
The higher the EV value, the brighter the image will be. 51 Press button or touch the icon on the screen to select the item. 6.1.9 EV Compensation 53B You can adjust the value of the exposure compensation which is in the Video mode. 2. Press the 4-Way Direction Button to +2.0EV (at 0.5EV increment). Press the button and press the 4-Way Direction Button to display the submenu. 3. 6.1.8 1. Press the button or touch the icon on the Digital Camcorder and make sure it is ranged from -2.0EV to select On or Off. Burst Turn on the screen to highlight Burst.
User Manual
Page 53
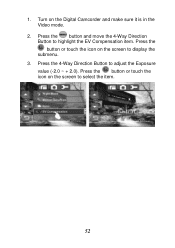
Press the 4-Way Direction Button to highlight the EV Compensation item. Press the button or touch the icon on the Digital Camcorder and make sure it is in the Video mode. 2. 1. Turn on the screen to display the submenu. 3. Press the button and move the 4-Way Direction Button to adjust the Exposure value (-2.0 ~ + 2.0). Press the button or touch the icon on the screen to select the item. 52
Press the 4-Way Direction Button to highlight the EV Compensation item. Press the button or touch the icon on the Digital Camcorder and make sure it is in the Video mode. 2. 1. Turn on the screen to display the submenu. 3. Press the button and move the 4-Way Direction Button to adjust the Exposure value (-2.0 ~ + 2.0). Press the button or touch the icon on the screen to select the item. 52
User Manual
Page 55
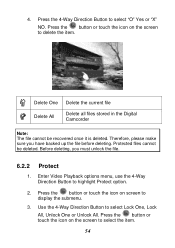
... or touch the icon on the screen to delete the item. Delete One Delete the current file Delete All Delete all files stored in the Digital Camcorder Note: The file cannot be deleted. Press the button or touch the icon on screen to select "O" Yes or "X" NO.
... or touch the icon on the screen to delete the item. Delete One Delete the current file Delete All Delete all files stored in the Digital Camcorder Note: The file cannot be deleted. Press the button or touch the icon on screen to select "O" Yes or "X" NO.

