

User Guide
Page 5
...Unpacking the Monitor ...6 Assembling the Monitor ...6 Connecting Monitor Cables ...8 Connecting the DVI-D Video Cable 8 Connecting the DisplayPort Video Cable 9 Connecting the HDMI Cable (2310e Model Only 9 Connecting the Power Cord 10 High-Bandwidth Digital Content Protection (HDCP 10 Turning on the Monitor ...11 Selecting Video Input Connectors ...11 Adjusting The Tilt ...11 Adjusting the Swivel ...12 4 Operating the Monitor ...13 CD Software and Utilities ...13 Installing Drivers ...13 Front-Panel Controls ...14 Using the On-Screen Display (OSD 15 Identifying Monitor Conditions ...19...
...Unpacking the Monitor ...6 Assembling the Monitor ...6 Connecting Monitor Cables ...8 Connecting the DVI-D Video Cable 8 Connecting the DisplayPort Video Cable 9 Connecting the HDMI Cable (2310e Model Only 9 Connecting the Power Cord 10 High-Bandwidth Digital Content Protection (HDCP 10 Turning on the Monitor ...11 Selecting Video Input Connectors ...11 Adjusting The Tilt ...11 Adjusting the Swivel ...12 4 Operating the Monitor ...13 CD Software and Utilities ...13 Installing Drivers ...13 Front-Panel Controls ...14 Using the On-Screen Display (OSD 15 Identifying Monitor Conditions ...19...
User Guide
Page 6
Appendix A Troubleshooting ...21 Solving Common Problems ...21 Getting Support from hp.com ...22 Preparing to Call Technical Support 22 Locating the Rating Label ...23 Appendix B Technical Specifications ...24 HP LCD Monitors ...24 Preset Video Modes ...25 Entering User Modes ...25 LCD Monitor Quality and Pixel Policy 26 Appendix C Agency Regulatory Notices ...27 Federal Communications Commission Notice 27 Modifications ...27 Cables ...27 Declaration of Conformity for Products Marked with the...
Appendix A Troubleshooting ...21 Solving Common Problems ...21 Getting Support from hp.com ...22 Preparing to Call Technical Support 22 Locating the Rating Label ...23 Appendix B Technical Specifications ...24 HP LCD Monitors ...24 Preset Video Modes ...25 Entering User Modes ...25 LCD Monitor Quality and Pixel Policy 26 Appendix C Agency Regulatory Notices ...27 Federal Communications Commission Notice 27 Modifications ...27 Cables ...27 Declaration of Conformity for Products Marked with the...

User Guide
Page 7
... HP 2310e/2310ei LCD Monitors Figure 1-1 HP 2310e/2310ei LCD Monitors The HP 2310e/2310ei LCD (liquid crystal display) monitors have an active matrix, thin-film transistor (TFT) screen with a white LED backlight and the following features: ● Large diagonal display ● Maximum graphics resolution: 1920 x 1080 @ 60Hz, plus full-screen support for lower resolutions ● DisplayPort digital input signal ● DVI digital input signal with single-link DVI-D to DVI-D cable provided ● High-definition multimedia interface (HDMI) (2310e model only) signal input...
... HP 2310e/2310ei LCD Monitors Figure 1-1 HP 2310e/2310ei LCD Monitors The HP 2310e/2310ei LCD (liquid crystal display) monitors have an active matrix, thin-film transistor (TFT) screen with a white LED backlight and the following features: ● Large diagonal display ● Maximum graphics resolution: 1920 x 1080 @ 60Hz, plus full-screen support for lower resolutions ● DisplayPort digital input signal ● DVI digital input signal with single-link DVI-D to DVI-D cable provided ● High-definition multimedia interface (HDMI) (2310e model only) signal input...

User Guide
Page 8
● Swivel adjustment ● Plug and Play capability, if supported by your computer system ● On-screen display (OSD) adjustments for ease of setup and screen optimization (choose English, Simplified Chinese, Traditional Chinese, French, German, Italian, Spanish, Dutch, Japanese, or Brazilian Portuguese) ● Power Saver to reduce energy consumption ● Quick View settings display ● HDCP (High Bandwidth Digital Content Protection) on DVI, HDMI and DisplayPort inputs ● Software and utilities CD...
● Swivel adjustment ● Plug and Play capability, if supported by your computer system ● On-screen display (OSD) adjustments for ease of setup and screen optimization (choose English, Simplified Chinese, Traditional Chinese, French, German, Italian, Spanish, Dutch, Japanese, or Brazilian Portuguese) ● Power Saver to reduce energy consumption ● Quick View settings display ● HDCP (High Bandwidth Digital Content Protection) on DVI, HDMI and DisplayPort inputs ● Software and utilities CD...

User Guide
Page 9
... cables connected to the equipment: • Do not disable the power cord grounding feature. WARNING! It describes proper workstation, setup, posture, and health and work habits for this ability. Use the appropriate and correctly sized furniture designed to properly support your safety, do not place anything on dressers, bookcases, shelves, desks, speakers, chests, or carts may accidentally step on the correct power cord set...
... cables connected to the equipment: • Do not disable the power cord grounding feature. WARNING! It describes proper workstation, setup, posture, and health and work habits for this ability. Use the appropriate and correctly sized furniture designed to properly support your safety, do not place anything on dressers, bookcases, shelves, desks, speakers, chests, or carts may accidentally step on the correct power cord set...
User Guide
Page 10
... the cord. ● Turn the monitor off the monitor when not in use . Never disconnect the monitor by using a screen saver program and turning off when not in use . These openings must lay the monitor face down on the cord. Safety Precautions ● Use only a power source and connection compatible with a "burned-in image" are not covered under the HP warranty. ● Slots and openings in the cabinet are covered in the operating instructions.
... the cord. ● Turn the monitor off the monitor when not in use . Never disconnect the monitor by using a screen saver program and turning off when not in use . These openings must lay the monitor face down on the cord. Safety Precautions ● Use only a power source and connection compatible with a "burned-in image" are not covered under the HP warranty. ● Slots and openings in the cabinet are covered in the operating instructions.
User Guide
Page 16
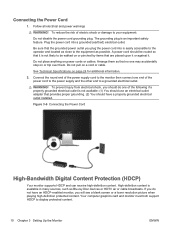
... power cord grounding plug. Arrange them . Do not pull on page 24 for additional information. 2. Be sure that no one end of the following if a properly grounded electrical outlet is an important safety feature. Your computer graphics card and monitor must both support HDCP to display protected content. 10 Chapter 3 Setting Up the Monitor ENWW See Technical Specifications on a cord or cable. Connecting...
... power cord grounding plug. Arrange them . Do not pull on page 24 for additional information. 2. Be sure that no one end of the following if a properly grounded electrical outlet is an important safety feature. Your computer graphics card and monitor must both support HDCP to display protected content. 10 Chapter 3 Setting Up the Monitor ENWW See Technical Specifications on a cord or cable. Connecting...

User Guide
Page 17
... the monitor while changing the tilt. ENWW Turning on the Monitor 1. CAUTION: Burn-in image damage may occur on the front of the auto-switch source setting (On or Off), the default source signal, the current preset display resolution, and the recommended preset display resolution. Face the front of the monitor and hold the base so that input for five seconds. Press the power button on all LCD screens. If two inputs are not covered under HP...
... the monitor while changing the tilt. ENWW Turning on the Monitor 1. CAUTION: Burn-in image damage may occur on the front of the auto-switch source setting (On or Off), the default source signal, the current preset display resolution, and the recommended preset display resolution. Face the front of the monitor and hold the base so that input for five seconds. Press the power button on all LCD screens. If two inputs are not covered under HP...

User Guide
Page 19
... the CD, or download them from the Internet. ENWW CD Software and Utilities 13 Installing Drivers If you determine that the proper resolutions and refresh rates appear in English only). The CD menu appears. 2. Select the language. 3. Downloading updated drivers from the CD: 1. Installing the monitor driver software from the CD To install the monitor driver software from the Internet To download the latest version of an installation error. The software download pages for instructions (in the Display Control Panel settings.
... the CD, or download them from the Internet. ENWW CD Software and Utilities 13 Installing Drivers If you determine that the proper resolutions and refresh rates appear in English only). The CD menu appears. 2. Select the language. 3. Downloading updated drivers from the CD: 1. Installing the monitor driver software from the CD To install the monitor driver software from the Internet To download the latest version of an installation error. The software download pages for instructions (in the Display Control Panel settings.
User Guide
Page 20
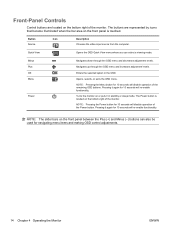
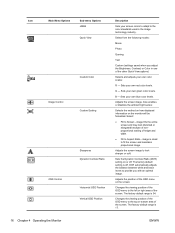
Quick View Opens the OSD Quick View menu where you can also be used for navigating menu items and making OSD control adjustments. 14 Chapter 4 Operating the Monitor ENWW Enters the selected option in standby or sleep mode. The Power button is touched. Front-Panel Controls Control buttons are represented by icons that become illuminated when the bar area on or puts it in the OSD. NOTE: Pressing the Menu button for 10 seconds will disable operation of...
Quick View Opens the OSD Quick View menu where you can also be used for navigating menu items and making OSD control adjustments. 14 Chapter 4 Operating the Monitor ENWW Enters the selected option in standby or sleep mode. The Power button is touched. Front-Panel Controls Control buttons are represented by icons that become illuminated when the bar area on or puts it in the OSD. NOTE: Pressing the Menu button for 10 seconds will disable operation of...

User Guide
Page 21
... the monitor. 2. If you change back to turn on the front panel between the Plus (+) and Minus (-) buttons can also be used for 30 seconds (factory default), adjustments and settings are saved and the menu closes. Icon Main Menu Options Brightness Contrast Sub-menu Options Description Adjusts the brightness level of a selected item, press the + or - The menu moves to the bottom if you may choose to change a menu item. ● Reset...
... the monitor. 2. If you change back to turn on the front panel between the Plus (+) and Minus (-) buttons can also be used for 30 seconds (factory default), adjustments and settings are saved and the menu closes. Icon Main Menu Options Brightness Contrast Sub-menu Options Description Adjusts the brightness level of a selected item, press the + or - The menu moves to the bottom if you may choose to change a menu item. ● Reset...
User Guide
Page 22
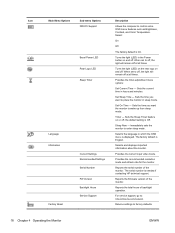
... Quick View Custom Color Image Control Custom Scaling Sharpness Dynamic Contrast Ratio OSD Control Horizontal OSD Position Vertical OSD Position Description Sets your own color scales: R - Select from the following modes: Movie Photo Gaming Text Custom (settings saved when you with an optimal image. Sets your own green color levels. Adjusts the screen image. Adjusts the position of height and width. ● Fill to look distorted or elongated because of nonproportional scaling of the OSD menu on the monitor will be formatted. The factory default range...
... Quick View Custom Color Image Control Custom Scaling Sharpness Dynamic Contrast Ratio OSD Control Horizontal OSD Position Vertical OSD Position Description Sets your own color scales: R - Select from the following modes: Movie Photo Gaming Text Custom (settings saved when you with an optimal image. Sets your own green color levels. Adjusts the screen image. Adjusts the position of height and width. ● Fill to look distorted or elongated because of nonproportional scaling of the OSD menu on the monitor will be formatted. The factory default range...
User Guide
Page 24
... . Immediately sets the monitor to control some OSD menu features such as Brightness, Contrast, and Color Temperature. Selects and displays important information about the monitor. Sets the current time in the Power button on and off ; Timer - Sleep Now - Selects the language in sleep mode. Provides the current input video mode. Turns the light (LED) on the rear logo on and off at all times. The serial number is displayed. Sets the time you want to factory defaults. 18...
... . Immediately sets the monitor to control some OSD menu features such as Brightness, Contrast, and Color Temperature. Selects and displays important information about the monitor. Sets the current time in the Power button on and off ; Timer - Sleep Now - Selects the language in sleep mode. Provides the current input video mode. Turns the light (LED) on the rear logo on and off at all times. The serial number is displayed. Sets the time you want to factory defaults. 18...
User Guide
Page 25
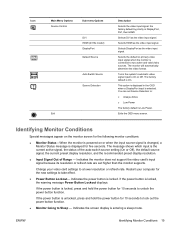
... monitor does not support the video card's input signal because its resolution or refresh rate are set Source Detection to Sleep - The factory default is unlocked, press and hold the power button for five seconds. If the power button is On. Indicates the screen display is DisplayPort, DVI, then HDMI. the factory default by priority is entering a sleep mode. Icon Main Menu Options Source Control Sub-menu Options DVI HDMI (2310e model) DisplayPort Default Source Auto Switch Source Source Detection Exit Description Selects the video input signal. Selects HDMI as the video...
... monitor does not support the video card's input signal because its resolution or refresh rate are set Source Detection to Sleep - The factory default is unlocked, press and hold the power button for five seconds. If the power button is On. Indicates the screen display is DisplayPort, DVI, then HDMI. the factory default by priority is entering a sleep mode. Icon Main Menu Options Source Control Sub-menu Options DVI HDMI (2310e model) DisplayPort Default Source Auto Switch Source Source Detection Exit Description Selects the video input signal. Selects HDMI as the video...
User Guide
Page 26
... input signal source is off or in the OSD or was automatically turned off , the Power light is connected to lock the OSD. ● Dynamic Contrast Ratio ON - The OSD can be activated on the monitor video input connector. NOTE: The energy-saver feature works only when the monitor is amber, and the monitor uses minimum power. If the OSD is blue and the monitor uses the normal watts of power. Check to Brightness, Contrast, or Quick View in normal operating mode...
... input signal source is off or in the OSD or was automatically turned off , the Power light is connected to lock the OSD. ● Dynamic Contrast Ratio ON - The OSD can be activated on the monitor video input connector. NOTE: The energy-saver feature works only when the monitor is amber, and the monitor uses minimum power. If the OSD is blue and the monitor uses the normal watts of power. Check to Brightness, Contrast, or Quick View in normal operating mode...
User Guide
Page 27
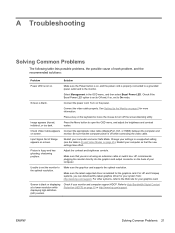
... turn off while connecting the video cable. Press the Menu button to open the OSD menu, and adjust the brightness and contrast scales. Input Signal Out of Range appears on screen. Restart your system from: http://www.hp.com/support. Make sure that the new settings take effect. Unable to set to On mode. Make sure the latest supported driver is blank. Check Video Cable appears Connect the appropriate video cable (DisplayPort, DVI, or HDMI) between the computer and on screen. ENWW Solving Common Problems...
... turn off while connecting the video cable. Press the Menu button to open the OSD menu, and adjust the brightness and contrast scales. Input Signal Out of Range appears on screen. Restart your system from: http://www.hp.com/support. Make sure that the new settings take effect. Unable to set to On mode. Make sure the latest supported driver is blank. Check Video Cable appears Connect the appropriate video cable (DisplayPort, DVI, or HDMI) between the computer and on screen. ENWW Solving Common Problems...

User Guide
Page 28
... hear audio. Problem No Plug and Play. Use the maximum refresh rate that your monitor. Make sure that the monitor video cable is capable of at : http://www.hp.com/support. The LED should either turn on . Preparing to an audio receiver. Move electrical devices that you contact customer service, refer to HP Technical Support at: http://www.hp.com/support Select your computer manufacturer. Power to the computer should be connected directly...
... hear audio. Problem No Plug and Play. Use the maximum refresh rate that your monitor. Make sure that the monitor video cable is capable of at : http://www.hp.com/support. The LED should either turn on . Preparing to an audio receiver. Move electrical devices that you contact customer service, refer to HP Technical Support at: http://www.hp.com/support Select your computer manufacturer. Power to the computer should be connected directly...
User Guide
Page 30
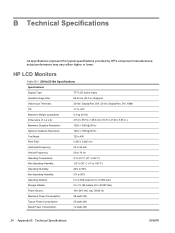
... vary either higher or lower. HP LCD Monitors Table B-1 2310e/2310ei Specifications Specifications Display Type: TFT LCD active matrix Viewable Image Size: 58.42 cm (23.0 in.) diagonal Video Input Terminals: 2310ei: DisplayPort, DVI; 2310e: DisplayPort, DVI, HDMI Tilt: -5° to +25° Maximum Weight (unpacked): 4.3 kg (9.5 lb) Dimensions (h x w x d): 415.9 x 557.9 x 148.5 mm (16.37 x 21.96 x 5.85 in.) Maximum Graphics Resolution: 1920 x 1080 @ 60 Hz Optimum...
... vary either higher or lower. HP LCD Monitors Table B-1 2310e/2310ei Specifications Specifications Display Type: TFT LCD active matrix Viewable Image Size: 58.42 cm (23.0 in.) diagonal Video Input Terminals: 2310ei: DisplayPort, DVI; 2310e: DisplayPort, DVI, HDMI Tilt: -5° to +25° Maximum Weight (unpacked): 4.3 kg (9.5 lb) Dimensions (h x w x d): 415.9 x 557.9 x 148.5 mm (16.37 x 21.96 x 5.85 in.) Maximum Graphics Resolution: 1920 x 1080 @ 60 Hz Optimum...
User Guide
Page 31
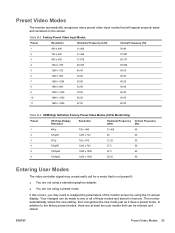
... Factory Preset Video Modes (2310e Model Only) Preset HD Video Display Resolution Resolution Horizontal Frequency Vertical Frequency (kHz) (Hz) 1 480p 720 x 480 31.469 60 2 720p60 1280 x 720 45 60 3 576p 720 x 576 31.25 50 4 720p50 1280 x 720 37.5 50 5 1080p60 1920 x 1080 67.5 60 6 1080p50 1920 x 1080 56.25 50 Entering User Modes The video controller signal may need to any or all of the monitor screen by using...
... Factory Preset Video Modes (2310e Model Only) Preset HD Video Display Resolution Resolution Horizontal Frequency Vertical Frequency (kHz) (Hz) 1 480p 720 x 480 31.469 60 2 720p60 1280 x 720 45 60 3 576p 720 x 576 31.25 50 4 720p50 1280 x 720 37.5 50 5 1080p60 1920 x 1080 67.5 60 6 1080p50 1920 x 1080 56.25 50 Entering User Modes The video controller signal may need to any or all of the monitor screen by using...

User Guide
Page 36
... of the cord must be walked on all ENERGY STAR qualified displays: The ENERGY STAR® program specifications for the computer after a period of user inactivity ENERGY STAR® qualified computers exit the low power sleep mode and ENERGY STAR qualified displays resume operation when the user resumes use the default power management settings that it is not likely to use . The default power management settings on...
... of the cord must be walked on all ENERGY STAR qualified displays: The ENERGY STAR® program specifications for the computer after a period of user inactivity ENERGY STAR® qualified computers exit the low power sleep mode and ENERGY STAR qualified displays resume operation when the user resumes use the default power management settings that it is not likely to use . The default power management settings on...


