

User Guide
Page 1
2310e and 2310ei LCD Monitors User Guide
2310e and 2310ei LCD Monitors User Guide
User Guide
Page 3
WARNING! CAUTION: Text set off in this manner indicates that failure to follow directions could result in damage to follow directions could result in bodily harm or loss of information. ENWW iii Text set off in this manner provides important supplemental information. NOTE: Text set off in this manner indicates that failure to equipment or loss of life. About This Guide This guide provides information on setting up the monitor, installing drivers, using the on-screen display menu, troubleshooting and technical specifications.
WARNING! CAUTION: Text set off in this manner indicates that failure to follow directions could result in damage to follow directions could result in bodily harm or loss of information. ENWW iii Text set off in this manner provides important supplemental information. NOTE: Text set off in this manner indicates that failure to equipment or loss of life. About This Guide This guide provides information on setting up the monitor, installing drivers, using the on-screen display menu, troubleshooting and technical specifications.

User Guide
Page 5
Table of contents 1 Product Features ...1 HP 2310e/2310ei LCD Monitors ...1 2 Safety and Maintenance Guidelines ...3 Important Safety Information ...3 Safety Precautions ...4 Maintenance Guidelines ...4 Cleaning the Monitor ...5 Shipping the Monitor ...5 3 Setting Up the Monitor ...6 Unpacking the Monitor ...6 Assembling the Monitor ...6 Connecting Monitor Cables ...8 Connecting the DVI-D Video Cable 8 Connecting the DisplayPort Video Cable 9 Connecting the HDMI Cable (2310e Model Only 9 Connecting the...
Table of contents 1 Product Features ...1 HP 2310e/2310ei LCD Monitors ...1 2 Safety and Maintenance Guidelines ...3 Important Safety Information ...3 Safety Precautions ...4 Maintenance Guidelines ...4 Cleaning the Monitor ...5 Shipping the Monitor ...5 3 Setting Up the Monitor ...6 Unpacking the Monitor ...6 Assembling the Monitor ...6 Connecting Monitor Cables ...8 Connecting the DVI-D Video Cable 8 Connecting the DisplayPort Video Cable 9 Connecting the HDMI Cable (2310e Model Only 9 Connecting the...
User Guide
Page 6
... ...22 Preparing to Call Technical Support 22 Locating the Rating Label ...23 Appendix B Technical Specifications ...24 HP LCD Monitors ...24 Preset Video Modes ...25 Entering User Modes ...25 LCD Monitor Quality and Pixel Policy 26 Appendix C Agency Regulatory Notices ...27 Federal Communications Commission Notice 27 Modifications ...27 Cables ...® Qualification 30 Disposal of Waste Equipment by Users in Private Household in the European Union ..... 31 Chemical Substances ...31 HP Recycling Program ...31 Restriction of Hazardous Substances (RoHS 31 Turkey EEE Regulation ...32 vi ENWW
... ...22 Preparing to Call Technical Support 22 Locating the Rating Label ...23 Appendix B Technical Specifications ...24 HP LCD Monitors ...24 Preset Video Modes ...25 Entering User Modes ...25 LCD Monitor Quality and Pixel Policy 26 Appendix C Agency Regulatory Notices ...27 Federal Communications Commission Notice 27 Modifications ...27 Cables ...® Qualification 30 Disposal of Waste Equipment by Users in Private Household in the European Union ..... 31 Chemical Substances ...31 HP Recycling Program ...31 Restriction of Hazardous Substances (RoHS 31 Turkey EEE Regulation ...32 vi ENWW

User Guide
Page 7
1 Product Features HP 2310e/2310ei LCD Monitors Figure 1-1 HP 2310e/2310ei LCD Monitors The HP 2310e/2310ei LCD (liquid crystal display) monitors have an active matrix, thin-film transistor (TFT) screen with a white LED backlight and the following features: ● Large diagonal display &#...better experience for hardcore gaming and graphics ● Easy viewing from a sitting or standing position, or while moving from one side of the monitor to the other ● Dynamic Contrast Ratio to provide deeper blacks and brighter whites for brilliant shading effects while gaming or watching movies &#...
1 Product Features HP 2310e/2310ei LCD Monitors Figure 1-1 HP 2310e/2310ei LCD Monitors The HP 2310e/2310ei LCD (liquid crystal display) monitors have an active matrix, thin-film transistor (TFT) screen with a white LED backlight and the following features: ● Large diagonal display &#...better experience for hardcore gaming and graphics ● Easy viewing from a sitting or standing position, or while moving from one side of the monitor to the other ● Dynamic Contrast Ratio to provide deeper blacks and brighter whites for brilliant shading effects while gaming or watching movies &#...

User Guide
Page 9
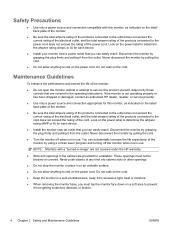
For your HP LCD monitor. To reduce the risk of electric shock or damage to the equipment: • Do not disable the power cord grounding feature. the power strips must be specifically labeled as having this monitor. Use the appropriate and correctly sized furniture designed to ...the protection of surge protection device such as the computer, connect all power strips provide surge protection; If another cord is included with the monitor. For information on dressers, bookcases, shelves, desks, speakers, chests, or carts may fall over . WARNING! Not all power cords ...
For your HP LCD monitor. To reduce the risk of electric shock or damage to the equipment: • Do not disable the power cord grounding feature. the power strips must be specifically labeled as having this monitor. Use the appropriate and correctly sized furniture designed to ...the protection of surge protection device such as the computer, connect all power strips provide surge protection; If another cord is included with the monitor. For information on dressers, bookcases, shelves, desks, speakers, chests, or carts may fall over . WARNING! Not all power cords ...
User Guide
Page 10
... that you must not be blocked or covered. Never disconnect the monitor by grasping the plug firmly and pulling it from the outlet. If the monitor is not operating properly or has been dropped or damaged, contact an authorized HP dealer, reseller, or service provider. ● Use only a... power source and connection appropriate for each device. ● Install your monitor near an outlet that you can easily reach. Disconnect the monitor by pulling the cord. ● Do not ...
... that you must not be blocked or covered. Never disconnect the monitor by grasping the plug firmly and pulling it from the outlet. If the monitor is not operating properly or has been dropped or damaged, contact an authorized HP dealer, reseller, or service provider. ● Use only a... power source and connection appropriate for each device. ● Install your monitor near an outlet that you can easily reach. Disconnect the monitor by pulling the cord. ● Do not ...
User Guide
Page 11
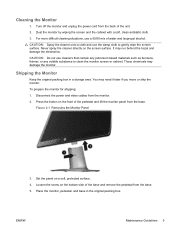
... surface. CAUTION: Do not use a 50/50 mix of the pedestal and lift the monitor panel from the base. 5. You may damage the monitor. Place the monitor, pedestal, and base in a storage area. Cleaning the Monitor 1. Dust the monitor by wiping the screen and the cabinet with a soft, clean antistatic cloth. 3. Shipping...It may run behind the bezel and damage the electronics. CAUTION: Spray the cleaner onto a cloth and use the damp cloth to clean the monitor screen or cabinet. Disconnect the power and video cables from the back of the base and remove the pedestal from the base.
... surface. CAUTION: Do not use a 50/50 mix of the pedestal and lift the monitor panel from the base. 5. You may damage the monitor. Place the monitor, pedestal, and base in a storage area. Cleaning the Monitor 1. Dust the monitor by wiping the screen and the cabinet with a soft, clean antistatic cloth. 3. Shipping...It may run behind the bezel and damage the electronics. CAUTION: Spray the cleaner onto a cloth and use the damp cloth to clean the monitor screen or cabinet. Disconnect the power and video cables from the back of the base and remove the pedestal from the base.
User Guide
Page 12
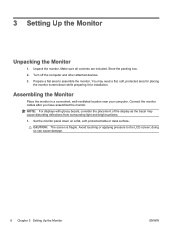
...soft, protected table or desk surface. Turn off the computer and other attached devices. 3. Connect the monitor cables after you have assembled the monitor. Assembling the Monitor Place the monitor in a convenient, well-ventilated location near your computer. CAUTION: The screen is fragile. Store the ...packing box. 2. Avoid touching or applying pressure to assemble the monitor. doing so can cause damage. 6 Chapter 3 Setting Up the Monitor ENWW 3 Setting Up the Monitor Unpacking the Monitor 1. Prepare a flat area to the LCD screen; NOTE: For displays with glossy...
...soft, protected table or desk surface. Turn off the computer and other attached devices. 3. Connect the monitor cables after you have assembled the monitor. Assembling the Monitor Place the monitor in a convenient, well-ventilated location near your computer. CAUTION: The screen is fragile. Store the ...packing box. 2. Avoid touching or applying pressure to assemble the monitor. doing so can cause damage. 6 Chapter 3 Setting Up the Monitor ENWW 3 Setting Up the Monitor Unpacking the Monitor 1. Prepare a flat area to the LCD screen; NOTE: For displays with glossy...
User Guide
Page 13
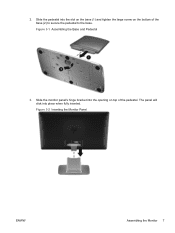
The panel will click into the slot on the base (1) and tighten the large screw on top of the base (2) to secure the pedestal to the base. Figure 3-2 Inserting the Monitor Panel ENWW Assembling the Monitor 7 Figure 3-1 Assembling the Base and Pedestal 3. Slide the monitor panel's hinge bracket into the opening on the bottom of the pedestal. Slide the pedestal into place when fully inserted. 2.
The panel will click into the slot on the base (1) and tighten the large screw on top of the base (2) to secure the pedestal to the base. Figure 3-2 Inserting the Monitor Panel ENWW Assembling the Monitor 7 Figure 3-1 Assembling the Base and Pedestal 3. Slide the monitor panel's hinge bracket into the opening on the bottom of the pedestal. Slide the pedestal into place when fully inserted. 2.
User Guide
Page 14
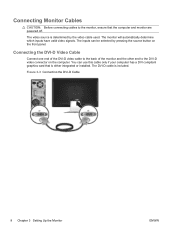
The video source is determined by pressing the source button on the computer. The monitor will automatically determine which inputs have valid video signals. Figure 3-3 Connecting the DVI-D Cable 8 Chapter 3 Setting Up the Monitor ENWW Connecting the DVI-D Video Cable Connect one end of the DVI-D video ...cable to the back of the monitor and the other end to the monitor, ensure that is included. You can be selected by the video cable used. Connecting Monitor Cables CAUTION: Before connecting cables to the DVI-D video connector on the front...
The video source is determined by pressing the source button on the computer. The monitor will automatically determine which inputs have valid video signals. Figure 3-3 Connecting the DVI-D Cable 8 Chapter 3 Setting Up the Monitor ENWW Connecting the DVI-D Video Cable Connect one end of the DVI-D video ...cable to the back of the monitor and the other end to the monitor, ensure that is included. You can be selected by the video cable used. Connecting Monitor Cables CAUTION: Before connecting cables to the DVI-D video connector on the front...
User Guide
Page 15
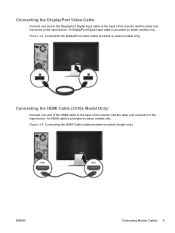
An HDMI cable is provided on select models only) ENWW Connecting Monitor Cables 9 Figure 3-4 Connecting the DisplayPort Cable (cable provided on select models only. Figure 3-5 Connecting the HDMI Cable (cable provided on select models only. Connecting the ...DisplayPort Video Cable Connect one end of the HDMI cable to the back of the monitor and the other end connector to the input device. A DisplayPort Digital Input cable is provided on select models only) Connecting the HDMI Cable (2310e Model...
An HDMI cable is provided on select models only) ENWW Connecting Monitor Cables 9 Figure 3-4 Connecting the DisplayPort Cable (cable provided on select models only. Figure 3-5 Connecting the HDMI Cable (cable provided on select models only. Connecting the ...DisplayPort Video Cable Connect one end of the HDMI cable to the back of the monitor and the other end connector to the input device. A DisplayPort Digital Input cable is provided on select models only) Connecting the HDMI Cable (2310e Model...
User Guide
Page 16
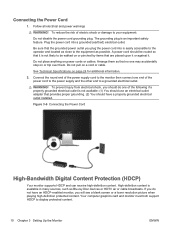
... protected content. A power cord should be routed so that it . Connect the round end of the power supply cord to the monitor then connect one of electric shock or damage to a grounded electrical outlet. Follow all electrical and power warnings WARNING! High-definition content...the risk of the following if a properly grounded electrical outlet is not likely to display protected content. 10 Chapter 3 Setting Up the Monitor ENWW See Technical Specifications on or pinched by items that provides proper grounding. (2) You should use an electrical outlet adapter that are placed ...
... protected content. A power cord should be routed so that it . Connect the round end of the power supply cord to the monitor then connect one of electric shock or damage to a grounded electrical outlet. Follow all electrical and power warnings WARNING! High-definition content...the risk of the following if a properly grounded electrical outlet is not likely to display protected content. 10 Chapter 3 Setting Up the Monitor ENWW See Technical Specifications on or pinched by items that provides proper grounding. (2) You should use an electrical outlet adapter that are placed ...

User Guide
Page 17
... the same static image on all LCD screens. Image retention is the current active signal, the status of time. ENWW Turning on the Monitor 1. CAUTION: Burn-in image damage may occur on screen for a prolonged period of the auto-switch source setting (On or Off), ...can change the default source in use . Turning on the Monitor 11 Monitors with a "burned-in image" are not covered under HP warranty. * A prolonged period of time.* To avoid burn-in image damage on the monitor screen, you do not topple the monitor while changing the tilt. Adjusting The Tilt For optimal viewing...
... the same static image on all LCD screens. Image retention is the current active signal, the status of time. ENWW Turning on the Monitor 1. CAUTION: Burn-in image damage may occur on screen for a prolonged period of the auto-switch source setting (On or Off), ...can change the default source in use . Turning on the Monitor 11 Monitors with a "burned-in image" are not covered under HP warranty. * A prolonged period of time.* To avoid burn-in image damage on the monitor screen, you do not topple the monitor while changing the tilt. Adjusting The Tilt For optimal viewing...
User Guide
Page 18
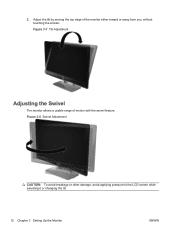
Figure 3-8 Swivel Adjustment CAUTION: To avoid breakage or other damage, avoid applying pressure to the LCD screen while swiveling it or changing the tilt. 12 Chapter 3 Setting Up the Monitor ENWW Figure 3-7 Tilt Adjustment Adjusting the Swivel The monitor allows a usable range of the monitor either toward or away from you, without touching the screen. 2. Adjust the tilt by moving the top edge of motion with the swivel feature.
Figure 3-8 Swivel Adjustment CAUTION: To avoid breakage or other damage, avoid applying pressure to the LCD screen while swiveling it or changing the tilt. 12 Chapter 3 Setting Up the Monitor ENWW Figure 3-7 Tilt Adjustment Adjusting the Swivel The monitor allows a usable range of the monitor either toward or away from you, without touching the screen. 2. Adjust the tilt by moving the top edge of motion with the swivel feature.

User Guide
Page 19
... from the CD To install the monitor driver software from the HP Support site: 1. Click Install Monitor Driver Software. 4. Refer to : http://www.hp.com/support. 2. Downloading updated drivers from the Internet To download the latest version of your monitor. ENWW CD Software and Utilities 13...instructions. 5. Refer to the Windows® operating system documentation for more information. Ensure that you need to install the digitally signed monitor drivers (INF or ICM files) manually from the Internet. Select the language. 3. Select your computer. Download and install the driver...
... from the CD To install the monitor driver software from the HP Support site: 1. Click Install Monitor Driver Software. 4. Refer to : http://www.hp.com/support. 2. Downloading updated drivers from the Internet To download the latest version of your monitor. ENWW CD Software and Utilities 13...instructions. 5. Refer to the Windows® operating system documentation for more information. Ensure that you need to install the digitally signed monitor drivers (INF or ICM files) manually from the Internet. Select the language. 3. Select your computer. Download and install the driver...
User Guide
Page 20
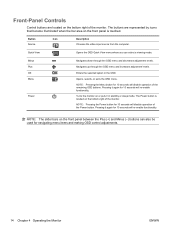
...NOTE: Pressing the Power button for 10 seconds will re-enable functionality. The buttons are located on the bottom right of the monitor. Turns the monitor on or puts it again for 10 seconds will disable operation of the Power button. The Power button is touched. Pressing it ... (-) buttons can select a viewing mode. Pressing it again for navigating menu items and making OSD control adjustments. 14 Chapter 4 Operating the Monitor ENWW Button Source Icon Description Chooses the video input source from the computer. Quick View Opens the OSD Quick View menu where you can also...
...NOTE: Pressing the Power button for 10 seconds will re-enable functionality. The buttons are located on the bottom right of the monitor. Turns the monitor on or puts it again for 10 seconds will disable operation of the Power button. The Power button is touched. Pressing it ... (-) buttons can select a viewing mode. Pressing it again for navigating menu items and making OSD control adjustments. 14 Chapter 4 Operating the Monitor ENWW Button Source Icon Description Chooses the video input source from the computer. Quick View Opens the OSD Quick View menu where you can also...

User Guide
Page 21
... Adjusts the contrast level of a selected item, press the + or - To navigate through the Main or sub-menu, press the + (Plus) button on the monitor's front panel to scroll up at the bottom of the screen. NOTE: The menu moves to slightly blueish white. NOTE: The slider bars on the... Menu Options Brightness Contrast Sub-menu Options Description Adjusts the brightness level of the selections. ENWW Using the On-Screen Display (OSD) 15 If the monitor is active only if you scroll up , or the - (Minus) button to : ● Cancel - To access the OSD menu, press the Menu button. Using...
... Adjusts the contrast level of a selected item, press the + or - To navigate through the Main or sub-menu, press the + (Plus) button on the monitor's front panel to scroll up at the bottom of the screen. NOTE: The menu moves to slightly blueish white. NOTE: The slider bars on the... Menu Options Brightness Contrast Sub-menu Options Description Adjusts the brightness level of the selections. ENWW Using the On-Screen Display (OSD) 15 If the monitor is active only if you scroll up , or the - (Minus) button to : ● Cancel - To access the OSD menu, press the Menu button. Using...
User Guide
Page 22
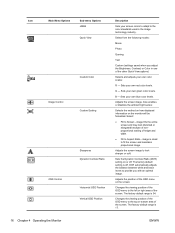
... to look distorted or elongated because of nonproportional scaling of the screen. The factory default range is 17. 16 Chapter 4 Operating the Monitor ENWW Also enables or disables the ambient light sensor. The factory default setting is sized to provide you adjust the Brightness, Contrast, or...when you with an optimal image. Select: ● Fill to the color standards used in one of the OSD menu on the monitor will be formatted. Icon Main Menu Options Sub-menu Options sRGB Quick View Custom Color Image Control Custom Scaling Sharpness Dynamic Contrast Ratio OSD...
... to look distorted or elongated because of nonproportional scaling of the screen. The factory default range is 17. 16 Chapter 4 Operating the Monitor ENWW Also enables or disables the ambient light sensor. The factory default setting is sized to provide you adjust the Brightness, Contrast, or...when you with an optimal image. Select: ● Fill to the color standards used in one of the OSD menu on the monitor will be formatted. Icon Main Menu Options Sub-menu Options sRGB Quick View Custom Color Image Control Custom Scaling Sharpness Dynamic Contrast Ratio OSD...
User Guide
Page 23
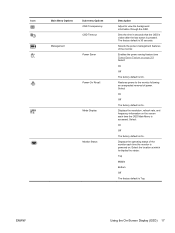
...pressed. Select: On Off The factory default is On. Displays the resolution, refresh rate, and frequency information on the screen each time the monitor is Top. ENWW Using the On-Screen Display (OSD) 17 Enables the power saving feature (see Power-Saver Feature on . Select: On... Off The factory default is On. Select the location at which to the monitor following an unexpected removal of power. Displays the operating status of the monitor. The factory default is accessed. Icon Main Menu Options Sub-menu Options OSD Transparency OSD Timeout Management...
...pressed. Select: On Off The factory default is On. Displays the resolution, refresh rate, and frequency information on the screen each time the monitor is Top. ENWW Using the On-Screen Display (OSD) 17 Enables the power saving feature (see Power-Saver Feature on . Select: On... Off The factory default is On. Select the location at which to the monitor following an unexpected removal of power. Displays the operating status of the monitor. The factory default is accessed. Icon Main Menu Options Sub-menu Options OSD Transparency OSD Timeout Management...


