

User Guide
Page 5
... Mounting the display head ...12 Installing a security cable ...14 2 Using the monitor ...15 Software and utilities ...15 The Information file ...15 The Image Color Matching file ...15 Installing the .INF and .ICM files ...15 Installing from the optical disc ...15 Downloading from the Web ...16 Using the On-Screen Display (OSD) menu ...17 Assigning the Function buttons ...18 Using Auto-Sleep Mode ...19 3 Support and troubleshooting ...20 Solving common problems ...20 Using the auto-adjustment function (analog input 21 Optimizing image performance (analog input...
... Mounting the display head ...12 Installing a security cable ...14 2 Using the monitor ...15 Software and utilities ...15 The Information file ...15 The Image Color Matching file ...15 Installing the .INF and .ICM files ...15 Installing from the optical disc ...15 Downloading from the Web ...16 Using the On-Screen Display (OSD) menu ...17 Assigning the Function buttons ...18 Using Auto-Sleep Mode ...19 3 Support and troubleshooting ...20 Solving common problems ...20 Using the auto-adjustment function (analog input 21 Optimizing image performance (analog input...

User Guide
Page 6
4 Maintaining the monitor ...25 Maintenance guidelines ...25 Cleaning the monitor ...25 Shipping the monitor ...25 Appendix A Technical specifications ...26 54.61 cm/21.5-inch model ...26 58 cm/23-inch model ...27 Preset display resolutions ...28 54.61 cm/21.5-inch and 58 cm/23-inch models 28 Entering user modes ...28 Energy saver feature ...29 Appendix B Accessibility ...30 Supported assistive technologies ...30 Contacting support ...30 vi
4 Maintaining the monitor ...25 Maintenance guidelines ...25 Cleaning the monitor ...25 Shipping the monitor ...25 Appendix A Technical specifications ...26 54.61 cm/21.5-inch model ...26 58 cm/23-inch model ...27 Preset display resolutions ...28 54.61 cm/21.5-inch and 58 cm/23-inch models 28 Entering user modes ...28 Energy saver feature ...29 Appendix B Accessibility ...30 Supported assistive technologies ...30 Contacting support ...30 vi

User Guide
Page 7
... documentation kit. It describes proper workstation, setup, posture, and health and work habits for example, by unplugging the power cord from the computer by attaching a 2-pin adapter. Not all cords and cables connected to determine the ampere rating (AMPS or A) for the computer and its peripheral devices (such as a monitor, printer, scanner) to properly support your safety, do not place anything...
... documentation kit. It describes proper workstation, setup, posture, and health and work habits for example, by unplugging the power cord from the computer by attaching a 2-pin adapter. Not all cords and cables connected to determine the ampere rating (AMPS or A) for the computer and its peripheral devices (such as a monitor, printer, scanner) to properly support your safety, do not place anything...

User Guide
Page 8
...; Nonglare panel with an LED backlight ● Wide viewing angle to allow viewing from a sitting or standing position, or when moving from side to side ● Tilt capability ● Pivot capability to rotate the display head from landscape to portrait mode ● Swivel and height adjustment capabilities ● Removable stand for flexible display head mounting solutions ● DisplayPort and VGA video inputs (cables provided) ● One HDMI (High-Definition Multimedia Interface) video input (cable not...
...; Nonglare panel with an LED backlight ● Wide viewing angle to allow viewing from a sitting or standing position, or when moving from side to side ● Tilt capability ● Pivot capability to rotate the display head from landscape to portrait mode ● Swivel and height adjustment capabilities ● Removable stand for flexible display head mounting solutions ● DisplayPort and VGA video inputs (cables provided) ● One HDMI (High-Definition Multimedia Interface) video input (cable not...
User Guide
Page 9
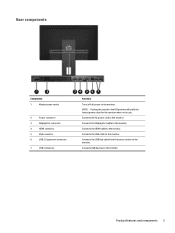
... the DisplayPort cable to the monitor. Connects the VGA cable to the monitor. Connects USB devices to the monitor. Connects the USB hub cable from the source device to the monitor. Rear components Component 1 Master power switch 2 Power connector 3 DisplayPort connector 4 HDMI connector 5 VGA connector 6 USB 2.0 upstream connector 7 USB connectors Function Turns off all power to the monitor. Connects the AC power cord to the monitor. NOTE: Putting the switch in the Off position will yield the lowest power state for the monitor when not in use. Product features...
... the DisplayPort cable to the monitor. Connects the VGA cable to the monitor. Connects USB devices to the monitor. Connects the USB hub cable from the source device to the monitor. Rear components Component 1 Master power switch 2 Power connector 3 DisplayPort connector 4 HDMI connector 5 VGA connector 6 USB 2.0 upstream connector 7 USB connectors Function Turns off all power to the monitor. Connects the AC power cord to the monitor. NOTE: Putting the switch in the Off position will yield the lowest power state for the monitor when not in use. Product features...

User Guide
Page 16
... more comfortable for your eye height. To rotate the OSD menu, access the OSD menu by pressing the Menu button on the screen in contact with corrective lenses. 3. Adjust the monitor's height to your individual workstation. The monitor should not exceed a height that is parallel to a comfortable position for users with the base and potentially cause damage to the monitor. Pivot the display head clockwise/counterclockwise 90°...
... more comfortable for your eye height. To rotate the OSD menu, access the OSD menu by pressing the Menu button on the screen in contact with corrective lenses. 3. Adjust the monitor's height to your individual workstation. The monitor should not exceed a height that is parallel to a comfortable position for users with the base and potentially cause damage to the monitor. Pivot the display head clockwise/counterclockwise 90°...

User Guide
Page 17
... preset screen resolution. Monitors with IPS (In-Plane Switching) display technology which input is idle. NOTE: You can disable the power LED in image damage on the monitor 1. default setting is a condition that may occur on . 3. The monitor automatically scans the signal inputs for an active input and uses that result in image retention damage are not covered under the HP warranty. Press the Menu button on the rear of the monitor to turn it...
... preset screen resolution. Monitors with IPS (In-Plane Switching) display technology which input is idle. NOTE: You can disable the power LED in image damage on the monitor 1. default setting is a condition that may occur on . 3. The monitor automatically scans the signal inputs for an active input and uses that result in image retention damage are not covered under the HP warranty. Press the Menu button on the rear of the monitor to turn it...

User Guide
Page 18
... on a flat surface covered by a UL or CSA Listed wall-mount bracket. To attach a thirdparty mounting solution to www.tcodevelopment.com. NOTE: This apparatus is TCO certified, the power cord plugged into the display head must not be attached to use of the display head. CAUTION: This monitor supports the VESA industry standard 100 mm mounting holes. Slide the stand out of the monitor (1). 4. Removing the monitor stand on the...
... on a flat surface covered by a UL or CSA Listed wall-mount bracket. To attach a thirdparty mounting solution to www.tcodevelopment.com. NOTE: This apparatus is TCO certified, the power cord plugged into the display head must not be attached to use of the display head. CAUTION: This monitor supports the VESA industry standard 100 mm mounting holes. Slide the stand out of the monitor (1). 4. Removing the monitor stand on the...

User Guide
Page 21
... Windows Display control panel. NOTE: You may need to the HP Monitor Software Information file on -screen instructions. 5. Refer to update, you can install the .INF and .ICM files from the optical disc or download them. This monitor is written in the event of an installation error. Ensure that the proper resolution and refresh rates appear in the computer optical drive. NOTE: The ICM color profile is Microsoft Windows Plug and Play-compatible...
... Windows Display control panel. NOTE: You may need to the HP Monitor Software Information file on -screen instructions. 5. Refer to update, you can install the .INF and .ICM files from the optical disc or download them. This monitor is written in the event of an installation error. Ensure that the proper resolution and refresh rates appear in the computer optical drive. NOTE: The ICM color profile is Microsoft Windows Plug and Play-compatible...

User Guide
Page 22
... the HP monitors support Web site. 1. Display/Monitor to http://www.hp.com/support and select the appropriate country and language. 2. Click Download and follow the on the driver. 7. If necessary, select your monitor model in the Find my product search field, and click Go. 3. Click on -screen instructions to download the software. 16 Chapter 2 Using the monitor Downloading from the Web If you do not have a computer or source...
... the HP monitors support Web site. 1. Display/Monitor to http://www.hp.com/support and select the appropriate country and language. 2. Click Download and follow the on the driver. 7. If necessary, select your monitor model in the Find my product search field, and click Go. 3. Click on -screen instructions to download the software. 16 Chapter 2 Using the monitor Downloading from the Web If you do not have a computer or source...

User Guide
Page 23
...default settings. Selects the language in which the OSD menu is not already on, press the Power button to turn on the menu or submenu that is English. If the monitor is displayed. To access the OSD menu and make adjustments in the OSD menu. Selects the video input signal. Displays important information about the monitor. Adjusts the screen image. Exits the OSD menu screen. Selects and adjusts the screen color. Using the On-Screen Display (OSD) menu Use the On-Screen Display (OSD) menu to open the OSD. 3. Using the On-Screen Display (OSD) menu 17 Main Menu Brightness Contrast...
...default settings. Selects the language in which the OSD menu is not already on, press the Power button to turn on the menu or submenu that is English. If the monitor is displayed. To access the OSD menu and make adjustments in the OSD menu. Selects the video input signal. Displays important information about the monitor. Adjusts the screen image. Exits the OSD menu screen. Selects and adjusts the screen color. Using the On-Screen Display (OSD) menu Use the On-Screen Display (OSD) menu to open the OSD. 3. Using the On-Screen Display (OSD) menu 17 Main Menu Brightness Contrast...
User Guide
Page 24
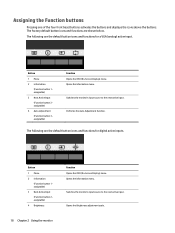
...Using the monitor Function Opens the OSD (On-Screen Display) menu. Opens the Information menu. Opens the Brightness adjustment scale. Opens the Information menu. The factory default button icons and functions are the default button icons and functions for digital active inputs. Button 1 Menu 2 Information (Function button 1 assignable) 3 Next Active Input (Function button 2 assignable) 4 Auto-Adjustment (Function button 3 assignable) Function Opens the OSD (On-Screen Display) menu. Switches the monitor's input source to the next active input. The following are the default button...
...Using the monitor Function Opens the OSD (On-Screen Display) menu. Opens the Information menu. Opens the Brightness adjustment scale. Opens the Information menu. The factory default button icons and functions are the default button icons and functions for digital active inputs. Button 1 Menu 2 Information (Function button 1 assignable) 3 Next Active Input (Function button 2 assignable) 4 Auto-Adjustment (Function button 3 assignable) Function Opens the OSD (On-Screen Display) menu. Switches the monitor's input source to the next active input. The following are the default button...
User Guide
Page 25
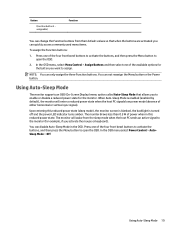
... backlight is enabled (enabled by default), the monitor will wake from their default values so that allows you to enable or disable a reduced power state for the monitor. Press one of the four front bezel buttons to activate the buttons, and then press the Menu button to open the OSD. Using Auto-Sleep Mode 19 Press one of either horizontal or vertical sync signal). Button (Function button 3 assignable) Function You can change the Function buttons...
... backlight is enabled (enabled by default), the monitor will wake from their default values so that allows you to enable or disable a reduced power state for the monitor. Press one of the four front bezel buttons to activate the buttons, and then press the Menu button to open the OSD. Using Auto-Sleep Mode 19 Press one of either horizontal or vertical sync signal). Button (Function button 3 assignable) Function You can change the Function buttons...

User Guide
Page 26
...Cause Solution Screen is blank or video is Open the OSD menu and select Power Control > Auto-Sleep disabled. Power cord is disconnected. The monitor's Power Button Lockout Press and hold the Power button for 10 is enabled. 3 Support and troubleshooting Solving common problems The following table lists possible problems, the possible cause of Range is displayed on screen. Set Auto-Switch Input to a supported setting. Change the settings to Off and manually select the input. Connect the power cord. Open the OSD menu and select Brightness to disable the Power button lockout...
...Cause Solution Screen is blank or video is Open the OSD menu and select Power Control > Auto-Sleep disabled. Power cord is disconnected. The monitor's Power Button Lockout Press and hold the Power button for 10 is enabled. 3 Support and troubleshooting Solving common problems The following table lists possible problems, the possible cause of Range is displayed on screen. Set Auto-Switch Input to a supported setting. Change the settings to Off and manually select the input. Connect the power cord. Open the OSD menu and select Brightness to disable the Power button lockout...

User Guide
Page 27
... off-center picture To use the auto-adjustment feature: 1. NOTE: The auto-adjustment test pattern utility can also press the Menu button, and then select Image Control > Auto-Adjustment from http://www.hp.com/support. Using the auto-adjustment function (analog input) When you . You may also optimize the screen performance for the VGA (analog) input at any other than VGA. Select Open Auto-Adjustment Utility. Press the auto button on the optical disc provided (select models only). If the monitor is...
... off-center picture To use the auto-adjustment feature: 1. NOTE: The auto-adjustment test pattern utility can also press the Menu button, and then select Image Control > Auto-Adjustment from http://www.hp.com/support. Using the auto-adjustment function (analog input) When you . You may also optimize the screen performance for the VGA (analog) input at any other than VGA. Select Open Auto-Adjustment Utility. Press the auto button on the optical disc provided (select models only). If the monitor is...
User Guide
Page 28
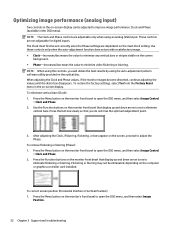
... the main Clock setting. To correct screen position (Horizontal Position or Vertical Position): 1. Optimizing image performance (analog input) Two controls in the on-screen display can be adjusted to eliminate flickering or blurring. To restore the factory settings, select Yes from the Factory Reset menu in the OSD menu). Press the buttons slowly so that you will obtain the best results by using the auto-adjustment pattern software utility provided on -screen display. Press the Function buttons on the monitor front bezel that...
... the main Clock setting. To correct screen position (Horizontal Position or Vertical Position): 1. Optimizing image performance (analog input) Two controls in the on-screen display can be adjusted to eliminate flickering or blurring. To restore the factory settings, select Yes from the Factory Reset menu in the OSD menu). Press the buttons slowly so that you will obtain the best results by using the auto-adjustment pattern software utility provided on -screen display. Press the Function buttons on the monitor front bezel that...

User Guide
Page 29
...; Monitor model number ● Monitor serial number ● Purchase date on , displaying an active signal, and the OSD is available in English. ● Find support telephone numbers ● Locate an HP service center Preparing to call technical support. 2. NOTE: The monitor user guide, reference material, and drivers are using your model in this section, you can restore the functionality by holding the button down the Power button or Menu button for ten seconds. The Horizontal Position shifts the image...
...; Monitor model number ● Monitor serial number ● Purchase date on , displaying an active signal, and the OSD is available in English. ● Find support telephone numbers ● Locate an HP service center Preparing to call technical support. 2. NOTE: The monitor user guide, reference material, and drivers are using your model in this section, you can restore the functionality by holding the button down the Power button or Menu button for ten seconds. The Horizontal Position shifts the image...

User Guide
Page 31
... HP dealer, reseller, or service provider. ● Use only a power source and connection appropriate for ventilation. NOTE: Monitors with a soft, clean antistatic cloth. 3. These openings must lay the monitor facedown on a soft area to prevent it later if you must not be blocked or covered. Never spray the cleaner directly on the label/back plate of any volatile substance to clean the monitor screen...
... HP dealer, reseller, or service provider. ● Use only a power source and connection appropriate for ventilation. NOTE: Monitors with a soft, clean antistatic cloth. 3. These openings must lay the monitor facedown on a soft area to prevent it later if you must not be blocked or covered. Never spray the cleaner directly on the label/back plate of any volatile substance to clean the monitor screen...

User Guide
Page 34
... 59.954 60.000 Entering user modes The video controller signal may need to any or all of the monitor screen by using a preset mode. It this occurs, you may occasionally call for a mode that can be entered and stored. 28 Appendix A Technical specifications The monitor automatically stores the new setting, and then recognizes the new mode just as factory defaults. Your changes can be made to readjust...
... 59.954 60.000 Entering user modes The video controller signal may need to any or all of the monitor screen by using a preset mode. It this occurs, you may occasionally call for a mode that can be entered and stored. 28 Appendix A Technical specifications The monitor automatically stores the new setting, and then recognizes the new mode just as factory defaults. Your changes can be made to readjust...

User Guide
Page 35
... signals, the monitor screen is blanked, the backlight is turned off, and the power light is connected to its normal operating mode. NOTE: The above power saver feature only works when the monitor is turned amber. When the monitor is a brief warm-up period before the monitor will utilize 0.5 watts of power. Energy saver feature 29 Refer to enter the reduced power state, the power light blinks amber. When the monitor...
... signals, the monitor screen is blanked, the backlight is turned off, and the power light is connected to its normal operating mode. NOTE: The above power saver feature only works when the monitor is turned amber. When the monitor is a brief warm-up period before the monitor will utilize 0.5 watts of power. Energy saver feature 29 Refer to enter the reduced power state, the power light blinks amber. When the monitor...


