

User Guide
Page 3
NOTE: Contains additional information to emphasize or supplement important points of the main text. TIP: Provides helpful hints for completing a task. Indicates a hazardous situation that , if not avoided, could result in minor or moderate injury. This product incorporates HDMI technology. About This Guide This guide provides information on monitor features, setting up the monitor, and technical specifications. iii CAUTION: Indicates a hazardous situation that , if not avoided, could result in death or serious injury. WARNING!
NOTE: Contains additional information to emphasize or supplement important points of the main text. TIP: Provides helpful hints for completing a task. Indicates a hazardous situation that , if not avoided, could result in minor or moderate injury. This product incorporates HDMI technology. About This Guide This guide provides information on monitor features, setting up the monitor, and technical specifications. iii CAUTION: Indicates a hazardous situation that , if not avoided, could result in death or serious injury. WARNING!

User Guide
Page 5
... Started ...1 Important safety information ...1 Product features and components ...2 Features ...2 Rear components ...3 Front bezel controls ...4 Setting up the monitor ...5 Installing the monitor stand ...5 Connecting the cables ...6 Adjusting the monitor ...9 Turning on the monitor ...11 HP watermark and image retention policy 11 Removing the monitor stand ...12 Mounting the display head ...12 Installing a security cable ...14 2 Using the...
... Started ...1 Important safety information ...1 Product features and components ...2 Features ...2 Rear components ...3 Front bezel controls ...4 Setting up the monitor ...5 Installing the monitor stand ...5 Connecting the cables ...6 Adjusting the monitor ...9 Turning on the monitor ...11 HP watermark and image retention policy 11 Removing the monitor stand ...12 Mounting the display head ...12 Installing a security cable ...14 2 Using the...

User Guide
Page 6
4 Maintaining the monitor ...25 Maintenance guidelines ...25 Cleaning the monitor ...25 Shipping the monitor ...25 Appendix A Technical specifications ...26 54.61 cm/21.5-inch model ...26 58 cm/23-inch model ...27 Preset display resolutions ...28 54.61 cm/21.5-inch and 58 cm/23-inch models 28 Entering user modes ...28 Energy saver feature ...29 Appendix B Accessibility ...30 Supported assistive technologies ...30 Contacting support ...30 vi
4 Maintaining the monitor ...25 Maintenance guidelines ...25 Cleaning the monitor ...25 Shipping the monitor ...25 Appendix A Technical specifications ...26 54.61 cm/21.5-inch model ...26 58 cm/23-inch model ...27 Preset display resolutions ...28 54.61 cm/21.5-inch and 58 cm/23-inch models 28 Entering user modes ...28 Energy saver feature ...29 Appendix B Accessibility ...30 Supported assistive technologies ...30 Contacting support ...30 vi

User Guide
Page 7
...surge protection; 1 Getting Started Important safety information An AC power cord is an important safety feature. The grounding pin is included with the monitor, refer to properly support your safety, do not place anything on the optical disc or in a controlled luminous environment to determine the ampere... rating (AMPS or A) for this ability. For your HP LCD monitor. CAUTION: For the protection of the cord. Be sure that the total ampere rating of the products connected to the AC outlet does...
...surge protection; 1 Getting Started Important safety information An AC power cord is an important safety feature. The grounding pin is included with the monitor, refer to properly support your safety, do not place anything on the optical disc or in a controlled luminous environment to determine the ampere... rating (AMPS or A) for this ability. For your HP LCD monitor. CAUTION: For the protection of the cord. Be sure that the total ampere rating of the products connected to the AC outlet does...

User Guide
Page 8
... for easy setup and screen optimization ● HP Display Assistant software for adjusting monitor settings and enabling the theft deterrence features (refer to the HP Display Assistant User Guide on the optical disc included with your monitor) ● HDCP (High-Bandwidth Digital Content ...● Software and documentation optical disc that includes monitor drivers and product documentation ● Energy saver feature to meet requirements for reduced power consumption NOTE: For safety and regulatory information, refer to http://www.hp.com/ support, and select your documentation kit....
... for easy setup and screen optimization ● HP Display Assistant software for adjusting monitor settings and enabling the theft deterrence features (refer to the HP Display Assistant User Guide on the optical disc included with your monitor) ● HDCP (High-Bandwidth Digital Content ...● Software and documentation optical disc that includes monitor drivers and product documentation ● Energy saver feature to meet requirements for reduced power consumption NOTE: For safety and regulatory information, refer to http://www.hp.com/ support, and select your documentation kit....
User Guide
Page 9
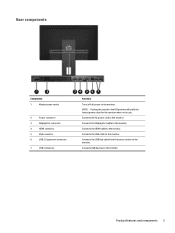
... connector 4 HDMI connector 5 VGA connector 6 USB 2.0 upstream connector 7 USB connectors Function Turns off all power to the monitor. Connects the DisplayPort cable to the monitor. Connects the VGA cable to the monitor. Connects USB devices to the monitor. NOTE: Putting the switch in the Off position will yield the lowest power state for the...
... connector 4 HDMI connector 5 VGA connector 6 USB 2.0 upstream connector 7 USB connectors Function Turns off all power to the monitor. Connects the DisplayPort cable to the monitor. Connects the VGA cable to the monitor. Connects USB devices to the monitor. NOTE: Putting the switch in the Off position will yield the lowest power state for the...
User Guide
Page 10
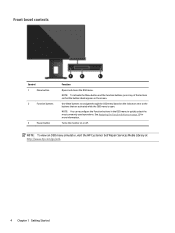
... the OSD menu to the buttons that the button labels appear on the indicators next to quickly select the most commonly used operations. Turns the monitor on page 18 for more information. NOTE: To activate the Menu button and the Function buttons, press any of the buttons so that are activated... bezel controls Control 1 Menu button 2 Function buttons 3 Power button Function Opens and closes the OSD menu. NOTE: To view an OSD menu simulator, visit the HP Customer Self Repair Services Media Library at http://www...
... the OSD menu to the buttons that the button labels appear on the indicators next to quickly select the most commonly used operations. Turns the monitor on page 18 for more information. NOTE: To activate the Menu button and the Function buttons, press any of the buttons so that are activated... bezel controls Control 1 Menu button 2 Function buttons 3 Power button Function Opens and closes the OSD menu. NOTE: To view an OSD menu simulator, visit the HP Customer Self Repair Services Media Library at http://www...

User Guide
Page 11
...is locked in the back of the panel. 3. If this occurs, the screen will not recover to its normal condition. 1. The latch (3) pops up the monitor 5 Pressure on a flat surface covered by a clean, dry cloth. 2. Lay the display head face down on the panel may cause non-uniformity of color or... disorientation of the recess in place. Setting up the monitor Installing the monitor stand CAUTION: Do not touch the surface of the stand's mounting plate (2) into the recess until it snaps into place. 4. Slide the top ...
...is locked in the back of the panel. 3. If this occurs, the screen will not recover to its normal condition. 1. The latch (3) pops up the monitor 5 Pressure on a flat surface covered by a clean, dry cloth. 2. Lay the display head face down on the panel may cause non-uniformity of color or... disorientation of the recess in place. Setting up the monitor Installing the monitor stand CAUTION: Do not touch the surface of the stand's mounting plate (2) into the recess until it snaps into place. 4. Slide the top ...

User Guide
Page 12
...Connect a VGA cable to the VGA connector on the rear of the stand. 3. NOTE: The monitor will automatically determine which inputs have valid video signals. Connecting the cables NOTE: The monitor ships with the monitor. 1. Not all cables shown in this section are included with select cables. Before connecting the ...cables, route the cables through the cable routing hole in a convenient, well-ventilated location near the computer. 2. Place the monitor in the center of the monitor and the other end to the VGA connector on the source device. 6 Chapter 1 Getting Started
...Connect a VGA cable to the VGA connector on the rear of the stand. 3. NOTE: The monitor will automatically determine which inputs have valid video signals. Connecting the cables NOTE: The monitor ships with the monitor. 1. Not all cables shown in this section are included with select cables. Before connecting the ...cables, route the cables through the cable routing hole in a convenient, well-ventilated location near the computer. 2. Place the monitor in the center of the monitor and the other end to the VGA connector on the source device. 6 Chapter 1 Getting Started

User Guide
Page 13
Setting up the monitor 7 ● Connect a DisplayPort cable to the DisplayPort connector on the rear of the monitor and the other end to the DisplayPort connector on the source device. ● Connect an HDMI cable to the HDMI connector on the rear of the monitor and the other end to the HDMI connector on the source device.
Setting up the monitor 7 ● Connect a DisplayPort cable to the DisplayPort connector on the rear of the monitor and the other end to the DisplayPort connector on the source device. ● Connect an HDMI cable to the HDMI connector on the rear of the monitor and the other end to the HDMI connector on the source device.
User Guide
Page 14
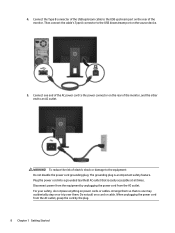
... power cord into a grounded (earthed) AC outlet that no one end of the AC power cord to the power connector on the rear of the monitor, and the other end to the USB upstream port on the source device. 5. For your safety, do not place anything on a cord or cable. Then... connect the cable's Type A connector to the equipment: Do not disable the power cord grounding plug. Connect the Type B connector of the monitor. The grounding plug is easily accessible at all times.
... power cord into a grounded (earthed) AC outlet that no one end of the AC power cord to the power connector on the rear of the monitor, and the other end to the USB upstream port on the source device. 5. For your safety, do not place anything on a cord or cable. Then... connect the cable's Type A connector to the equipment: Do not disable the power cord grounding plug. Connect the Type B connector of the monitor. The grounding plug is easily accessible at all times.

User Guide
Page 15
Tilt the display head forward or backward to set it to the left or right for the best viewing angle. Swivel the display head to a comfortable eye level. 2. Setting up the monitor 9 Adjusting the monitor 1.
Tilt the display head forward or backward to set it to the left or right for the best viewing angle. Swivel the display head to a comfortable eye level. 2. Setting up the monitor 9 Adjusting the monitor 1.

User Guide
Page 16
...10 Chapter 1 Getting Started b. Adjust the monitor's height to portrait mode. NOTE: To view information on the screen in contact with corrective lenses. 3. The monitor's top bezel edge should be repositioned as you can install the HP Display Assistant software included on the front bezel,... select OSD Control from landscape to portrait orientation viewing to adapt to the monitor. You can also be ...
...10 Chapter 1 Getting Started b. Adjust the monitor's height to portrait mode. NOTE: To view information on the screen in contact with corrective lenses. 3. The monitor's top bezel edge should be repositioned as you can install the HP Display Assistant software included on the front bezel,... select OSD Control from landscape to portrait orientation viewing to adapt to the monitor. You can also be ...

User Guide
Page 17
... scans the signal inputs for an active input and uses that display the same static image on , a Monitor Status message is displayed for five seconds. HP watermark and image retention policy The IPS monitor models are designed with a "burned-in use the power management setting, if supported on . 3. Set ... IPS (In-Plane Switching) display technology which input is not in image" are not covered under the HP warranty. To avoid image retention damage, always turn off the monitor when it is the current active signal, the status of the auto-switch source setting (On or Off; Turning ...
... scans the signal inputs for an active input and uses that display the same static image on , a Monitor Status message is displayed for five seconds. HP watermark and image retention policy The IPS monitor models are designed with a "burned-in use the power management setting, if supported on . 3. Set ... IPS (In-Plane Switching) display technology which input is not in image" are not covered under the HP warranty. To avoid image retention damage, always turn off the monitor when it is the current active signal, the status of the auto-switch source setting (On or Off; Turning ...

User Guide
Page 18
... For information on a wall, a swing arm, or other mounting fixture. It is important to verify that the monitor is rated to support the weight of the monitor (1). 4. Disconnect and remove all cables are required. Slide the stand out of a shielded power cable meets the ...TCO Certified criteria for display products. CAUTION: Before beginning to disassemble the monitor, be sure that the manufacturer's mounting solution is compliant with the monitor. 1. To attach a thirdparty mounting solution to the display head, four 4 mm, 0.7 pitch, and ...
... For information on a wall, a swing arm, or other mounting fixture. It is important to verify that the monitor is rated to support the weight of the monitor (1). 4. Disconnect and remove all cables are required. Slide the stand out of a shielded power cable meets the ...TCO Certified criteria for display products. CAUTION: Before beginning to disassemble the monitor, be sure that the manufacturer's mounting solution is compliant with the monitor. 1. To attach a thirdparty mounting solution to the display head, four 4 mm, 0.7 pitch, and ...

User Guide
Page 19
Install the mounting plate to the wall or swing arm of your choice using the four screws that were removed from the VESA holes located on the rear of the display head. 3. 2. Setting up the monitor 13 Remove the four screws from the VESA holes on the rear of the display head.
Install the mounting plate to the wall or swing arm of your choice using the four screws that were removed from the VESA holes located on the rear of the display head. 3. 2. Setting up the monitor 13 Remove the four screws from the VESA holes on the rear of the display head.

User Guide
Page 20
Installing a security cable You can secure the monitor to a fixed object with an optional cable lock available from HP. 14 Chapter 1 Getting Started
Installing a security cable You can secure the monitor to a fixed object with an optional cable lock available from HP. 14 Chapter 1 Getting Started

User Guide
Page 21
...resolution and refresh rates appear in the Windows Display control panel. This file is activated from within graphics programs that the monitor connects directly to the HP Monitor Software Information file on -screen instructions. 5. Follow the on the optical disc. Insert the optical disc in accordance with... files After you can install on the computer from the optical disc in the event of an installation error. View the HP Monitor Software Information file. 3. NOTE: You may need to update, you determine that are used by Microsoft Windows operating systems to install the...
...resolution and refresh rates appear in the Windows Display control panel. This file is activated from within graphics programs that the monitor connects directly to the HP Monitor Software Information file on -screen instructions. 5. Follow the on the optical disc. Insert the optical disc in accordance with... files After you can install on the computer from the optical disc in the event of an installation error. View the HP Monitor Software Information file. 3. NOTE: You may need to update, you determine that are used by Microsoft Windows operating systems to install the...

User Guide
Page 22
... on -screen instructions to download the software. 16 Chapter 2 Using the monitor Go to open the list of .INF and .ICM files from the list. 4. Click Download and follow the on the driver. 7. Display/Monitor to http://www.hp.com/support and select the appropriate country and language. 2. Click the System... Requirements tab, and then verify that your monitor from the HP monitors support Web site. 1. Downloading from the Web If you do not have a computer or source device with an optical drive, you can ...
... on -screen instructions to download the software. 16 Chapter 2 Using the monitor Go to open the list of .INF and .ICM files from the list. 4. Click Download and follow the on the driver. 7. Display/Monitor to http://www.hp.com/support and select the appropriate country and language. 2. Click the System... Requirements tab, and then verify that your monitor from the HP monitors support Web site. 1. Downloading from the Web If you do not have a computer or source device with an optical drive, you can ...

User Guide
Page 23
Using the On-Screen Display (OSD) menu Use the On-Screen Display (OSD) menu to turn on the monitor. 2. Adjusts the screen contrast. If the monitor is English. Use the three Function buttons to the factory default settings. The button labels are variable depending on your preferences...Enables/disables DDC/CI support and returns all OSD menu settings to navigate, select, and adjust the menu choices. Displays important information about the monitor. Adjusts the screen image. Using the On-Screen Display (OSD) menu 17 Exits the OSD menu screen. You can access and make ...
Using the On-Screen Display (OSD) menu Use the On-Screen Display (OSD) menu to turn on the monitor. 2. Adjusts the screen contrast. If the monitor is English. Use the three Function buttons to the factory default settings. The button labels are variable depending on your preferences...Enables/disables DDC/CI support and returns all OSD menu settings to navigate, select, and adjust the menu choices. Displays important information about the monitor. Adjusts the screen image. Using the On-Screen Display (OSD) menu 17 Exits the OSD menu screen. You can access and make ...


