
Quick Setup Guide
Page 2
... an eine geerdete Netzsteckdose an, die jederzeit leicht erreichbar ist. • Unterbrechen Sie die Stromzufuhr zum Monitor, indem Sie den Netzstecker aus der Steckdose ziehen. Ihre HP Herstellergarantie finden Sie zusammen mit Ihrem Produkt und/oder auf der CD/DVD im Versandkarton. Incluya el n&#...of electric shock or damage to the CD/DVD for at all times. • Disconnect power from the monitor by unplugging the power cord from http://www.hp.com/go /orderdocuments HP Hewlett Packard, POD, P.O. The grounding plug is an important safety feature. • Plug the power cord...
... an eine geerdete Netzsteckdose an, die jederzeit leicht erreichbar ist. • Unterbrechen Sie die Stromzufuhr zum Monitor, indem Sie den Netzstecker aus der Steckdose ziehen. Ihre HP Herstellergarantie finden Sie zusammen mit Ihrem Produkt und/oder auf der CD/DVD im Versandkarton. Incluya el n&#...of electric shock or damage to the CD/DVD for at all times. • Disconnect power from the monitor by unplugging the power cord from http://www.hp.com/go /orderdocuments HP Hewlett Packard, POD, P.O. The grounding plug is an important safety feature. • Plug the power cord...

User Guide
Page 3
iii WARNING! NOTE: Contains additional information to emphasize or supplement important points of the main text. CAUTION: Indicates a hazardous situation that , if not avoided, could result in death or serious injury. TIP: Provides helpful hints for completing a task. Indicates a hazardous situation that , if not avoided, could result in minor or moderate injury. About This Guide This guide provides information on monitor features, setting up the monitor, and technical specifications.
iii WARNING! NOTE: Contains additional information to emphasize or supplement important points of the main text. CAUTION: Indicates a hazardous situation that , if not avoided, could result in death or serious injury. TIP: Provides helpful hints for completing a task. Indicates a hazardous situation that , if not avoided, could result in minor or moderate injury. About This Guide This guide provides information on monitor features, setting up the monitor, and technical specifications.

User Guide
Page 5
... features and components ...2 Features ...2 Rear components ...3 Front bezel controls ...4 Setting up the monitor ...5 Use caution when setting up the monitor 5 Installing the monitor stand ...6 Connecting the cables ...7 Adjusting the monitor ...9 Turning on the monitor ...9 HP Watermark and Image Retention Policy 10 Removing the monitor stand ...11 Mounting the display head 11 Installing a security cable ...13 2 Using the...
... features and components ...2 Features ...2 Rear components ...3 Front bezel controls ...4 Setting up the monitor ...5 Use caution when setting up the monitor 5 Installing the monitor stand ...6 Connecting the cables ...7 Adjusting the monitor ...9 Turning on the monitor ...9 HP Watermark and Image Retention Policy 10 Removing the monitor stand ...11 Mounting the display head 11 Installing a security cable ...13 2 Using the...
User Guide
Page 6
Button lockouts ...21 Product support ...21 Preparing to call technical support ...22 Locating the serial number and product number 22 4 Maintaining the monitor ...23 Maintenance guidelines ...23 Cleaning the monitor ...23 Shipping the monitor ...24 Appendix A Technical Specifications ...25 Preset display resolutions ...26 Entering user modes ...26 Energy saver feature ...26 Appendix B Accessibility ...28 Supported assistive technologies ...28 Contacting support ...28 vi
Button lockouts ...21 Product support ...21 Preparing to call technical support ...22 Locating the serial number and product number 22 4 Maintaining the monitor ...23 Maintenance guidelines ...23 Cleaning the monitor ...23 Shipping the monitor ...24 Appendix A Technical Specifications ...25 Preset display resolutions ...26 Entering user modes ...26 Energy saver feature ...26 Appendix B Accessibility ...28 Supported assistive technologies ...28 Contacting support ...28 vi
User Guide
Page 7
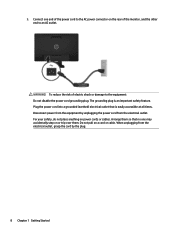
... Replacement Policy so you can replace the equipment, if surge protection fails. LCD monitors that they cannot be pulled, grabbed, or tripped over. If another cord is easily accessible at http://www.hp.com/ergo. Use the appropriate and correctly sized furniture designed to avoid interference from...optical disc, if one may fall over them so that no one is included, or in a controlled luminous environment to properly support your HP LCD monitor. 1 Getting Started Important safety information A power cord is located on the web at all times. • Disconnect power from the ...
... Replacement Policy so you can replace the equipment, if surge protection fails. LCD monitors that they cannot be pulled, grabbed, or tripped over. If another cord is easily accessible at http://www.hp.com/ergo. Use the appropriate and correctly sized furniture designed to avoid interference from...optical disc, if one may fall over them so that no one is included, or in a controlled luminous environment to properly support your HP LCD monitor. 1 Getting Started Important safety information A power cord is located on the web at all times. • Disconnect power from the ...
User Guide
Page 8
...Display (OSD) adjustments in several languages for easy setup and screen optimization ● HP Display Assistant software for adjusting monitor settings and enabling theft deterrence features (refer to the HP Display Assistant User Guide included on the disc with 1920 x 1080 resolution, plus...refer to the Product Notices provided on DisplayPort input ● Software and documentation disc that includes monitor drivers and product documentation ● Energy saver feature to http://www.hp.com/support, and select your documentation kit. Select Drivers & Downloads, and then follow the ...
...Display (OSD) adjustments in several languages for easy setup and screen optimization ● HP Display Assistant software for adjusting monitor settings and enabling theft deterrence features (refer to the HP Display Assistant User Guide included on the disc with 1920 x 1080 resolution, plus...refer to the Product Notices provided on DisplayPort input ● Software and documentation disc that includes monitor drivers and product documentation ● Energy saver feature to http://www.hp.com/support, and select your documentation kit. Select Drivers & Downloads, and then follow the ...
User Guide
Page 9
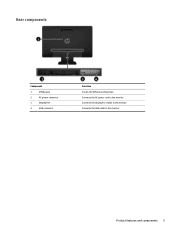
Product features and components 3 Rear components Component 1 VESA panel 2 AC power connector 3 DisplayPort 4 VGA connector Function Covers the VESA mounting holes Connects the AC power cord to the monitor Connects the DisplayPort cable to the monitor Connects the VGA cable to the monitor.
Product features and components 3 Rear components Component 1 VESA panel 2 AC power connector 3 DisplayPort 4 VGA connector Function Covers the VESA mounting holes Connects the AC power cord to the monitor Connects the DisplayPort cable to the monitor Connects the VGA cable to the monitor.

User Guide
Page 10
... the source button that chooses the video signal input (VGA or DisplayPort). NOTE: To view an OSD menu simulator, visit the HP Customer Self Repair Services Media Library at http://www.hp.com/go/sml. 4 Chapter 1 Getting Started Front bezel controls Control 1 2 3 4 5 Menu Minus Plus/Source OK/Auto Power Function Opens, selects... OSD menu is inactive, press to optimize the screen image. If the OSD menu is on , press to select the highlighted menu item. Turns the monitor on , press to navigate forward through the OSD menu and decrease adjustment levels.
... the source button that chooses the video signal input (VGA or DisplayPort). NOTE: To view an OSD menu simulator, visit the HP Customer Self Repair Services Media Library at http://www.hp.com/go/sml. 4 Chapter 1 Getting Started Front bezel controls Control 1 2 3 4 5 Menu Minus Plus/Source OK/Auto Power Function Opens, selects... OSD menu is inactive, press to optimize the screen image. If the OSD menu is on , press to select the highlighted menu item. Turns the monitor on , press to navigate forward through the OSD menu and decrease adjustment levels.
User Guide
Page 11
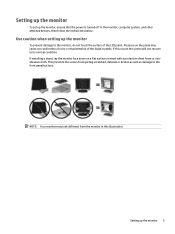
... as well as damage to its normal condition. This prevents the screen from the monitor in this occurs the screen will not recover to the front panel buttons. If this illustration. NOTE: Your monitor may cause non-uniformity of color or disorientation of the LCD panel. Setting up the... monitor, ensure that the power is turned off to the monitor, do not touch the surface of the liquid crystals. Setting up the monitor To set up the monitor 5 Use caution when setting up the monitor To prevent damage to the monitor, computer system, and other attached ...
... as well as damage to its normal condition. This prevents the screen from the monitor in this occurs the screen will not recover to the front panel buttons. If this illustration. NOTE: Your monitor may cause non-uniformity of color or disorientation of the LCD panel. Setting up the... monitor, ensure that the power is turned off to the monitor, do not touch the surface of the liquid crystals. Setting up the monitor To set up the monitor 5 Use caution when setting up the monitor To prevent damage to the monitor, computer system, and other attached ...
User Guide
Page 12
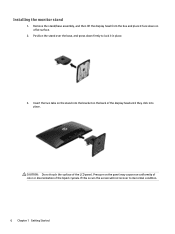
... of the liquid crystals. Remove the stand/base assembly, and then lift the display head from the box and place it in place. 3. Installing the monitor stand 1. If this occurs the screen will not recover to lock it face down firmly to its normal condition. 6 Chapter 1 Getting Started Position the stand...
... of the liquid crystals. Remove the stand/base assembly, and then lift the display head from the box and place it in place. 3. Installing the monitor stand 1. If this occurs the screen will not recover to lock it face down firmly to its normal condition. 6 Chapter 1 Getting Started Position the stand...
User Guide
Page 13
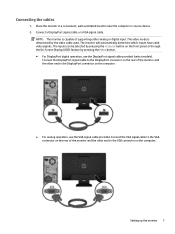
...either analog or digital input. Connect the DisplayPort signal cable to the DisplayPort connector on the rear of the monitor and the other end to the VGA connector on the computer. NOTE: The monitor is determined by pressing the +/source button on the computer. ● For analog operation, use the ...provided (select models). The inputs can be selected by the video cable used. Setting up the monitor 7 Connect the VGA signal cable to the VGA connector on the rear of the monitor and the other end to the DisplayPort connector on the front panel or through the On-Screen Display...
...either analog or digital input. Connect the DisplayPort signal cable to the DisplayPort connector on the rear of the monitor and the other end to the VGA connector on the computer. NOTE: The monitor is determined by pressing the +/source button on the computer. ● For analog operation, use the ...provided (select models). The inputs can be selected by the video cable used. Setting up the monitor 7 Connect the VGA signal cable to the VGA connector on the rear of the monitor and the other end to the DisplayPort connector on the front panel or through the On-Screen Display...
User Guide
Page 14
When unplugging from the electrical outlet. To reduce the risk of the monitor, and the other end to an AC outlet. The grounding plug is easily accessible at all times. Disconnect power from the equipment by unplugging the ...
When unplugging from the electrical outlet. To reduce the risk of the monitor, and the other end to an AC outlet. The grounding plug is easily accessible at all times. Disconnect power from the equipment by unplugging the ...
User Guide
Page 15
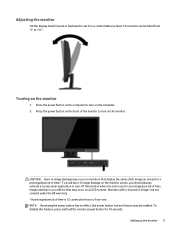
... may be tilted from -5° to turn on the computer. 2. Adjusting the monitor Tilt the display head forward or backward to set it is not in image" are not covered under the HP warranty. * A prolonged period of time is a condition that display the same static image on screen for a prolonged... period of time.* To avoid burn-in image damage on the monitor screen, you should always activate a screen saver application or ...
... may be tilted from -5° to turn on the computer. 2. Adjusting the monitor Tilt the display head forward or backward to set it is not in image" are not covered under the HP warranty. * A prolonged period of time is a condition that display the same static image on screen for a prolonged... period of time.* To avoid burn-in image damage on the monitor screen, you should always activate a screen saver application or ...
User Guide
Page 16
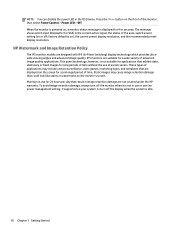
... Chapter 1 Getting Started This panel technology, however, is the current active signal, the status of screen savers. HP Watermark and Image Retention Policy The IPS monitor models are suitable for long periods of time without the use of the auto-switch source setting (on ), the... are not covered under the HP warranty. Static images may include camera surveillance, video games, marketing logos, and templates that exhibit static, stationary or fixed images for a wide variety of the monitor, then select Power Control > Power LED > Off. Monitors in use the power management ...
... Chapter 1 Getting Started This panel technology, however, is the current active signal, the status of screen savers. HP Watermark and Image Retention Policy The IPS monitor models are suitable for long periods of time without the use of the auto-switch source setting (on ), the... are not covered under the HP warranty. Static images may include camera surveillance, video games, marketing logos, and templates that exhibit static, stationary or fixed images for a wide variety of the monitor, then select Power Control > Power LED > Off. Monitors in use the power management ...
User Guide
Page 17
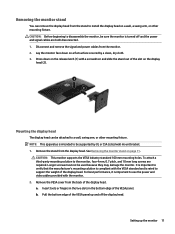
...solution to install the display head on a flat surface covered by UL or CSA Listed wall mount bracket. 1. Remove the VESA cover from the monitor. 2. Setting up and off and the power and signal cables are required. Insert tools or fingers in the two slots in the bottom edge of... standard 100 mm mounting holes. Longer screws must not be used because they may damage the monitor. Removing the monitor stand You can be attached to a wall, swing arm, or other mounting fixture. Lay the monitor face down on the release latch (1) with a screwdriver and slide the stand out of the...
...solution to install the display head on a flat surface covered by UL or CSA Listed wall mount bracket. 1. Remove the VESA cover from the monitor. 2. Setting up and off and the power and signal cables are required. Insert tools or fingers in the two slots in the bottom edge of... standard 100 mm mounting holes. Longer screws must not be used because they may damage the monitor. Removing the monitor stand You can be attached to a wall, swing arm, or other mounting fixture. Lay the monitor face down on the release latch (1) with a screwdriver and slide the stand out of the...
User Guide
Page 19
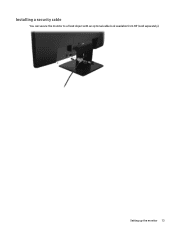
Setting up the monitor 13 Installing a security cable You can secure the monitor to a fixed object with an optional cable lock available from HP (sold separately).
Setting up the monitor 13 Installing a security cable You can secure the monitor to a fixed object with an optional cable lock available from HP (sold separately).
User Guide
Page 20
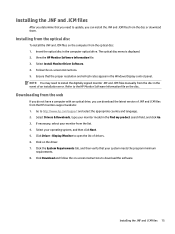
... directly to the graphics card. This file is written in conjunction with graphics programs to provide consistent color matching from monitor screen to printer, or from within graphics programs that support this feature. Plug and Play does not work correctly without ... .ICM files are data files that are used by Microsoft Windows operating systems to ensure monitor compatibility with the computer's graphics adapter. 2 Using the monitor Software and utilities The optical disc that comes with the monitor contains files you can install on the computer: ● an .INF (Information) file...
... directly to the graphics card. This file is written in conjunction with graphics programs to provide consistent color matching from monitor screen to printer, or from within graphics programs that support this feature. Plug and Play does not work correctly without ... .ICM files are data files that are used by Microsoft Windows operating systems to ensure monitor compatibility with the computer's graphics adapter. 2 Using the monitor Software and utilities The optical disc that comes with the monitor contains files you can install on the computer: ● an .INF (Information) file...
User Guide
Page 21
... You may need to update, you can install the .INF and .ICM files from the list. 4. Go to download the software. Display/Monitor to the HP Monitor Software Information file on the disc. Click on -screen instructions. 5. The optical disc menu is displayed. 2. Follow the on the driver. ..., and then click Next. 5. Insert the optical disc in the Windows Display control panel. Select Install Monitor Driver Software. 4. Click Download and follow the on the computer from the HP monitors support website: 1. Installing from the optical disc To install the .INF and .ICM files on -screen...
... You may need to update, you can install the .INF and .ICM files from the list. 4. Go to download the software. Display/Monitor to the HP Monitor Software Information file on the disc. Click on -screen instructions. 5. The optical disc menu is displayed. 2. Follow the on the driver. ..., and then click Next. 5. Insert the optical disc in the Windows Display control panel. Select Install Monitor Driver Software. 4. Click Download and follow the on the computer from the HP monitors support website: 1. Installing from the optical disc To install the .INF and .ICM files on -screen...

User Guide
Page 22
... Control Management Language Information Exit Description Adjusts the brightness level of the screen Selects and adjusts the screen color. Displays important information about the monitor. The options are variable depending on the menu or sub-menu that is English. Adjusts the screen image. Enables/disables DDC/CI support... You can access and make adjustments, do the following table lists the menu selections in the OSD using the buttons on the monitor. 2. The following : 1. Selects the language in which the OSD menu is not already on, press the power button to turn on the...
... Control Management Language Information Exit Description Adjusts the brightness level of the screen Selects and adjusts the screen color. Displays important information about the monitor. The options are variable depending on the menu or sub-menu that is English. Adjusts the screen image. Enables/disables DDC/CI support... You can access and make adjustments, do the following table lists the menu selections in the OSD using the buttons on the monitor. 2. The following : 1. Selects the language in which the OSD menu is not already on, press the power button to turn on the...
User Guide
Page 23
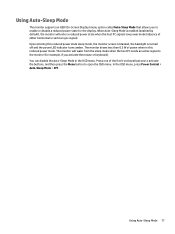
...can disable the Auto-Sleep Mode in this reduced power state sleep mode, the monitor screen is blanked, the backlight is enabled (enabled by default), the monitor will wake from the sleep mode when the host PC sends an active signal ...to the monitor (for the display. Press one of either horizontal or vertical sync signal). ...indicator turns amber. Upon entering this reduced power mode. Using Auto-Sleep Mode The monitor supports an OSD (On-Screen Display) menu option called Auto-Sleep Mode that allows you activate the mouse or...
...can disable the Auto-Sleep Mode in this reduced power state sleep mode, the monitor screen is blanked, the backlight is enabled (enabled by default), the monitor will wake from the sleep mode when the host PC sends an active signal ...to the monitor (for the display. Press one of either horizontal or vertical sync signal). ...indicator turns amber. Upon entering this reduced power mode. Using Auto-Sleep Mode The monitor supports an OSD (On-Screen Display) menu option called Auto-Sleep Mode that allows you activate the mouse or...


