

User Guide
Page 5
... 10 Removing the monitor stand ...11 Mounting the display head 11 Installing a security cable ...13 2 Using the monitor ...14 Software and utilities ...14 The Information file ...14 The Image Color Matching file ...14 Installing the .INF and .ICM files ...15 Installing from the optical disc ...15 Downloading from the web ...15 Using the On-Screen Display (OSD) menu ...16 Using Auto-Sleep Mode ...17 3 Support and troubleshooting ...18 Solving common problems ...18 Using the auto-adjustment function (analog input 19 Optimizing image performance (analog input 20...
... 10 Removing the monitor stand ...11 Mounting the display head 11 Installing a security cable ...13 2 Using the monitor ...14 Software and utilities ...14 The Information file ...14 The Image Color Matching file ...14 Installing the .INF and .ICM files ...15 Installing from the optical disc ...15 Downloading from the web ...15 Using the On-Screen Display (OSD) menu ...16 Using Auto-Sleep Mode ...17 3 Support and troubleshooting ...18 Solving common problems ...18 Using the auto-adjustment function (analog input 19 Optimizing image performance (analog input 20...
User Guide
Page 6
Button lockouts ...21 Product support ...21 Preparing to call technical support ...22 Locating the serial number and product number 22 4 Maintaining the monitor ...23 Maintenance guidelines ...23 Cleaning the monitor ...23 Shipping the monitor ...24 Appendix A Technical Specifications ...25 Preset display resolutions ...26 Entering user modes ...26 Energy saver feature ...26 Appendix B Accessibility ...28 Supported assistive technologies ...28 Contacting support ...28 vi
Button lockouts ...21 Product support ...21 Preparing to call technical support ...22 Locating the serial number and product number 22 4 Maintaining the monitor ...23 Maintenance guidelines ...23 Cleaning the monitor ...23 Shipping the monitor ...24 Appendix A Technical Specifications ...25 Preset display resolutions ...26 Entering user modes ...26 Energy saver feature ...26 Appendix B Accessibility ...28 Supported assistive technologies ...28 Contacting support ...28 vi
User Guide
Page 7
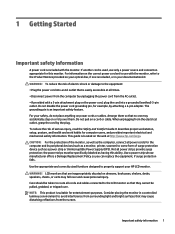
... risk of surge protection device such as a monitor, printer, scanner) to use only a power source and connection appropriate for computer users, and provides important electrical and mechanical safety information. This guide is located on your HP LCD monitor. Not all power cords for example, by the plug. Use a power strip whose manufacturer offers a Damage Replacement Policy so you can replace the equipment, if surge protection fails. NOTE...
... risk of surge protection device such as a monitor, printer, scanner) to use only a power source and connection appropriate for computer users, and provides important electrical and mechanical safety information. This guide is located on your HP LCD monitor. Not all power cords for example, by the plug. Use a power strip whose manufacturer offers a Damage Replacement Policy so you can replace the equipment, if surge protection fails. NOTE...
User Guide
Page 8
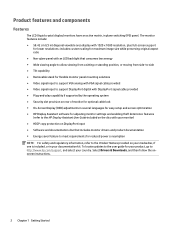
... onscreen instructions. 2 Chapter 1 Getting Started includes custom scaling for maximum image size while preserving original aspect ratio ● Non-glare panel with an LED backlight that consumes less energy ● Wide viewing angle to allow viewing from a sitting or standing position, or moving from side-to-side ● Tilt capability ● Removable stand for flexible monitor panel mounting solutions ● Video signal input to support VGA analog with VGA signal cable provided ● Video signal input to support DisplayPort digital with DisplayPort signal cable...
... onscreen instructions. 2 Chapter 1 Getting Started includes custom scaling for maximum image size while preserving original aspect ratio ● Non-glare panel with an LED backlight that consumes less energy ● Wide viewing angle to allow viewing from a sitting or standing position, or moving from side-to-side ● Tilt capability ● Removable stand for flexible monitor panel mounting solutions ● Video signal input to support VGA analog with VGA signal cable provided ● Video signal input to support DisplayPort digital with DisplayPort signal cable...

User Guide
Page 10
... screen image. NOTE: To view an OSD menu simulator, visit the HP Customer Self Repair Services Media Library at http://www.hp.com/go/sml. 4 Chapter 1 Getting Started If the OSD menu is on , press to select the highlighted menu item. Turns the monitor on , press to navigate backward through the OSD menu and increase adjustment levels. If the OSD menu is inactive, press to activate the source button that chooses the video signal input (VGA...
... screen image. NOTE: To view an OSD menu simulator, visit the HP Customer Self Repair Services Media Library at http://www.hp.com/go/sml. 4 Chapter 1 Getting Started If the OSD menu is on , press to select the highlighted menu item. Turns the monitor on , press to navigate backward through the OSD menu and increase adjustment levels. If the OSD menu is inactive, press to activate the source button that chooses the video signal input (VGA...
User Guide
Page 11
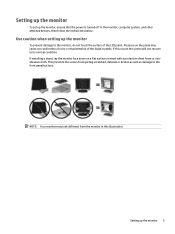
.... Setting up the monitor To set up the monitor, ensure that the power is turned off to the front panel buttons. This prevents the screen from the monitor in this occurs the screen will not recover to the monitor, do not touch the surface of the liquid crystals. NOTE: Your monitor may cause non-uniformity of color or disorientation of the LCD panel. If this illustration. If installing a stand...
.... Setting up the monitor To set up the monitor, ensure that the power is turned off to the front panel buttons. This prevents the screen from the monitor in this occurs the screen will not recover to the monitor, do not touch the surface of the liquid crystals. NOTE: Your monitor may cause non-uniformity of color or disorientation of the LCD panel. If this illustration. If installing a stand...
User Guide
Page 13
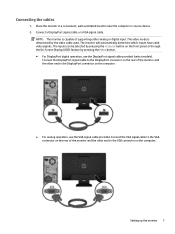
... pressing the +/source button on the computer. ● For analog operation, use the DisplayPort signal cable provided (select models). Connect the VGA signal cable to the VGA connector on the rear of the monitor and the other end to the DisplayPort connector on the front panel or through the On-Screen Display (OSD) feature by pressing the Menu button. ● For DisplayPort digital operation, use the VGA signal cable provided. The inputs can be selected by the video cable used.
... pressing the +/source button on the computer. ● For analog operation, use the DisplayPort signal cable provided (select models). Connect the VGA signal cable to the VGA connector on the rear of the monitor and the other end to the DisplayPort connector on the front panel or through the On-Screen Display (OSD) feature by pressing the Menu button. ● For DisplayPort digital operation, use the VGA signal cable provided. The inputs can be selected by the video cable used.
User Guide
Page 15
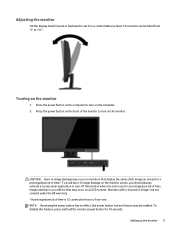
... hours of the monitor to turn on the computer to turn off the monitor when it to +22°. Setting up the monitor 9 Press the power button on all LCD screens. Monitors with a "burned-in image damage may occur on the front of non-use for a prolonged period of time. The monitor can be enabled. CAUTION: Burn-in image" are not covered under the HP warranty. * A prolonged...
... hours of the monitor to turn on the computer to turn off the monitor when it to +22°. Setting up the monitor 9 Press the power button on all LCD screens. Monitors with a "burned-in image damage may occur on the front of non-use for a prolonged period of time. The monitor can be enabled. CAUTION: Burn-in image" are not covered under the HP warranty. * A prolonged...
User Guide
Page 16
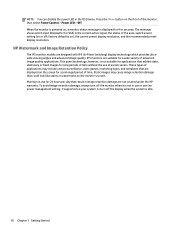
... the Menu button on ), the current preset display resolution, and the recommended preset display resolution. factory default is idle. 10 Chapter 1 Getting Started To avoid image retention damage, always turn off the display when the system is on the front of screen savers. NOTE: You can disable the power LED in use the power management setting, if supported on the screen for 24 hours per day that are not covered under the HP...
... the Menu button on ), the current preset display resolution, and the recommended preset display resolution. factory default is idle. 10 Chapter 1 Getting Started To avoid image retention damage, always turn off the display when the system is on the front of screen savers. NOTE: You can disable the power LED in use the power management setting, if supported on the screen for 24 hours per day that are not covered under the HP...
User Guide
Page 17
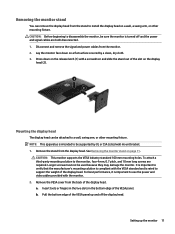
... a flat surface covered by UL or CSA Listed wall mount bracket. 1. To attach a third-party mounting solution to support the weight of the display head. It is important to verify that the manufacturer's mounting solution is compliant with the VESA standard and is important to install the display head on the release latch (1) with the monitor. 2. a. b. Setting up and off and the power and signal cables...
... a flat surface covered by UL or CSA Listed wall mount bracket. 1. To attach a third-party mounting solution to support the weight of the display head. It is important to verify that the manufacturer's mounting solution is compliant with the VESA standard and is important to install the display head on the release latch (1) with the monitor. 2. a. b. Setting up and off and the power and signal cables...
User Guide
Page 21
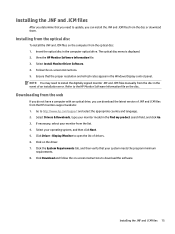
... driver. 7. Go to download the software. Select your monitor from the HP monitors support website: 1. Installing the .INF and .ICM files After you determine that you need to install the digitally signed monitor .INF and .ICM files manually from the disc in the event of an installation error. Click Download and follow the on-screen instructions to http://www.hp.com/support and select the appropriate country and language. 2. Refer to update...
... driver. 7. Go to download the software. Select your monitor from the HP monitors support website: 1. Installing the .INF and .ICM files After you determine that you need to install the digitally signed monitor .INF and .ICM files manually from the disc in the event of an installation error. Click Download and follow the on-screen instructions to http://www.hp.com/support and select the appropriate country and language. 2. Refer to update...

User Guide
Page 22
... : 1. Adjusts the screen image. Adjusts the power settings. Enables/disables DDC/CI support and returns all OSD menu settings to open the OSD menu. 3. Displays important information about the monitor. Main Menu Brightness Contrast Color Control Input Control Image Control Power Control Menu Control Management Language Information Exit Description Adjusts the brightness level of the screen Selects and adjusts the screen color. The factory default is displayed. Press the Menu button to the factory default settings. Use the menu options to turn on the monitor's front panel. The...
... : 1. Adjusts the screen image. Adjusts the power settings. Enables/disables DDC/CI support and returns all OSD menu settings to open the OSD menu. 3. Displays important information about the monitor. Main Menu Brightness Contrast Color Control Input Control Image Control Power Control Menu Control Management Language Information Exit Description Adjusts the brightness level of the screen Selects and adjusts the screen color. The factory default is displayed. Press the Menu button to the factory default settings. Use the menu options to turn on the monitor's front panel. The...
User Guide
Page 23
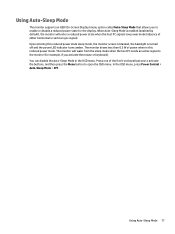
... you to open the OSD menu. In the OSD menu, press Power Control > Auto-Sleep Mode > Off. Using Auto-Sleep Mode The monitor supports an OSD (On-Screen Display) menu option called Auto-Sleep Mode that allows you activate the mouse or keyboard). Press one of either horizontal or vertical sync signal). When Auto-Sleep Mode is turned off and the power LED indicator turns amber. Using Auto-Sleep Mode 17 You can disable the Auto-Sleep Mode in this reduced power state sleep mode, the monitor screen is blanked, the backlight is enabled (enabled by default), the monitor will...
... you to open the OSD menu. In the OSD menu, press Power Control > Auto-Sleep Mode > Off. Using Auto-Sleep Mode The monitor supports an OSD (On-Screen Display) menu option called Auto-Sleep Mode that allows you activate the mouse or keyboard). Press one of either horizontal or vertical sync signal). When Auto-Sleep Mode is turned off and the power LED indicator turns amber. Using Auto-Sleep Mode 17 You can disable the Auto-Sleep Mode in this reduced power state sleep mode, the monitor screen is blanked, the backlight is enabled (enabled by default), the monitor will...
User Guide
Page 24
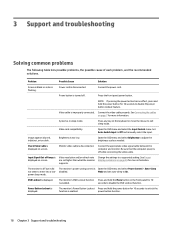
... manually select the input. Monitor video cable is disconnected. seconds to a supported setting. Image appears blurred, indistinct, or too dark. Be sure that the computer power is enabled. Video resolution and/or refresh rate are set auto-sleep to disable the power button lockout feature. The monitor's OSD Lockout function Press and hold the Menu button on the keyboard or move the mouse to unlock the function is displayed. Press the front panel power button. Brightness is displayed. Change the settings to disable...
... manually select the input. Monitor video cable is disconnected. seconds to a supported setting. Image appears blurred, indistinct, or too dark. Be sure that the computer power is enabled. Video resolution and/or refresh rate are set auto-sleep to disable the power button lockout feature. The monitor's OSD Lockout function Press and hold the Menu button on the keyboard or move the mouse to unlock the function is displayed. Press the front panel power button. Brightness is displayed. Change the settings to disable...
User Guide
Page 25
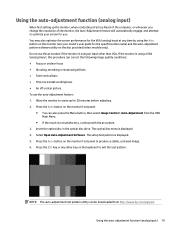
... monitor front panel. ● You can also press the Menu button, then select Image Control > Auto-Adjustment from http://www.hp.com/support. Using the auto-adjustment function (analog input) 19 Do not use the auto-adjustment feature: 1. Insert the optical disc in the optical disc drive. Select Open Auto-Adjustment Software. You may also optimize the screen performance for the VGA (analog) input at any other than VGA. Press the Auto button on the monitor (see your screen for you change the resolution...
... monitor front panel. ● You can also press the Menu button, then select Image Control > Auto-Adjustment from http://www.hp.com/support. Using the auto-adjustment function (analog input) 19 Do not use the auto-adjustment feature: 1. Insert the optical disc in the optical disc drive. Select Open Auto-Adjustment Software. You may also optimize the screen performance for the VGA (analog) input at any other than VGA. Press the Auto button on the monitor (see your screen for you change the resolution...
User Guide
Page 26
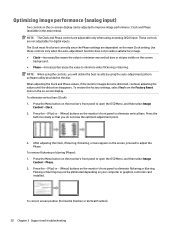
... not adjustable for digital inputs. To restore the factory settings, select Yes from the Factory Reset menu in the on the disc. Press the + (Plus) or - (Minus) buttons on the monitor's front panel to minimize video flickering or blurring. Press the buttons slowly so that you will obtain the best results by using the controls, you do not miss the optimum adjustment point. 3. Optimizing image performance (analog input) Two controls in the on-screen display...
... not adjustable for digital inputs. To restore the factory settings, select Yes from the Factory Reset menu in the on the disc. Press the + (Plus) or - (Minus) buttons on the monitor's front panel to minimize video flickering or blurring. Press the buttons slowly so that you will obtain the best results by using the controls, you do not miss the optimum adjustment point. 3. Optimizing image performance (analog input) Two controls in the on-screen display...
User Guide
Page 27
... Horizontal Position shifts the image left or right; For worldwide support, go to http://www.hp.com/go to http://welcome.hp.com/ country/us/en/wwcontact_us.html. This functionality is only available when the monitor is not active. Press the Menu button on , displaying an active signal, and the OSD is powered on the monitor's front panel to open the OSD Menu, and then select Image Control > Horizontal Position and/or Vertical Position...
... Horizontal Position shifts the image left or right; For worldwide support, go to http://www.hp.com/go to http://welcome.hp.com/ country/us/en/wwcontact_us.html. This functionality is only available when the monitor is not active. Press the Menu button on , displaying an active signal, and the OSD is powered on the monitor's front panel to open the OSD Menu, and then select Image Control > Horizontal Position and/or Vertical Position...
User Guide
Page 29
... removing the monitor stand, you can substantially increase the life expectancy of the unit. 2. Look on the cord. ● Keep the monitor in the operating instructions. NOTE: Monitors with a soft, clean antistatic cloth. 3. Do not walk on the power label to prevent it from the back of the monitor by wiping the screen and the cabinet with a "burned-in image" are not covered under...
... removing the monitor stand, you can substantially increase the life expectancy of the unit. 2. Look on the cord. ● Keep the monitor in the operating instructions. NOTE: Monitors with a soft, clean antistatic cloth. 3. Do not walk on the power label to prevent it from the back of the monitor by wiping the screen and the cabinet with a "burned-in image" are not covered under...
User Guide
Page 31
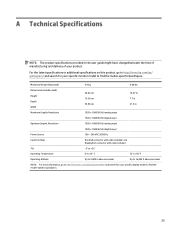
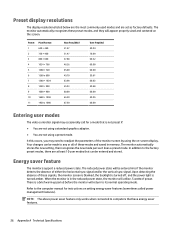
... search for your specific monitor model to find the model-specific QuickSpecs. 25 one DisplayPort connector with cable included; A Technical Specifications NOTE: The product specifications provided in Maximum Graphic Resolution 1920 x 1080 (60 Hz) analog input 1920 x 1080 (60 Hz) digital input Optimum Graphic Resolution 1920 x 1080 (60 Hz) analog input 1920 x 1080 (60 Hz) digital input Power Source 100 - 240 VAC 50/60 Hz Input Terminal One VGA connector with cable included Tilt -5° to...
... search for your specific monitor model to find the model-specific QuickSpecs. 25 one DisplayPort connector with cable included; A Technical Specifications NOTE: The product specifications provided in Maximum Graphic Resolution 1920 x 1080 (60 Hz) analog input 1920 x 1080 (60 Hz) digital input Optimum Graphic Resolution 1920 x 1080 (60 Hz) analog input 1920 x 1080 (60 Hz) digital input Power Source 100 - 240 VAC 50/60 Hz Input Terminal One VGA connector with cable included Tilt -5° to...
User Guide
Page 32
... recognizes these signals, the monitor screen is blanked, the backlight is turned off, and the power light is in memory. NOTE: The above power saver feature only works when connected to the factory preset modes, there are set as it does a preset mode. Refer to readjust the parameters of these preset modes, and they will utilize .5 watts of either the horizontal sync signal and/or the vertical sync signal. It this...
... recognizes these signals, the monitor screen is blanked, the backlight is turned off, and the power light is in memory. NOTE: The above power saver feature only works when connected to the factory preset modes, there are set as it does a preset mode. Refer to readjust the parameters of these preset modes, and they will utilize .5 watts of either the horizontal sync signal and/or the vertical sync signal. It this...


