

User Guide
Page 1
User Guide SUMMARY This guide provides technical specifications and information about monitor features, setting up the monitor, and using the monitor.
User Guide SUMMARY This guide provides technical specifications and information about monitor features, setting up the monitor, and using the monitor.
User Guide
Page 3
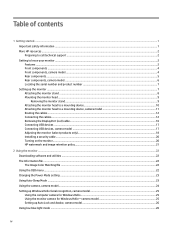
...hazardous situation that , if not avoided, could result in this guide This guide provides technical specifications and information about monitor features, setting up the monitor, and using the software. NOTE: Contains additional information to property damage). About this guide. Warns the user that.... WARNING! IMPORTANT: Indicates information considered important but not hazard-related (for completing a task. Depending on the model, your monitor may not have all the features included in loss of the main text. Also contains essential information to explain a concept or...
...hazardous situation that , if not avoided, could result in this guide This guide provides technical specifications and information about monitor features, setting up the monitor, and using the software. NOTE: Contains additional information to property damage). About this guide. Warns the user that.... WARNING! IMPORTANT: Indicates information considered important but not hazard-related (for completing a task. Depending on the model, your monitor may not have all the features included in loss of the main text. Also contains essential information to explain a concept or...
User Guide
Page 4
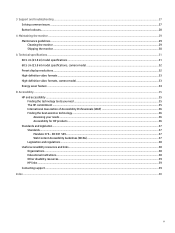
... (out) cable...16 Connecting USB devices ...17 Connecting USB devices, camera model ...17 Adjusting the monitor (select products only)...18 Installing a security cable ...20 Turning on the monitor...20 HP watermark and image retention policy...21 2 Using the monitor ...22 Downloading software and utilities ...22 The Information file ...22 The Image Color Matching file...
... (out) cable...16 Connecting USB devices ...17 Connecting USB devices, camera model ...17 Adjusting the monitor (select products only)...18 Installing a security cable ...20 Turning on the monitor...20 HP watermark and image retention policy...21 2 Using the monitor ...22 Downloading software and utilities ...22 The Information file ...22 The Image Color Matching file...
User Guide
Page 5
... links ...38 Organizations...38 Educational institutions...38 Other disability resources...39 HP links ...39 Contacting support ...39 Index ...40 v 3 Support and troubleshooting ...27 Solving common issues ...27 Button lockouts...28 4 Maintaining the monitor ...29 Maintenance guidelines...29 Cleaning the monitor ...29 Shipping the monitor ...30 A Technical specifications ...31 60.5 cm (23.8 in) model specifications...
... links ...38 Organizations...38 Educational institutions...38 Other disability resources...39 HP links ...39 Contacting support ...39 Index ...40 v 3 Support and troubleshooting ...27 Solving common issues ...27 Button lockouts...28 4 Maintaining the monitor ...29 Maintenance guidelines...29 Cleaning the monitor ...29 Shipping the monitor ...30 A Technical specifications ...31 60.5 cm (23.8 in) model specifications...
User Guide
Page 6
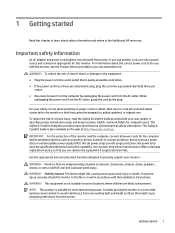
... cords or cables. WARNING! Stability hazard: The device might cause disturbing reflections from the screen. To prevent injury, securely attach the monitor to properly support your user guides. 1 Getting started 1 The Safety & Comfort Guide is suitable for computer users. IMPORTANT: For ...computer and its peripheral devices (such as a monitor, printer, scanner) to a surge protection device such as having this chapter to learn about the correct power cord set to find additional HP resources. WARNING! Consider placing the monitor in your safety, do not place anything ...
... cords or cables. WARNING! Stability hazard: The device might cause disturbing reflections from the screen. To prevent injury, securely attach the monitor to properly support your user guides. 1 Getting started 1 The Safety & Comfort Guide is suitable for computer users. IMPORTANT: For ...computer and its peripheral devices (such as a monitor, printer, scanner) to a surge protection device such as having this chapter to learn about the correct power cord set to find additional HP resources. WARNING! Consider placing the monitor in your safety, do not place anything ...
User Guide
Page 7
... Hardware configuration ● Name and version of monitor setup and features For HP support or to resolve a hardware or software problem, go to http://www.hp.com/support, and follow the instructions to find your monitor Your monitor has top-rated features. Preparing to call to ...locate resources that provide product details, how-to information, and more. This section provides details about your monitor. Table 1-1 Additional information Resource Contents Setup Instructions HP support Overview of the hardware and software that shipped with your components, where they work. or -...
... Hardware configuration ● Name and version of monitor setup and features For HP support or to resolve a hardware or software problem, go to http://www.hp.com/support, and follow the instructions to find your monitor Your monitor has top-rated features. Preparing to call to ...locate resources that provide product details, how-to information, and more. This section provides details about your monitor. Table 1-1 Additional information Resource Contents Setup Instructions HP support Overview of the hardware and software that shipped with your components, where they work. or -...
User Guide
Page 8
...capability, if supported by your operating system ● RJ-45 (network) (camera model) Monitor stand ● Removable stand for flexible monitor head mounting solutions ● HP Quick Release 2 device to attach the monitor head to the stand with a click and then remove it with the sliding tab release... ● VESA® mounting bracket for attaching the monitor head to meet requirements for...
...capability, if supported by your operating system ● RJ-45 (network) (camera model) Monitor stand ● Removable stand for flexible monitor head mounting solutions ● HP Quick Release 2 device to attach the monitor head to the stand with a click and then remove it with the sliding tab release... ● VESA® mounting bracket for attaching the monitor head to meet requirements for...
User Guide
Page 9
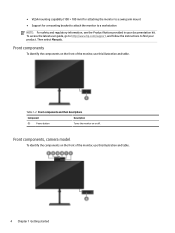
...4 Chapter 1 Getting started ● VESA mounting capability (100 × 100 mm) for attaching the monitor to a swing arm mount ● Support for a mounting bracket to attach the monitor to find your documentation kit. Then select Manuals. Front components, camera model To identify the components on... the front of the monitor, use this illustration and table. To access the latest user guide, go to http://www.hp.com/support, and follow the instructions to a workstation NOTE: For safety and regulatory ...
...4 Chapter 1 Getting started ● VESA mounting capability (100 × 100 mm) for attaching the monitor to a swing arm mount ● Support for a mounting bracket to attach the monitor to find your documentation kit. Then select Manuals. Front components, camera model To identify the components on... the front of the monitor, use this illustration and table. To access the latest user guide, go to http://www.hp.com/support, and follow the instructions to a workstation NOTE: For safety and regulatory ...
User Guide
Page 10
... appear on the right side of the screen. (2) Security cable slot Connects an optional security cable. (3) Master power switch Turns the monitor on by default. When you return to a source device such as a computer or game console. (6) DisplayPort (in) connector Connects ...the DisplayPort cable to the computer, your presence in front of the monitor, use . (3) Camera RGB lens Transmits your image in a video conference. (4) Camera IR lens Transmits your image in a video conference. (5) ...
... appear on the right side of the screen. (2) Security cable slot Connects an optional security cable. (3) Master power switch Turns the monitor on by default. When you return to a source device such as a computer or game console. (6) DisplayPort (in) connector Connects ...the DisplayPort cable to the computer, your presence in front of the monitor, use . (3) Camera RGB lens Transmits your image in a video conference. (4) Camera IR lens Transmits your image in a video conference. (5) ...
User Guide
Page 11
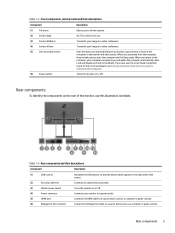
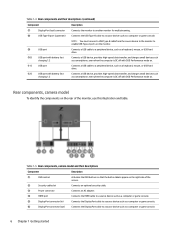
... computer or game console. 6 Chapter 1 Getting started NOTE: You must connect a USB Type-B cable from the source device to the monitor to enable USB Type-A ports on the monitor. (9) USB port Connects a USB cable to a peripheral device, such as a keyboard, mouse, or USB hard drive. (10) ...charges small devices such as a smartphone, even when the computer is DC off with OSD Performance mode on the right side of the monitor, use this illustration and table. Table 1-4 Rear components and their descriptions Component Description (1) OSD control Activates the OSD buttons so that the...
... computer or game console. 6 Chapter 1 Getting started NOTE: You must connect a USB Type-B cable from the source device to the monitor to enable USB Type-A ports on the monitor. (9) USB port Connects a USB cable to a peripheral device, such as a keyboard, mouse, or USB hard drive. (10) ...charges small devices such as a smartphone, even when the computer is DC off with OSD Performance mode on the right side of the monitor, use this illustration and table. Table 1-4 Rear components and their descriptions Component Description (1) OSD control Activates the OSD buttons so that the...
User Guide
Page 12
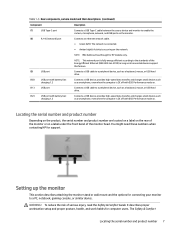
Setting up the monitor This section describes attaching the monitor stand or wall mount and the options for HP models only. It describes proper workstation setup and proper posture, health, and work habits for support. Locating the serial number and ... . The Safety & Comfort Locating the serial number and product number 7 WARNING! NOTE: MAC Address Pass through for connecting your monitor to enable the camera, microphone, network, and USB ports on the monitor. (8) RJ-45 (network) port Connects an ethernet network cable. ● Green (left): The network is connected. ●...
Setting up the monitor This section describes attaching the monitor stand or wall mount and the options for HP models only. It describes proper workstation setup and proper posture, health, and work habits for support. Locating the serial number and ... . The Safety & Comfort Locating the serial number and product number 7 WARNING! NOTE: MAC Address Pass through for connecting your monitor to enable the camera, microphone, network, and USB ports on the monitor. (8) RJ-45 (network) port Connects an ethernet network cable. ● Green (left): The network is connected. ●...
User Guide
Page 13
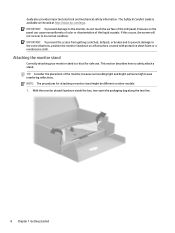
...To prevent damage to the control buttons, position the monitor facedown on other models. 1. NOTE: The procedures... the screen will not recover to safely attach a stand. With the monitor placed facedown inside the box, tear open the packaging bag along the ... or broken and to prevent damage to the monitor, do not touch the surface of the monitor, because surrounding light and bright surfaces might be... Guide is critical for attaching a monitor stand might cause interfering reflections. Attaching the monitor stand Correctly attaching your monitor stand is available on the panel ...
...To prevent damage to the control buttons, position the monitor facedown on other models. 1. NOTE: The procedures... the screen will not recover to safely attach a stand. With the monitor placed facedown inside the box, tear open the packaging bag along the ... or broken and to prevent damage to the monitor, do not touch the surface of the monitor, because surrounding light and bright surfaces might be... Guide is critical for attaching a monitor stand might cause interfering reflections. Attaching the monitor stand Correctly attaching your monitor stand is available on the panel ...
User Guide
Page 14
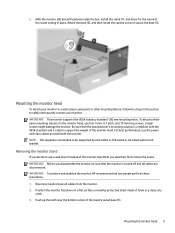
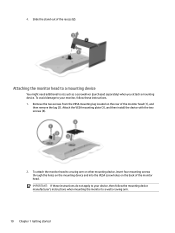
... sound of foam or a clean, dry cloth. 3. To attach a thirdparty mounting solution to support the weight of the monitor head. IMPORTANT: To position and stabilize the monitor, HP recommends that the monitor is rated to the monitor head, use the power and video cables provided with the VESA standard and is turned off and all...
... sound of foam or a clean, dry cloth. 3. To attach a thirdparty mounting solution to support the weight of the monitor head. IMPORTANT: To position and stabilize the monitor, HP recommends that the monitor is rated to the monitor head, use the power and video cables provided with the VESA standard and is turned off and all...
User Guide
Page 15
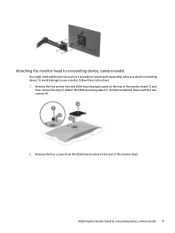
... swing arm. 10 Chapter 1 Getting started Attach the VESA mounting plate (3), and then install the device with the two screws (4). 2. To attach the monitor head to a mounting device You might need additional tools such as a screwdriver (purchased separately) when you attach a mounting device. Attaching the... monitor head to a swing arm or other mounting device, insert four mounting screws through the holes on the mounting device and into the VESA...
... swing arm. 10 Chapter 1 Getting started Attach the VESA mounting plate (3), and then install the device with the two screws (4). 2. To attach the monitor head to a mounting device You might need additional tools such as a screwdriver (purchased separately) when you attach a mounting device. Attaching the... monitor head to a swing arm or other mounting device, insert four mounting screws through the holes on the mounting device and into the VESA...
User Guide
Page 16
... a mounting device. Remove the four screws from the VESA mounting lug located on the rear of the monitor head (1), and then remove the lug (2). Attaching the monitor head to your monitor, follow these instructions. 1. Attach the VESA mounting plate (3), and then install the device with the two... screws (4). 2. Attaching the monitor head to a mounting device, camera model 11 Remove the two screws from ...
... a mounting device. Remove the four screws from the VESA mounting lug located on the rear of the monitor head (1), and then remove the lug (2). Attaching the monitor head to your monitor, follow these instructions. 1. Attach the VESA mounting plate (3), and then install the device with the two... screws (4). 2. Attaching the monitor head to a mounting device, camera model 11 Remove the two screws from ...
User Guide
Page 17
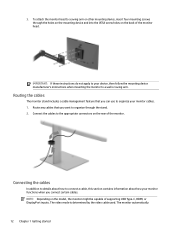
... cables that you can use to a wall or swing arm. Connect the cables to the appropriate connectors on the rear of the monitor head. To attach the monitor head to organize through the holes on the mounting device and into the VESA screw holes on the model, the... 1 Getting started IMPORTANT: If these instructions do not apply to your device, then follow the mounting device manufacturer's instructions when mounting the monitor to organize your monitor functions when you want to a swing arm or other mounting device, insert four mounting screws through the stand. 2. NOTE: Depending on ...
... cables that you can use to a wall or swing arm. Connect the cables to the appropriate connectors on the rear of the monitor head. To attach the monitor head to organize through the holes on the mounting device and into the VESA screw holes on the model, the... 1 Getting started IMPORTANT: If these instructions do not apply to your device, then follow the mounting device manufacturer's instructions when mounting the monitor to organize your monitor functions when you want to a swing arm or other mounting device, insert four mounting screws through the stand. 2. NOTE: Depending on ...
User Guide
Page 18
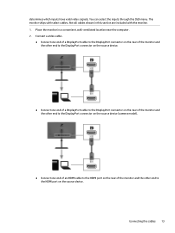
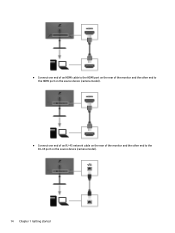
... inputs through the OSD menu. Connect a video cable. ● Connect one end of a DisplayPort cable to the DisplayPort connector on the rear of the monitor and the other end to the DisplayPort connector on the source device. ● Connect one end of a DisplayPort cable to the DisplayPort connector on the... rear of the monitor and the other end to the DisplayPort connector on the source device (camera model). ● Connect one end of an HDMI cable to the HDMI...
... inputs through the OSD menu. Connect a video cable. ● Connect one end of a DisplayPort cable to the DisplayPort connector on the rear of the monitor and the other end to the DisplayPort connector on the source device. ● Connect one end of a DisplayPort cable to the DisplayPort connector on the... rear of the monitor and the other end to the DisplayPort connector on the source device (camera model). ● Connect one end of an HDMI cable to the HDMI...
User Guide
Page 19
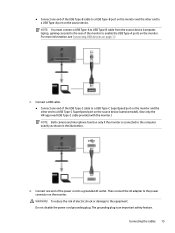
● Connect one end of an HDMI cable to the HDMI port on the rear of the monitor and the other end to the HDMI port on the source device (camera model). ● Connect one end of an RJ-45 network cable on the rear of the monitor and the other end to the RJ-45 port on the source device (camera model). 14 Chapter 1 Getting started
● Connect one end of an HDMI cable to the HDMI port on the rear of the monitor and the other end to the HDMI port on the source device (camera model). ● Connect one end of an RJ-45 network cable on the rear of the monitor and the other end to the RJ-45 port on the source device (camera model). 14 Chapter 1 Getting started
User Guide
Page 20
... USB Type-B port on the monitor and the other end to a USB Type-C SuperSpeed port on the source device (camera model). (Use only the HP-approved USB Type-C cable provided with the monitor.) NOTE: Both camera and microphone function only if the monitor is an important safety feature. For... more information, see Connecting USB devices on the monitor. Then connect the AC adapter to the equipment...
... USB Type-B port on the monitor and the other end to a USB Type-C SuperSpeed port on the source device (camera model). (Use only the HP-approved USB Type-C cable provided with the monitor.) NOTE: Both camera and microphone function only if the monitor is an important safety feature. For... more information, see Connecting USB devices on the monitor. Then connect the AC adapter to the equipment...
User Guide
Page 21
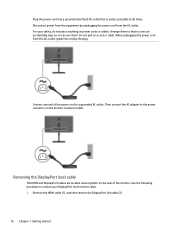
... cable. Use the following procedure to remove your safety, do not place anything on power cords or cables. Connect one can accidentally step on the monitor (camera model). Then connect the AC adapter to the power connector on or trip over them so that is easily accessible at all times. Remove... power cord from the AC outlet, grasp the cord by the plug. When unplugging the power cord from the AC outlet. For your DisplayPort (out) monitor cable. 1. Arrange them . Plug the power cord into a grounded (earthed) AC outlet that no one end of the...
... cable. Use the following procedure to remove your safety, do not place anything on power cords or cables. Connect one can accidentally step on the monitor (camera model). Then connect the AC adapter to the power connector on or trip over them so that is easily accessible at all times. Remove... power cord from the AC outlet, grasp the cord by the plug. When unplugging the power cord from the AC outlet. For your DisplayPort (out) monitor cable. 1. Arrange them . Plug the power cord into a grounded (earthed) AC outlet that no one end of the...


