
User Guide
Page 4
... a mounting device, camera model 11 Routing the cables ...12 Connecting the cables...12 Removing the DisplayPort (out) cable...16 Connecting USB devices ...17 Connecting USB devices, camera model ...17 Adjusting the monitor (select products only)...18 Installing a security cable ...20 Turning on the monitor...20 HP watermark and image retention policy...21 2 Using the monitor ...22 Downloading software and utilities ...22 The Information file ...22 The Image Color Matching file ...22 Using the OSD menu ...22 Changing the Power Mode setting ...23 Using Auto-Sleep Mode ...23 Using...
... a mounting device, camera model 11 Routing the cables ...12 Connecting the cables...12 Removing the DisplayPort (out) cable...16 Connecting USB devices ...17 Connecting USB devices, camera model ...17 Adjusting the monitor (select products only)...18 Installing a security cable ...20 Turning on the monitor...20 HP watermark and image retention policy...21 2 Using the monitor ...22 Downloading software and utilities ...22 The Information file ...22 The Image Color Matching file ...22 Using the OSD menu ...22 Changing the Power Mode setting ...23 Using Auto-Sleep Mode ...23 Using...
User Guide
Page 5
... disability resources...39 HP links ...39 Contacting support ...39 Index ...40 v 3 Support and troubleshooting ...27 Solving common issues ...27 Button lockouts...28 4 Maintaining the monitor ...29 Maintenance guidelines...29 Cleaning the monitor ...29 Shipping the monitor ...30 A Technical specifications ...31 60.5 cm (23.8 in) model specifications ...31 60.5 cm (23.8 in) model specifications, camera model 32 Preset display resolutions ...32 High-definition video formats ...33 High-definition video formats, camera model...
... disability resources...39 HP links ...39 Contacting support ...39 Index ...40 v 3 Support and troubleshooting ...27 Solving common issues ...27 Button lockouts...28 4 Maintaining the monitor ...29 Maintenance guidelines...29 Cleaning the monitor ...29 Shipping the monitor ...30 A Technical specifications ...31 60.5 cm (23.8 in) model specifications ...31 60.5 cm (23.8 in) model specifications, camera model 32 Preset display resolutions ...32 High-definition video formats ...33 High-definition video formats, camera model...
User Guide
Page 6
... correct power cord set to properly support your safety, do not place anything on the web at all power strips provide surge protection; It describes proper workstation setup and proper posture, health, and work habits for entertainment purposes. The Safety & Comfort Guide is suitable for computer users. Use the appropriate and correctly sized furniture designed to use only a power source and connection appropriate for use in...
... correct power cord set to properly support your safety, do not place anything on the web at all power strips provide surge protection; It describes proper workstation setup and proper posture, health, and work habits for entertainment purposes. The Safety & Comfort Guide is suitable for computer users. Use the appropriate and correctly sized furniture designed to use only a power source and connection appropriate for use in...
User Guide
Page 7
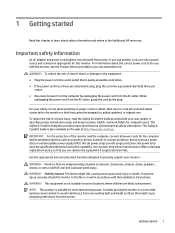
... select HP Support Assistant. - Preparing to call technical support Use this table to locate resources that shipped with your monitor Your monitor has top-rated features. Table 1-1 Additional information Resource Contents Setup Instructions HP support Overview of the hardware and software that you are located, and how they work. or - NOTE: Contact customer support to replace the power cord, the AC adapter (select products only), or any other cables...
... select HP Support Assistant. - Preparing to call technical support Use this table to locate resources that shipped with your monitor Your monitor has top-rated features. Table 1-1 Additional information Resource Contents Setup Instructions HP support Overview of the hardware and software that you are located, and how they work. or - NOTE: Contact customer support to replace the power cord, the AC adapter (select products only), or any other cables...
User Guide
Page 8
... keep your eyes comfortable ● Liquid crystal display (LCD) with active matrix and in-plane switching (IPS) ● Nonglare panel with an LED backlight ● Wide viewing angle to allow viewing from a sitting or standing position, or moving the joystick or joypad in a defined direction immediately performs a hot-key function without showing the OSD button menu first. ● On-screen display (OSD) adjustments in several languages for easy setup and screen optimization ● Color...
... keep your eyes comfortable ● Liquid crystal display (LCD) with active matrix and in-plane switching (IPS) ● Nonglare panel with an LED backlight ● Wide viewing angle to allow viewing from a sitting or standing position, or moving the joystick or joypad in a defined direction immediately performs a hot-key function without showing the OSD button menu first. ● On-screen display (OSD) adjustments in several languages for easy setup and screen optimization ● Color...
User Guide
Page 10
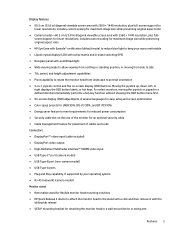
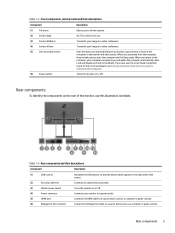
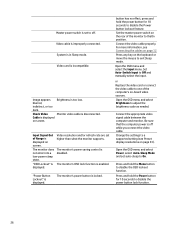
... by default. Table 1-3 Front components, camera model and their descriptions Component Description (1) OSD control Activates the OSD buttons so that the button labels appear on the right side of the screen. (2) Security cable slot Connects an optional security cable. (3) Master power switch Turns the monitor on or off . (4) Power connector Connects your monitor to a power outlet. (5) HDMI port Connects the HDMI cable to a source device such as a computer or game console. (6) DisplayPort (in) connector Connects the DisplayPort cable to a source device...
... by default. Table 1-3 Front components, camera model and their descriptions Component Description (1) OSD control Activates the OSD buttons so that the button labels appear on the right side of the screen. (2) Security cable slot Connects an optional security cable. (3) Master power switch Turns the monitor on or off . (4) Power connector Connects your monitor to a power outlet. (5) HDMI port Connects the HDMI cable to a source device such as a computer or game console. (6) DisplayPort (in) connector Connects the DisplayPort cable to a source device...
User Guide
Page 14
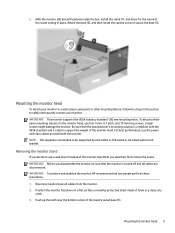
... a clean, dry cloth. 3. For best performance, use four 4 mm, 0.7 pitch, and 10 mm long screws. IMPORTANT: To position and stabilize the monitor, HP recommends that you disassemble the monitor, be supported by protective sheet made of the stand's swivel base (1). Position the monitor facedown on a flat surface covered by a UL-listed or CSA-listed or GS-listed wall-mount bracket. IMPORTANT: This monitor supports the VESA industry-standard 100 mm mounting holes. Mounting...
... a clean, dry cloth. 3. For best performance, use four 4 mm, 0.7 pitch, and 10 mm long screws. IMPORTANT: To position and stabilize the monitor, HP recommends that you disassemble the monitor, be supported by protective sheet made of the stand's swivel base (1). Position the monitor facedown on a flat surface covered by a UL-listed or CSA-listed or GS-listed wall-mount bracket. IMPORTANT: This monitor supports the VESA industry-standard 100 mm mounting holes. Mounting...
User Guide
Page 17
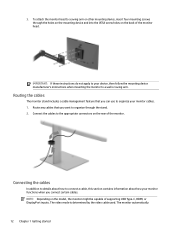
... connectors on the model, the monitor might be capable of the monitor head. The video mode is determined by the video cable used. The monitor automatically 12 Chapter 1 Getting started Routing the cables The monitor stand includes a cable management feature that you can use to a swing arm or other mounting device, insert four mounting screws through the stand. 2. Connect the cables to organize through the holes on the mounting device and into the VESA screw...
... connectors on the model, the monitor might be capable of the monitor head. The video mode is determined by the video cable used. The monitor automatically 12 Chapter 1 Getting started Routing the cables The monitor stand includes a cable management feature that you can use to a swing arm or other mounting device, insert four mounting screws through the stand. 2. Connect the cables to organize through the holes on the mounting device and into the VESA screw...
User Guide
Page 25
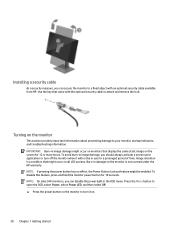
... attach and remove the lock. NOTE: On select HP monitors, you can secure the monitor to a fixed object with the optional security cable to your monitor, startup indicators, and troubleshooting information. Installing a security cable As a security measure, you can disable the power light in the OSD menu. Turning on all LCD screens. Image retention is not covered under the HP warranty. To avoid burn-in image damage, you should always activate a screen saver application...
... attach and remove the lock. NOTE: On select HP monitors, you can secure the monitor to a fixed object with the optional security cable to your monitor, startup indicators, and troubleshooting information. Installing a security cable As a security measure, you can disable the power light in the OSD menu. Turning on all LCD screens. Image retention is not covered under the HP warranty. To avoid burn-in image damage, you should always activate a screen saver application...
User Guide
Page 26
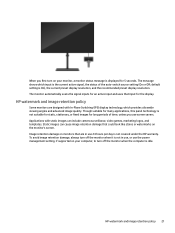
... of the auto-switch source setting (On or Off; default setting is displayed for an active input and uses that could look like stains or watermarks on the monitor's screen. The monitor automatically scans the signal inputs for 5 seconds. When you use the power management setting, if supported on your computer, to turn on your monitor, a monitor status message is On), the current preset display resolution, and the recommended preset display resolution. HP watermark and image retention...
... of the auto-switch source setting (On or Off; default setting is displayed for an active input and uses that could look like stains or watermarks on the monitor's screen. The monitor automatically scans the signal inputs for 5 seconds. When you use the power management setting, if supported on your computer, to turn on your monitor, a monitor status message is On), the current preset display resolution, and the recommended preset display resolution. HP watermark and image retention...
User Guide
Page 27
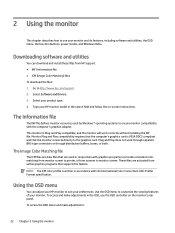
... OSD menu, the function buttons, power modes, and Windows Hello. Plug and Play does not work correctly without installing the INF file. These files are used by Windows® operating systems to ensure monitor compatibility with the computer's graphics adapter. NOTE: The ICM color profile is VESA DDC2 compliant and that are activated from HP Support. ● INF (Information) file ● ICM (Image Color Matching) files To download the files: 1. Select Software...
... OSD menu, the function buttons, power modes, and Windows Hello. Plug and Play does not work correctly without installing the INF file. These files are used by Windows® operating systems to ensure monitor compatibility with the computer's graphics adapter. NOTE: The ICM color profile is VESA DDC2 compliant and that are activated from HP Support. ● INF (Information) file ● ICM (Image Color Matching) files To download the files: 1. Select Software...
User Guide
Page 28
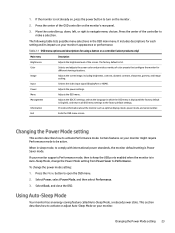
.... To change the Power Mode setting from Power Saver to activate or adjust Auto-Sleep Mode on your monitor supports Performance mode, then to keep the USB ports enabled when the monitor is Power Saver mode. Color Selects and adjusts the screen color and provides a variety of color presets that configure the monitor for using a button or a controller (select products only) Main menu Description Brightness+ Adjusts the brightness level of the OSD controller on your monitor. When in which the OSD menu is displayed (the factory default is English), and...
.... To change the Power Mode setting from Power Saver to activate or adjust Auto-Sleep Mode on your monitor supports Performance mode, then to keep the USB ports enabled when the monitor is Power Saver mode. Color Selects and adjusts the screen color and provides a variety of color presets that configure the monitor for using a button or a controller (select products only) Main menu Description Brightness+ Adjusts the brightness level of the OSD controller on your monitor. When in which the OSD menu is displayed (the factory default is English), and...
User Guide
Page 30
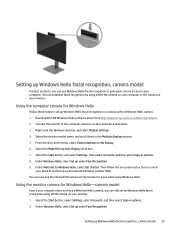
... and monitor. 3. Connect the monitor to Windows Hello, select Get Started. Select the Start button, select Settings, select Accounts, and then select Sign-in options. 8. Download the HP Windows Hello software driver from http://support.hp.com/us-en/drivers/products. 2. Then select Accounts, and then select Sign-in options. 2. Select the Make this display. 6. Under Windows Hello, select Set up Windows Hello facial recognition, camera model 25 Setting up under Face Recognition. 9. Using...
... and monitor. 3. Connect the monitor to Windows Hello, select Get Started. Select the Start button, select Settings, select Accounts, and then select Sign-in options. 8. Download the HP Windows Hello software driver from http://support.hp.com/us-en/drivers/products. 2. Then select Accounts, and then select Sign-in options. 2. Select the Make this display. 6. Under Windows Hello, select Set up Windows Hello facial recognition, camera model 25 Setting up under Face Recognition. 9. Using...
User Guide
Page 31
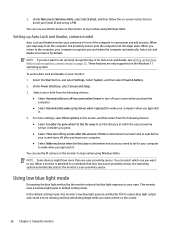
... for Auto Lock and Awake, see Setting up a PIN. To access Auto Lock and Awake on by the monitor reduces the blue light exposure to log in when using Windows Hello. 3. You can select which the user-proximity sensor considers you return to use the IR camera on page 25. Using low blue light mode Decreasing the blue light emitted by default. These features are only supported on -screen instructions to save power and...
... for Auto Lock and Awake, see Setting up a PIN. To access Auto Lock and Awake on by the monitor reduces the blue light exposure to log in when using Windows Hello. 3. You can select which the user-proximity sensor considers you return to use the IR camera on page 25. Using low blue light mode Decreasing the blue light emitted by default. These features are only supported on -screen instructions to save power and...
User Guide
Page 32
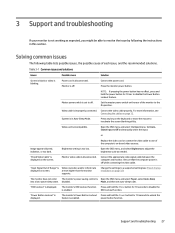
... and manually select the input. The monitor's OSD Lockout function is off. Press any key on the screen. Open the OSD menu, and select Brightness to adjust the brightness scale as expected, you might be able to unlock the feature is Video resolution and/or refresh rate displayed on -board video sources. Be sure that the computer power is blinking. Monitor is enabled. or Replace the video card or connect the video cable to inactivate the screen blanking utility. "Input Signal Out...
... and manually select the input. The monitor's OSD Lockout function is off. Press any key on the screen. Open the OSD menu, and select Brightness to adjust the brightness scale as expected, you might be able to unlock the feature is Video resolution and/or refresh rate displayed on -board video sources. Be sure that the computer power is blinking. Monitor is enabled. or Replace the video card or connect the video cable to inactivate the screen blanking utility. "Input Signal Out...
User Guide
Page 34
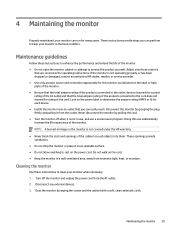
... the monitor is not in the operating instructions. Cleaning the monitor Use these instructions to clean your monitor in a well-ventilated area, away from the outlet. Turn off when it is not covered under the HP warranty. ● Never block the slots and openings of the monitor. Look on the power cord. These instructions provide steps you can easily reach. Dust the monitor by grasping the plug firmly...
... the monitor is not in the operating instructions. Cleaning the monitor Use these instructions to clean your monitor in a well-ventilated area, away from the outlet. Turn off when it is not covered under the HP warranty. ● Never block the slots and openings of the monitor. Look on the power cord. These instructions provide steps you can easily reach. Dust the monitor by grasping the plug firmly...
Maintenance and Service Guide
Page 1
Maintenance and Service Guide Z24m G3 model SUMMARY This guide provides information about spare parts, removal and replacement of parts, diagnostic tests, problem troubleshooting, and more.
Maintenance and Service Guide Z24m G3 model SUMMARY This guide provides information about spare parts, removal and replacement of parts, diagnostic tests, problem troubleshooting, and more.
Maintenance and Service Guide
Page 5
...; Keep the soldering iron tip clean and well tinned when replacing parts. ● After repair, perform a close inspection of the circuit board to confirm it to the customer. 2 Reference to an official registration system as proof of electrical shock. A professional repairer must replace a capacitor, insert new parts carefully to confirm the power supply is posted, the monitor does not need a firmware update. General descriptions This manual...
...; Keep the soldering iron tip clean and well tinned when replacing parts. ● After repair, perform a close inspection of the circuit board to confirm it to the customer. 2 Reference to an official registration system as proof of electrical shock. A professional repairer must replace a capacitor, insert new parts carefully to confirm the power supply is posted, the monitor does not need a firmware update. General descriptions This manual...
Maintenance and Service Guide
Page 6
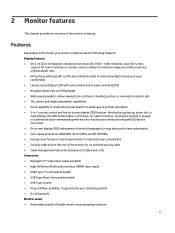
... of cables and cords Connectors ● DisplayPort ™ video input (cable included) ● High-Definition Multimedia Interface (HDMI) video inputs ● USB Type-C® port (camera model) ● USB Type-B port (noncamera model) ● USB Type-A ports ● Plug and Play capability, if supported by your eyes comfortable ● Liquid crystal display (LCD) with active matrix and in-plane switching (IPS) ● Nonglare panel with an LED backlight ● Wide viewing angle to allow viewing from a sitting or standing position...
... of cables and cords Connectors ● DisplayPort ™ video input (cable included) ● High-Definition Multimedia Interface (HDMI) video inputs ● USB Type-C® port (camera model) ● USB Type-B port (noncamera model) ● USB Type-A ports ● Plug and Play capability, if supported by your eyes comfortable ● Liquid crystal display (LCD) with active matrix and in-plane switching (IPS) ● Nonglare panel with an LED backlight ● Wide viewing angle to allow viewing from a sitting or standing position...
Maintenance and Service Guide
Page 29
.... Input Signal Out of the monitor to one ofthe computer's on page 33). "Power Button Lockout" is displayed on the rear of Range is disconnected. Open the OSD menu and select Power, select Auto-Sleep Mode and set higher than what the monitor supports. or Replace the video card or connect the video cable to theOn position. Cable is displayed. The monitor does not enter into a low-power sleep state. Video card is enabled. Set the master power switch on screen. Video resolution and/or refresh rate are set auto-sleep to a supported setting (see Connecting...
.... Input Signal Out of the monitor to one ofthe computer's on page 33). "Power Button Lockout" is displayed on the rear of Range is disconnected. Open the OSD menu and select Power, select Auto-Sleep Mode and set higher than what the monitor supports. or Replace the video card or connect the video cable to theOn position. Cable is displayed. The monitor does not enter into a low-power sleep state. Video card is enabled. Set the master power switch on screen. Video resolution and/or refresh rate are set auto-sleep to a supported setting (see Connecting...


