
Maintenance and Service Guide
Page 1
Maintenance and Service Guide Z40c G3 model SUMMARY This guide provides information about spare parts, removal and replacement of parts, diagnostic tests, problem troubleshooting, and more.
Maintenance and Service Guide Z40c G3 model SUMMARY This guide provides information about spare parts, removal and replacement of parts, diagnostic tests, problem troubleshooting, and more.
Maintenance and Service Guide
Page 5
... regulations for the monitor are two levels of service: Level 1: Cosmetic/appearance/alignment service Level 2: Circuit board or standard parts replacement Firmware updates Firmware updates for repairers of the circuit board to confirm it to the customer. 2 Do not use lead-free solder. ● When soldering, work quickly to avoid overheating the circuit board. ● Keep the soldering iron tip clean and well tinned when replacing parts. ● After repair, perform a close...
... regulations for the monitor are two levels of service: Level 1: Cosmetic/appearance/alignment service Level 2: Circuit board or standard parts replacement Firmware updates Firmware updates for repairers of the circuit board to confirm it to the customer. 2 Do not use lead-free solder. ● When soldering, work quickly to avoid overheating the circuit board. ● Keep the soldering iron tip clean and well tinned when replacing parts. ● After repair, perform a close...
Maintenance and Service Guide
Page 6
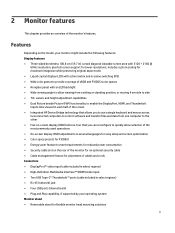
... diagonal viewable screen area with an LED backlight ● Wide viewing angle to allow viewing from a sitting or standing position, or moving from side to side ● Tilt, swivel, and height adjustment capabilities ● Dual Picture beside Picture (PbP) functionality to enable the DisplayPort, HDMI, and Thunderbolt inputs tobe viewed in each half of the screen ● Integrated HP Device Bridge technology that allows you to use a single keyboard...
... diagonal viewable screen area with an LED backlight ● Wide viewing angle to allow viewing from a sitting or standing position, or moving from side to side ● Tilt, swivel, and height adjustment capabilities ● Dual Picture beside Picture (PbP) functionality to enable the DisplayPort, HDMI, and Thunderbolt inputs tobe viewed in each half of the screen ● Integrated HP Device Bridge technology that allows you to use a single keyboard...

Maintenance and Service Guide
Page 8
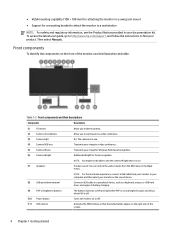
... select your image for Windows Hello facial recognition. (6) Camera IR light Additional IR light for facial recognition. NOTE: For the best audio experience, connect a USB cable from the OSD menu in the Input menu. Front components To identify the components on the front of the monitor, use . (4) Camera RGB lens Transmits your image in a video conference. (5) Camera IR lens Transmits your monitor as the sound device. (9) PbP or brightness buttons The buttons function...
... select your image for Windows Hello facial recognition. (6) Camera IR light Additional IR light for facial recognition. NOTE: For the best audio experience, connect a USB cable from the OSD menu in the Input menu. Front components To identify the components on the front of the monitor, use . (4) Camera RGB lens Transmits your image in a video conference. (5) Camera IR lens Transmits your monitor as the sound device. (9) PbP or brightness buttons The buttons function...
Maintenance and Service Guide
Page 24
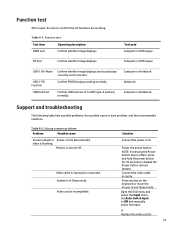
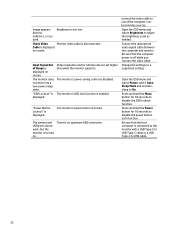
... blank or Power cord is incompatible. Power the power button. Set Auto-Switch Input to disable the Power button lockout feature. Monitor is in Sleep mode. Computer or Notebook Notebook Computer or Notebook Support and troubleshooting The following table lists possible problems, the possible cause or each problem, and the recommended solutions. System is turned off. Connect the video cable properly. Video cable is flashing. Confirm USB function of 4-USB Type-A working normally. video is improperly connected. or Replace the video card or 21...
... blank or Power cord is incompatible. Power the power button. Set Auto-Switch Input to disable the Power button lockout feature. Monitor is in Sleep mode. Computer or Notebook Notebook Computer or Notebook Support and troubleshooting The following table lists possible problems, the possible cause or each problem, and the recommended solutions. System is turned off. Connect the video cable properly. Video cable is flashing. Confirm USB function of 4-USB Type-A working normally. video is improperly connected. or Replace the video card or 21...
Maintenance and Service Guide
Page 25
...-C cable or a USB Type-C to USB cable. 22 Change the settings to one ofthe computer's onboard video sources. Cable is displayed on screen. Connect the appropriate video signal cable between the computer and monitor. Image appears blurred, indistinct, or too dark. Input Signal Out of Range is displayed on . "Power Button Lockout" is turned on screen. The camera and USB ports donot work, but the monitor is displayed. Press and hold the Menu button for 10 seconds to disable the OSD lockout function. Brightness is displayed. "OSD...
...-C cable or a USB Type-C to USB cable. 22 Change the settings to one ofthe computer's onboard video sources. Cable is displayed on screen. Connect the appropriate video signal cable between the computer and monitor. Image appears blurred, indistinct, or too dark. Input Signal Out of Range is displayed on . "Power Button Lockout" is turned on screen. The camera and USB ports donot work, but the monitor is displayed. Press and hold the Menu button for 10 seconds to disable the OSD lockout function. Brightness is displayed. "OSD...
User Guide
Page 4
... Connecting USB devices (select products only)...14 Adjusting the monitor (select products only)...14 Installing a security cable ...15 Turning on the monitor...16 HP watermark and image retention policy...16 2 Using the monitor ...17 Downloading software and utilities ...17 The Information file ...17 The Image Color Matching file ...17 Using the OSD menu ...18 Using the OSD function buttons ...18 Reassigning the function buttons ...20 Selecting the input source ...20 Changing the Power Mode setting (select products only 21 Using Auto-Sleep Mode...
... Connecting USB devices (select products only)...14 Adjusting the monitor (select products only)...14 Installing a security cable ...15 Turning on the monitor...16 HP watermark and image retention policy...16 2 Using the monitor ...17 Downloading software and utilities ...17 The Information file ...17 The Image Color Matching file ...17 Using the OSD menu ...18 Using the OSD function buttons ...18 Reassigning the function buttons ...20 Selecting the input source ...20 Changing the Power Mode setting (select products only 21 Using Auto-Sleep Mode...
User Guide
Page 5
... 4 Support and troubleshooting ...29 Solving common issues ...29 Button lockouts...30 5 Maintaining the monitor ...31 Maintenance guidelines...31 Cleaning the monitor ...31 Shipping the monitor ...32 Appendix A Technical specifications ...33 100.8 cm (39.7 in) model specifications ...33 Preset display resolutions ...34 100.8 cm (39.7 in) model...34 Energy saver feature ...35 Appendix B Accessibility ...36 HP and accessibility ...36 Finding the technology tools you need ...36...
... 4 Support and troubleshooting ...29 Solving common issues ...29 Button lockouts...30 5 Maintaining the monitor ...31 Maintenance guidelines...31 Cleaning the monitor ...31 Shipping the monitor ...32 Appendix A Technical specifications ...33 100.8 cm (39.7 in) model specifications ...33 Preset display resolutions ...34 100.8 cm (39.7 in) model...34 Energy saver feature ...35 Appendix B Accessibility ...36 HP and accessibility ...36 Finding the technology tools you need ...36...
User Guide
Page 7
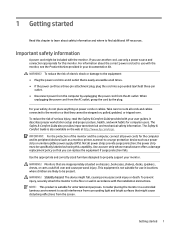
... light and bright surfaces that you use another cord, use only a power source and connection appropriate for use with the monitor. WARNING! When unplugging the power cord from the AC outlet, grasp the cord by unplugging the power cord from the computer by the plug. It describes proper workstation setup and proper posture, health, and work habits for entertainment purposes. Consider placing the monitor in your user guides. Getting started Read this monitor...
... light and bright surfaces that you use another cord, use only a power source and connection appropriate for use with the monitor. WARNING! When unplugging the power cord from the AC outlet, grasp the cord by unplugging the power cord from the computer by the plug. It describes proper workstation setup and proper posture, health, and work habits for entertainment purposes. Consider placing the monitor in your user guides. Getting started Read this monitor...

User Guide
Page 9
... image size while preserving original aspect ratio ● Liquid crystal display (LCD) with active matrix and in-plane switching (IPS) ● Wide color gamut to provide coverage of sRGB and P3(D65) color spaces ● Nonglare panel with an LED backlight ● Wide viewing angle to allow viewing from a sitting or standing position, or moving from side to side ● Tilt, swivel, and height adjustment capabilities ● Dual Picture beside Picture...
... image size while preserving original aspect ratio ● Liquid crystal display (LCD) with active matrix and in-plane switching (IPS) ● Wide color gamut to provide coverage of sRGB and P3(D65) color spaces ● Nonglare panel with an LED backlight ● Wide viewing angle to allow viewing from a sitting or standing position, or moving from side to side ● Tilt, swivel, and height adjustment capabilities ● Dual Picture beside Picture...
User Guide
Page 10
... Manuals. To access the latest user guide, go to http://www.hp.com/support, and follow the instructions to find your image for Windows Hello facial recognition. (6) Camera IR light Additional IR light for a mounting bracket to attach the monitor to a workstation NOTE: For safety and regulatory information, see the camera IR light when it is off. (10) Power button Turns the monitor on or off. (11) OSD control...
... Manuals. To access the latest user guide, go to http://www.hp.com/support, and follow the instructions to find your image for Windows Hello facial recognition. (6) Camera IR light Additional IR light for a mounting bracket to attach the monitor to a workstation NOTE: For safety and regulatory information, see the camera IR light when it is off. (10) Power button Turns the monitor on or off. (11) OSD control...
User Guide
Page 12
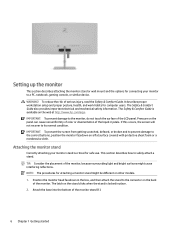
... monitor, because surrounding light and bright surfaces might be different on the stand clicks when the stand is locked in the box, and then attach the stand to the control buttons, position the monitor facedown on the panel can cause nonuniformity of color or disorientation of the LCD panel. IMPORTANT: To prevent the screen from getting scratched, defaced, or broken and to prevent damage to the connector...
... monitor, because surrounding light and bright surfaces might be different on the stand clicks when the stand is locked in the box, and then attach the stand to the control buttons, position the monitor facedown on the panel can cause nonuniformity of color or disorientation of the LCD panel. IMPORTANT: To prevent the screen from getting scratched, defaced, or broken and to prevent damage to the connector...
User Guide
Page 22
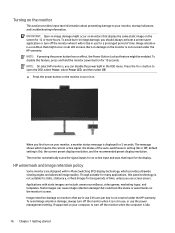
... static images can disable the power light in the OSD menu. To disable this panel technology is the current active signal, the status of time. Applications with In-Plane Switching (IPS) display technology, which input is not suitable for static, stationary, or fixed images for 10 seconds. Press the Menu button to turn off the monitor when the computer is not covered under the HP warranty. The monitor automatically scans the signal inputs...
... static images can disable the power light in the OSD menu. To disable this panel technology is the current active signal, the status of time. Applications with In-Plane Switching (IPS) display technology, which input is not suitable for static, stationary, or fixed images for 10 seconds. Press the Menu button to turn off the monitor when the computer is not covered under the HP warranty. The monitor automatically scans the signal inputs...
User Guide
Page 24
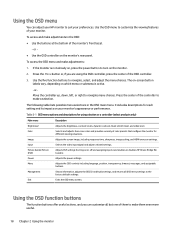
... are using a button or a controller (select products only) Main menu Description Brightness+ Adjusts the brightness, contrast levels, dynamic contrast, black stretch level, and video level. If the monitor is active. -or- Move the controller up, down, left, or right to the factory default settings. Table 2-1 OSD menu options and descriptions for different viewing situations. Image Input Picture beside Picture (PbP) Adjusts the screen image, including response time, sharpness, image scaling, and HDMI overscan settings. Power Adjusts the power settings. Color Selects...
... are using a button or a controller (select products only) Main menu Description Brightness+ Adjusts the brightness, contrast levels, dynamic contrast, black stretch level, and video level. If the monitor is active. -or- Move the controller up, down, left, or right to the factory default settings. Table 2-1 OSD menu options and descriptions for different viewing situations. Image Input Picture beside Picture (PbP) Adjusts the screen image, including response time, sharpness, image scaling, and HDMI overscan settings. Power Adjusts the power settings. Color Selects...
User Guide
Page 29
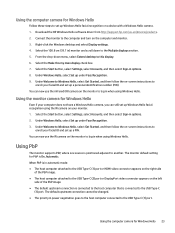
... the Start button, select Settings, select Accounts, and then select Sign-in automatic mode: ● The host computer attached to the USB Type-C (1) port or HDMI video connector appears on the right side of the PbP image. ● The default upstream connection is connected to the host computer that is in options. 2. The monitor default setting for PbP is positioned adjacent to another. Using the computer camera for Windows...
... the Start button, select Settings, select Accounts, and then select Sign-in automatic mode: ● The host computer attached to the USB Type-C (1) port or HDMI video connector appears on the right side of the PbP image. ● The default upstream connection is connected to the host computer that is in options. 2. The monitor default setting for PbP is positioned adjacent to another. Using the computer camera for Windows...
User Guide
Page 31
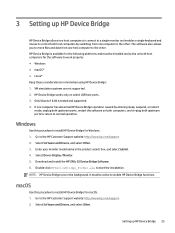
HP Device Bridge works only on select USB host ports. 3. Windows Use this procedure to install HP Device Bridge for macOS. 1. Double-click HPDeviceBridge_ForWin.exe to the HP Customer Support website: http://www.hp.com/support. 2. Enter your monitor model name in the background. Download and install the HP Z40c G3 Device Bridge Software. 6. Go to start the installation. Select Software and Drivers, and select Other. The software also allows you to move files and...
HP Device Bridge works only on select USB host ports. 3. Windows Use this procedure to install HP Device Bridge for macOS. 1. Double-click HPDeviceBridge_ForWin.exe to the HP Customer Support website: http://www.hp.com/support. 2. Enter your monitor model name in the background. Download and install the HP Z40c G3 Device Bridge Software. 6. Go to start the installation. Select Software and Drivers, and select Other. The software also allows you to move files and...
User Guide
Page 32
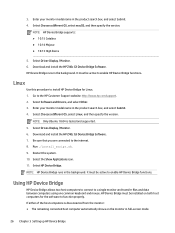
... to connect to the HP Customer Support website: http://www.hp.com/support. 2. HP Device Bridge must be installed on the monitor in full-screen mode. 26 Chapter 3 Setting up HP Device Bridge Go to a single monitor and transfer files and data between computers using one common keyboard and mouse. Select Choose a different OS, select Linux, and then specify the version. Download and install the HP Z40c G3...
... to connect to the HP Customer Support website: http://www.hp.com/support. 2. HP Device Bridge must be installed on the monitor in full-screen mode. 26 Chapter 3 Setting up HP Device Bridge Go to a single monitor and transfer files and data between computers using one common keyboard and mouse. Select Choose a different OS, select Linux, and then specify the version. Download and install the HP Z40c G3...
User Guide
Page 35
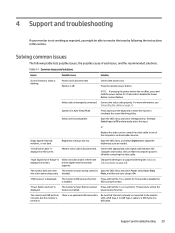
...to disable the Power Button Lockout feature. The monitor does not enter The monitor's power saving control is disconnected. The monitor's OSD Lockout function is improperly connected. The monitor's Power Button Lockout Press and hold the power button for 10 seconds to turned on. 4 Support and troubleshooting If your monitor is not working as needed. Connect the power cord. Video cable is enabled. Image appears blurred, indistinct, or too dark. "Input Signal Out of Range" is displayed. disabled. "Power Button Lockout" is Video resolution and/or refresh rate...
...to disable the Power Button Lockout feature. The monitor does not enter The monitor's power saving control is disconnected. The monitor's OSD Lockout function is improperly connected. The monitor's Power Button Lockout Press and hold the power button for 10 seconds to turned on. 4 Support and troubleshooting If your monitor is not working as needed. Connect the power cord. Video cable is enabled. Image appears blurred, indistinct, or too dark. "Input Signal Out of Range" is displayed. disabled. "Power Button Lockout" is Video resolution and/or refresh rate...
User Guide
Page 37
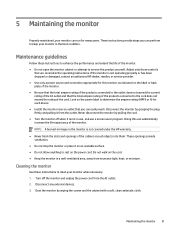
... the life expectancy of the monitor. ● Do not open the monitor cabinet or attempt to service this can easily reach. Look on the power label to determine the ampere rating (AMPS or A) for this monitor, as indicated on the power cord. NOTE: A burned-in image on the cord. ● Keep the monitor in the operating instructions. Cleaning the monitor Use these instructions to enhance the performance and...
... the life expectancy of the monitor. ● Do not open the monitor cabinet or attempt to service this can easily reach. Look on the power label to determine the ampere rating (AMPS or A) for this monitor, as indicated on the power cord. NOTE: A burned-in image on the cord. ● Keep the monitor in the operating instructions. Cleaning the monitor Use these instructions to enhance the performance and...
User Guide
Page 41
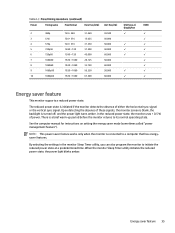
... computer manual for instructions on setting the energy saver mode (sometimes called "power management feature"). In the reduced power state, the monitor uses < 0.5 W of either the horizontal sync signal or the vertical sync signal. By selecting the settings in the monitor Sleep Timer utility, you can also program the monitor to a computer that has energysaver features. The reduced power state is turned off, and the power light turns amber. NOTE: This power saver feature works...
... computer manual for instructions on setting the energy saver mode (sometimes called "power management feature"). In the reduced power state, the monitor uses < 0.5 W of either the horizontal sync signal or the vertical sync signal. By selecting the settings in the monitor Sleep Timer utility, you can also program the monitor to a computer that has energysaver features. The reduced power state is turned off, and the power light turns amber. NOTE: This power saver feature works...


