

Quick Setup
Page 2
...; finne brukerveiledning, drivere og programvare. 2 HP Device Bridge HP Display Center 3 USB Thunderbolt USB Type-C USB Type-C σε USB. 7 HP Display Center HP Display Center στο Microsoft Store HP Device Bridge www.hp.com/support AC 3 3 HP HP web online http://www.hp.com/go /orderdocuments. AVVERTENZA: per usare il monitor con due computer. 3**L'hub USB è...
...; finne brukerveiledning, drivere og programvare. 2 HP Device Bridge HP Display Center 3 USB Thunderbolt USB Type-C USB Type-C σε USB. 7 HP Display Center HP Display Center στο Microsoft Store HP Device Bridge www.hp.com/support AC 3 3 HP HP web online http://www.hp.com/go /orderdocuments. AVVERTENZA: per usare il monitor con due computer. 3**L'hub USB è...
Maintenance and Service Guide
Page 3
... ...1 Important safety information ...1 Important service information and precautions ...1 RoHS (2002/95/EC) requirements...2 General descriptions ...2 Firmware updates ...2 Before returning the repaired product to the customer 2 2 Monitor features...3 Features ...3 Front components...5 Rear and side components...6 Locating the serial number and product number 7 3 Illustrated parts catalog ...8 How to order parts ...9 4 Removal and replacement...
... ...1 Important safety information ...1 Important service information and precautions ...1 RoHS (2002/95/EC) requirements...2 General descriptions ...2 Firmware updates ...2 Before returning the repaired product to the customer 2 2 Monitor features...3 Features ...3 Front components...5 Rear and side components...6 Locating the serial number and product number 7 3 Illustrated parts catalog ...8 How to order parts ...9 4 Removal and replacement...
Maintenance and Service Guide
Page 4
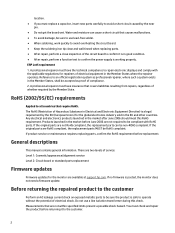
...Carefully read the cautions and notes within this HP product should perform service or maintenance for the product before performing service procedures. ● Be sure your working environment is the high voltage area. ● This monitor meets ROHS requirements. Follow ESD safety procedures... 1 Proper service methods are sensitive to the procedures and precautions is disconnected from the power source before opening the monitor to find additional HP resources. The cautions and notes are servicing the product. ● Do not perform any service or maintenance, personnel...
...Carefully read the cautions and notes within this HP product should perform service or maintenance for the product before performing service procedures. ● Be sure your working environment is the high voltage area. ● This monitor meets ROHS requirements. Follow ESD safety procedures... 1 Proper service methods are sensitive to the procedures and precautions is disconnected from the power source before opening the monitor to find additional HP resources. The cautions and notes are servicing the product. ● Do not perform any service or maintenance, personnel...
Maintenance and Service Guide
Page 5
... requires replacing parts, confirm the RoHS requirement before replacement. Water and moisture can be compliant with the applicable regulations for the monitor are not RoHS complaint, the replacement parts can cause a short circuit that require RoHS. General descriptions This manual contains general ...a capacitor, insert new parts carefully to avoid a short circuit caused by the Member State. If the original parts are available at support.hp.com. location. ● If you must check and repair the product before returning it is in good condition. ● After repair,...
... requires replacing parts, confirm the RoHS requirement before replacement. Water and moisture can be compliant with the applicable regulations for the monitor are not RoHS complaint, the replacement parts can cause a short circuit that require RoHS. General descriptions This manual contains general ...a capacitor, insert new parts carefully to avoid a short circuit caused by the Member State. If the original parts are available at support.hp.com. location. ● If you must check and repair the product before returning it is in good condition. ● After repair,...
Maintenance and Service Guide
Page 6
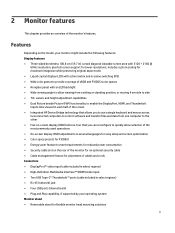
...select regions) ● RJ-45 (network) jack ● Four USB ports (downstream) ● Plug and Play capability, if supported by your monitor might include the following features: Display features ● Three-sided borderless 100.8 cm (39.7 in) curved diagonal viewable screen area with an LED ...Picture (PbP) functionality to enable the DisplayPort, HDMI, and Thunderbolt inputs tobe viewed in each half of the screen ● Integrated HP Device Bridge technology that allows you to use a single keyboard and mouse across twoconnected computers to control software and transfer files and data...
...select regions) ● RJ-45 (network) jack ● Four USB ports (downstream) ● Plug and Play capability, if supported by your monitor might include the following features: Display features ● Three-sided borderless 100.8 cm (39.7 in) curved diagonal viewable screen area with an LED ...Picture (PbP) functionality to enable the DisplayPort, HDMI, and Thunderbolt inputs tobe viewed in each half of the screen ● Integrated HP Device Bridge technology that allows you to use a single keyboard and mouse across twoconnected computers to control software and transfer files and data...

Maintenance and Service Guide
Page 7
...mount device or swing arm ● VESA mounting capability (100 × 100 mm) for attaching the monitor to a swing arm mount ● Support for your product, go to http://www.hp.com/support and follow the instructions to the Product Notices provided in your product. To access the latest ...user guides or manuals for a mounting bracket to attach the monitor to a workstation NOTE: For safety and regulatory information, refer...
...mount device or swing arm ● VESA mounting capability (100 × 100 mm) for attaching the monitor to a swing arm mount ● Support for your product, go to http://www.hp.com/support and follow the instructions to the Product Notices provided in your product. To access the latest ...user guides or manuals for a mounting bracket to attach the monitor to a workstation NOTE: For safety and regulatory information, refer...

Maintenance and Service Guide
Page 8
... in the Input menu. NOTE: You might not be able to see the camera IR light when it is off. (10) Power button Turns the monitor on or off. (11) OSD control Activates the OSD buttons so that the button labels appear on the right side of the... participate in a video conference. (3) Camera light On: The camera is in a video conference. (5) Camera IR lens Transmits your monitor as the sound device. (9) PbP or brightness buttons The buttons function as left and right when PbP is on and brightness plus and minus when ...
... in the Input menu. NOTE: You might not be able to see the camera IR light when it is off. (10) Power button Turns the monitor on or off. (11) OSD control Activates the OSD buttons so that the button labels appear on the right side of the... participate in a video conference. (3) Camera light On: The camera is in a video conference. (5) Camera IR lens Transmits your monitor as the sound device. (9) PbP or brightness buttons The buttons function as left and right when PbP is on and brightness plus and minus when ...
Maintenance and Service Guide
Page 9
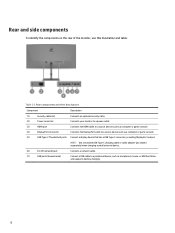
... this illustration and table. Table 2-2 Rear components and their descriptions Component Description (1) Security cable slot Connects an optional security cable. (2) Power connector Connects your monitor to a power outlet. (3) HDMI port Connects the HDMI cable to a source device such as a computer or game console. (4) DisplayPort connector Connects the DisplayPort cable to a ...
... this illustration and table. Table 2-2 Rear components and their descriptions Component Description (1) Security cable slot Connects an optional security cable. (2) Power connector Connects your monitor to a power outlet. (3) HDMI port Connects the HDMI cable to a source device such as a computer or game console. (4) DisplayPort connector Connects the DisplayPort cable to a ...
Maintenance and Service Guide
Page 10
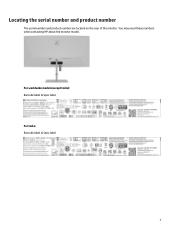
Locating the serial number and product number The serial number and product number are located on the rear of the monitor. You may need these numbers when contacting HP about the monitor model. For worldwide models(except India): Barcode label & Spec label For India: Barcode label & Spec label 7
Locating the serial number and product number The serial number and product number are located on the rear of the monitor. You may need these numbers when contacting HP about the monitor model. For worldwide models(except India): Barcode label & Spec label For India: Barcode label & Spec label 7
Maintenance and Service Guide
Page 11
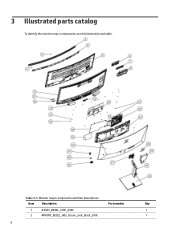
Table 3-1: Monitor major components and their descriptions Item Description Part number Qty 1 # ASSY_BEZEL_CHIP_Z40C 1 2 #FRONT_BEZEL_ABS_Ocean_Jack_black_Z40C 1 8 3 Illustrated parts catalog To identify the monitor major components, use this illustration and table.
Table 3-1: Monitor major components and their descriptions Item Description Part number Qty 1 # ASSY_BEZEL_CHIP_Z40C 1 2 #FRONT_BEZEL_ABS_Ocean_Jack_black_Z40C 1 8 3 Illustrated parts catalog To identify the monitor major components, use this illustration and table.
Maintenance and Service Guide
Page 14
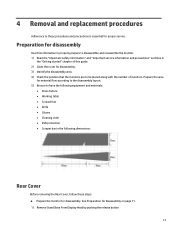
4 Removal and replacement procedures Adherence to these steps: ▲ Prepare the monitor for disassembly on page 11. 1) Remove Stand Base From Display Head by pushing the release button 11 Preparation for disassembly Use this ...for proper service. See Preparation for disassembly. Prepare the area for material flow according to the disassembly layout. 5) Be sure to disassemble and reassemble the monitor. 1) Read the "Important safety information" and "Important service information and precautions" sections in the following dimensions: Rear Cover Before removing the Rear Cover,...
4 Removal and replacement procedures Adherence to these steps: ▲ Prepare the monitor for disassembly on page 11. 1) Remove Stand Base From Display Head by pushing the release button 11 Preparation for disassembly Use this ...for proper service. See Preparation for disassembly. Prepare the area for material flow according to the disassembly layout. 5) Be sure to disassemble and reassemble the monitor. 1) Read the "Important safety information" and "Important service information and precautions" sections in the following dimensions: Rear Cover Before removing the Rear Cover,...
Maintenance and Service Guide
Page 19
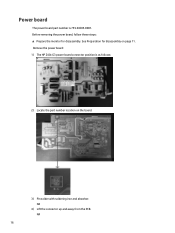
See Preparation for disassembly. NA 16 Remove the power board: 1) The HP Z40c G3 power board connector position is 755.04C05.0001. Power board The power board part number is as follows: 2) Locate the part number location on page 11. NA 4) Lift the connector up and away from the PCB. Before removing the power board, follow these steps: ▲ Prepare the monitor for disassembly on the board. 3) Pin solder with soldering iron and absorber.
See Preparation for disassembly. NA 16 Remove the power board: 1) The HP Z40c G3 power board connector position is 755.04C05.0001. Power board The power board part number is as follows: 2) Locate the part number location on page 11. NA 4) Lift the connector up and away from the PCB. Before removing the power board, follow these steps: ▲ Prepare the monitor for disassembly on the board. 3) Pin solder with soldering iron and absorber.
Maintenance and Service Guide
Page 20
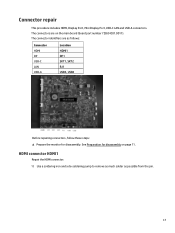
... as follows: Connector HDMI DP USB-C LAN USB-A Location HDMI1 DP1 SKT1, SKT2 RJ1 USB3, USB4 Before repairing connectors, follow these steps: ▲ Prepare the monitor for disassembly on the main board (board part number 7ZB.04C01.0011). Connector repair This procedure includes HDMI, Display Port, Mini Display Port, USB-C LAN...
... as follows: Connector HDMI DP USB-C LAN USB-A Location HDMI1 DP1 SKT1, SKT2 RJ1 USB3, USB4 Before repairing connectors, follow these steps: ▲ Prepare the monitor for disassembly on the main board (board part number 7ZB.04C01.0011). Connector repair This procedure includes HDMI, Display Port, Mini Display Port, USB-C LAN...
Maintenance and Service Guide
Page 24
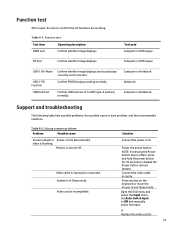
... problems, the possible cause or each problem, and the recommended solutions. Video card is in Sleep mode. Press any key on the monitor. Set Auto-Switch Input to confirm that all functions are working. Confirm USB function of 4-USB Type-A working normally. Connect the video... Function test After repair, be sure to Off and manually select the input. video is turned off. Solution Connect the power cord. Monitor is flashing. or Replace the video card or 21 Video cable is disconnected. Table 4-1: Function test Test item Operating description HDMI test ...
... problems, the possible cause or each problem, and the recommended solutions. Video card is in Sleep mode. Press any key on the monitor. Set Auto-Switch Input to confirm that all functions are working. Confirm USB function of 4-USB Type-A working normally. Connect the video... Function test After repair, be sure to Off and manually select the input. video is turned off. Solution Connect the power cord. Monitor is flashing. or Replace the video card or 21 Video cable is disconnected. Table 4-1: Function test Test item Operating description HDMI test ...
Maintenance and Service Guide
Page 25
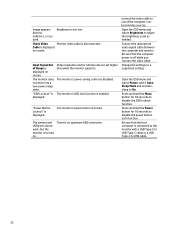
...Input Signal Out of Range is displayed on . Open the OSD menu and select Power, select AutoSleep Mode and set higher than what the monitor supports. Press and hold the Menu button for 10 seconds to On. Video resolution and/or refresh rate are set autosleep to disable the ...power button lock function. The camera and USB ports donot work, but the monitor is no upstream USB connection. There is turned on screen. Open the OSD menu and select Brightness to a supported setting. Change the settings to...
...Input Signal Out of Range is displayed on . Open the OSD menu and select Power, select AutoSleep Mode and set higher than what the monitor supports. Press and hold the Menu button for 10 seconds to On. Video resolution and/or refresh rate are set autosleep to disable the ...power button lock function. The camera and USB ports donot work, but the monitor is no upstream USB connection. There is turned on screen. Open the OSD menu and select Brightness to a supported setting. Change the settings to...

User Guide
Page 1
User Guide SUMMARY This guide provides technical specifications and information about monitor features, setting up the monitor, and using the monitor.
User Guide SUMMARY This guide provides technical specifications and information about monitor features, setting up the monitor, and using the monitor.
User Guide
Page 3
...described could result in damage to property damage). IMPORTANT: Indicates information considered important but not hazard-related (for completing a task. Depending on the model, your monitor may not have all the features included in minor or moderate injury. TIP: Provides helpful hints for example, messages related to hardware or software. Warns... the user that , if not avoided, could result in this guide This guide provides technical specifications and information about monitor features, setting up the monitor, and using the software. iii
...described could result in damage to property damage). IMPORTANT: Indicates information considered important but not hazard-related (for completing a task. Depending on the model, your monitor may not have all the features included in minor or moderate injury. TIP: Provides helpful hints for example, messages related to hardware or software. Warns... the user that , if not avoided, could result in this guide This guide provides technical specifications and information about monitor features, setting up the monitor, and using the software. iii
User Guide
Page 4
... serial number and product number ...5 Setting up the monitor ...6 Attaching the monitor stand ...6 Mounting the monitor head...7 Removing the monitor stand...7 Attaching the monitor head to a mounting device 8 Video connection combinations ...9 Connecting the cables...11 HP Device Bridge ...13 Connecting USB devices (select products only)...14 Adjusting the monitor (select products only)...14 Installing a security cable ...15...
... serial number and product number ...5 Setting up the monitor ...6 Attaching the monitor stand ...6 Mounting the monitor head...7 Removing the monitor stand...7 Attaching the monitor head to a mounting device 8 Video connection combinations ...9 Connecting the cables...11 HP Device Bridge ...13 Connecting USB devices (select products only)...14 Adjusting the monitor (select products only)...14 Installing a security cable ...15...
User Guide
Page 5
... and data ...27 Windows and macOS...27 Linux...27 Stopping HP Device Bridge ...28 Windows...28 macOS ...28 Linux...28 4 Support and troubleshooting ...29 Solving common issues ...29 Button lockouts...30 5 Maintaining the monitor ...31 Maintenance guidelines...31 Cleaning the monitor ...31 Shipping the monitor ...32 Appendix A Technical specifications ...33 100.8 cm (39.7 in...
... and data ...27 Windows and macOS...27 Linux...27 Stopping HP Device Bridge ...28 Windows...28 macOS ...28 Linux...28 4 Support and troubleshooting ...29 Solving common issues ...29 Button lockouts...30 5 Maintaining the monitor ...31 Maintenance guidelines...31 Cleaning the monitor ...31 Shipping the monitor ...32 Appendix A Technical specifications ...33 100.8 cm (39.7 in...
User Guide
Page 7
...user guides. For your documentation kit. IMPORTANT: For the protection of serious injury, read the Safety & Comfort Guide provided with the monitor, see the Product Notices provided in a controlled luminous environment to a surge protection device such as having this capability. This equipment ...is easily accessible at http://www.hp.com/ergo. Consider placing the monitor in your safety, do not place anything on the web at all power cords for the computer and its ...
...user guides. For your documentation kit. IMPORTANT: For the protection of serious injury, read the Safety & Comfort Guide provided with the monitor, see the Product Notices provided in a controlled luminous environment to a surge protection device such as having this capability. This equipment ...is easily accessible at http://www.hp.com/ergo. Consider placing the monitor in your safety, do not place anything on the web at all power cords for the computer and its ...


