
Installing Microsoft Windows XP Service Pack 2 on HP Compaq Business Notebooks
Page 3
Failure to complete the ROM upgrade. 3 Connect AC power. 4. Check the current ROM BIOS using the current operating system (OS).... can also download all PC card devices. 3. See Appendix A for users who upgrade the preinstalled image of HP Drivers and Enhancements" o Optionally, the software can be downloaded from the HP website at www.hp.com and burned onto ...recent version. If you have the most recent version, install the latest system ROM BIOS. Preparing for each PC • Microsoft Windows XP Service Pack 2 o SP2 is updated monthly and available by pressing Fn+Esc after...
Failure to complete the ROM upgrade. 3 Connect AC power. 4. Check the current ROM BIOS using the current operating system (OS).... can also download all PC card devices. 3. See Appendix A for users who upgrade the preinstalled image of HP Drivers and Enhancements" o Optionally, the software can be downloaded from the HP website at www.hp.com and burned onto ...recent version. If you have the most recent version, install the latest system ROM BIOS. Preparing for each PC • Microsoft Windows XP Service Pack 2 o SP2 is updated monthly and available by pressing Fn+Esc after...

Installing Microsoft Windows XP Service Pack 2 on HP Compaq Business Notebooks
Page 6
... upper right corner of the ROM version and compare it to create a ROMPaq diskette. Close HP System Information by clicking on the download page to listings in Table 2. 3. Press Enter to external power. 2. If the ROM requires upgrading and the ROMPaq diskette is not available, see "Creating ...appears which includes the System BIOS information. Creating a ROMPaq diskette Download the ROMPaq SoftPaq from http://www.hp.com/support/files After downloading the appropriate SoftPaq from the HP website, follow the instructions on the X in the upper right corner of the ROM version and ...
... upper right corner of the ROM version and compare it to create a ROMPaq diskette. Close HP System Information by clicking on the download page to listings in Table 2. 3. Press Enter to external power. 2. If the ROM requires upgrading and the ROMPaq diskette is not available, see "Creating ...appears which includes the System BIOS information. Creating a ROMPaq diskette Download the ROMPaq SoftPaq from http://www.hp.com/support/files After downloading the appropriate SoftPaq from the HP website, follow the instructions on the X in the upper right corner of the ROM version and ...

Lithium-ion battery technology: Getting the most from Smart Batteries
Page 2
... as the IPAQ Pocket PC and some ultra-portable PCs, which require battery packs less than prismatic cells. Introduction One of run time and lifespan. however, most common questions asked by the battery fuel gauge (Power Meter). This paper explains these factors, describes the Smart Battery Technology built into HP notebooks, and recommends practices to...
... as the IPAQ Pocket PC and some ultra-portable PCs, which require battery packs less than prismatic cells. Introduction One of run time and lifespan. however, most common questions asked by the battery fuel gauge (Power Meter). This paper explains these factors, describes the Smart Battery Technology built into HP notebooks, and recommends practices to...

Lithium-ion battery technology: Getting the most from Smart Batteries
Page 3
...occurrences of a 50% depth of discharge represent one year of applications running on the air temperature as well as the heat generated by the notebook itself and by its immediate environment, such as a percentage of the initial rated capacity of the battery. Battery energy, expressed in a ..., and DVD movies drains the battery faster and decreases its useful life; however, its power management settings. FCC is affected by the average operating temperature of the battery depends on the notebook and by its capacity begins to decrease in watt-hours (Wh), is irreversible; The ...
...occurrences of a 50% depth of discharge represent one year of applications running on the air temperature as well as the heat generated by the notebook itself and by its immediate environment, such as a percentage of the initial rated capacity of the battery. Battery energy, expressed in a ..., and DVD movies drains the battery faster and decreases its useful life; however, its power management settings. FCC is affected by the average operating temperature of the battery depends on the notebook and by its capacity begins to decrease in watt-hours (Wh), is irreversible; The ...

Lithium-ion battery technology: Getting the most from Smart Batteries
Page 4
...HP provides a 12-month warranty for a mobile user who only cycles the battery once per year) in a normal environment. however, the capacity (run time) delivered between charges will continue to decrease. The first profile is for Li-Ion batteries. As shown in the table, the additional heat generated by running high power...wireless, spreadsheets, database management) 80% 70% High* (CAD, 3D games, DVDs, high LCD brightness) 60% *High power applications may also reduce the battery cycle life by using a docking station accelerates the loss of its initial capacity after one ...
...HP provides a 12-month warranty for a mobile user who only cycles the battery once per year) in a normal environment. however, the capacity (run time) delivered between charges will continue to decrease. The first profile is for Li-Ion batteries. As shown in the table, the additional heat generated by running high power...wireless, spreadsheets, database management) 80% 70% High* (CAD, 3D games, DVDs, high LCD brightness) 60% *High power applications may also reduce the battery cycle life by using a docking station accelerates the loss of its initial capacity after one ...

Lithium-ion battery technology: Getting the most from Smart Batteries
Page 5
...about the Smart Battery System, go to "relearn" its usable capacity so it can synchronize its charge status with the Power Meter. Some notebooks estimate the battery charge state based on its history in the system. Smart Batteries calibrate their FCC each battery is less... words, the newly calibrated battery may be calibrated about once a month. 1 For more information about 5% of its remaining capacity. HP Smart Battery Technology is subjected to calibrate the battery. Smart Battery calibration Repeated short discharges and recharges cause increasing inaccuracy between the state-...
...about the Smart Battery System, go to "relearn" its usable capacity so it can synchronize its charge status with the Power Meter. Some notebooks estimate the battery charge state based on its history in the system. Smart Batteries calibrate their FCC each battery is less... words, the newly calibrated battery may be calibrated about once a month. 1 For more information about 5% of its remaining capacity. HP Smart Battery Technology is subjected to calibrate the battery. Smart Battery calibration Repeated short discharges and recharges cause increasing inaccuracy between the state-...

Lithium-ion battery technology: Getting the most from Smart Batteries
Page 6
Additional battery care practices are covered in the HP User Guides for example, running a notebook computer in a docking station under a heavy load) will run time and lifespan. For example, playing 3D games will decrease below its recommended low-voltage level...the loss of Li-Ion cells. • Remove the battery if the notebook will be stored (turned off and not plugged into AC power) for more than 2 weeks. • Remove the battery from the notebook if the notebook will be plugged into AC power continuously (via a wall adapter or docking station) for extended periods. ...
Additional battery care practices are covered in the HP User Guides for example, running a notebook computer in a docking station under a heavy load) will run time and lifespan. For example, playing 3D games will decrease below its recommended low-voltage level...the loss of Li-Ion cells. • Remove the battery if the notebook will be stored (turned off and not plugged into AC power) for more than 2 weeks. • Remove the battery from the notebook if the notebook will be plugged into AC power continuously (via a wall adapter or docking station) for extended periods. ...

WLAN solutions for HP enterprise notebooks and Tablet PCs
Page 6
... 802.11b: 1, 2, 5.5, 11 Modulation HW Accelerated AES Output Power (for CKK) Output Power (for Intel 2200BG will be activated by data rate) Power Consumption(max), Transmit Power Consumption (max), Receive Power Consumption (nominal), Idle mode Power Consumption, Sleep mode Power Management Direct Sequence Spread Spectrum DBPSK, DQPSK, CCK No 16 dBM...802.11b Range, Outdoor (typical) 802.11g Range, Indoor (typical) 802.11g Form Factor Weight N/A N/A 1200 ft. 300 ft. power varies by a future driver release. 6 N/A N/A MiniPCI Type IIIB 0.026 lb/11.75 gm (max) N/A N/A 1200 ft. 300 ft. 1200 ...
... 802.11b: 1, 2, 5.5, 11 Modulation HW Accelerated AES Output Power (for CKK) Output Power (for Intel 2200BG will be activated by data rate) Power Consumption(max), Transmit Power Consumption (max), Receive Power Consumption (nominal), Idle mode Power Consumption, Sleep mode Power Management Direct Sequence Spread Spectrum DBPSK, DQPSK, CCK No 16 dBM...802.11b Range, Outdoor (typical) 802.11g Range, Indoor (typical) 802.11g Form Factor Weight N/A N/A 1200 ft. 300 ft. power varies by a future driver release. 6 N/A N/A MiniPCI Type IIIB 0.026 lb/11.75 gm (max) N/A N/A 1200 ft. 300 ft. 1200 ...
Hardware Guide
Page 1
It also includes power and environmental specifications, which might be helpful when traveling with the notebook. Hardware Guide HP Notebook Series Document Part Number: 355386-001 November 2003 This guide explains how to identify and use notebook hardware features, including connectors for external devices.
It also includes power and environmental specifications, which might be helpful when traveling with the notebook. Hardware Guide HP Notebook Series Document Part Number: 355386-001 November 2003 This guide explains how to identify and use notebook hardware features, including connectors for external devices.

Hardware Guide
Page 3
Contents 1 Hardware Components Identifying Parts of the Notebook 1-1 Display 1-1 TouchPad 1-3 Top Components 1-5 Power Lights 1-5 Keyboard and Drive Lights 1-7 Power and Volume Controls 1-9 Quick Launch Buttons and Keyboard Keys 1-11 Wireless On/Off Button and Application Keys. . . . 1-13 Function and Keypad Keys 1-14 Front Components 1-...
Contents 1 Hardware Components Identifying Parts of the Notebook 1-1 Display 1-1 TouchPad 1-3 Top Components 1-5 Power Lights 1-5 Keyboard and Drive Lights 1-7 Power and Volume Controls 1-9 Quick Launch Buttons and Keyboard Keys 1-11 Wireless On/Off Button and Application Keys. . . . 1-13 Function and Keypad Keys 1-14 Front Components 1-...

Hardware Guide
Page 4
...Using the Keypad 2-13 3 Battery Packs Running the Notebook on Battery Power 3-1 Inserting or Removing the Battery Pack 3-2 Charging a Battery Pack 3-4 Obtaining Accurate Charge Information 3-5 Accessing the Battery Charge Display 3-5 Placing the Power Meter Icon on the Taskbar 3-6 Managing Low-Battery ... Calibrate 3-8 How to Calibrate 3-8 Battery Conservation Procedures and Settings 3-10 Conserving Power as You Work 3-10 Storing a Battery Pack 3-11 Disposing of a Used Battery Pack 3-12 Finding More Power Information 3-12 4 Drives About Drive Terms 4-1 Caring for Drives and Drive ...
...Using the Keypad 2-13 3 Battery Packs Running the Notebook on Battery Power 3-1 Inserting or Removing the Battery Pack 3-2 Charging a Battery Pack 3-4 Obtaining Accurate Charge Information 3-5 Accessing the Battery Charge Display 3-5 Placing the Power Meter Icon on the Taskbar 3-6 Managing Low-Battery ... Calibrate 3-8 How to Calibrate 3-8 Battery Conservation Procedures and Settings 3-10 Conserving Power as You Work 3-10 Storing a Battery Pack 3-11 Disposing of a Used Battery Pack 3-12 Finding More Power Information 3-12 4 Drives About Drive Terms 4-1 Caring for Drives and Drive ...

Hardware Guide
Page 5
... Light 4-7 Inserting and Removing Drive Media 4-8 Inserting a CD or DVD 4-8 Removing a CD or DVD (With Power 4-10 Removing a CD or DVD (Without Power 4-12 Inserting a Diskette (Select Models 4-14 Removing a Diskette (Select Models 4-15 Installing an Optional HP USB Digital Drive (Select Models 4-16 Installing an Optional SD Memory Card 4-17 Connecting an...
... Light 4-7 Inserting and Removing Drive Media 4-8 Inserting a CD or DVD 4-8 Removing a CD or DVD (With Power 4-10 Removing a CD or DVD (Without Power 4-12 Inserting a Diskette (Select Models 4-14 Removing a Diskette (Select Models 4-15 Installing an Optional HP USB Digital Drive (Select Models 4-16 Installing an Optional SD Memory Card 4-17 Connecting an...

Hardware Guide
Page 7
Contents Using Digital Media Cards (Select Models 8-6 Inserting an Optional Digital Media Card 8-7 Removing an Optional Digital Media Card 8-9 Disabling an Optional Digital Media Card 8-10 Increasing Memory 8-11 Displaying Memory Information 8-11 Removing or Inserting a Memory Module 8-12 Replacing the Hard Drive 8-21 Finding More Upgrade Information 8-28 9 Specifications Operating Environment 9-1 Rated Input Power 9-2 Index Hardware Guide vii
Contents Using Digital Media Cards (Select Models 8-6 Inserting an Optional Digital Media Card 8-7 Removing an Optional Digital Media Card 8-9 Disabling an Optional Digital Media Card 8-10 Increasing Memory 8-11 Displaying Memory Information 8-11 Removing or Inserting a Memory Module 8-12 Replacing the Hard Drive 8-21 Finding More Upgrade Information 8-28 9 Specifications Operating Environment 9-1 Rated Input Power 9-2 Index Hardware Guide vii

Hardware Guide
Page 12
Blinking: Notebook is in Standby. Blinking: Notebook is in Standby. Top Components Power Lights Hardware Components Component 1 Power button light 2 Power/Standby light 3 Battery light Description On: Notebook is turned on . Off: Notebook is off or in Hibernation. Off: Notebook is off or in Hibernation. Hardware Guide 1-5 Blinking: Battery pack has reached a low-battery condition. On: Notebook is turned on . On: Battery pack is applied. Off: AC power is applied, with battery pack either fully charged or not installed, or no AC power is charging.
Blinking: Notebook is in Standby. Blinking: Notebook is in Standby. Top Components Power Lights Hardware Components Component 1 Power button light 2 Power/Standby light 3 Battery light Description On: Notebook is turned on . Off: Notebook is off or in Hibernation. Off: Notebook is off or in Hibernation. Hardware Guide 1-5 Blinking: Battery pack has reached a low-battery condition. On: Notebook is turned on . On: Battery pack is applied. Off: AC power is applied, with battery pack either fully charged or not installed, or no AC power is charging.

Hardware Guide
Page 13
Blinking: Notebook is turned on . Hardware Components Component 1 Power button light 2 Power/Standby light 3 Battery light Description On: Notebook is in Standby. On: Notebook is charging. Off: Notebook is off or in Hibernation. On: Battery pack is turned on . Off: AC power is applied, with battery pack either fully charged or not installed, or no AC power is in Hibernation. Blinking: Battery pack has reached a low-battery condition. Blinking: Notebook is applied. 1-6 Hardware Guide Off: Notebook is off or in Standby.
Blinking: Notebook is turned on . Hardware Components Component 1 Power button light 2 Power/Standby light 3 Battery light Description On: Notebook is in Standby. On: Notebook is charging. Off: Notebook is off or in Hibernation. On: Battery pack is turned on . Off: AC power is applied, with battery pack either fully charged or not installed, or no AC power is in Hibernation. Blinking: Battery pack has reached a low-battery condition. Blinking: Notebook is applied. 1-6 Hardware Guide Off: Notebook is off or in Standby.
Hardware Guide
Page 16
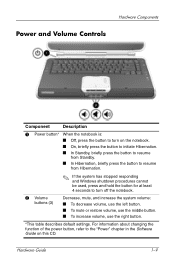
... Volume Controls Component Description 1 Power button* When the notebook is: ■ Off, press the button to turn on the notebook. ■ On, briefly press the button to initiate Hibernation. ■ In Standby, briefly press the button to resume from Standby. ■ In Hibernation... cannot be used, press and hold the button for at least 4 seconds to the "Power" chapter in the Software Guide on this CD. For information about changing the function of the power button, refer to turn off the notebook. 2 Volume buttons (3) Decrease, mute, and increase the system volume: ■ To ...
... Volume Controls Component Description 1 Power button* When the notebook is: ■ Off, press the button to turn on the notebook. ■ On, briefly press the button to initiate Hibernation. ■ In Standby, briefly press the button to resume from Standby. ■ In Hibernation... cannot be used, press and hold the button for at least 4 seconds to the "Power" chapter in the Software Guide on this CD. For information about changing the function of the power button, refer to turn off the notebook. 2 Volume buttons (3) Decrease, mute, and increase the system volume: ■ To ...
Hardware Guide
Page 17
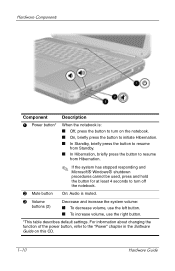
For information about changing the function of the power button, refer to the "Power" chapter in the Software Guide on the notebook. ■ On, briefly press the button to initiate Hibernation. ■ In Standby, briefly press the button to resume from Standby. ■ ... the button for at least 4 seconds to turn on this CD. 1-10 Hardware Guide Hardware Components Component Description 1 Power button* When the notebook is: ■ Off, press the button to turn off the notebook. 2 Mute button On: Audio is muted. 3 Volume buttons (2) Decrease and increase the system volume: ■...
For information about changing the function of the power button, refer to the "Power" chapter in the Software Guide on the notebook. ■ On, briefly press the button to initiate Hibernation. ■ In Standby, briefly press the button to resume from Standby. ■ ... the button for at least 4 seconds to turn on this CD. 1-10 Hardware Guide Hardware Components Component Description 1 Power button* When the notebook is: ■ Off, press the button to turn off the notebook. 2 Mute button On: Audio is muted. 3 Volume buttons (2) Decrease and increase the system volume: ■...
Hardware Guide
Page 23
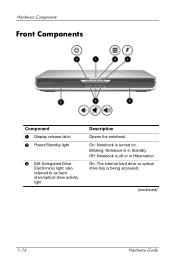
Off: Notebook is turned on. On: Notebook is off or in Standby. On: The internal hard drive or optical drive bay is in Hibernation. Blinking: Notebook is being accessed. (continued) 1-16 Hardware Guide also referred to as hard drive/optical drive activity light Description Opens the notebook. Hardware Components Front Components Component 1 Display release latch 2 Power/Standby light 3 IDE (Integrated Drive Electronics) light;
Off: Notebook is turned on. On: Notebook is off or in Standby. On: The internal hard drive or optical drive bay is in Hibernation. Blinking: Notebook is being accessed. (continued) 1-16 Hardware Guide also referred to as hard drive/optical drive activity light Description Opens the notebook. Hardware Components Front Components Component 1 Display release latch 2 Power/Standby light 3 IDE (Integrated Drive Electronics) light;

Hardware Guide
Page 24
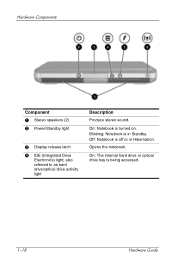
Blinking: Battery pack has reached a low-battery condition. Hardware Guide 1-17 Off: AC power is applied, with battery pack either fully charged or not installed, or no AC power is charging. Hardware Components 4 Battery light On: Battery pack is applied. 5 Stereo speakers (2) Produce stereo sound. 6 Volume and mute buttons (3) Decrease, mute, and increase the system volume: ■ To decrease volume, use the left button. ■ To mute or restore volume, use the middle button. ■ To increase volume, use the right button.
Blinking: Battery pack has reached a low-battery condition. Hardware Guide 1-17 Off: AC power is applied, with battery pack either fully charged or not installed, or no AC power is charging. Hardware Components 4 Battery light On: Battery pack is applied. 5 Stereo speakers (2) Produce stereo sound. 6 Volume and mute buttons (3) Decrease, mute, and increase the system volume: ■ To decrease volume, use the left button. ■ To mute or restore volume, use the middle button. ■ To increase volume, use the right button.
Hardware Guide
Page 25
also referred to as hard drive/optical drive activity light Description Produce stereo sound. Blinking: Notebook is off or in Standby. Opens the notebook. Off: Notebook is in Hibernation. On: The internal hard drive or optical drive bay is turned on. Hardware Components Component 1 Stereo speakers (2) 2 Power/Standby light 3 Display release latch 4 IDE (Integrated Drive Electronics) light; On: Notebook is being accessed. 1-18 Hardware Guide
also referred to as hard drive/optical drive activity light Description Produce stereo sound. Blinking: Notebook is off or in Standby. Opens the notebook. Off: Notebook is in Hibernation. On: The internal hard drive or optical drive bay is turned on. Hardware Components Component 1 Stereo speakers (2) 2 Power/Standby light 3 Display release latch 4 IDE (Integrated Drive Electronics) light; On: Notebook is being accessed. 1-18 Hardware Guide


