End User License Agreement
Page 1
... for CONDITIONS OF THIS EULA. Use. You do not have Software Product into Your Computer's AGREE TO ALL TERMS AND temporary memory (RAM) for use of any portion of the HP Product. c. Other software may load the Software ON THE CONDITION THAT YOU Product into the local... memory or storage device of the Software Product which constitutes non-proprietary HP software or software provided under public license by you shall be governed You may contain a EULA in its suppliers ...
... for CONDITIONS OF THIS EULA. Use. You do not have Software Product into Your Computer's AGREE TO ALL TERMS AND temporary memory (RAM) for use of any portion of the HP Product. c. Other software may load the Software ON THE CONDITION THAT YOU Product into the local... memory or storage device of the Software Product which constitutes non-proprietary HP software or software provided under public license by you shall be governed You may contain a EULA in its suppliers ...

HP USB Digital Drive
Page 2
The Digital Drive can purchase one (in various storage capacities) from any computer that is a pocket-sized SD (Secure Digital) memory drive for storing and transferring files such as digital pictures, music, video, and data. An SD memory card 2 may not be used with any HP authorized reseller. You can be included. User Guide 1 However, you will need an SD memory card to operate the Digital Drive. The HP USB Digital Drive 1 is running Microsoft Windows XP Home, Windows XP Pro, or Windows 2000.
The Digital Drive can purchase one (in various storage capacities) from any computer that is a pocket-sized SD (Secure Digital) memory drive for storing and transferring files such as digital pictures, music, video, and data. An SD memory card 2 may not be used with any HP authorized reseller. You can be included. User Guide 1 However, you will need an SD memory card to operate the Digital Drive. The HP USB Digital Drive 1 is running Microsoft Windows XP Home, Windows XP Pro, or Windows 2000.

HP USB Digital Drive
Page 3
If the SD memory card does not slide in properly, gently pull it out and reinsert it. 2 User Guide Remove the cap 1 of the Digital Drive. 2. Installing the SD Memory Card 1. Insert the SD memory card into the SD slot 2 with the notched corner positioned on the lower left as shown.
If the SD memory card does not slide in properly, gently pull it out and reinsert it. 2 User Guide Remove the cap 1 of the Digital Drive. 2. Installing the SD Memory Card 1. Insert the SD memory card into the SD slot 2 with the notched corner positioned on the lower left as shown.

HP USB Digital Drive
Page 10
User Guide 9 Removing the SD Memory Card ✎ Do not attempt to pull the SD memory card out when the status light on the Digital Drive is flashing. » After you disconnect the Digital Drive from your computer, gently pull the SD memory card from the Digital Drive.
User Guide 9 Removing the SD Memory Card ✎ Do not attempt to pull the SD memory card out when the status light on the Digital Drive is flashing. » After you disconnect the Digital Drive from your computer, gently pull the SD memory card from the Digital Drive.
Startup and Reference Guide
Page 19
2 System Components Contents Top 2-2 TouchPad 2-2 Keys 2-3 Power Controls 2-4 Lights 2-5 Audio Buttons 2-6 Front 2-7 Rear 2-8 Connectors and Jacks 2-8 Vents 2-9 Left Side 2-10 Connectors and Jacks 2-10 Vents 2-11 Right Side 2-12 Bottom 2-13 Bays and Memory Compartment 2-13 Vents 2-14 Labels 2-15 Additional Standard Components 2-16 Cables and Cord 2-16 Adapters and Battery Pack 2-17 Restoration and Documentation CDs 2-18 Startup and Reference Guide-Part 2 2-1
2 System Components Contents Top 2-2 TouchPad 2-2 Keys 2-3 Power Controls 2-4 Lights 2-5 Audio Buttons 2-6 Front 2-7 Rear 2-8 Connectors and Jacks 2-8 Vents 2-9 Left Side 2-10 Connectors and Jacks 2-10 Vents 2-11 Right Side 2-12 Bottom 2-13 Bays and Memory Compartment 2-13 Vents 2-14 Labels 2-15 Additional Standard Components 2-16 Cables and Cord 2-16 Adapters and Battery Pack 2-17 Restoration and Documentation CDs 2-18 Startup and Reference Guide-Part 2 2-1
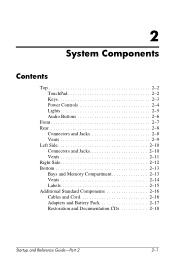
Startup and Reference Guide
Page 30
... Components Right Side Component Description 1 Infrared port Provides wireless communication between the notebook and an optional IrDA-compliant device. 2 Digital Media slot Supports SD Memory Cards, MultiMediaCards, Memory Sticks, and SmartMedia. 3 Optical drive release button Opens the optical drive. 4 Optical drive* Supports an optical disc. 5 PC Card eject button 6 PC Card slot...
... Components Right Side Component Description 1 Infrared port Provides wireless communication between the notebook and an optional IrDA-compliant device. 2 Digital Media slot Supports SD Memory Cards, MultiMediaCards, Memory Sticks, and SmartMedia. 3 Optical drive release button Opens the optical drive. 4 Optical drive* Supports an optical disc. 5 PC Card eject button 6 PC Card slot...

Startup and Reference Guide
Page 31
Holds a battery pack. Depending on the model, when the notebook is shipped either one or both memory slots may be filled with a replaceable memory module. Startup and Reference Guide-Part 2 2-13 Holds the internal hard drive. System Components Bottom Bays and Memory Compartment Component 1 Battery pack release latch 2 Memory compartment 3 Hard drive bay 4 Battery bay Description Releases a battery pack from the battery bay. Contains 2 memory slots.
Holds a battery pack. Depending on the model, when the notebook is shipped either one or both memory slots may be filled with a replaceable memory module. Startup and Reference Guide-Part 2 2-13 Holds the internal hard drive. System Components Bottom Bays and Memory Compartment Component 1 Battery pack release latch 2 Memory compartment 3 Hard drive bay 4 Battery bay Description Releases a battery pack from the battery bay. Contains 2 memory slots.

Startup and Reference Guide
Page 51
... system will be initiated by you left off. Ä CAUTION: To avoid a complete battery discharge, do not leave your work is saved in random access memory (RAM) and the screen is in Standby, the power/standby light blinks. When Standby is initiated, your notebook in use. Power About Standby, Hibernation and...
... system will be initiated by you left off. Ä CAUTION: To avoid a complete battery discharge, do not leave your work is saved in random access memory (RAM) and the screen is in Standby, the power/standby light blinks. When Standby is initiated, your notebook in use. Power About Standby, Hibernation and...

Startup and Reference Guide
Page 52
... restore from Hibernation when power is disabled and the notebook reaches a critical low-battery condition, the system does not automatically save your system memory. 4-4 Startup and Reference Guide-Part 2 To reduce the risk of the notebook system is changed during a battery pack calibration. Ä.... When possible, save your work returns to the screen exactly as you will be prompted to prevent loss of the current system memory, saves it . Power Hibernation Hibernation takes a snapshot of data. When you restore from Hibernation. Hibernation is in Hibernation: ■ ...
... restore from Hibernation when power is disabled and the notebook reaches a critical low-battery condition, the system does not automatically save your system memory. 4-4 Startup and Reference Guide-Part 2 To reduce the risk of the notebook system is changed during a battery pack calibration. Ä.... When possible, save your work returns to the screen exactly as you will be prompted to prevent loss of the current system memory, saves it . Power Hibernation Hibernation takes a snapshot of data. When you restore from Hibernation. Hibernation is in Hibernation: ■ ...
Startup and Reference Guide
Page 72
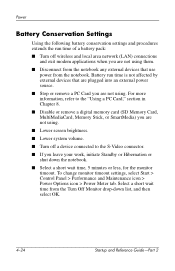
... brightness. ■ Lower system volume. ■ Turn off a device connected to the "Using a PC Card," section in Chapter 8. ■ Disable or remove a digital memory card (SD Memory Card, MultiMediaCard, Memory Stick, or SmartMedia) you leave your work, initiate Standby or Hibernation or shut down list, and then select OK. 4-24 Startup and Reference...
... brightness. ■ Lower system volume. ■ Turn off a device connected to the "Using a PC Card," section in Chapter 8. ■ Disable or remove a digital memory card (SD Memory Card, MultiMediaCard, Memory Stick, or SmartMedia) you leave your work, initiate Standby or Hibernation or shut down list, and then select OK. 4-24 Startup and Reference...

Startup and Reference Guide
Page 76
In addition, some notebooks have a higher capacity than CDs. DVDs have a diskette drive and/or an HP USB Digital Drive. Additional data storage can read or write to one of software such as described in the following table. Adding a Drive to the ... disk drive. The notebook can be added to the system by model. The notebook can be added with Digital Media including Secure Digital Memory Cards, MultiMediaCards, Smart Media, and Memory Sticks. An optional external drive can read or write to store or transport small amounts of data. Drives About Drives Hard drive...
In addition, some notebooks have a higher capacity than CDs. DVDs have a diskette drive and/or an HP USB Digital Drive. Additional data storage can read or write to one of software such as described in the following table. Adding a Drive to the ... disk drive. The notebook can be added to the system by model. The notebook can be added with Digital Media including Secure Digital Memory Cards, MultiMediaCards, Smart Media, and Memory Sticks. An optional external drive can read or write to store or transport small amounts of data. Drives About Drives Hard drive...
Startup and Reference Guide
Page 115
... a PC Card 8-6 Stopping and Removing a PC Card 8-7 Using Digital Media 8-8 Using the Digital Media Light 8-9 Inserting Digital Memory Cards 8-10 Removing Digital Memory Cards 8-11 Disabling or Restarting Digital Memory Cards. . . . 8-12 Increasing Memory 8-12 Displaying Memory Information 8-13 Removing or Inserting a Memory Module 8-14 Connecting an Optional Cable Lock 8-19 Startup and Reference Guide-Part 2 8-1
... a PC Card 8-6 Stopping and Removing a PC Card 8-7 Using Digital Media 8-8 Using the Digital Media Light 8-9 Inserting Digital Memory Cards 8-10 Removing Digital Memory Cards 8-11 Disabling or Restarting Digital Memory Cards. . . . 8-12 Increasing Memory 8-12 Displaying Memory Information 8-13 Removing or Inserting a Memory Module 8-14 Connecting an Optional Cable Lock 8-19 Startup and Reference Guide-Part 2 8-1
Startup and Reference Guide
Page 118
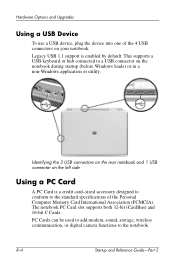
... 1 USB connector on your notebook. Hardware Options and Upgrades Using a USB Device To use a USB device, plug the device into one of the Personal Computer Memory Card International Association (PCMCIA). Legacy USB 1.1 support is a credit card-sized accessory designed to conform to the standard specifications of the 4 USB connectors on the...
... 1 USB connector on your notebook. Hardware Options and Upgrades Using a USB Device To use a USB device, plug the device into one of the Personal Computer Memory Card International Association (PCMCIA). Legacy USB 1.1 support is a credit card-sized accessory designed to conform to the standard specifications of the 4 USB connectors on the...
Startup and Reference Guide
Page 122
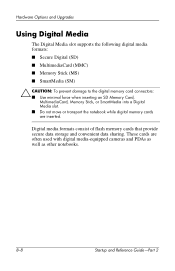
...Secure Digital (SD) ■ MultimediaCard (MMC) ■ Memory Stick (MS) ■ SmartMedia (SM) Ä CAUTION: To prevent damage to the digital memory card connectors: ■ Use minimal force when inserting an SD Memory Card, MultimediaCard, Memory Stick, or SmartMedia into a Digital Media slot. ■... Do not move or transport the notebook while digital memory cards are often used with digital...
...Secure Digital (SD) ■ MultimediaCard (MMC) ■ Memory Stick (MS) ■ SmartMedia (SM) Ä CAUTION: To prevent damage to the digital memory card connectors: ■ Use minimal force when inserting an SD Memory Card, MultimediaCard, Memory Stick, or SmartMedia into a Digital Media slot. ■... Do not move or transport the notebook while digital memory cards are often used with digital...
Startup and Reference Guide
Page 123
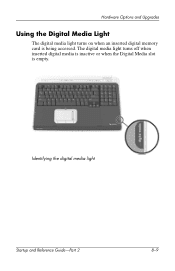
The digital media light turns off when inserted digital media is inactive or when the Digital Media slot is being accessed. Hardware Options and Upgrades Using the Digital Media Light The digital media light turns on when an inserted digital memory card is empty. Identifying the digital media light Startup and Reference Guide-Part 2 8-9
The digital media light turns off when inserted digital media is inactive or when the Digital Media slot is being accessed. Hardware Options and Upgrades Using the Digital Media Light The digital media light turns on when an inserted digital memory card is empty. Identifying the digital media light Startup and Reference Guide-Part 2 8-9

Startup and Reference Guide
Page 124
Hold the card label-side up with the connectors facing the notebook. 2. Hardware Options and Upgrades Inserting Digital Memory Cards To insert a digital memory card: 1. Gently slide the card into the Digital Media slot until the card is seated. (The card will extend slightly beyond the edge of the notebook.) Inserting a digital memory card 8-10 Startup and Reference Guide-Part 2
Hold the card label-side up with the connectors facing the notebook. 2. Hardware Options and Upgrades Inserting Digital Memory Cards To insert a digital memory card: 1. Gently slide the card into the Digital Media slot until the card is seated. (The card will extend slightly beyond the edge of the notebook.) Inserting a digital memory card 8-10 Startup and Reference Guide-Part 2

Startup and Reference Guide
Page 125
Pull the card out of the slot 2. Push the card in until it is released 1. 3. Releasing and removing a digital memory card Startup and Reference Guide-Part 2 8-11 Hardware Options and Upgrades Removing Digital Memory Cards To remove a digital memory card: 1. Complete all activities that are supported by the card (such as a data transfer) and close all applications. 2.
Pull the card out of the slot 2. Push the card in until it is released 1. 3. Releasing and removing a digital memory card Startup and Reference Guide-Part 2 8-11 Hardware Options and Upgrades Removing Digital Memory Cards To remove a digital memory card: 1. Complete all activities that are supported by the card (such as a data transfer) and close all applications. 2.
Startup and Reference Guide
Page 126
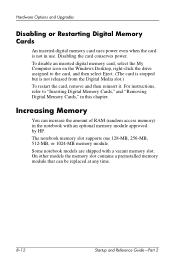
... Guide-Part 2 On other models the memory slot contains a preinstalled memory module that can increase the amount of RAM (random access memory) in the notebook with a vacant memory slot. Some notebook models are shipped with an optional memory module approved by HP. Disabling the card conserves power. The notebook memory slot supports one 128-MB, 256-MB...
... Guide-Part 2 On other models the memory slot contains a preinstalled memory module that can increase the amount of RAM (random access memory) in the notebook with a vacant memory slot. Some notebook models are shipped with an optional memory module approved by HP. Disabling the card conserves power. The notebook memory slot supports one 128-MB, 256-MB...
Startup and Reference Guide
Page 127
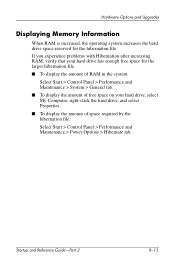
... experience problems with Hibernation after increasing RAM, verify that your hard drive has enough free space for the hibernation file. Hardware Options and Upgrades Displaying Memory Information When RAM is increased, the operating system increases the hard drive space reserved for the larger hibernation file. ■ To display the amount of...
... experience problems with Hibernation after increasing RAM, verify that your hard drive has enough free space for the hibernation file. Hardware Options and Upgrades Displaying Memory Information When RAM is increased, the operating system increases the hard drive space reserved for the larger hibernation file. ■ To display the amount of...
Startup and Reference Guide
Page 128
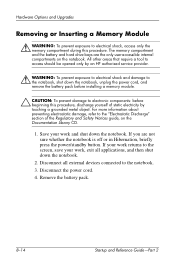
...Disconnect the power cord. 4. Remove the battery pack. 8-14 Startup and Reference Guide-Part 2 Hardware Options and Upgrades Removing or Inserting a Memory Module Å WARNING: To prevent exposure to the notebook. 3. Disconnect all applications, and then shut down the notebook. For more information about... and Safety Notices guide, on the notebook. If your work returns to the "Electrostatic Discharge" section of static electricity by an HP authorized service provider. Å WARNING: To prevent exposure to electrical shock and damage to the notebook, shut down the notebook, ...
...Disconnect the power cord. 4. Remove the battery pack. 8-14 Startup and Reference Guide-Part 2 Hardware Options and Upgrades Removing or Inserting a Memory Module Å WARNING: To prevent exposure to the notebook. 3. Disconnect all applications, and then shut down the notebook. For more information about... and Safety Notices guide, on the notebook. If your work returns to the "Electrostatic Discharge" section of static electricity by an HP authorized service provider. Å WARNING: To prevent exposure to electrical shock and damage to the notebook, shut down the notebook, ...


