Expansion Base Reference Guide
Page 28
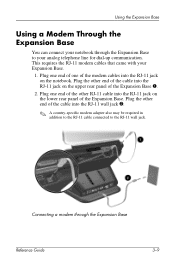
... the cable into the RJ-11 jack on the upper rear panel of the cable into the RJ-11 wall jack 2. ✎ A country-specific modem adapter also may be required in addition to the RJ-11 cable connected to your Expansion Base. 1. Plug one of the Expansion Base. Plug the other...
... the cable into the RJ-11 jack on the upper rear panel of the cable into the RJ-11 wall jack 2. ✎ A country-specific modem adapter also may be required in addition to the RJ-11 cable connected to your Expansion Base. 1. Plug one of the Expansion Base. Plug the other...

Startup and Reference Guide
Page 4
Startup Setting Up the Hardware To set up the notebook for details.) Identifying the AC adapter, the power cord, and the battery pack (Power cords vary by region and country.) 1-2 Startup and Reference Guide-Part 1 Insert the battery pack into the notebook, so that the battery can begin to charge as soon as the notebook is connected to external power. (Refer to the next section for the first time, you need the notebook, the power cord 1, the AC adapter 2, and the battery pack 3.
Startup Setting Up the Hardware To set up the notebook for details.) Identifying the AC adapter, the power cord, and the battery pack (Power cords vary by region and country.) 1-2 Startup and Reference Guide-Part 1 Insert the battery pack into the notebook, so that the battery can begin to charge as soon as the notebook is connected to external power. (Refer to the next section for the first time, you need the notebook, the power cord 1, the AC adapter 2, and the battery pack 3.
Startup and Reference Guide
Page 7
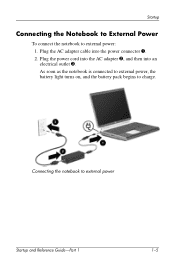
Plug the power cord into the AC adapter 2, and then into the power connector 1. 2. Startup Connecting the Notebook to External Power To connect the notebook to external power Startup and Reference Guide-Part 1 1-5 Connecting the notebook to external power: 1. As soon as the notebook is connected to external power, the battery light turns on, and the battery pack begins to charge. Plug the AC adapter cable into an electrical outlet 3.
Plug the power cord into the AC adapter 2, and then into the power connector 1. 2. Startup Connecting the Notebook to External Power To connect the notebook to external power Startup and Reference Guide-Part 1 1-5 Connecting the notebook to external power: 1. As soon as the notebook is connected to external power, the battery light turns on, and the battery pack begins to charge. Plug the AC adapter cable into an electrical outlet 3.
Startup and Reference Guide
Page 9
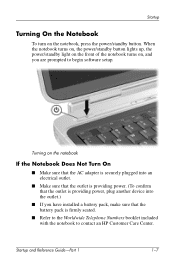
.../standby button. Startup Turning On the Notebook To turn on the notebook If the Notebook Does Not Turn On ■ Make sure that the AC adapter is securely plugged into the outlet.) ■ If you are prompted to contact an...
.../standby button. Startup Turning On the Notebook To turn on the notebook If the Notebook Does Not Turn On ■ Make sure that the AC adapter is securely plugged into the outlet.) ■ If you are prompted to contact an...

Startup and Reference Guide
Page 10
... the Software Ä CAUTION: To prevent file corruption and ensure that you do not choose are prompted to the prompt and proceeding through the AC adapter. These pauses and restarts occur only during routine Microsoft® Windows® startups. 1-8 Startup and Reference Guide-Part 1
... the Software Ä CAUTION: To prevent file corruption and ensure that you do not choose are prompted to the prompt and proceeding through the AC adapter. These pauses and restarts occur only during routine Microsoft® Windows® startups. 1-8 Startup and Reference Guide-Part 1
Startup and Reference Guide
Page 19
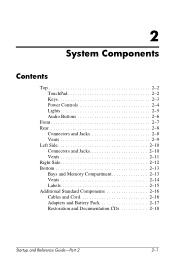
2 System Components Contents Top 2-2 TouchPad 2-2 Keys 2-3 Power Controls 2-4 Lights 2-5 Audio Buttons 2-6 Front 2-7 Rear 2-8 Connectors and Jacks 2-8 Vents 2-9 Left Side 2-10 Connectors and Jacks 2-10 Vents 2-11 Right Side 2-12 Bottom 2-13 Bays and Memory Compartment 2-13 Vents 2-14 Labels 2-15 Additional Standard Components 2-16 Cables and Cord 2-16 Adapters and Battery Pack 2-17 Restoration and Documentation CDs 2-18 Startup and Reference Guide-Part 2 2-1
2 System Components Contents Top 2-2 TouchPad 2-2 Keys 2-3 Power Controls 2-4 Lights 2-5 Audio Buttons 2-6 Front 2-7 Rear 2-8 Connectors and Jacks 2-8 Vents 2-9 Left Side 2-10 Connectors and Jacks 2-10 Vents 2-11 Right Side 2-12 Bottom 2-13 Bays and Memory Compartment 2-13 Vents 2-14 Labels 2-15 Additional Standard Components 2-16 Cables and Cord 2-16 Adapters and Battery Pack 2-17 Restoration and Documentation CDs 2-18 Startup and Reference Guide-Part 2 2-1
Startup and Reference Guide
Page 28
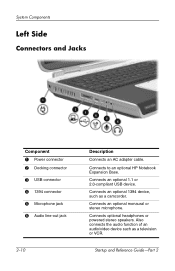
... microphone. Also connects the audio function of an audio/video device such as a camcorder. Connects an optional 1.1 or 2.0-compliant USB device. Connects to an optional HP Notebook Expansion Base. System Components Left Side Connectors and Jacks Component 1 Power connector 2 Docking connector 3 USB connector 4 1394 connector 5 Microphone jack 6 Audio line-out jack...
... microphone. Also connects the audio function of an audio/video device such as a camcorder. Connects an optional 1.1 or 2.0-compliant USB device. Connects to an optional HP Notebook Expansion Base. System Components Left Side Connectors and Jacks Component 1 Power connector 2 Docking connector 3 USB connector 4 1394 connector 5 Microphone jack 6 Audio line-out jack...
Startup and Reference Guide
Page 34
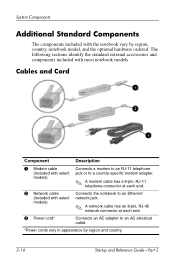
... 2 Cables and Cord Component Description 1 Modem cable (included with select models) Connects a modem to an RJ-11 telephone jack or to a country-specific modem adapter. ✎ A modem cable has a 6-pin, RJ-11 telephone connector at each end. 2 Network cable (included with most notebook models. The following sections ... Ethernet network jack. ✎ A network cable has an 8-pin, RJ-45 network connector at each end. 3 Power cord* Connects an AC adapter to an AC electrical outlet. *Power cords vary in appearance by region, country, notebook model, and the optional hardware ordered.
... 2 Cables and Cord Component Description 1 Modem cable (included with select models) Connects a modem to an RJ-11 telephone jack or to a country-specific modem adapter. ✎ A modem cable has a 6-pin, RJ-11 telephone connector at each end. 2 Network cable (included with most notebook models. The following sections ... Ethernet network jack. ✎ A network cable has an 8-pin, RJ-45 network connector at each end. 3 Power cord* Connects an AC adapter to an AC electrical outlet. *Power cords vary in appearance by region, country, notebook model, and the optional hardware ordered.

Startup and Reference Guide
Page 35
Adapters and Battery Pack System Components Component Description 1 AC adapter Converts AC power to DC power. 2 Country-specific modem adapter (included by region as required) Adapts the modem cable to a non-RJ-11 telephone jack. 3 Japan-specific outlet adapter Connects the AC adapter to a 2-prong (Japan only) electrical outlet. 4 Battery pack Runs the notebook when the notebook is not connected to external power. Startup and Reference Guide-Part 2 2-17
Adapters and Battery Pack System Components Component Description 1 AC adapter Converts AC power to DC power. 2 Country-specific modem adapter (included by region as required) Adapts the modem cable to a non-RJ-11 telephone jack. 3 Japan-specific outlet adapter Connects the AC adapter to a 2-prong (Japan only) electrical outlet. 4 Battery pack Runs the notebook when the notebook is not connected to external power. Startup and Reference Guide-Part 2 2-17

Startup and Reference Guide
Page 50
...). 4-2 Startup and Reference Guide-Part 2 The following devices: ❐ AC adapter ❐ Optional HP Notebook Expansion Base External power supplied through: ■ AC adapter ■ Optional HP Notebook Expansion Base External power supplied through the following table describes the best power ... Power Source ■ Charged battery pack in the notebook ■ External power supplied through : ■ AC adapter ■ Optional HP Notebook Expansion Base Å WARNING: This notebook is normal for extended periods. Power Selecting a Power Source The notebook...
...). 4-2 Startup and Reference Guide-Part 2 The following devices: ❐ AC adapter ❐ Optional HP Notebook Expansion Base External power supplied through: ■ AC adapter ■ Optional HP Notebook Expansion Base External power supplied through the following table describes the best power ... Power Source ■ Charged battery pack in the notebook ■ External power supplied through : ■ AC adapter ■ Optional HP Notebook Expansion Base Å WARNING: This notebook is normal for extended periods. Power Selecting a Power Source The notebook...
Startup and Reference Guide
Page 65
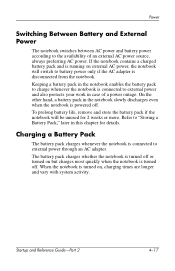
... or more. To prolong battery life, remove and store the battery pack if the notebook will switch to battery power only if the AC adapter is disconnected from the notebook. Charging a Battery Pack The battery pack charges whenever the notebook is turned off or turned on external AC power... the notebook will be unused for details. The battery pack charges whether the notebook is turned off . Refer to external power through an AC adapter. Keeping a battery pack in case of an external AC power source, always preferring AC power. If the notebook contains a charged battery pack and...
... or more. To prolong battery life, remove and store the battery pack if the notebook will switch to battery power only if the AC adapter is disconnected from the notebook. Charging a Battery Pack The battery pack charges whenever the notebook is turned off or turned on external AC power... the notebook will be unused for details. The battery pack charges whether the notebook is turned off . Refer to external power through an AC adapter. Keeping a battery pack in case of an external AC power source, always preferring AC power. If the notebook contains a charged battery pack and...
Startup and Reference Guide
Page 67
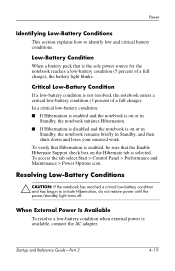
... or in Standby, the notebook initiates Hibernation. ■ If Hibernation is disabled and the notebook is on the Hibernate tab is available, connect the AC adapter.
... or in Standby, the notebook initiates Hibernation. ■ If Hibernation is disabled and the notebook is on the Hibernate tab is available, connect the AC adapter.
Startup and Reference Guide
Page 106
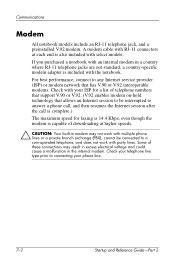
... and Reference Guide-Part 2 If you purchased a notebook with an internal modem in a country where RJ-11 telephone jacks are not standard, a country-specific modem adapter is also included with the notebook. Some of downloading at each end is included with select models. A modem cable with RJ-11 connectors at higher...
... and Reference Guide-Part 2 If you purchased a notebook with an internal modem in a country where RJ-11 telephone jacks are not standard, a country-specific modem adapter is also included with the notebook. Some of downloading at each end is included with select models. A modem cable with RJ-11 connectors at higher...
Startup and Reference Guide
Page 150
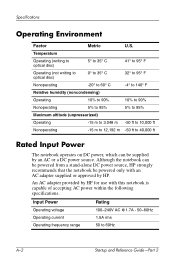
... the notebook can be powered only with an AC adapter supplied or approved by HP for use with this notebook is capable of accepting AC power within the following specifications. Temperature Operating (writing to optical disc) 5° to 35° C ... rms 50 to 40,000 ft Rated Input Power The notebook operates on DC power, which can be powered from a stand-alone DC power source, HP strongly recommends that the notebook be supplied by an AC or a DC power source. Specifications Operating Environment Factor Metric U.S.
... the notebook can be powered only with an AC adapter supplied or approved by HP for use with this notebook is capable of accepting AC power within the following specifications. Temperature Operating (writing to optical disc) 5° to 35° C ... rms 50 to 40,000 ft Rated Input Power The notebook operates on DC power, which can be powered from a stand-alone DC power source, HP strongly recommends that the notebook be supplied by an AC or a DC power source. Specifications Operating Environment Factor Metric U.S.
Startup and Reference Guide
Page 153
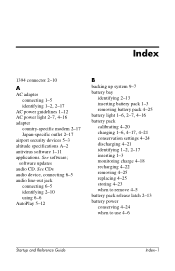
... release latch 2-13 battery power conserving 4-24 when to use 4-6 Startup and Reference Guide Index-1 Index 1394 connector 2-10 A AC adapter connecting 1-5 identifying 1-2, 2-17 AC power guidelines 1-12 AC power light 2-7, 4-16 adapter country-specific modem 2-17 Japan-specific outlet 2-17 airport security devices 5-3 altitude specifications A-2 antivirus software 1-11 applications. software updates...
... release latch 2-13 battery power conserving 4-24 when to use 4-6 Startup and Reference Guide Index-1 Index 1394 connector 2-10 A AC adapter connecting 1-5 identifying 1-2, 2-17 AC power guidelines 1-12 AC power light 2-7, 4-16 adapter country-specific modem 2-17 Japan-specific outlet 2-17 airport security devices 5-3 altitude specifications A-2 antivirus software 1-11 applications. software updates...

Startup and Reference Guide
Page 154
... drive 5-3 external monitor 2-8 infrared port 2-12, 7-8 modem 2-8, 7-3 network 7-3 parallel 2-8 power 2-10 S-Video 2-8, 2-10, 6-7 USB 2-8, 2-10, 8-3 conservation, power 4-24 copyright-protected material 5-13 country-specific modem adapter identifying 2-17 customer support 1-13, 2-18 Index-2 Startup and Reference Guide Index BIOS (basic input/output system) 9-2 boot order 5-14 buttons media 3-10 mute 2-6, 6-2 optical...
... drive 5-3 external monitor 2-8 infrared port 2-12, 7-8 modem 2-8, 7-3 network 7-3 parallel 2-8 power 2-10 S-Video 2-8, 2-10, 6-7 USB 2-8, 2-10, 8-3 conservation, power 4-24 copyright-protected material 5-13 country-specific modem adapter identifying 2-17 customer support 1-13, 2-18 Index-2 Startup and Reference Guide Index BIOS (basic input/output system) 9-2 boot order 5-14 buttons media 3-10 mute 2-6, 6-2 optical...
Startup and Reference Guide
Page 158
... 2-10 identifying 6-5 using 6-6 microphones 6-6 Microsoft Certificate of Authenticity label 2-15 Microsoft Internet Connection Firewall 1-11 model number 1-13, 9-2 modem approvals label 2-15 connecting 7-3 specifications 7-2 modem adapter 2-17 Modem and Networking guide 2-18 modem approvals label 2-15 modem cable 2-8, 2-16 monitor, external connector 2-8 switching display 3-6 switching image 3-6 MultiMediaCard 8-8 mute button 2-6, 6-2 N network connection...
... 2-10 identifying 6-5 using 6-6 microphones 6-6 Microsoft Certificate of Authenticity label 2-15 Microsoft Internet Connection Firewall 1-11 model number 1-13, 9-2 modem approvals label 2-15 connecting 7-3 specifications 7-2 modem adapter 2-17 Modem and Networking guide 2-18 modem approvals label 2-15 modem cable 2-8, 2-16 monitor, external connector 2-8 switching display 3-6 switching image 3-6 MultiMediaCard 8-8 mute button 2-6, 6-2 N network connection...
Startup and Reference Guide
Page 159
...; DVDs optical drive release button 2-12 optical drives avoiding Standby and Hibernation while using 5-13 boot order 5-14 identifying 2-12 overview 5-2, 5-9 See also drives outlet adapter 2-17 P PAL television format 6-8 PAL-M television format 6-8 parallel connector 2-8 passwords 4-15, 9-12 PC Card configuring 8-5 functions 8-4 inserting 8-6 removing 8-7 stopping 8-7 types available 8-5 PC Card eject button...
...; DVDs optical drive release button 2-12 optical drives avoiding Standby and Hibernation while using 5-13 boot order 5-14 identifying 2-12 overview 5-2, 5-9 See also drives outlet adapter 2-17 P PAL television format 6-8 PAL-M television format 6-8 parallel connector 2-8 passwords 4-15, 9-12 PC Card configuring 8-5 functions 8-4 inserting 8-6 removing 8-7 stopping 8-7 types available 8-5 PC Card eject button...

Expansion Base - Maintenance and Service Guide
Page 33
Disconnecting the expansion cable 5-4 Maintenance and Service Guide If the notebook computer is in the Expansion Base, turn off the notebook and press the buttons on the notebook may vary by notebook series and model. Removal and Replacement Procedures 5.3 Preparing the HP Notebook Expansion Base for Disassembly Perform the following steps before disassembling the Expansion Base: 1. Disconnect the AC adapter and all external devices. ✎ The location of the expansion connector on the end of the expansion cable 1 to disconnect the cable from the notebook 2. 2.
Disconnecting the expansion cable 5-4 Maintenance and Service Guide If the notebook computer is in the Expansion Base, turn off the notebook and press the buttons on the notebook may vary by notebook series and model. Removal and Replacement Procedures 5.3 Preparing the HP Notebook Expansion Base for Disassembly Perform the following steps before disassembling the Expansion Base: 1. Disconnect the AC adapter and all external devices. ✎ The location of the expansion connector on the end of the expansion cable 1 to disconnect the cable from the notebook 2. 2.

Expansion Base - Maintenance and Service Guide
Page 51
Specifications Power supply Rated input voltage Rated input current Rated frequency Table 6-2 Internal AC Adapter 160 W with PFC 100 to 240 VAC RMS 1.7 A RMS 47 to 63 Hz 6-2 Maintenance and Service Guide
Specifications Power supply Rated input voltage Rated input current Rated frequency Table 6-2 Internal AC Adapter 160 W with PFC 100 to 240 VAC RMS 1.7 A RMS 47 to 63 Hz 6-2 Maintenance and Service Guide


