User Manual
Page 9
... 148 12.1 Managing User Accounts 148 12.2 Authentication ...150 12.3 Anonymous Visit 151 12.4 IP Address Filter 152 12.5 Security Service 153 12.6 Viewing Device Information 154 12.7 Maintenance ...155 12.7.1 Rebooting the Camera 155 12.7.2 Restoring Default Settings 155 12.7.3 Exporting / Importing Configuration File 156 12.7.4 Upgrading the System 157 12...
... 148 12.1 Managing User Accounts 148 12.2 Authentication ...150 12.3 Anonymous Visit 151 12.4 IP Address Filter 152 12.5 Security Service 153 12.6 Viewing Device Information 154 12.7 Maintenance ...155 12.7.1 Rebooting the Camera 155 12.7.2 Restoring Default Settings 155 12.7.3 Exporting / Importing Configuration File 156 12.7.4 Upgrading the System 157 12...
User Manual
Page 12
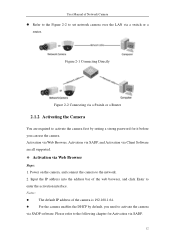
... into the address bar of the web browser, and click Enter to the network. 2. Notes: The default IP address of the camera is 192.168.1.64. For the camera enables the DHCP by setting a strong password for Activation via a switch or a router. ... network camera over the LAN via SADP. 12 Please refer to the following chapter for it before you need to activate the camera first by default, you can use the camera. Activation via Web Browser, Activation via SADP, and Activation via Client Software are all supported. Activation via a Switch or...
... into the address bar of the web browser, and click Enter to the network. 2. Notes: The default IP address of the camera is 192.168.1.64. For the camera enables the DHCP by setting a strong password for Activation via a switch or a router. ... network camera over the LAN via SADP. 12 Please refer to the following chapter for it before you need to activate the camera first by default, you can use the camera. Activation via Web Browser, Activation via SADP, and Activation via Client Software are all supported. Activation via a Switch or...
User Manual
Page 22
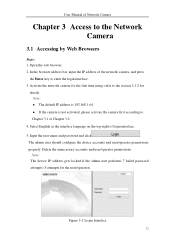
Note: The default IP address is 192.168.1.64. If the camera is not activated, please activate... and user/operator permissions. User Manual of login interface. 5. Input the user name and password and click . Note: The device IP address gets locked if the admin user performs 7 failed password attempts (5 attempts for the first time using, refer to Chapter 3.1 or...Activate the network camera for the user/operator). In the browser address bar, input the IP address of the network camera, and press the Enter key to the Network Camera 3.1 Accessing by Web Browsers Steps: ...
Note: The default IP address is 192.168.1.64. If the camera is not activated, please activate... and user/operator permissions. User Manual of login interface. 5. Input the user name and password and click . Note: The device IP address gets locked if the admin user performs 7 failed password attempts (5 attempts for the first time using, refer to Chapter 3.1 or...Activate the network camera for the user/operator). In the browser address bar, input the IP address of the network camera, and press the Enter key to the Network Camera 3.1 Accessing by Web Browsers Steps: ...
User Manual
Page 33
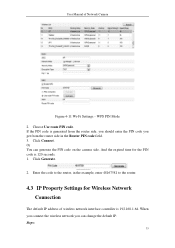
... Settings for the PIN code is 192.168.1.64. And the expired time for Wireless Network Connection The default IP address of Network Camera Figure 4-11 Wi-Fi Settings - Steps: 33 WPS PIN Mode 2. Enter the code to the router, in the Router PIN code ...
... Settings for the PIN code is 192.168.1.64. And the expired time for Wireless Network Connection The default IP address of Network Camera Figure 4-11 Wi-Fi Settings - Steps: 33 WPS PIN Mode 2. Enter the code to the router, in the Router PIN code ...
User Manual
Page 34
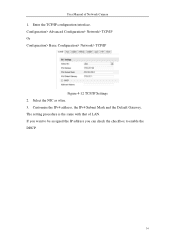
The setting procedure is the same with that of Network Camera 1. Enter the TCP/IP configuration interface. If you want to be assigned the IP address you can check the checkbox to enable the DHCP. 34 Select the NIC as wlan. 3. Customize the IPv4 address, the IPv4 Subnet Mask and the Default Gateway. Configuration> Advanced Configuration> Network> TCP/IP Or Configuration> Basic Configuration> Network> TCP/IP Figure 4-12 TCP/IP Settings 2. User Manual of LAN.
The setting procedure is the same with that of Network Camera 1. Enter the TCP/IP configuration interface. If you want to be assigned the IP address you can check the checkbox to enable the DHCP. 34 Select the NIC as wlan. 3. Customize the IPv4 address, the IPv4 Subnet Mask and the Default Gateway. Configuration> Advanced Configuration> Network> TCP/IP Or Configuration> Basic Configuration> Network> TCP/IP Figure 4-12 TCP/IP Settings 2. User Manual of LAN.
User Manual
Page 45
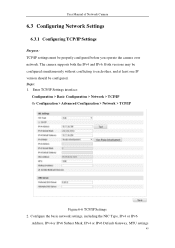
..., including the NIC Type, IPv4 or IPv6 Address, IPv4 or IPv6 Subnet Mask, IPv4 or IPv6 Default Gateway, MTU settings 45 User Manual of Network Camera 6.3 Configuring Network Settings 6.3.1 Configuring TCP/IP Settings Purpose: TCP/IP settings must be configured. Both versions may be configured simultaneously without conflicting to each other, and at...
..., including the NIC Type, IPv4 or IPv6 Address, IPv4 or IPv6 Subnet Mask, IPv4 or IPv6 Default Gateway, MTU settings 45 User Manual of Network Camera 6.3 Configuring Network Settings 6.3.1 Configuring TCP/IP Settings Purpose: TCP/IP settings must be configured. Both versions may be configured simultaneously without conflicting to each other, and at...
User Manual
Page 48
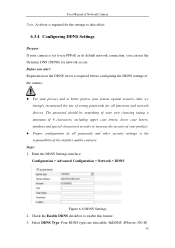
... the security of your product. Proper configuration of all functions and network devices. Four DDNS types are selectable: HiDDNS, IPServer, NO-IP, 48 Before you can use of strong passwords for network access. Steps: 1. User Manual of Network Camera Note: A reboot is required for... the settings to take effect. 6.3.4 Configuring DDNS Settings Purpose: If your camera is set to use PPPoE as its default network connection, you start: Registration on the DDNS server is required before configuring the DDNS settings of the camera. For your privacy...
... the security of your product. Proper configuration of all functions and network devices. Four DDNS types are selectable: HiDDNS, IPServer, NO-IP, 48 Before you can use of strong passwords for network access. Steps: 1. User Manual of Network Camera Note: A reboot is required for... the settings to take effect. 6.3.4 Configuring DDNS Settings Purpose: If your camera is set to use PPPoE as its default network connection, you start: Registration on the DDNS server is required before configuring the DDNS settings of the camera. For your privacy...
User Manual
Page 59
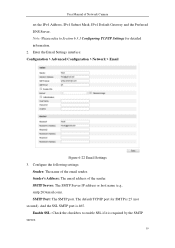
Configure the following settings: Sender: The name of the sender. Enable SSL: Check the checkbox to Section 6.3.1 Configuring TCP/IP Settings for SMTP is 25 (not secured). SMTP Port: The SMTP port. Enter the Email Settings interface: Configuration > Advanced Configuration > Network > Email Figure 6-22 Email ...Settings 3. Sender's Address: The email address of the email sender. And the SSL SMTP port is required by the SMTP server. 59 The default TCP/IP port for detailed information. 2. Note: Please refer to enable SSL if it is 465. SMTP Server: The SMTP Server...
Configure the following settings: Sender: The name of the sender. Enable SSL: Check the checkbox to Section 6.3.1 Configuring TCP/IP Settings for SMTP is 25 (not secured). SMTP Port: The SMTP port. Enter the Email Settings interface: Configuration > Advanced Configuration > Network > Email Figure 6-22 Email ...Settings 3. Sender's Address: The email address of the email sender. And the SSL SMTP port is required by the SMTP server. 59 The default TCP/IP port for detailed information. 2. Note: Please refer to enable SSL if it is 465. SMTP Server: The SMTP Server...
User Manual
Page 156
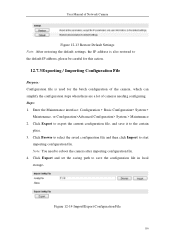
...Maintenance, or Configuration>Advanced Configuration> System > Maintenance 2. Click Browse to select the saved configuration file and then click Import to the default IP address, please be careful for this action. 12.7.3 Exporting / Importing Configuration File Purpose: Configuration file is used for the batch configuration... of cameras needing configuring. Steps: 1. User Manual of Network Camera Figure 12-13 Restore Default Settings Note: After restoring the default settings, the IP address is also restored to start importing configuration file. Note: You need to the certain place. 3.
...Maintenance, or Configuration>Advanced Configuration> System > Maintenance 2. Click Browse to select the saved configuration file and then click Import to the default IP address, please be careful for this action. 12.7.3 Exporting / Importing Configuration File Purpose: Configuration file is used for the batch configuration... of cameras needing configuring. Steps: 1. User Manual of Network Camera Figure 12-13 Restore Default Settings Note: After restoring the default settings, the IP address is also restored to start importing configuration file. Note: You need to the certain place. 3.
User Manual
Page 163
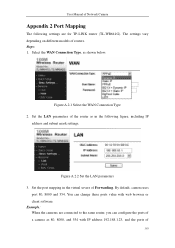
... the port mapping in the following settings are connected to the same router, you can change these ports value with IP address 192.168.1.23, and the ports of 163 By default, camera uses port 80, 8000 and 554. Steps: 1. Figure A.2.2 Set the LAN parameters 3. The settings vary depending on different models...
... the port mapping in the following settings are connected to the same router, you can change these ports value with IP address 192.168.1.23, and the ports of 163 By default, camera uses port 80, 8000 and 554. Steps: 1. Figure A.2.2 Set the LAN parameters 3. The settings vary depending on different models...
Quick Start Guide
Page 13
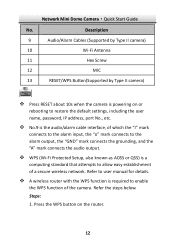
... standard that attempts to enable the WPS function of a secure wireless network. Press the WPS button on or rebooting to restore the default settings, including the user name, password, IP address, port No., etc. No.9 is the audio/alarm cable interface, of which the "I" mark connects to the alarm input, the...
... standard that attempts to enable the WPS function of a secure wireless network. Press the WPS button on or rebooting to restore the default settings, including the user name, password, IP address, port No., etc. No.9 is the audio/alarm cable interface, of which the "I" mark connects to the alarm input, the...
Quick Start Guide
Page 35
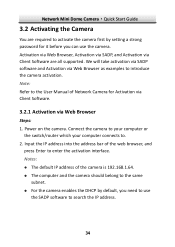
... are all supported. Activation via Web Browser, Activation via SADP, and Activation via Web Browser as examples to introduce the camera activation. Notes: The default IP address of Network Camera for it before you need to use the SADP software to activate the camera first by... default, you can use the camera. We will take activation via SADP software and Activation via Client Software are required to search the IP address. 34 Power on the camera. Note: Refer to the User Manual of the...
... are all supported. Activation via Web Browser, Activation via SADP, and Activation via Web Browser as examples to introduce the camera activation. Notes: The default IP address of Network Camera for it before you need to use the SADP software to activate the camera first by... default, you can use the camera. We will take activation via SADP software and Activation via Client Software are required to search the IP address. 34 Power on the camera. Note: Refer to the User Manual of the...
Quick Start Guide
Page 41
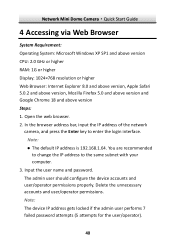
...of the network camera, and press the Enter key to the same subnet with your computer. 3. Note: The default IP address is 192.168.1.64. You are recommended to change the IP address to enter the login interface. Input the user name and password. Network Mini Dome Camera·Quick Start Guide... 8.0 and above version, Apple Safari 5.0.2 and above version, Mozilla Firefox 5.0 and above version and Google Chrome 18 and above version Steps: 1. Note: The device IP address gets locked if the admin user performs 7 failed password attempts (5 attempts for the user/operator). 40
...of the network camera, and press the Enter key to the same subnet with your computer. 3. Note: The default IP address is 192.168.1.64. You are recommended to change the IP address to enter the login interface. Input the user name and password. Network Mini Dome Camera·Quick Start Guide... 8.0 and above version, Apple Safari 5.0.2 and above version, Mozilla Firefox 5.0 and above version and Google Chrome 18 and above version Steps: 1. Note: The device IP address gets locked if the admin user performs 7 failed password attempts (5 attempts for the user/operator). 40