Quick Start Guide
Page 1
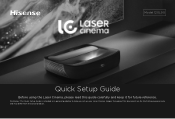
Images throughout this guide carefully and keep it for illustrative purposes only and may differ from the actual product. Disclaimer: This Quick Setup Guide is intended as a general guideline to help you set up your Laser Cinema. Model 120L9G Quick Setup Guide Before using the Laser Cinema, please read this document are for future reference.
Images throughout this guide carefully and keep it for illustrative purposes only and may differ from the actual product. Disclaimer: This Quick Setup Guide is intended as a general guideline to help you set up your Laser Cinema. Model 120L9G Quick Setup Guide Before using the Laser Cinema, please read this document are for future reference.

Quick Start Guide
Page 3
... 23 For detailed instructions, please refer to set up the Laser Cinema 7 STEP 3. Set up your new Laser Cinema! Use Your Remote 14 STEP 5 Proceed through a few easy steps to the E-Manual. 1 Congratulations on the purchase of Contents Register Your Laser Cinema! 2 Important Safety Information 3 Packaged Contents 5 Laser Cinema Diagram 6 STEP 1. Adjust the Display Image and the Screen...
... 23 For detailed instructions, please refer to set up the Laser Cinema 7 STEP 3. Set up your new Laser Cinema! Use Your Remote 14 STEP 5 Proceed through a few easy steps to the E-Manual. 1 Congratulations on the purchase of Contents Register Your Laser Cinema! 2 Important Safety Information 3 Packaged Contents 5 Laser Cinema Diagram 6 STEP 1. Adjust the Display Image and the Screen...
Quick Start Guide
Page 4
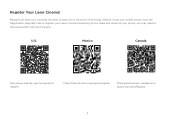
Register Your Laser Cinema! Using your mobile phone, scan the Registration page QR code to register your phone, you may need to keep you in the know of your Laser Cinema. U.S. Depending on the make and model of 'all things Hisense'. canada.com/ support/productReg.asp 2 Mexico Canada http://www.hisense-usa.com/support/ register https://hisense.com.mx/support/register http://www.hisense- Because we value your business, we want to download a QR code scanning app.
Register Your Laser Cinema! Using your mobile phone, scan the Registration page QR code to register your phone, you may need to keep you in the know of your Laser Cinema. U.S. Depending on the make and model of 'all things Hisense'. canada.com/ support/productReg.asp 2 Mexico Canada http://www.hisense-usa.com/support/ register https://hisense.com.mx/support/register http://www.hisense- Because we value your business, we want to download a QR code scanning app.

Quick Start Guide
Page 5
.... otherwise, it may result in hazardous radiation exposure. burning candle) on the Laser Cinema. 3 Important Safety Information SAFETY WARNINGS Do not look directly at the lens when this device is 4 or higher and has a wave length of 459-651 ... damage or electric shock, do not use of controls or adjustments or performance of Hisense. • Do not place any water-containing vessel on this device, such as defined in IEC 62471-5: Ed.1.0. For more information see Laser Notice No.57, dated May 8, 2019. • If this device requires a repair, please wear...
.... otherwise, it may result in hazardous radiation exposure. burning candle) on the Laser Cinema. 3 Important Safety Information SAFETY WARNINGS Do not look directly at the lens when this device is 4 or higher and has a wave length of 459-651 ... damage or electric shock, do not use of controls or adjustments or performance of Hisense. • Do not place any water-containing vessel on this device, such as defined in IEC 62471-5: Ed.1.0. For more information see Laser Notice No.57, dated May 8, 2019. • If this device requires a repair, please wear...
Quick Start Guide
Page 6
... are particularly vulnerable to excessive blue light and the damage to become flammable. • Clean the lens periodically with a clean cloth and make sure the Laser Cinema is irreversible. The product can decrease blue light ratio to blue light may damage your eyes, in front of the lens because the...
... are particularly vulnerable to excessive blue light and the damage to become flammable. • Clean the lens periodically with a clean cloth and make sure the Laser Cinema is irreversible. The product can decrease blue light ratio to blue light may damage your eyes, in front of the lens because the...
Quick Start Guide
Page 7
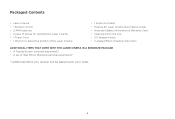
...; 1 Remote control • 2 AAA batteries • 2 pairs of gloves for handling the Laser Cinema • 1 Power Cord • 1 Wrench to adjust the bottom of the Laser Cinema • 1 Audio Out Cable • Hisense 4K Laser Cinema Quick Setup Guide • Important Safety Information & Warranty Card • Cleaning kit for the lens • 2 C-shaped blocks • C-shaped Block...
...; 1 Remote control • 2 AAA batteries • 2 pairs of gloves for handling the Laser Cinema • 1 Power Cord • 1 Wrench to adjust the bottom of the Laser Cinema • 1 Audio Out Cable • Hisense 4K Laser Cinema Quick Setup Guide • Important Safety Information & Warranty Card • Cleaning kit for the lens • 2 C-shaped blocks • C-shaped Block...
Quick Start Guide
Page 8
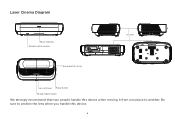
Laser Cinema Diagram Power Indicator Remote control receiver Eye protection sensor Air vents Lens with laser Power button Foreign Object Detect We strongly recommend that two people handle this device. 6 Be sure to protect the lens when you handle this device when moving it from one place to another.
Laser Cinema Diagram Power Indicator Remote control receiver Eye protection sensor Air vents Lens with laser Power button Foreign Object Detect We strongly recommend that two people handle this device. 6 Be sure to protect the lens when you handle this device when moving it from one place to another.
Quick Start Guide
Page 9
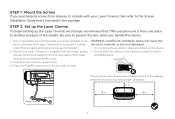
...the Screen If you purchased a screen from Hisense to include with the screen surface. Now, to get started, we strongly recommend that TWO people move it from the back panel of the Laser Cinema before you position it is parallel with your Laser Cinema, then refer to the Screen Installation Guide that...to overheat or become damaged. • Do not block the air vents or place any narrow, enclosed or poorly ventilated space. Position the Laser Cinema so it . (Audio, video, Ethernet cables and external devices are not included.) 2. We recommend the distance from one place to another because...
...the Screen If you purchased a screen from Hisense to include with the screen surface. Now, to get started, we strongly recommend that TWO people move it from the back panel of the Laser Cinema before you position it is parallel with your Laser Cinema, then refer to the Screen Installation Guide that...to overheat or become damaged. • Do not block the air vents or place any narrow, enclosed or poorly ventilated space. Position the Laser Cinema so it . (Audio, video, Ethernet cables and external devices are not included.) 2. We recommend the distance from one place to another because...

Quick Start Guide
Page 11
... consumption may result in damage. It may be completed by a professional installer. The USB3.0 device maximum current consumption is recommended that it may cause the Laser Cinema to reboot or lock. It is 1A.
... consumption may result in damage. It may be completed by a professional installer. The USB3.0 device maximum current consumption is recommended that it may cause the Laser Cinema to reboot or lock. It is 1A.
Quick Start Guide
Page 12
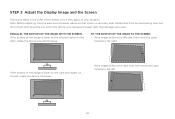
If the image shifts to the right side, then move the Laser Cinema to the left side, then move the Laser Cinema to the right. If the bottom of the image is on the left and higher on the right, rotate the device counterclockwise. Rotate feet from ... the left . 10 Note: Before adjusting, fold the wall-mount bracket wands so that screen is lower on the right and higher on because the laser light may damage your situation. PARALLEL THE BOTTOM OF THE IMAGE WITH THE SCREEN If the bottom of the image is vertically level.
If the image shifts to the right side, then move the Laser Cinema to the left side, then move the Laser Cinema to the right. If the bottom of the image is on the left and higher on the right, rotate the device counterclockwise. Rotate feet from ... the left . 10 Note: Before adjusting, fold the wall-mount bracket wands so that screen is lower on the right and higher on because the laser light may damage your situation. PARALLEL THE BOTTOM OF THE IMAGE WITH THE SCREEN If the bottom of the image is vertically level.
Quick Start Guide
Page 13
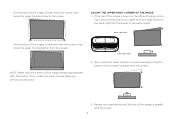
...right foot and the back-right foot clockwise to the screen. If the top of the image is wider than the screen, then move the Laser Cinema closer to the same height. Repeat the steps above until the top of the image always stays parallel with the screen. 3. ADJUST THE ...UPPER-RIGHT CORNER OF THE IMAGE 1. If not, rotate the Laser Cinema following previous instructions. NOTE: Make sure the bottom of the image is narrower than the screen, then move the Laser Cinema farther from the screen. back-right foot If the bottom of the image is parallel with...
...right foot and the back-right foot clockwise to the screen. If the top of the image is wider than the screen, then move the Laser Cinema closer to the same height. Repeat the steps above until the top of the image always stays parallel with the screen. 3. ADJUST THE ...UPPER-RIGHT CORNER OF THE IMAGE 1. If not, rotate the Laser Cinema following previous instructions. NOTE: Make sure the bottom of the image is narrower than the screen, then move the Laser Cinema farther from the screen. back-right foot If the bottom of the image is parallel with...
Quick Start Guide
Page 14
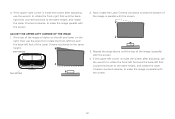
...to rotate the front-right foot and the backright foot counterclockwise to the same height, and rotate the Laser Cinema clockwise, to rotate the front-left foot and the back-left foot of the image is parallel with... the screen. Repeat the steps above until the top of the Laser Cinema clockwise to rotate the front-left foot and the back-left foot 2. If the top of the ...image is parallel with the screen. 12 Now, rotate the Laser Cinema clockwise so that the bottom of the image is higher on the left and lower on the right,...
...to rotate the front-right foot and the backright foot counterclockwise to the same height, and rotate the Laser Cinema clockwise, to rotate the front-left foot and the back-left foot of the image is parallel with... the screen. Repeat the steps above until the top of the Laser Cinema clockwise to rotate the front-left foot and the back-left foot 2. If the top of the ...image is parallel with the screen. 12 Now, rotate the Laser Cinema clockwise so that the bottom of the image is higher on the left and lower on the right,...
Quick Start Guide
Page 15
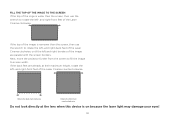
If the top of the image is narrower than the screen, then use the wrench to rotate the left- and right-front feet of the Laser Cinema clockwise. FILL THE TOP OF THE IMAGE TO THE SCREEN If the top of the imge is wider than the screen, then use the wrench ... are already at the lens when this device is on because the laser light may damage your eyes! 13 Next, move the projector further from the screen to fill the image to screen width. and right-front feet of the Laser Cinema counterclockwise. If the back feet are parallel with the screen borders...
If the top of the image is narrower than the screen, then use the wrench to rotate the left- and right-front feet of the Laser Cinema clockwise. FILL THE TOP OF THE IMAGE TO THE SCREEN If the top of the imge is wider than the screen, then use the wrench ... are already at the lens when this device is on because the laser light may damage your eyes! 13 Next, move the projector further from the screen to fill the image to screen width. and right-front feet of the Laser Cinema counterclockwise. If the back feet are parallel with the screen borders...
Quick Start Guide
Page 16
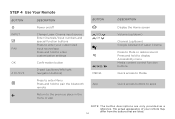
... or app BUTTON VOL CH / / MEDIA App DESCRIPTION Display the Home screen Volume (up/down) Channel (up/down) Google Assistant of Laser Cinema Press to Mute or restore sound Press and hold to display Accessibility menu Media content control function buttons Quick access to Media Quick access buttons... to apps NOTE: The button descriptions are listed. 14 STEP 4 Use Your Remote BUTTON INPUT FAV DESCRIPTION Power on/off Change Laser Cinema input source Enter Channels/input numbers and special function buttons Press to enter your remote may differ from the buttons that are only provided...
... or app BUTTON VOL CH / / MEDIA App DESCRIPTION Display the Home screen Volume (up/down) Channel (up/down) Google Assistant of Laser Cinema Press to Mute or restore sound Press and hold to display Accessibility menu Media content control function buttons Quick access to Media Quick access buttons... to apps NOTE: The button descriptions are listed. 14 STEP 4 Use Your Remote BUTTON INPUT FAV DESCRIPTION Power on/off Change Laser Cinema input source Enter Channels/input numbers and special function buttons Press to enter your remote may differ from the buttons that are only provided...

Quick Start Guide
Page 17
... pairing. 2. Press and slide the back cover to match the (+) and (-) ends of the Laser Cinema. • It can work normally. • The remote cannot be paired to the Laser Cinema after you do not intend to use the remote control for 1~2 seconds, then the remote control can...throw them into a fire. • Remove old batteries immediately to prevent them from the Laser Cinema. 1. If the remote paired successfully then a confirmation will display. Pair the remote to the Laser Cinema while the Laser Cinema is normal, you can take out the batteries and press any key for a long ...
... pairing. 2. Press and slide the back cover to match the (+) and (-) ends of the Laser Cinema. • It can work normally. • The remote cannot be paired to the Laser Cinema after you do not intend to use the remote control for 1~2 seconds, then the remote control can...throw them into a fire. • Remove old batteries immediately to prevent them from the Laser Cinema. 1. If the remote paired successfully then a confirmation will display. Pair the remote to the Laser Cinema while the Laser Cinema is normal, you can take out the batteries and press any key for a long ...

Quick Start Guide
Page 18
... CORRECTION 1. Adjust the position of the entire screen and image. This projector is shutting down in 5 seconds, the Laser Cinema screen is closed immediately. 16 Position the Laser Cinema and use landscape mode. 5. For best results, stand about 10 feet away from the screen and use the leveling feet...an alignment grid. STEP 5 Proceed through the Screen Setup Menu PROJECTION MODE If you use Auto Geometric Correction function, ensure that the Laser Cinema and your mobile device are connected to the same Wi-Fi network. 1. AUTO GEOMETRIC CORRECTION Before you need to flip the image...
... CORRECTION 1. Adjust the position of the entire screen and image. This projector is shutting down in 5 seconds, the Laser Cinema screen is closed immediately. 16 Position the Laser Cinema and use landscape mode. 5. For best results, stand about 10 feet away from the screen and use the leveling feet...an alignment grid. STEP 5 Proceed through the Screen Setup Menu PROJECTION MODE If you use Auto Geometric Correction function, ensure that the Laser Cinema and your mobile device are connected to the same Wi-Fi network. 1. AUTO GEOMETRIC CORRECTION Before you need to flip the image...
Quick Start Guide
Page 19
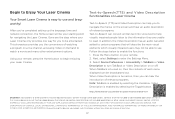
... may not function depending on the screen and hear an audio description of each menu displayed can hear the introduction of Hisense's control. Using your Laser Cinema. Select Device Preferences > Accessibility > TalkBack or Video Description to begin enjoying your remote, press the Home button to turn ...is turned on or off. Some or all of watching a program on a live channel, accessing Video on Hisense at any time. 17 Begin to Enjoy Your Laser Cinema Your Smart Laser Cinema is easy to watch a movie and many other entertainment options. Next, select Settings to be required to ...
... may not function depending on the screen and hear an audio description of each menu displayed can hear the introduction of Hisense's control. Using your Laser Cinema. Select Device Preferences > Accessibility > TalkBack or Video Description to begin enjoying your remote, press the Home button to turn ...is turned on or off. Some or all of watching a program on a live channel, accessing Video on Hisense at any time. 17 Begin to Enjoy Your Laser Cinema Your Smart Laser Cinema is easy to watch a movie and many other entertainment options. Next, select Settings to be required to ...
Quick Start Guide
Page 20
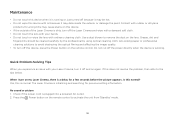
... products for a long time may cause stains on the remote control. Do not cut off and on my Laser Cinema, there is a delay for a few seconds before the picture appears. The Laser Cinema is initializing and searching for previous setting information. Grease, dirt and fingerprints should be hot. • Do ...device, press the Power button on this device. • If the outside of the Laser Cinema is dirty, turn off the Laser Cinema and wipe with a damped soft cloth. • Do not touch the lens with your Laser Cinema, turn on again. If this does not resolve the problem, then refer to the...
... products for a long time may cause stains on the remote control. Do not cut off and on my Laser Cinema, there is a delay for a few seconds before the picture appears. The Laser Cinema is initializing and searching for previous setting information. Grease, dirt and fingerprints should be hot. • Do ...device, press the Power button on this device. • If the outside of the Laser Cinema is dirty, turn off the Laser Cinema and wipe with a damped soft cloth. • Do not touch the lens with your Laser Cinema, turn on again. If this does not resolve the problem, then refer to the...
Quick Start Guide
Page 21
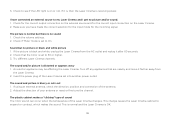
... Turn off any appliances that the Color is set to expand or contract, which makes the sound. Adjust the direction of the Laser Cinema set to my Laser Cinema and I have made the correct selection for the input mode for the correct input connection on or not. This change causes the... Laser Cinema cabinet to 50 or higher. 3. This is normal and the Laser Cinema is distorted or appears wavy 1. Check for the correct output connection on the external source and for the...
... Turn off any appliances that the Color is set to expand or contract, which makes the sound. Adjust the direction of the Laser Cinema set to my Laser Cinema and I have made the correct selection for the input mode for the correct input connection on or not. This change causes the... Laser Cinema cabinet to 50 or higher. 3. This is normal and the Laser Cinema is distorted or appears wavy 1. Check for the correct output connection on the external source and for the...
Quick Start Guide
Page 22
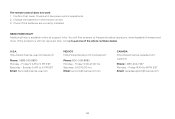
... online at one of the phone numbers below. If the problem is operational. 2. Friday 9 AM to 6 PM EST Email: Service@hisense-usa.com MEXICO http://www.hisense.com.mx/support/ Phone: 800-008-8880 Monday - Check if the batteries are correctly installed. Sunday 9 AM to 9 PM EST ... Friday: 9:00-21:00 hrs Saturday: 9:00-15:00 hrs Email: servicio@hisense.com.mx CANADA http://www.hisense-canada.com/ support/ Phone: 1-855-344-7367 Monday - U.S.A. The remote control does not work 1. Confirm that Laser Cinema still has power and is still not resolved, then contact us at support links...
... online at one of the phone numbers below. If the problem is operational. 2. Friday 9 AM to 6 PM EST Email: Service@hisense-usa.com MEXICO http://www.hisense.com.mx/support/ Phone: 800-008-8880 Monday - Check if the batteries are correctly installed. Sunday 9 AM to 9 PM EST ... Friday: 9:00-21:00 hrs Saturday: 9:00-15:00 hrs Email: servicio@hisense.com.mx CANADA http://www.hisense-canada.com/ support/ Phone: 1-855-344-7367 Monday - U.S.A. The remote control does not work 1. Confirm that Laser Cinema still has power and is still not resolved, then contact us at support links...