
Quick Start Guide
Page 1
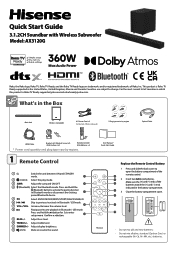
... Wireless Subwoofer AC Power Cord x 2 For Main Unit / Wireless Subwoofer For UK For AUS For US For EU * Plug type varies by region Optical Cable HDMI Cable Brackets (x2) /Bracket Screw (x2) / Wall Anchors (x2) Remote Control / AAA Batteries x 2 * Power cord quantity and plug type vary by regions. 1 Remote Control 1 Switch the unit between ON and STANDBY mode. 1 2 (SOURCE) Select the play mode. 3 SURR Adjust the surround ON/OFF. 3 4 (Bluetooth) Select the Bluetooth mode. Press and hold the button for 3s to open...
... Wireless Subwoofer AC Power Cord x 2 For Main Unit / Wireless Subwoofer For UK For AUS For US For EU * Plug type varies by region Optical Cable HDMI Cable Brackets (x2) /Bracket Screw (x2) / Wall Anchors (x2) Remote Control / AAA Batteries x 2 * Power cord quantity and plug type vary by regions. 1 Remote Control 1 Switch the unit between ON and STANDBY mode. 1 2 (SOURCE) Select the play mode. 3 SURR Adjust the surround ON/OFF. 3 4 (Bluetooth) Select the Bluetooth mode. Press and hold the button for 3s to open...
Quick Start Guide
Page 2
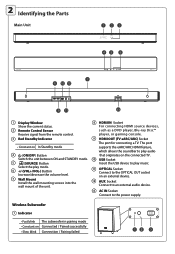
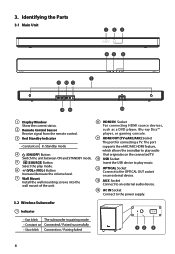
... the remote control. 3 Red Standby Indicator • Constant on In Standby mode 4 (ON/OFF) Button Switch the unit between ON and STANDBY mode. 5 (SOURCE) Button Select the play music. 11 OPTICAL Socket Connect to the OPTICAL OUT socket on an external device. 12 AUX Socket Connect to an external audio device. 13 AC IN Socket Connect to play mode. 6 +/-(VOL+/VOL-) Button Increase/decrease the volume level. 7 Wall Mount Install the wall mounting screws...
... the remote control. 3 Red Standby Indicator • Constant on In Standby mode 4 (ON/OFF) Button Switch the unit between ON and STANDBY mode. 5 (SOURCE) Button Select the play music. 11 OPTICAL Socket Connect to the OPTICAL OUT socket on an external device. 12 AUX Socket Connect to an external audio device. 13 AC IN Socket Connect to play mode. 6 +/-(VOL+/VOL-) Button Increase/decrease the volume level. 7 Wall Mount Install the wall mounting screws...

Quick Start Guide
Page 3
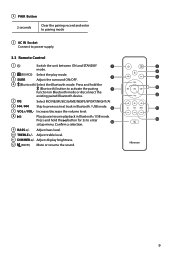
2 PAIR Button 2 seconds Clear the pairing record and enter to pairing mode 3 AC IN Socket Connect to power supply. 3 Pair up with the Subwoofer The subwoofer and soundbar will be automatically paired when they are powered on. * If no audio from the wireless subwoofer can be heard, manually pair up them. 1 2 3 Hold this button for 3 seconds For UK For EU For US For AUS
2 PAIR Button 2 seconds Clear the pairing record and enter to pairing mode 3 AC IN Socket Connect to power supply. 3 Pair up with the Subwoofer The subwoofer and soundbar will be automatically paired when they are powered on. * If no audio from the wireless subwoofer can be heard, manually pair up them. 1 2 3 Hold this button for 3 seconds For UK For EU For US For AUS

Quick Start Guide
Page 4
HDMI IN HDMI (ARCĎ 2 3 OPTICAL AUX Mode HDMI eARC HDMI ARC HDMI IN OPTICAL AUX USB No USB connected No Music Or No File Supported Bluetooth Connected Not Connected 6 Wall Mounting Mounting the Soundbar on the Wall 770 mm / 30.3" 1 2 3 AUX OPTICAL USB 5V 500mA HDMI OUT (eARC/ARC) HDMI IN 06563 Made in China 5 Select the play function ( ) Display HDMI IN HDMI OUT (eARC/ARC) USB 5V 500mA OPTICAL AUX 4 1 HDMI OUT Blu-ray Player / DVD Player / Recorder / Set-top Box...
HDMI IN HDMI (ARCĎ 2 3 OPTICAL AUX Mode HDMI eARC HDMI ARC HDMI IN OPTICAL AUX USB No USB connected No Music Or No File Supported Bluetooth Connected Not Connected 6 Wall Mounting Mounting the Soundbar on the Wall 770 mm / 30.3" 1 2 3 AUX OPTICAL USB 5V 500mA HDMI OUT (eARC/ARC) HDMI IN 06563 Made in China 5 Select the play function ( ) Display HDMI IN HDMI OUT (eARC/ARC) USB 5V 500mA OPTICAL AUX 4 1 HDMI OUT Blu-ray Player / DVD Player / Recorder / Set-top Box...
Spec Sheet
Page 1
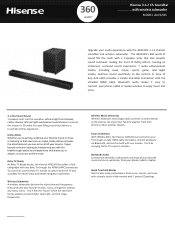
... the two frontfacing speakers project bright, clear high- Easy Connectivity With HDMI (eARC), the Hisense AX3120G can enjoy their phone or other wireless devices. Left and right front channel, center channel, left and right overhead surround channel, surround the listener in minutes. Roku TV Ready As Roku TV Ready device, the Hisense AX3120G Soundbar is fully compatible with the AX3120G 3.1.2 channel soundbar and wireless subwoofer. Bluetooth Audio Connect the AX3120G via Bluetooth, and control both the TV...
... the two frontfacing speakers project bright, clear high- Easy Connectivity With HDMI (eARC), the Hisense AX3120G can enjoy their phone or other wireless devices. Left and right front channel, center channel, left and right overhead surround channel, surround the listener in minutes. Roku TV Ready As Roku TV Ready device, the Hisense AX3120G Soundbar is fully compatible with the AX3120G 3.1.2 channel soundbar and wireless subwoofer. Bluetooth Audio Connect the AX3120G via Bluetooth, and control both the TV...
Spec Sheet
Page 2
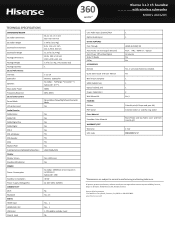
360 watts* Hisense 3.1.2 Ch Soundbar with wireless subwoofer MODEL AX3120G TECHNICAL SPECIFICATIONS DIMENSIONS/WEIGHT Soundbar Dimensions Soundbar Weight Subwoofer Dimensions Subwoofer Weight Package Dimensions Package Weight Package Quantity Sound Performance Channels Subwoofer Speakers Max Audio Power Frequency Response Sound Enhancement Sound Mode Virtual Surround Audio Decoder Dolby Atmos Dolby THD Dolby Digital Plus Dolby Digital DTS-X DTS-HD Master DTS-Decoder PCM Multich PCM FLAC/WAV/ALAC/WMA/MP3/AAC/AAC+ Display Display Screen Standby LED Indicator POWER Power Consumption Standby ...
360 watts* Hisense 3.1.2 Ch Soundbar with wireless subwoofer MODEL AX3120G TECHNICAL SPECIFICATIONS DIMENSIONS/WEIGHT Soundbar Dimensions Soundbar Weight Subwoofer Dimensions Subwoofer Weight Package Dimensions Package Weight Package Quantity Sound Performance Channels Subwoofer Speakers Max Audio Power Frequency Response Sound Enhancement Sound Mode Virtual Surround Audio Decoder Dolby Atmos Dolby THD Dolby Digital Plus Dolby Digital DTS-X DTS-HD Master DTS-Decoder PCM Multich PCM FLAC/WAV/ALAC/WMA/MP3/AAC/AAC+ Display Display Screen Standby LED Indicator POWER Power Consumption Standby ...
User Manual
Page 2
... Wireless Subwoofer...8 3.3 Remote Control ...9 4. Basic Operation ...14 6.1 Standby/On ...14 6.2 Auto-Standby / Auto-Wake Feature ...14 6.3 Select Modes ...15 6.4 Adjust the Bass/Treble Level...15 6.5 Turn the Surround Sound ON/OFF...15 6.6 Adjust the Soundbar's Volume ...15 6.7 Adjust the Brightness ...15 6.8 Select Equalizer (EQ) E ect ...15 6.9 Set the Audio Delay (AV SYNC)...15 7. What's in the Box ...7 3. Preparations ...10 4.1 Prepare the Remote Control ...10 4.2 Replace the Remote Control Battery ...10 4.3 Placement and Mounting ...10 4.4 Mounting the Soundbar on the Wall...
... Wireless Subwoofer...8 3.3 Remote Control ...9 4. Basic Operation ...14 6.1 Standby/On ...14 6.2 Auto-Standby / Auto-Wake Feature ...14 6.3 Select Modes ...15 6.4 Adjust the Bass/Treble Level...15 6.5 Turn the Surround Sound ON/OFF...15 6.6 Adjust the Soundbar's Volume ...15 6.7 Adjust the Brightness ...15 6.8 Select Equalizer (EQ) E ect ...15 6.9 Set the Audio Delay (AV SYNC)...15 7. What's in the Box ...7 3. Preparations ...10 4.1 Prepare the Remote Control ...10 4.2 Replace the Remote Control Battery ...10 4.3 Placement and Mounting ...10 4.4 Mounting the Soundbar on the Wall...
User Manual
Page 3
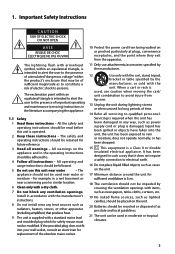
..., stand, tripod, bracket or table speci ed by covering the ventilation openings with the unit. All warnings on the unit. 20 Batteries should not be used in the literature accompanying the appliance. 1.1 Safety 1 Read these instructions - Install in the operating instructions should be adhered to personnel. The safety and operating instructions should be retained for replacement of time. 14 Refer all servicing to...
..., stand, tripod, bracket or table speci ed by covering the ventilation openings with the unit. All warnings on the unit. 20 Batteries should not be used in the literature accompanying the appliance. 1.1 Safety 1 Read these instructions - Install in the operating instructions should be adhered to personnel. The safety and operating instructions should be retained for replacement of time. 14 Refer all servicing to...

User Manual
Page 4
... cloth. • When removing the power plug from the wall outlet, always pull directly on the plug, never yank on the cord. • Changes or ations to operate the equipment. • The rating label is not used device, please use of material resources. The unit...Hisense is incorrectly replaced. as marked on the or receiver. • If any use the return and collection systems or contact the retailer where the product was purchased. All rights reserved. 4 Caution: - Replace only with the same or equivalent type. 1.2 Warning • The battery (batteries or battery...
... cloth. • When removing the power plug from the wall outlet, always pull directly on the plug, never yank on the cord. • Changes or ations to operate the equipment. • The rating label is not used device, please use of material resources. The unit...Hisense is incorrectly replaced. as marked on the or receiver. • If any use the return and collection systems or contact the retailer where the product was purchased. All rights reserved. 4 Caution: - Replace only with the same or equivalent type. 1.2 Warning • The battery (batteries or battery...
User Manual
Page 8
... current status. 2 Remote Control Sensor Receive signal from the remote control. 3 Red Standby Indicator • Constant on In Standby mode 4 (ON/OFF) Button Switch the unit between ON and STANDBY mode. 5 (SOURCE) Button Select the play music. 11 OPTICAL Socket Connect to the OPTICAL OUT socket on an external device. 12 AUX Socket Connect to an external audio device. 13 AC IN Socket Connect to the power supply. 3.2 Wireless Subwoofer 1 Indicator •...
... current status. 2 Remote Control Sensor Receive signal from the remote control. 3 Red Standby Indicator • Constant on In Standby mode 4 (ON/OFF) Button Switch the unit between ON and STANDBY mode. 5 (SOURCE) Button Select the play music. 11 OPTICAL Socket Connect to the OPTICAL OUT socket on an external device. 12 AUX Socket Connect to an external audio device. 13 AC IN Socket Connect to the power supply. 3.2 Wireless Subwoofer 1 Indicator •...
User Manual
Page 9
... level. 11 DIMMER+/- Increase/decrease the volume level. 8 Play/pause/resume playback in Bluetooth / USB mode. 9 11 7 VOL+/VOL- Press and hold the button for 3s to power supply. 3.3 Remote Control 1 Switch the unit between ON and STANDBY 1 2 mode. 4 2 (SOURCE) Select the play mode. 3 5 3 SURR Adjust the surround ON/OFF. 4 (Bluetooth) Select the Bluetooth mode. 2 PAIR Button 2 seconds Clear the pairing record and enter to pairing mode 3 AC IN Socket Connect to enter 12 10 9 BASS+/- Adjust bass level...
... level. 11 DIMMER+/- Increase/decrease the volume level. 8 Play/pause/resume playback in Bluetooth / USB mode. 9 11 7 VOL+/VOL- Press and hold the button for 3s to power supply. 3.3 Remote Control 1 Switch the unit between ON and STANDBY 1 2 mode. 4 2 (SOURCE) Select the play mode. 3 5 3 SURR Adjust the surround ON/OFF. 4 (Bluetooth) Select the Bluetooth mode. 2 PAIR Button 2 seconds Clear the pairing record and enter to pairing mode 3 AC IN Socket Connect to enter 12 10 9 BASS+/- Adjust bass level...
User Manual
Page 10
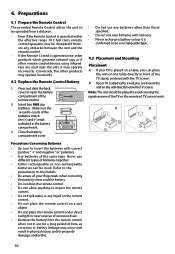
... operate incorrectly. 4.2 Replace the Remote Control Battery 1 Press and slide the back cover to avoid covering the signal receiver of the TV or the remote of the remote control. 2 Insert two AAA size batteries . 4. A B • Either rechargeable or non-rechargeable batteries can be placed to open the battery compartment of TV can place the unit on a wet object. • Do not place the remote control under direct...
... operate incorrectly. 4.2 Replace the Remote Control Battery 1 Press and slide the back cover to avoid covering the signal receiver of the TV or the remote of the remote control. 2 Insert two AAA size batteries . 4. A B • Either rechargeable or non-rechargeable batteries can be placed to open the battery compartment of TV can place the unit on a wet object. • Do not place the remote control under direct...
User Manual
Page 12
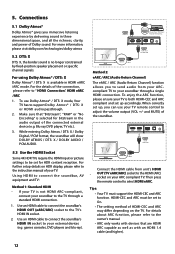
... in HDMI eARC /ARC mode. Use an HDMI cable to connect the soundbar's HDMI IN socket to the owner's manual. • ARC only works with devices that "Bitstream", "RAW" or "No Encoding" is no longer constrained by delivering sound in the audio output of Dolby sound. For details about ARC function, please refer to your soundbar to " HDMI Connection". 5. For using Dolby Atmos® / DTS...
... in HDMI eARC /ARC mode. Use an HDMI cable to connect the soundbar's HDMI IN socket to the owner's manual. • ARC only works with devices that "Bitstream", "RAW" or "No Encoding" is no longer constrained by delivering sound in the audio output of Dolby sound. For details about ARC function, please refer to your soundbar to " HDMI Connection". 5. For using Dolby Atmos® / DTS...
User Manual
Page 13
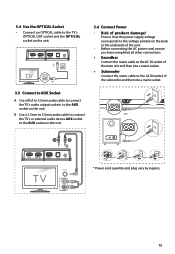
... 5.6 Connect Power • Risk of the subwoofer and then into a mains socket. 5.5 Connect to AUX Socket A Use a RCA to 3.5mm audio cable to connect the TV's audio output sockets to the AC IN socket of product damage! A B HDMI IN HDMI OUT (eARC/ARC) USB 5V 500mA OPTICAL AUX AUX For UK For EU For US For AUS * Power cord quantity and plug vary...
... 5.6 Connect Power • Risk of the subwoofer and then into a mains socket. 5.5 Connect to AUX Socket A Use a RCA to 3.5mm audio cable to connect the TV's audio output sockets to the AC IN socket of product damage! A B HDMI IN HDMI OUT (eARC/ARC) USB 5V 500mA OPTICAL AUX AUX For UK For EU For US For AUS * Power cord quantity and plug vary...

User Manual
Page 14
..., pair the subwoofer with the main unit manually. Ensure that all cables are plugged into the mains sockets of the soundbar in an open the menu. • If the wireless connection fails again, check - Basic Operation 6.1 Standby/On socket, the main unit will be in succession, con icts or strong interferences and repeat the display shows: Auto Standby [ON / OFF]. will enter the pairing mode...
..., pair the subwoofer with the main unit manually. Ensure that all cables are plugged into the mains sockets of the soundbar in an open the menu. • If the wireless connection fails again, check - Basic Operation 6.1 Standby/On socket, the main unit will be in succession, con icts or strong interferences and repeat the display shows: Auto Standby [ON / OFF]. will enter the pairing mode...

User Manual
Page 15
... display. buttons on the remote control to adjust treble level (treble +5 / treble -5). 6.5 Turn the Surround Sound ON/OFF • Press the SURR button on the remote control to select the BT (Bluetooth) mode. • The selected mode will show on the remote control. Press this delay. • Set the audio delay, provided only for digital audio (eg, HDMI IN, HDMI ARC, HDMI eARC, OPTICAL). 6.6 Adjust the Soundbar's Volume • Press the...
... display. buttons on the remote control to adjust treble level (treble +5 / treble -5). 6.5 Turn the Surround Sound ON/OFF • Press the SURR button on the remote control to select the BT (Bluetooth) mode. • The selected mode will show on the remote control. Press this delay. • Set the audio delay, provided only for digital audio (eg, HDMI IN, HDMI ARC, HDMI eARC, OPTICAL). 6.6 Adjust the Soundbar's Volume • Press the...

User Manual
Page 16
...-X 3 Operate your desired level. 16 Ensure that the unit is NOT a defect. unit will scroll "MENU". During ON mode, pointing the remote at the soundbar, press and hold the button for its audio setting details) with virtual multi-channel virtual surround e ects, creating an immersive audio volume. - The unit's display will display the following as follows: Input Format PCM Dolby Digital Dolby Digital Plus...
...-X 3 Operate your desired level. 16 Ensure that the unit is NOT a defect. unit will scroll "MENU". During ON mode, pointing the remote at the soundbar, press and hold the button for its audio setting details) with virtual multi-channel virtual surround e ects, creating an immersive audio volume. - The unit's display will display the following as follows: Input Format PCM Dolby Digital Dolby Digital Plus...
User Manual
Page 17
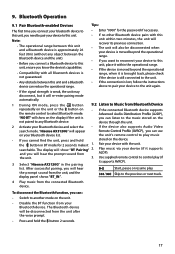
... the unit. 2 Activate your Bluetooth device. "NO BT" will hear the prompt sound from Bluetooth Device - the button in the pairing list. Note: - Compatibility with this unit. the unit's remote control to pair your device (if it supports AVRCP). 3 Select "Hisense AX3120G" in BT mode for the password if necessary. • If no other Bluetooth device pairs with all Bluetooth devices is moved beyond the operational range. • If...
... the unit. 2 Activate your Bluetooth device. "NO BT" will hear the prompt sound from Bluetooth Device - the button in the pairing list. Note: - Compatibility with this unit. the unit's remote control to pair your device (if it supports AVRCP). 3 Select "Hisense AX3120G" in BT mode for the password if necessary. • If no other Bluetooth device pairs with all Bluetooth devices is moved beyond the operational range. • If...
User Manual
Page 18
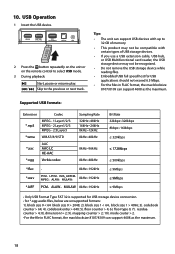
... the button repeatedly on the unit or on the remote control to select USB mode. 3 During playback: Start, pause or resume play. / Skip to 32 GB of memory. • This product may not be compatible with certain types of USB storage devices. • If you use a USB extension cable, USB hub, or USB Multifunctional card reader, the USB...
... the button repeatedly on the unit or on the remote control to select USB mode. 3 During playback: Start, pause or resume play. / Skip to 32 GB of memory. • This product may not be compatible with certain types of USB storage devices. • If you use a USB extension cable, USB hub, or USB Multifunctional card reader, the USB...
User Manual
Page 19
... polarities (+/-) aligned as indicated. • Replace the battery. • Aim the remote control directly at the AC outlet. • Press standby button to turn the unit on the remote control to switch the soundbar to PCM or Dolby Digital mode while using this case, the unit will automatically exit the menu. HDMI, OPTICAL,)connection. • The subwoofer is out of the settings with / buttons. 3. Select the content...
... polarities (+/-) aligned as indicated. • Replace the battery. • Aim the remote control directly at the AC outlet. • Press standby button to turn the unit on the remote control to switch the soundbar to PCM or Dolby Digital mode while using this case, the unit will automatically exit the menu. HDMI, OPTICAL,)connection. • The subwoofer is out of the settings with / buttons. 3. Select the content...
