

Owners Guide
Page 1
... OEMN01145 © Hitachi, Ltd. 1996 Malaysia Printed in 1 TABLE OF CONTENTS 1HITACHI TV/VCR Combination 13VR10B Owner's Manual Your Complete Guide to TV/VCR Combination Viewing and Recording This TV/VCR Combination will display television closed captioning ( or ), in accordance with direct station call Closed caption system Game mode Auto power on and off system Auto rewind when the end of a tape is reached 2 Step picture search operation CM...
... OEMN01145 © Hitachi, Ltd. 1996 Malaysia Printed in 1 TABLE OF CONTENTS 1HITACHI TV/VCR Combination 13VR10B Owner's Manual Your Complete Guide to TV/VCR Combination Viewing and Recording This TV/VCR Combination will display television closed captioning ( or ), in accordance with direct station call Closed caption system Game mode Auto power on and off system Auto rewind when the end of a tape is reached 2 Step picture search operation CM...
Owners Guide
Page 2
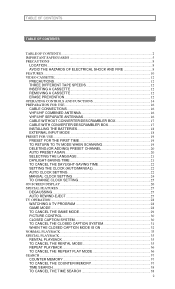
... CONTROLS AND FUNCTIONS 14 PREPARATION FOR USE...16 CABLE CONNECTIONS 16 VHF/UHF COMBINED ANTENNA 16 VHF/UHF SEPARATE ANTENNAS 16 CABLE WITHOUT CONVERTER/DESCRAMBLER BOX 17 CABLE WITH CONVERTER/DESCRAMBLER BOX 17 INSTALLING THE BATTERIES 18 EXTERNAL INPUT MODE 18 PRESET FOR USE ...19 PRESET FOR THE FIRST TIME 19 TO RETURN TO TV MODE WHEN SCANNING 19 DELETING (OR ADDING) PRESET CHANNEL 20 AUTO PRESET AGAIN 20 SELECTING...
... CONTROLS AND FUNCTIONS 14 PREPARATION FOR USE...16 CABLE CONNECTIONS 16 VHF/UHF COMBINED ANTENNA 16 VHF/UHF SEPARATE ANTENNAS 16 CABLE WITHOUT CONVERTER/DESCRAMBLER BOX 17 CABLE WITH CONVERTER/DESCRAMBLER BOX 17 INSTALLING THE BATTERIES 18 EXTERNAL INPUT MODE 18 PRESET FOR USE ...19 PRESET FOR THE FIRST TIME 19 TO RETURN TO TV MODE WHEN SCANNING 19 DELETING (OR ADDING) PRESET CHANNEL 20 AUTO PRESET AGAIN 20 SELECTING...
Owners Guide
Page 3
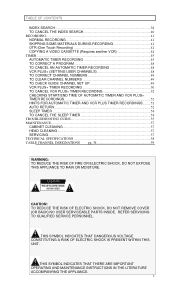
... CHECK GUIDE CHANNEL SET UP 49 VCR PLUS+ TIMER RECORDING 50 TO CANCEL VCR PLUS+ TIMER RECORDING 52 CHECKING START/END TIME OF AUTOMATIC TIMER AND VCR PLUS+ TIMER RECORDINGS ...52 HINTS FOR AUTOMATIC TIMER AND VCR PLUS TIMER RECORDINGS......... 52 AUTO RETURN...52 SLEEP TIMER ...54 TO CANCEL THE SLEEP TIMER 54 TROUBLESHOOTING GUIDE 55 MAINTENANCE...57 CABINET CLEANING ...57 HEAD CLEANING ...57 SERVICING...57 TECHNICAL SPECIFICATIONS 58 CABLE CHANNEL...
... CHECK GUIDE CHANNEL SET UP 49 VCR PLUS+ TIMER RECORDING 50 TO CANCEL VCR PLUS+ TIMER RECORDING 52 CHECKING START/END TIME OF AUTOMATIC TIMER AND VCR PLUS+ TIMER RECORDINGS ...52 HINTS FOR AUTOMATIC TIMER AND VCR PLUS TIMER RECORDINGS......... 52 AUTO RETURN...52 SLEEP TIMER ...54 TO CANCEL THE SLEEP TIMER 54 TROUBLESHOOTING GUIDE 55 MAINTENANCE...57 CABINET CLEANING ...57 HEAD CLEANING ...57 SERVICING...57 TECHNICAL SPECIFICATIONS 58 CABLE CHANNEL...
Owners Guide
Page 9
... limits are expressly approved in a TV/VCR which the receiver is connected. 4) Consult the dealer or an experienced radio/TV technician for help. However, there is no responsibility for the unauthorized duplication, use of broadcast television programming, video tape, film or other acts which can radiate radio frequency energy and, if not installed and used in case of theft. IMPORTANT COPYRIGHT...
... limits are expressly approved in a TV/VCR which the receiver is connected. 4) Consult the dealer or an experienced radio/TV technician for help. However, there is no responsibility for the unauthorized duplication, use of broadcast television programming, video tape, film or other acts which can radiate radio frequency energy and, if not installed and used in case of theft. IMPORTANT COPYRIGHT...

Owners Guide
Page 10
... cable channels.) • Closed caption system - Allows you to skip. • Index search - Lets you to the program. • Game mode - You can view a video program at any time, for use with a TV game. • Auto power on screen menu display selectable in LP and SLP mode. • CM skip - Allows you Index the start of a recorded television program during playback. • Still - Allows you to set the TV/VCR...
... cable channels.) • Closed caption system - Allows you to skip. • Index search - Lets you to the program. • Game mode - You can view a video program at any time, for use with a TV game. • Auto power on screen menu display selectable in LP and SLP mode. • CM skip - Allows you Index the start of a recorded television program during playback. • Still - Allows you to set the TV/VCR...

Owners Guide
Page 11
... of the recorded program(s) can program the timer for automatic recording using the POWER button after a desired time period. • Auto clock setting - Allows you to 480 minutes is finished, the beginning of the tape. • VCR plus+ - Instant timed recording from 30 to turn off the TV/VCR without using the VCR Plus+ numbers that are printed in most newspaper TV listings and TV Guide> • Auto...
... of the recorded program(s) can program the timer for automatic recording using the POWER button after a desired time period. • Auto clock setting - Allows you to 480 minutes is finished, the beginning of the tape. • VCR plus+ - Instant timed recording from 30 to turn off the TV/VCR without using the VCR Plus+ numbers that are printed in most newspaper TV listings and TV Guide> • Auto...

Owners Guide
Page 14
... the Play mode. (See page 19.) REAR VIEW illustration 13 EARPHONE jack - Lights up in the Stop mode to turn TV/VCR on screen) during recording. PICTURE CONTROL function - Connect to select desired channels for Timer Recording. 4 Remote sensor window - Press to remove a tape frm the TV/VCR. 16 MUTE button - Press in the Stand-by mode for viewing or recording. Press to mute sound. Press to activate One Touch Recording. (used to select the channel...
... the Play mode. (See page 19.) REAR VIEW illustration 13 EARPHONE jack - Lights up in the Stop mode to turn TV/VCR on screen) during recording. PICTURE CONTROL function - Connect to select desired channels for Timer Recording. 4 Remote sensor window - Press to remove a tape frm the TV/VCR. 16 MUTE button - Press in the Stand-by mode for viewing or recording. Press to mute sound. Press to activate One Touch Recording. (used to select the channel...

Owners Guide
Page 17
... a converter box. This means that provides guidelines for Automatic Timer Recording. CH3) 2. Select the channel to be connected to Article 820-40 of the NEC that channels cannot be made with a converter box you can use your TV/VCR Remote Control to the poing of the Cable Converter Box. (Ex. PREPARATION FOR USE CABLE WITHOUT CONVERTER/DESCRAMBLER BOX Use this connection if your cable system connects direcly to one channel at a time. CABLE WITH CONVERTER/DESCRAMBLER BOX If your cable service supplies...
... a converter box. This means that provides guidelines for Automatic Timer Recording. CH3) 2. Select the channel to be connected to Article 820-40 of the NEC that channels cannot be made with a converter box you can use your TV/VCR Remote Control to the poing of the Cable Converter Box. (Ex. PREPARATION FOR USE CABLE WITHOUT CONVERTER/DESCRAMBLER BOX Use this connection if your cable system connects direcly to one channel at a time. CABLE WITH CONVERTER/DESCRAMBLER BOX If your cable service supplies...

Owners Guide
Page 18
Then press CHANNEL / button or enter "00" with number button so that "AUX" appears on the remote unit in the direction of your TV/VCR. PREPARATION FOR USE INSTALLING THE BATTERIES 1) Open the battery compartment cover by pressing the cover on the screen. 18 EXTERNAL INPUT MODE When using an external input signal (another VCR or camcorder), connect the player's audio/video output cables to the AUDIO IN, VIDEO IN jacks of the arrow. 2) Insert 2 "AA" penlight batteries into the battery compartment in the direction indicated by the polarity (+/-) markings. 3) Replace the cover.
Then press CHANNEL / button or enter "00" with number button so that "AUX" appears on the remote unit in the direction of your TV/VCR. PREPARATION FOR USE INSTALLING THE BATTERIES 1) Open the battery compartment cover by pressing the cover on the screen. 18 EXTERNAL INPUT MODE When using an external input signal (another VCR or camcorder), connect the player's audio/video output cables to the AUDIO IN, VIDEO IN jacks of the arrow. 2) Insert 2 "AA" penlight batteries into the battery compartment in the direction indicated by the polarity (+/-) markings. 3) Replace the cover.
Owners Guide
Page 20
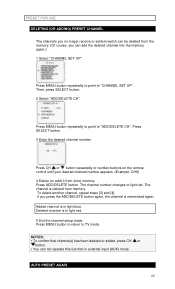
... channel number changes to "ADD/DELETE CH". If you can add the deleted channel into ) memory Press ADD/DELETE button. Deleted channel is memorized again. Press MENU button repeatedly to point to light red. Press SELECT button. 3 Enter the desired channel number Press CH or button repeatedly or number buttons on the remote control until your desired channel number appears. (Example: CH8) 4 Delete (or add) it from (into the memory again.) 1 Select "CHANNEL SET...
... channel number changes to "ADD/DELETE CH". If you can add the deleted channel into ) memory Press ADD/DELETE button. Deleted channel is memorized again. Press MENU button repeatedly to point to light red. Press SELECT button. 3 Enter the desired channel number Press CH or button repeatedly or number buttons on the remote control until your desired channel number appears. (Example: CH8) 4 Delete (or add) it from (into the memory again.) 1 Select "CHANNEL SET...
Owners Guide
Page 22
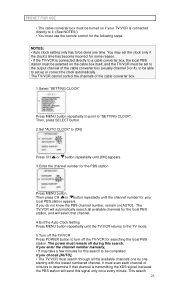
... using a new service called Extended Data Service (XDS). Then, press CH or button until the TV/VCR return to turn on the TV/VCR. • You must use the remote control for proper automatic timer recording. AUTO CLOCK SETTING You can have set the clock automatically by the PBS station in your area, using the Public Broadcasting Station (PBS) channel in your area. Make sure... • Press POWER button to "SETTING...
... using a new service called Extended Data Service (XDS). Then, press CH or button until the TV/VCR return to turn on the TV/VCR. • You must use the remote control for proper automatic timer recording. AUTO CLOCK SETTING You can have set the clock automatically by the PBS station in your area, using the Public Broadcasting Station (PBS) channel in your area. Make sure... • Press POWER button to "SETTING...
Owners Guide
Page 23
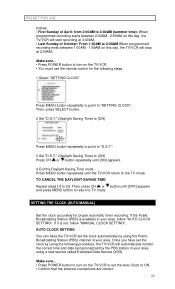
... must use the remote control for your TV/VCR is connected directly to be done one , starting with the lowest numbered channel. Then press CH or button repeatedly until the channel number for the following steps. The power must remain off the TV/VCR for this search to "SETTING CLOCK". PRESET FOR USE • The cable converter box must be turned on if your local PBS station appears. Then, press SELECT button. 2 Set...
... must use the remote control for your TV/VCR is connected directly to be done one , starting with the lowest numbered channel. Then press CH or button repeatedly until the channel number for the following steps. The power must remain off the TV/VCR for this search to "SETTING CLOCK". PRESET FOR USE • The cable converter box must be turned on if your local PBS station appears. Then, press SELECT button. 2 Set...
Owners Guide
Page 24
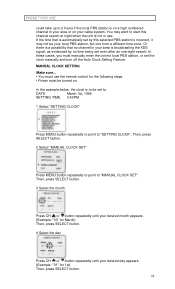
... station is broadcasting the XDS signal, as evidenced by no channel in your area or on a high numbered channel in your cable system. If the time that no time being set to: DATE March 1st, 1996 SETTING TIME 5:40PM 1 Select "SETTING CLOCK" Press MENU button repeatedly to point to "MANUAL CLOCK SET". MANUAL CLOCK SETTING Make sure... • You must use . Or there is a possibility that...
... station is broadcasting the XDS signal, as evidenced by no channel in your area or on a high numbered channel in your cable system. If the time that no time being set to: DATE March 1st, 1996 SETTING TIME 5:40PM 1 Select "SETTING CLOCK" Press MENU button repeatedly to point to "MANUAL CLOCK SET". MANUAL CLOCK SETTING Make sure... • You must use . Or there is a possibility that...

Owners Guide
Page 31
... the caption setting mode Press MENU button repeatedly until the TV/VCR returns to TV mode. 31 TEXT mode: You may get these captions or text information by choosing the text mode. 1/2: You may watch dramas, movies and news etc. To clear screen, select [CAPTION1], [CAPTION2] or [OFF]. with closed captions from high quality antenna, cable and VCR signals. Your television is set to result in caption errors or no captions at all programs are broadcast...
... the caption setting mode Press MENU button repeatedly until the TV/VCR returns to TV mode. 31 TEXT mode: You may get these captions or text information by choosing the text mode. 1/2: You may watch dramas, movies and news etc. To clear screen, select [CAPTION1], [CAPTION2] or [OFF]. with closed captions from high quality antenna, cable and VCR signals. Your television is set to result in caption errors or no captions at all programs are broadcast...

Owners Guide
Page 35
... SPECIAL PLAYBACK Make sure... • You must use the remote control for the following steps. • Power must be turned on. • Insert a prerecorded tape. • Before playback, follow step [2] but select [OFF]. RENTAL PLAYBACK This function enables you turn off the TV/VCR. Then, press SELECT button. 2 Set "RENTAL" to [ON] Press MENU button to point to "USER'S SET UP". Then, follow steps below. Press...
... SPECIAL PLAYBACK Make sure... • You must use the remote control for the following steps. • Power must be turned on. • Insert a prerecorded tape. • Before playback, follow step [2] but select [OFF]. RENTAL PLAYBACK This function enables you turn off the TV/VCR. Then, press SELECT button. 2 Set "RENTAL" to [ON] Press MENU button to point to "USER'S SET UP". Then, follow steps below. Press...

Owners Guide
Page 47
...) Press SELECT button. 7 Set end minute Press CH or button repeatedly until your desired minute appears. (Example: "50" for 8:50PM) Press SELECT button. 8 Set the channel number Press CH or button repeatedly until your desired channel number appears. (Example: CH61) Press SELECT button. 9 Set the tape speed Press CH or button repeatedly until your desired tape speed appears. (Example: LP) Press SELECT button. 10 Exit the program mode Press SELECT button. Program 4 is...
...) Press SELECT button. 7 Set end minute Press CH or button repeatedly until your desired minute appears. (Example: "50" for 8:50PM) Press SELECT button. 8 Set the channel number Press CH or button repeatedly until your desired channel number appears. (Example: CH61) Press SELECT button. 9 Set the tape speed Press CH or button repeatedly until your desired tape speed appears. (Example: LP) Press SELECT button. 10 Exit the program mode Press SELECT button. Program 4 is...

Owners Guide
Page 48
... POWER button. 2) Repeat steps [1] ~ [2] and select a program number you to memorize user channels to guide channels according to set automatic timer recording. The REC indicator lights up. • You must use the remote control for you want to the TV mode. TO CORRECT A PROGRAM • While setting a program; NOTE: You must turn off and you continue watching TV, "TIMER REC STANDBY" starts flashing on the TV/VCR. Press MENU button to return to correct flashes, then make changes...
... POWER button. 2) Repeat steps [1] ~ [2] and select a program number you to memorize user channels to guide channels according to set automatic timer recording. The REC indicator lights up. • You must use the remote control for you want to the TV mode. TO CORRECT A PROGRAM • While setting a program; NOTE: You must turn off and you continue watching TV, "TIMER REC STANDBY" starts flashing on the TV/VCR. Press MENU button to return to correct flashes, then make changes...

Owners Guide
Page 49
...SET UP" list appears on the TV screen, press SELECT button repeatedly to change the displayed page. 4 Select a user channel number (USER) Press CH or button repeatedly until your desired user channel number appears. (Example: user channel 26) To set another, repeat steps [3] and [4]. 5 Exit the guide channel set up mode Press MENU button. Press SELECT button. 3 Select a guide channel number (GUIDE) that "- -" appears. 4) Press MENU button to return to the TV mode. TO CLEAR CHANNEL NUMBERS 1) Follow steps [1] and [2]. 2) Select a guide channel number using CH or button. 4) Press MENU button...
...SET UP" list appears on the TV screen, press SELECT button repeatedly to change the displayed page. 4 Select a user channel number (USER) Press CH or button repeatedly until your desired user channel number appears. (Example: user channel 26) To set another, repeat steps [3] and [4]. 5 Exit the guide channel set up mode Press MENU button. Press SELECT button. 3 Select a guide channel number (GUIDE) that "- -" appears. 4) Press MENU button to return to the TV mode. TO CLEAR CHANNEL NUMBERS 1) Follow steps [1] and [2]. 2) Select a guide channel number using CH or button. 4) Press MENU button...
Owners Guide
Page 50
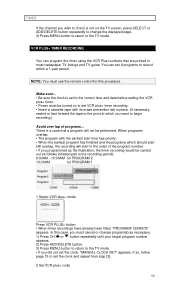
... carried out as necessary. 1) Press CH or button repeatedly until your target program number appears. 2) Press ADD/DELETE button. 3) Press MENU button to return to the TV mode. • If you must use the remote control for PROGRAM 1 1 Select VCR plus+ mode Press VCR PLUS+ button. • When timer recordings have already been filled, "PROGRAM 12345678" appears. VCR PLUS+ TIMER RECORDING You can set the clock and repeat from step [3]. 2 Set VCR plus+ code 50
... carried out as necessary. 1) Press CH or button repeatedly until your target program number appears. 2) Press ADD/DELETE button. 3) Press MENU button to return to the TV mode. • If you must use the remote control for PROGRAM 1 1 Select VCR plus+ mode Press VCR PLUS+ button. • When timer recordings have already been filled, "PROGRAM 12345678" appears. VCR PLUS+ TIMER RECORDING You can set the clock and repeat from step [3]. 2 Set VCR plus+ code 50

Owners Guide
Page 55
... Record mode. Make sure the AC cord is not set to an ac outlet. The timer recording is connect to OFF. Picture control is necessary, consult the nearest Service center. Check the batteries. No power to remedy the problem. Head cleaning is not adequate. My TV/VCR will not show the text in the ON position. Video heads are watching a live broadcasts. CLOSED CAPTION PROBLEM POSSIBLE...
... Record mode. Make sure the AC cord is not set to an ac outlet. The timer recording is connect to OFF. Picture control is necessary, consult the nearest Service center. Check the batteries. No power to remedy the problem. Head cleaning is not adequate. My TV/VCR will not show the text in the ON position. Video heads are watching a live broadcasts. CLOSED CAPTION PROBLEM POSSIBLE...


