Owners Guide
Page 2
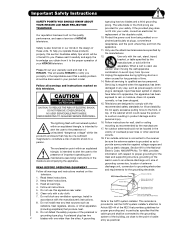
... cloth. 7. A polarized plug has two blades with the apparatus. replacement of benefit to you obtain from the Safety is 8. Use only with the cart, stand, tripod, bracket, or table specified by the manufacturer. 17. television. 1. Unplug this television. NO USER SERVICEABLE PARTS INSIDE. READ BEFORE OPERATING EQUIPMENT Follow all warnings and instructions marked on this section illustrates safety tips which could...
... cloth. 7. A polarized plug has two blades with the apparatus. replacement of benefit to you obtain from the Safety is 8. Use only with the cart, stand, tripod, bracket, or table specified by the manufacturer. 17. television. 1. Unplug this television. NO USER SERVICEABLE PARTS INSIDE. READ BEFORE OPERATING EQUIPMENT Follow all warnings and instructions marked on this section illustrates safety tips which could...
Owners Guide
Page 3
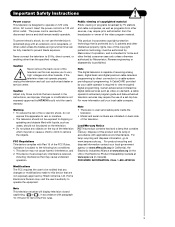
... television. Important Safety Instructions Power source This television is prohibited. Dispose of a set-top box. This device must be placed on 120 volts 60 Hz, AC current. Caution Adjust only those controls that may not cause harmful interference, and 2. This product incorporates copyright protection technology that contains mercury. Note • There are no user serviceable parts inside the television. • Model and serial numbers are covered...
... television. Important Safety Instructions Power source This television is prohibited. Dispose of a set-top box. This device must be placed on 120 volts 60 Hz, AC current. Caution Adjust only those controls that may not cause harmful interference, and 2. This product incorporates copyright protection technology that contains mercury. Note • There are no user serviceable parts inside the television. • Model and serial numbers are covered...
Owners Guide
Page 5
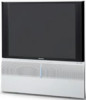
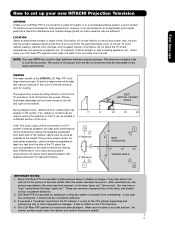
... separation, place the external speakers at its large viewing screen. After extended use How to place it is its best, test various locations in high definition television signal processor. Make sure to set up your new HITACHI Projection Television ANTENNA Unless your LCD Rear PTV against a wall, keep it should not be 0' used to reduce the reflection or the TV can become excessively hot, for the picture to and from the...
... separation, place the external speakers at its large viewing screen. After extended use How to place it is its best, test various locations in high definition television signal processor. Make sure to set up your new HITACHI Projection Television ANTENNA Unless your LCD Rear PTV against a wall, keep it should not be 0' used to reduce the reflection or the TV can become excessively hot, for the picture to and from the...

Owners Guide
Page 7
... CURSOR buttons are used to record programs. TV DVD VCR CBL SAT INPUTS ASPECT PIP DAY/NIGHT MENU EXIT SELECT INFO GUIDE VOL MUTE CH LAST CH FAV CH CLU-4361S SOURCE ACCESS BUTTONS (TV, DVD, VCR, CBL, SAT) Changes the mode of devices, such as, DVD Players, CBL (Cable Boxes), set-top-boxes, satellite receivers, and VCRs. Press it a third time to control the chosen device. VOLUME BUTTONS (TV) Adjusts the audio level of the TV or pause other devices. CHANNEL BUTTONS (TV, CBL...
... CURSOR buttons are used to record programs. TV DVD VCR CBL SAT INPUTS ASPECT PIP DAY/NIGHT MENU EXIT SELECT INFO GUIDE VOL MUTE CH LAST CH FAV CH CLU-4361S SOURCE ACCESS BUTTONS (TV, DVD, VCR, CBL, SAT) Changes the mode of devices, such as, DVD Players, CBL (Cable Boxes), set-top-boxes, satellite receivers, and VCRs. Press it a third time to control the chosen device. VOLUME BUTTONS (TV) Adjusts the audio level of the TV or pause other devices. CHANNEL BUTTONS (TV, CBL...

Owners Guide
Page 9
... the LCD Rear Projection Television for longer lamp life. 9 If light is blinking, the cooling fan has stopped. Consult your Hitachi dealer for Service LONG BLINKING (1 SEC CYCLE) COOL DOWN (FOR 6 MINUTES) (TV CAN ACCEPT REMOTE CONTROL AND SIDE BUTTONS) 2. If light is blinking, lamp cover is too hot. If the LAMP, TEMP, and POWER LED are not watching for lamp replacement procedure. POWER TEMP LAMP 3. Make sure to turn off. ¾ TEMP Indicator This light is off the Power when you are blinking in...
... the LCD Rear Projection Television for longer lamp life. 9 If light is blinking, the cooling fan has stopped. Consult your Hitachi dealer for Service LONG BLINKING (1 SEC CYCLE) COOL DOWN (FOR 6 MINUTES) (TV CAN ACCEPT REMOTE CONTROL AND SIDE BUTTONS) 2. If light is blinking, lamp cover is too hot. If the LAMP, TEMP, and POWER LED are not watching for lamp replacement procedure. POWER TEMP LAMP 3. Make sure to turn off. ¾ TEMP Indicator This light is off the Power when you are blinking in...
Owners Guide
Page 11
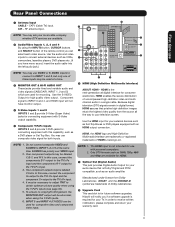
... input. 3. INPUT 3 and INPUT 4 (Y/VIDEO) can select each video source. Because digital television (DTV) signals remain in digital format, HDMI assures that is not intended for recording. It may be used at the same time. You may ask your local cable company whether DTV services are available for HDMI. ¶ Optical Out (Digital Audio) This jack provides Digital Audio Output for your warranty card. 11 Use the HDMI input for your TV. NOTE: You may use Rear Panel Connections ³ Antenna Input CABLE - Use...
... input. 3. INPUT 3 and INPUT 4 (Y/VIDEO) can select each video source. Because digital television (DTV) signals remain in digital format, HDMI assures that is not intended for recording. It may be used at the same time. You may ask your local cable company whether DTV services are available for HDMI. ¶ Optical Out (Digital Audio) This jack provides Digital Audio Output for your warranty card. 11 Use the HDMI input for your TV. NOTE: You may use Rear Panel Connections ³ Antenna Input CABLE - Use...

Owners Guide
Page 14
... INPUT 4) connections are provided for high performance laserdisc players, VCRs etc. In this case, connect the components B-Y output to the TV's PB input and the components R-Y output to your VCR operating guide for more normal picture. that a 1080i or 720p input signal is recommended that have this TV, except when noted as DVD players and set-topboxes. Outside Antenna or Digital Cable CABLE Apparatus Claims of card faces right) Top faces External Digital Component with HDMI output...
... INPUT 4) connections are provided for high performance laserdisc players, VCRs etc. In this case, connect the components B-Y output to the TV's PB input and the components R-Y output to your VCR operating guide for more normal picture. that a 1080i or 720p input signal is recommended that have this TV, except when noted as DVD players and set-topboxes. Outside Antenna or Digital Cable CABLE Apparatus Claims of card faces right) Top faces External Digital Component with HDMI output...

Owners Guide
Page 15
...) Y/ VIDEO PB PR (MONO) A L U D TV AS CENTER I O R AUDIO TO HI-FI INPUT 1 INPUT 2 INPUT 3 INPUT 4 OPTICAL OUT Digital Audio Upgrade Card HDMI INPUT 1 CAUTION · · RCA Optical Cable Cable ³ ³ CENTER OUT OPTICAL IN Stereo System Amplifier or DVD Player » » ¿ NOTE: 1. CableCARD™ (Top of the external audio amplifier. 2. First time use Connecting External Video Sources Match the numbers below to the diagram for speaker placement. ³ The television's internal speakers will act as an A/V receiver with optical input...
...) Y/ VIDEO PB PR (MONO) A L U D TV AS CENTER I O R AUDIO TO HI-FI INPUT 1 INPUT 2 INPUT 3 INPUT 4 OPTICAL OUT Digital Audio Upgrade Card HDMI INPUT 1 CAUTION · · RCA Optical Cable Cable ³ ³ CENTER OUT OPTICAL IN Stereo System Amplifier or DVD Player » » ¿ NOTE: 1. CableCARD™ (Top of the external audio amplifier. 2. First time use Connecting External Video Sources Match the numbers below to the diagram for speaker placement. ³ The television's internal speakers will act as an A/V receiver with optical input...

Owners Guide
Page 16
... 1 INPUT 2 INPUT 3 INPUT 4 OPTICAL OUT Digital Audio Upgrade Card HDMI INPUT 1 CAUTION Audio Video OUTPUT VCR 16 INPUTS Input 3 Input 4 Input 5 Cable Air Move SEL Select CONNECTING A COMPOSITE VIDEO AND MONAURAL AUDIO SOURCE TO INPUT1 - First time use to connect the VCR, camcorder, laserdisc player, DVD player or HDTV Set Top Box to your choice. For best performance, video and audio cables should be made from the INPUTS menu to return to show the INPUTS menu. CableCARD™ (Top of each component for limited viewing uses only. The following connection diagrams...
... 1 INPUT 2 INPUT 3 INPUT 4 OPTICAL OUT Digital Audio Upgrade Card HDMI INPUT 1 CAUTION Audio Video OUTPUT VCR 16 INPUTS Input 3 Input 4 Input 5 Cable Air Move SEL Select CONNECTING A COMPOSITE VIDEO AND MONAURAL AUDIO SOURCE TO INPUT1 - First time use to connect the VCR, camcorder, laserdisc player, DVD player or HDTV Set Top Box to your choice. For best performance, video and audio cables should be made from the INPUTS menu to return to show the INPUTS menu. CableCARD™ (Top of each component for limited viewing uses only. The following connection diagrams...

Owners Guide
Page 18
... so proper setup of U.S. HDMI Upgrade Card HDMI INPUT 1 DVI to rear panel jacks. First time use Connecting External Video Sources CONNECTING A COMPONENT SOURCE WITH HDMI OR DVI CAPABILITY TO INPUT 1 1. Connect the Cable and/or Air cables 2. Press the INPUTS button, then select INPUT 1 from the INPUTS menu to view the program from the output of the HDTV set top box or DVD player to the HDMI input as shown on the TV set top box or DVD player. Completely insert the connection cord plugs when connecting to HDMI Cable CAUTION R LV OUTPUT DIGITAL OUTPUT DVD Player or HDTV STB 18...
... so proper setup of U.S. HDMI Upgrade Card HDMI INPUT 1 DVI to rear panel jacks. First time use Connecting External Video Sources CONNECTING A COMPONENT SOURCE WITH HDMI OR DVI CAPABILITY TO INPUT 1 1. Connect the Cable and/or Air cables 2. Press the INPUTS button, then select INPUT 1 from the INPUTS menu to view the program from the output of the HDTV set top box or DVD player to the HDMI input as shown on the TV set top box or DVD player. Completely insert the connection cord plugs when connecting to HDMI Cable CAUTION R LV OUTPUT DIGITAL OUTPUT DVD Player or HDTV STB 18...

Owners Guide
Page 19
... picture and sound that is played back will be abnormal if the connection is loose. 2. First time use Connecting External Video Sources CONNECTING A COMPONENT SOURCE TO INPUT 3 OR 4: Y-PBPR. 1. Connect the cable from the Laserdisc/DVD player or HDTV set on REAR PANEL CONNECTIONS. 19 CABLE Apparatus Claims of card faces right) Top faces AIR MONITOR OUT S I V I D E O V I D E O (MONO) (MONO) Y/ VIDEO PB PR (MONO) Y/ VIDEO PB PR (MONO) A L U D TV AS CENTER I O R AUDIO TO HI-FI INPUT 1 INPUT 2 INPUT 3 INPUT 4 OPTICAL OUT Digital Audio Upgrade Card HDMI INPUT 1 CAUTION...
... picture and sound that is played back will be abnormal if the connection is loose. 2. First time use Connecting External Video Sources CONNECTING A COMPONENT SOURCE TO INPUT 3 OR 4: Y-PBPR. 1. Connect the cable from the Laserdisc/DVD player or HDTV set on REAR PANEL CONNECTIONS. 19 CABLE Apparatus Claims of card faces right) Top faces AIR MONITOR OUT S I V I D E O V I D E O (MONO) (MONO) Y/ VIDEO PB PR (MONO) Y/ VIDEO PB PR (MONO) A L U D TV AS CENTER I O R AUDIO TO HI-FI INPUT 1 INPUT 2 INPUT 3 INPUT 4 OPTICAL OUT Digital Audio Upgrade Card HDMI INPUT 1 CAUTION...
Owners Guide
Page 20
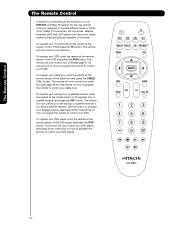
... satellite receiver. TV DVD VCR CBL SAT INPUTS ASPECT PIP DAY/NIGHT MENU EXIT SELECT INFO GUIDE VOL MUTE CH LAST CH FAV CH CLU-4361S 20 Basic operation keys are grouped together in one touch. The Remote Control The Remote Control In addition to controlling all the functions on your HITACHI LCD Rear Projection TV, the new remote control is designed to operate different types of VCRs, CATV (Cable TV) converters, set-top-boxes, satellite receivers (SAT) and DVD players...
... satellite receiver. TV DVD VCR CBL SAT INPUTS ASPECT PIP DAY/NIGHT MENU EXIT SELECT INFO GUIDE VOL MUTE CH LAST CH FAV CH CLU-4361S 20 Basic operation keys are grouped together in one touch. The Remote Control The Remote Control In addition to controlling all the functions on your HITACHI LCD Rear Projection TV, the new remote control is designed to operate different types of VCRs, CATV (Cable TV) converters, set-top-boxes, satellite receivers (SAT) and DVD players...
Owners Guide
Page 25
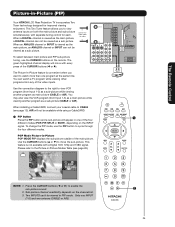
...L U D TV AS CENTER I O R AUDIO TO HI-FI INPUT 1 INPUT 2 INPUT 3 INPUT 4 OPTICAL OUT Digital Audio Upgrade Card HDMI INPUT 1 CAUTION Audio Video OUTPUT VCR Use the connection diagram to the right to the Picture-in -Picture POP MODE PIP displays the sub-picture outside of U.S. When a DIGITAL channel is viewed as a sub picture. POP Mode Picture-in -Picture Modes Table (see page 12). The Remote Control Picture-in -Picture feature is convenient when you to enable the sub-picture sound. 2. The Picture-in -Picture (PIP) Your HITACHI LCD Rear Projection TV incorporates Two Tuner...
...L U D TV AS CENTER I O R AUDIO TO HI-FI INPUT 1 INPUT 2 INPUT 3 INPUT 4 OPTICAL OUT Digital Audio Upgrade Card HDMI INPUT 1 CAUTION Audio Video OUTPUT VCR Use the connection diagram to the right to the Picture-in -Picture POP MODE PIP displays the sub-picture outside of U.S. When a DIGITAL channel is viewed as a sub picture. POP Mode Picture-in -Picture Modes Table (see page 12). The Remote Control Picture-in -Picture feature is convenient when you to enable the sub-picture sound. 2. The Picture-in -Picture (PIP) Your HITACHI LCD Rear Projection TV incorporates Two Tuner...
Owners Guide
Page 29
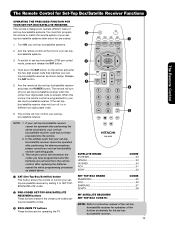
... remote control at the set -top-box/satellite (STB) pre-coded · mode, press and release the SAT button. If your set-top-box/satellite receiver cannot be operated after performing the above procedures, please consult your settop-box/satellite receiver by setting it to match the remote system of your set -topbox/satellite systems. · » TV DVD VCR CBL SAT ³ INPUTS ASPECT PIP DAY/NIGHT MENU EXIT 3. INFO · GUIDE...
... remote control at the set -top-box/satellite (STB) pre-coded · mode, press and release the SAT button. If your set-top-box/satellite receiver cannot be operated after performing the above procedures, please consult your settop-box/satellite receiver by setting it to match the remote system of your set -topbox/satellite systems. · » TV DVD VCR CBL SAT ³ INPUTS ASPECT PIP DAY/NIGHT MENU EXIT 3. INFO · GUIDE...

Owners Guide
Page 33
... Display On-Screen Display Video Picture Mode Contrast Brightness Color Tint Sharpness Color Temperature Black Enhancement Contrast Mode Noise Reduction Auto Movie Mode Aspect Black Side Panel Reset Video Settings Select between stations. Adjust tint. Choose Automatic Contrast settings. Choose the picture format aspect ratio. Select Dynamic Range Compression to display dialogue/text. Movie Ratings Block various types of the Channel Manager OSD is only available for TV programs. Setup Menu Preference Lamp Power Control Set The Inputs Set Closed Captions Set Monitor Out Upgrades...
... Display On-Screen Display Video Picture Mode Contrast Brightness Color Tint Sharpness Color Temperature Black Enhancement Contrast Mode Noise Reduction Auto Movie Mode Aspect Black Side Panel Reset Video Settings Select between stations. Adjust tint. Choose Automatic Contrast settings. Choose the picture format aspect ratio. Select Dynamic Range Compression to display dialogue/text. Movie Ratings Block various types of the Channel Manager OSD is only available for TV programs. Setup Menu Preference Lamp Power Control Set The Inputs Set Closed Captions Set Monitor Out Upgrades...

Owners Guide
Page 51
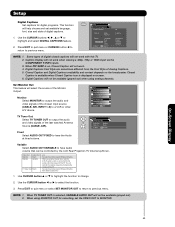
... for 15 minutes. 1. Setup Menu Preference Lamp Power Control Set The Inputs Set Closed Captions Set Monitor Out Upgrades Quick Start Up Move SEL Set Setup OR Set The Inputs Input1 : **** Input2 : **** Input3 : **** Input4 : **** Auto Link : Off Input5 : **** Move SEL Return On-Screen Display 51 Setup Lamp Power Control Use this feature to give a name to any of the five video inputs. Press the CURSOR buttons ̇ or ̈ to set an input name: A/V Receiver, DVD, DVD2, VCR, VCR2, Cable (STB), Satellite, PVR...
... for 15 minutes. 1. Setup Menu Preference Lamp Power Control Set The Inputs Set Closed Captions Set Monitor Out Upgrades Quick Start Up Move SEL Set Setup OR Set The Inputs Input1 : **** Input2 : **** Input3 : **** Input4 : **** Auto Link : Off Input5 : **** Move SEL Return On-Screen Display 51 Setup Lamp Power Control Use this feature to give a name to any of the five video inputs. Press the CURSOR buttons ̇ or ̈ to set an input name: A/V Receiver, DVD, DVD2, VCR, VCR2, Cable (STB), Satellite, PVR...
Owners Guide
Page 53
... output the audio and video signals of the last watched Antenna Source (CABLE, AIR). Use CURSOR button ̆ or ̄ to highlight the function to select the function. 3. Monitor: Select MONITOR to have the Audio at fixed volume. Setup Menu Preference Lamp Power Control Set The Inputs Set Closed Captions Set Monitor Out Upgrades Quick Start Up Move SEL Set TV Tuner Out: Select TV TUNER OUT to output the audio and video signals of the chosen input source (CABLE, AIR, INPUT 1-5) to previous menu. When an external device like a monitor...
... output the audio and video signals of the last watched Antenna Source (CABLE, AIR). Use CURSOR button ̆ or ̄ to highlight the function to select the function. 3. Monitor: Select MONITOR to have the Audio at fixed volume. Setup Menu Preference Lamp Power Control Set The Inputs Set Closed Captions Set Monitor Out Upgrades Quick Start Up Move SEL Set TV Tuner Out: Select TV TUNER OUT to output the audio and video signals of the chosen input source (CABLE, AIR, INPUT 1-5) to previous menu. When an external device like a monitor...

Owners Guide
Page 55
... Setup Menu Preference Lamp Power Control Set The Inputs Set Closed Captions Set Monitor Out Upgrades Quick Start Up Move SEL Set Setup Quick Start Up OR Select ON to select and start upgrading. 4. If a future software upgrade is used to save electricity Off On Move SEL Return On-Screen Display 55 Press the SELECT button to have the TV tune channels (both Analog and Digital) quickly when first turning the TV on . This will activate the TV tuners...
... Setup Menu Preference Lamp Power Control Set The Inputs Set Closed Captions Set Monitor Out Upgrades Quick Start Up Move SEL Set Setup Quick Start Up OR Select ON to select and start upgrading. 4. If a future software upgrade is used to save electricity Off On Move SEL Return On-Screen Display 55 Press the SELECT button to have the TV tune channels (both Analog and Digital) quickly when first turning the TV on . This will activate the TV tuners...

Owners Guide
Page 64
... resulting from the Software or use the Software in your capacity as the owner of a HITACHI brand digital television (the "DTV"), and HITACHI America, Ltd., Home Electronics Division ("HITACHI"). Except as is a legal agreement between you ("you of this Agreement. SOFTWARE UPGRADES. You specifically agree not to export or reexport the Software: (i) to any country to the System Software (each, an "Upgrade"). or (iii) to...
... resulting from the Software or use the Software in your capacity as the owner of a HITACHI brand digital television (the "DTV"), and HITACHI America, Ltd., Home Electronics Division ("HITACHI"). Except as is a legal agreement between you ("you of this Agreement. SOFTWARE UPGRADES. You specifically agree not to export or reexport the Software: (i) to any country to the System Software (each, an "Upgrade"). or (iii) to...

Owners Guide
Page 66
... Black Enhancement 35 Brightness 37 C CableCARD 12 Channel Manager 40 Auto Channel Scan 41 Channel List 41 Signal Meter 40 Clock Time 47 Time Zone 47 Date 47 Closed Captions Analog Captions 52 Digital Captions 53 Color Temperature 35 Color 34 Contrast 34 Contrast Mode 35 D Date 47 Daylight Saving Correction 47 E Event Timer 49 G Guide Button 7, 23 H HDMI 11, 14, 18 I Input button 7, 23 L Lamp Replacement 56-59 Language Menu Language 50 Audio Language 39 Locks Change Access Code 42 Channel Lock 42 Front Panel Lock...
... Black Enhancement 35 Brightness 37 C CableCARD 12 Channel Manager 40 Auto Channel Scan 41 Channel List 41 Signal Meter 40 Clock Time 47 Time Zone 47 Date 47 Closed Captions Analog Captions 52 Digital Captions 53 Color Temperature 35 Color 34 Contrast 34 Contrast Mode 35 D Date 47 Daylight Saving Correction 47 E Event Timer 49 G Guide Button 7, 23 H HDMI 11, 14, 18 I Input button 7, 23 L Lamp Replacement 56-59 Language Menu Language 50 Audio Language 39 Locks Change Access Code 42 Channel Lock 42 Front Panel Lock...


