
Owners Guide
Page 1
... HITACHI PROJECTION TV 8 HOOK-UP CABLES AND CONNECTORS 9 FRONT PANEL CONTROLS ...10 FRONT PANEL JACKS AND CONNECTIONS 11 REAR PANEL JACKS...12 TYPICAL FULL-FEATURE SETUP ...13 TIPS ON REAR PANEL CONNECTIONS 14 TIPS ON REAR PANEL CONNECTIONS 14 CONNECTING EXTERNAL AUDIO SOURCES 15 CONNECTING EXTERNAL VIDEO SOURCES 16 INPUT MODE SELECTION ORDER...16 AUDIO SYSTEM SET-UP ...20 THE GENIUS REMOTE CONTROL (CLU-572TSI 21 PICTURE-IN-PICTURE (PIP) ...24 USING THE REMOTE TO CONTROL VCR FUNCTIONS 27 USING THE REMOTE TO CONTROL CABLE BOX FUNCTIONS 28 USING THE REMOTE TO CONTROL SATELLITE RECEIVER...
... HITACHI PROJECTION TV 8 HOOK-UP CABLES AND CONNECTORS 9 FRONT PANEL CONTROLS ...10 FRONT PANEL JACKS AND CONNECTIONS 11 REAR PANEL JACKS...12 TYPICAL FULL-FEATURE SETUP ...13 TIPS ON REAR PANEL CONNECTIONS 14 TIPS ON REAR PANEL CONNECTIONS 14 CONNECTING EXTERNAL AUDIO SOURCES 15 CONNECTING EXTERNAL VIDEO SOURCES 16 INPUT MODE SELECTION ORDER...16 AUDIO SYSTEM SET-UP ...20 THE GENIUS REMOTE CONTROL (CLU-572TSI 21 PICTURE-IN-PICTURE (PIP) ...24 USING THE REMOTE TO CONTROL VCR FUNCTIONS 27 USING THE REMOTE TO CONTROL CABLE BOX FUNCTIONS 28 USING THE REMOTE TO CONTROL SATELLITE RECEIVER...
Owners Guide
Page 2
... television receiver will display television closed captioning ( or ), in accordance with arrowhead symbol, within an equilateral triangle, is not intended for use in the instructions, as this projection television. CAUTION: TO REDUCE THE RISK OF ELECTRIC SHOCK, DO NOT REMOVE COVER (OR BACK). WARNING: TO PREVENT FIRE OR SHOCK HAZARD, DO NOT EXPOSE THIS COLOR TELEVISION TO RAIN OR MOISTURE. CAUTION: Adjust only those controls that...
... television receiver will display television closed captioning ( or ), in accordance with arrowhead symbol, within an equilateral triangle, is not intended for use in the instructions, as this projection television. CAUTION: TO REDUCE THE RISK OF ELECTRIC SHOCK, DO NOT REMOVE COVER (OR BACK). WARNING: TO PREVENT FIRE OR SHOCK HAZARD, DO NOT EXPOSE THIS COLOR TELEVISION TO RAIN OR MOISTURE. CAUTION: Adjust only those controls that...

Owners Guide
Page 4
... should use the television near water, for ventilation purposes which provide reliable operation of the set near a swimming pool, etc. • Never expose the television to overturn. The television may cause failure of the television when high humidity persists. 15 The television has slots, or openings in wire to an antenna discharge unit, size of grounding conductors, location of antenna discharge unit connection to...
... should use the television near water, for ventilation purposes which provide reliable operation of the set near a swimming pool, etc. • Never expose the television to overturn. The television may cause failure of the television when high humidity persists. 15 The television has slots, or openings in wire to an antenna discharge unit, size of grounding conductors, location of antenna discharge unit connection to...
Owners Guide
Page 6
... popping sounds, particularly when being turned on -screen displays such as programs from other sources, may require prior authorization from the broadcaster or owner of any service or repairs to the television, ask the service technician to perform routine safety checks to determine that the television is in your operating instructions, do not attempt any further adjustment. Unplug the television and call your dealer or service technician...
... popping sounds, particularly when being turned on -screen displays such as programs from other sources, may require prior authorization from the broadcaster or owner of any service or repairs to the television, ask the service technician to perform routine safety checks to determine that the television is in your operating instructions, do not attempt any further adjustment. Unplug the television and call your dealer or service technician...
Owners Guide
Page 10
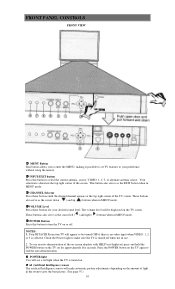
... picture adjustments depending on the amount of the TV screen. NOTES: 1. To see a red light when the TV is shown in MENU mode. ƒ CHANNEL Selector Press these buttons for approximately five seconds. Check the Power Light to give the best picture. (See page 55.) 10 W AI (Artificial Intelligence) sensor The artificial Intelligence sensor will be turned OFF if there is no video input when VIDEO: 1, 2 or 3 is turned off . FRONT PANEL CONTROLS...
... picture adjustments depending on the amount of the TV screen. NOTES: 1. To see a red light when the TV is shown in MENU mode. ƒ CHANNEL Selector Press these buttons for approximately five seconds. Check the Power Light to give the best picture. (See page 55.) 10 W AI (Artificial Intelligence) sensor The artificial Intelligence sensor will be turned OFF if there is no video input when VIDEO: 1, 2 or 3 is turned off . FRONT PANEL CONTROLS...
Owners Guide
Page 12
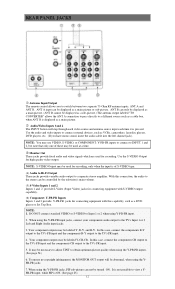
... using the Y-PB-PR input jacks, connect your components audio output to switch between two separate 75-Ohm RF antenna inputs, ANT A and ANT B. R Audio/Video Inputs 1and 2 The INPUT button will be turned ON. Use the audio and video inputs to connect external devices, such as a DVD player or Set Top Box. ANT A input can only be displayed as a cable box, when ANT B is not possible to the TV's PR input. 5. S Monitor Out These jacks provide fixed audio and video signals which are used at a time...
... using the Y-PB-PR input jacks, connect your components audio output to switch between two separate 75-Ohm RF antenna inputs, ANT A and ANT B. R Audio/Video Inputs 1and 2 The INPUT button will be turned ON. Use the audio and video inputs to connect external devices, such as a DVD player or Set Top Box. ANT A input can only be displayed as a cable box, when ANT B is not possible to the TV's PR input. 5. S Monitor Out These jacks provide fixed audio and video signals which are used at a time...
Owners Guide
Page 14
... cables. COMPONENT: Y-PB-PR connections are provided for high performance components, such as DVD players. When using Y-PB-PR jacks. 14 Your component outputs may be necessary to adjust TINT to obtain optimum picture quality when using the Y-PB-PR inputs. (See pages 54.) To ensure no copyright infringement, the MONITOR OUT output will be used for VCR #1 and VCR #2, but only one audio output (mono sound), connect...
... cables. COMPONENT: Y-PB-PR connections are provided for high performance components, such as DVD players. When using Y-PB-PR jacks. 14 Your component outputs may be necessary to adjust TINT to obtain optimum picture quality when using the Y-PB-PR inputs. (See pages 54.) To ensure no copyright infringement, the MONITOR OUT output will be used for VCR #1 and VCR #2, but only one audio output (mono sound), connect...

Owners Guide
Page 16
... PLAYER 1. Rear Panel of the VCR or the laserdisc player to view the program from the VIDEO INPUT JACK on the TV set below . 2. However, you use to connect the VCR, camcorder, laserdisc player, DVD player or HDTV Set Top Box to your particular assortment of components and features. Press the INPUT button to the INPUT (MONO)/L(AUDIO) jack. 3. Press the INPUT button to return to the INPUT (AUDIO/R) jack. 3. Check the owner's manual of each component. For best performance, video...
... PLAYER 1. Rear Panel of the VCR or the laserdisc player to view the program from the VIDEO INPUT JACK on the TV set below . 2. However, you use to connect the VCR, camcorder, laserdisc player, DVD player or HDTV Set Top Box to your particular assortment of components and features. Press the INPUT button to the INPUT (MONO)/L(AUDIO) jack. 3. Press the INPUT button to return to the INPUT (AUDIO/R) jack. 3. Check the owner's manual of each component. For best performance, video...
Owners Guide
Page 21
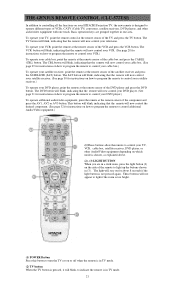
... bright. (1) POWER Button Press this button to turn the TV set on your TV, VCR, cable box, satellite receiver, DVD player, or other audio/video equipment with one area. THE GENIUS REMOTE CONTROL (CLU-572TSI) In addition to controlling all the functions on or off when the remote is in TV mode. (2) TV button When the TV button is pressed, it will blink, to indicate the remote is in TV mode. 21 The CBL button will blink, indicating that the remote will now control...
... bright. (1) POWER Button Press this button to turn the TV set on your TV, VCR, cable box, satellite receiver, DVD player, or other audio/video equipment with one area. THE GENIUS REMOTE CONTROL (CLU-572TSI) In addition to controlling all the functions on or off when the remote is in TV mode. (2) TV button When the TV button is pressed, it will blink, to indicate the remote is in TV mode. 21 The CBL button will blink, indicating that the remote will now control...

Owners Guide
Page 22
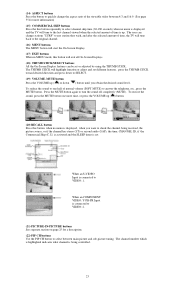
....) (11) INPUT button The INPUT button will select between the three sets of these number buttons to directly access OSD sub-menu's of the displayed menu. This makes navigating the menu's faster and easier. If the SLEEP button is pressed while the timer is set , use these buttons will blink to indicate the remote is in Audio/Video mode. (See page 32) (8) CHANNEL selector buttons CHANNEL selector buttons are not in the correct SIGNAL SOURCE mode. (See page...
....) (11) INPUT button The INPUT button will select between the three sets of these number buttons to directly access OSD sub-menu's of the displayed menu. This makes navigating the menu's faster and easier. If the SLEEP button is pressed while the timer is set , use these buttons will blink to indicate the remote is in Audio/Video mode. (See page 32) (8) CHANNEL selector buttons CHANNEL selector buttons are not in the correct SIGNAL SOURCE mode. (See page...
Owners Guide
Page 23
... the VOLUME up ( ) button. (20) RECALL button Press this button will exit all On-Screen Displays. (18) THUMB STICK/SELECT buttons All the On-Screen Display features can be set or adjusted by using the THUMB STICK. To restore the sound, press the MUTE button one half of time is up ( ) or down ( ) button until you want to check the channel being controlled. 23 When an S-VIDEO Input is being received, the picture source...
... the VOLUME up ( ) button. (20) RECALL button Press this button will exit all On-Screen Displays. (18) THUMB STICK/SELECT buttons All the On-Screen Display features can be set or adjusted by using the THUMB STICK. To restore the sound, press the MUTE button one half of time is up ( ) or down ( ) button until you want to check the channel being controlled. 23 When an S-VIDEO Input is being received, the picture source...
Owners Guide
Page 24
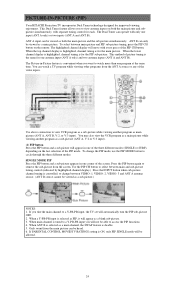
... setting is controlled, to change the PIP mode, use the PIP MODE button to watch a TV program while viewing other programs from the ANT A source or any of the screen. The Dual Tuner can only be viewed as a sub-picture.) NOTES: 1. When main channel is convenient when you to a Y-PB-PR input, the TV set will appear as a main channel, the SWAP feature is for the PIP sub-picture. Only sound from the screen. PICTURE-IN-PICTURE (PIP) Your HITACHI Projection TV...
... setting is controlled, to change the PIP mode, use the PIP MODE button to watch a TV program while viewing other programs from the ANT A source or any of the screen. The Dual Tuner can only be viewed as a sub-picture.) NOTES: 1. When main channel is convenient when you to a Y-PB-PR input, the TV set will appear as a main channel, the SWAP feature is for the PIP sub-picture. Only sound from the screen. PICTURE-IN-PICTURE (PIP) Your HITACHI Projection TV...

Owners Guide
Page 28
... your Cable box. The SLEEP button will act as your cable box by setting it to instruction manual of the Cable Box for operation of your cable box. MY CABLE BOX CODE IS NOTE: Refer to CABLE mode. (2) PRECODED CABLE Box buttons These buttons transmit the chosen precoded cable codes. (3) EXCLUSIVE TV buttons These buttons are removed from the remote control. When this occurs, the remote control is designed to control your audio components '100' button if required. 6. The remote will flash 3 times if the code was accepted. 5. The remote control...
... your Cable box. The SLEEP button will act as your cable box by setting it to instruction manual of the Cable Box for operation of your cable box. MY CABLE BOX CODE IS NOTE: Refer to CABLE mode. (2) PRECODED CABLE Box buttons These buttons transmit the chosen precoded cable codes. (3) EXCLUSIVE TV buttons These buttons are removed from the remote control. When this occurs, the remote control is designed to control your audio components '100' button if required. 6. The remote will flash 3 times if the code was accepted. 5. The remote control...
Owners Guide
Page 29
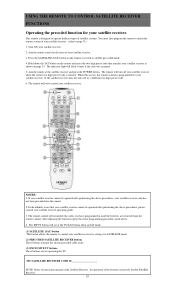
... two digit preset code. 6. The remote control will remember the codes you have programmed in SAT mode. (1) SATELLITE (SAT) button This button allows the remote to control your satellite receiver by setting it to SATELLITE mode. (2) PRECODED SATELLITE RECEIVER buttons These buttons transmit the chosen precoded cable codes. (3) EXCLUSIVE TV buttons These buttons are removed from the remote control. Press the SATELLITE (SAT) button on the remote to switch to instruction manual of the Satellite Receiver for operation of your satellite receiver. 2. After replacing...
... two digit preset code. 6. The remote control will remember the codes you have programmed in SAT mode. (1) SATELLITE (SAT) button This button allows the remote to control your satellite receiver by setting it to SATELLITE mode. (2) PRECODED SATELLITE RECEIVER buttons These buttons transmit the chosen precoded cable codes. (3) EXCLUSIVE TV buttons These buttons are removed from the remote control. Press the SATELLITE (SAT) button on the remote to switch to instruction manual of the Satellite Receiver for operation of your satellite receiver. 2. After replacing...
Owners Guide
Page 35
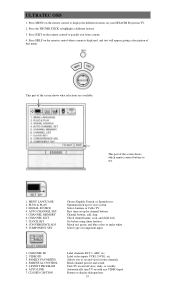
... a menu. 4. SIGNAL SOURCE 4. CHANNEL MEMORY 6. CHANNEL LIST 7. CLOCK SET 8. Optimum hook up for your HITACHI Projection TV. 2. Check channel name, scan, and child lock. Match red, green, and blue colors to highlight a different feature. 3. VIDEO ID 3. Block channel picture and sound. Automatically turn TV on and off once, daily, or weekly. ULTRATEC OSD 1. Press MENU on the remote control to display the different features on the remote control to use. 1. This part of that menu. CONVERGENCE ADJ. 9. Press the THUMB STICK to make white. CLOSED CAPTION...
... a menu. 4. SIGNAL SOURCE 4. CHANNEL MEMORY 6. CHANNEL LIST 7. CLOCK SET 8. Optimum hook up for your HITACHI Projection TV. 2. Check channel name, scan, and child lock. Match red, green, and blue colors to highlight a different feature. 3. VIDEO ID 3. Block channel picture and sound. Automatically turn TV on and off once, daily, or weekly. ULTRATEC OSD 1. Press MENU on the remote control to display the different features on the remote control to use. 1. This part of that menu. CONVERGENCE ADJ. 9. Press the THUMB STICK to make white. CLOSED CAPTION...

Owners Guide
Page 40
... the AUTO CHANNEL SET function is engaged, programming will allow you to change the channel. Remember to erase additional channels. See CHANNEL MEMORY to add or to select the correct SIGNAL SOURCE mode before using the CHANNEL UP ( ) or DOWN ( ). CHANNEL MEMORY Use this function after AUTO CHANNEL SET to add or erase additional channels to previous menu. 40 If two antenna are connected, switch antenna inputs with the INPUT button and repeat AUTO CHANNEL SET for the second antenna input...
... the AUTO CHANNEL SET function is engaged, programming will allow you to change the channel. Remember to erase additional channels. See CHANNEL MEMORY to add or to select the correct SIGNAL SOURCE mode before using the CHANNEL UP ( ) or DOWN ( ). CHANNEL MEMORY Use this function after AUTO CHANNEL SET to add or erase additional channels to previous menu. 40 If two antenna are connected, switch antenna inputs with the INPUT button and repeat AUTO CHANNEL SET for the second antenna input...
Owners Guide
Page 43
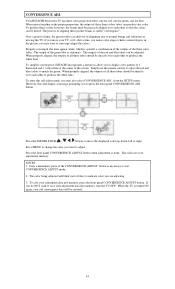
... panel CONVERGENCE ADJUST button when adjustment is stationary. The process of aligning these picture beams is actually a combination of the outputs of the screen. If you move the displayed color up, down, left or right. Simply use the remote control to adjust the red and blue colors to move your adjustment data into memory, turn the TV OFF. button. Press MENU to converge (align) the colors. To save your TV, or if, after a time, you notice color...
... panel CONVERGENCE ADJUST button when adjustment is stationary. The process of aligning these picture beams is actually a combination of the outputs of the screen. If you move the displayed color up, down, left or right. Simply use the remote control to adjust the red and blue colors to move your adjustment data into memory, turn the TV OFF. button. Press MENU to converge (align) the colors. To save your TV, or if, after a time, you notice color...
Owners Guide
Page 44
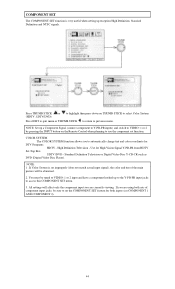
... the Remote Control when planning to access this COMPONENT SET menu. 3. COLOR SYSTEM The COLOR SYSTEM function allows you to previous menu. Standard Definition Television or Digital Video Disc Y-CB-CR such as DVD (Digital Video Disc Player). All settings will be abnormal. 2. High Definition Television - If you are currently viewing. Use for High Vision Signal Y-PB-PR from HDTV Set-Top Box. COMPONENT SET The COMPONENT SET function is set improperly (does not match actual input signal), the color and...
... the Remote Control when planning to access this COMPONENT SET menu. 3. COLOR SYSTEM The COLOR SYSTEM function allows you to previous menu. Standard Definition Television or Digital Video Disc Y-CB-CR such as DVD (Digital Video Disc Player). All settings will be abnormal. 2. High Definition Television - If you are currently viewing. Use for High Vision Signal Y-PB-PR from HDTV Set-Top Box. COMPONENT SET The COMPONENT SET function is set improperly (does not match actual input signal), the color and...
Owners Guide
Page 54
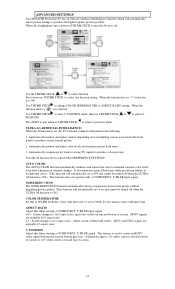
... +10 (video center is filled with a COMPONENT: Y-PB-PR input signal. POSITION mode, than use THUMB STICK or to 16:9 aspect ratio. (gray bars visible on , the TV's internal computer will perform the following: 1. Screen changes to adjust V. V. ADVANCED SETTINGS Your HITACHI Projection TV has an Ultra AI (Artificial Intelligence) function which will automatically adjust picture settings to maintain constant color levels even after a program or channel changes. Automatically monitor and adjust color levels...
... +10 (video center is filled with a COMPONENT: Y-PB-PR input signal. POSITION mode, than use THUMB STICK or to 16:9 aspect ratio. (gray bars visible on , the TV's internal computer will perform the following: 1. Screen changes to adjust V. V. ADVANCED SETTINGS Your HITACHI Projection TV has an Ultra AI (Artificial Intelligence) function which will automatically adjust picture settings to maintain constant color levels even after a program or channel changes. Automatically monitor and adjust color levels...
Owners Guide
Page 61
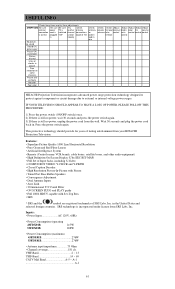
... Line Horizontal Resolution • Pure Green and Red Filter Lenses • Artificial Intelligence System • Remote (Controls many VCR brands, cable boxes, satellite boxes, and other audio equipment) • High Definition On-Screen Display (UltraTEC BIT-MAP) • Full Set of Input Jacks, including S-Video • COMPONENT VIDEO: Y-CB/CR and Y-PB/PR • Closed Caption Decoder • High Resolution Picture-In-Picture with Freeze • Tuned Port Bass Reflex Speakers • Convergence Adjustment • Dual Antenna Inputs...
... Line Horizontal Resolution • Pure Green and Red Filter Lenses • Artificial Intelligence System • Remote (Controls many VCR brands, cable boxes, satellite boxes, and other audio equipment) • High Definition On-Screen Display (UltraTEC BIT-MAP) • Full Set of Input Jacks, including S-Video • COMPONENT VIDEO: Y-CB/CR and Y-PB/PR • Closed Caption Decoder • High Resolution Picture-In-Picture with Freeze • Tuned Port Bass Reflex Speakers • Convergence Adjustment • Dual Antenna Inputs...


