Owners Guide
Page 2
... be notified that any changes or modifications made to this device that may void the user s authority to operate the equipment. NOTE: ¥There are no user serviceable parts inside the television. ¥Model and serial numbers are covered in the literature accompanying the appliance. NO USER SERVICEABLE PARTS INSIDE. Follow all warnings and instructions marked on this can expose you to very high voltages and other...
... be notified that any changes or modifications made to this device that may void the user s authority to operate the equipment. NOTE: ¥There are no user serviceable parts inside the television. ¥Model and serial numbers are covered in the literature accompanying the appliance. NO USER SERVICEABLE PARTS INSIDE. Follow all warnings and instructions marked on this can expose you to very high voltages and other...

Owners Guide
Page 3
... be blocked or covered. 13. Do not overload wall outlets and extension cords as this section illustrates safety tips which provide reliable operation of the receiver and protect the television from the wall outlet before cleaning. Refer all warnings and instructions marked on the television. Be careful not to qualified service personnel. 6. NO! Do not use the television near water, for...
... be blocked or covered. 13. Do not overload wall outlets and extension cords as this section illustrates safety tips which provide reliable operation of the receiver and protect the television from the wall outlet before cleaning. Refer all warnings and instructions marked on the television. Be careful not to qualified service personnel. 6. NO! Do not use the television near water, for...
Owners Guide
Page 4
... service technician has used replacement parts specified by following the detailed procedure in your HITACHI Factory Warranty. ¥ When using Picture-in particular, specifies that indicates a need for long periods of time, unplug it checked by following the operating instructions, unplug the television from the type of overhead power lines or other controls may result in safe operating condition. OPERATION OF YOUR TELEVISION 19. When installing an outside antenna is connected to the television...
... service technician has used replacement parts specified by following the detailed procedure in your HITACHI Factory Warranty. ¥ When using Picture-in particular, specifies that indicates a need for long periods of time, unplug it checked by following the operating instructions, unplug the television from the type of overhead power lines or other controls may result in safe operating condition. OPERATION OF YOUR TELEVISION 19. When installing an outside antenna is connected to the television...
Owners Guide
Page 6
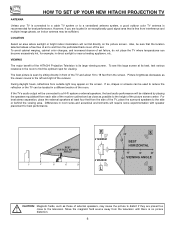
... signal area that the location selected allows a free flow of air to and from the side of set . Differences in direct sunlight or near a heating appliance, etc. HOW TO SET UP YOUR NEW HITACHI PROJECTION TV ANTENNA Unless your TV is connected to a cable TV system or to a centralized antenna system, a good outdoor color TV antenna is no picture distortion. 6 For best stereo separation, place the external speakers at its large viewing screen...
... signal area that the location selected allows a free flow of air to and from the side of set . Differences in direct sunlight or near a heating appliance, etc. HOW TO SET UP YOUR NEW HITACHI PROJECTION TV ANTENNA Unless your TV is connected to a cable TV system or to a centralized antenna system, a good outdoor color TV antenna is no picture distortion. 6 For best stereo separation, place the external speakers at its large viewing screen...

Owners Guide
Page 11
... connection, the audio can only be displayed as a main picture or sub-picture. The volume level is controlled by the television s main volume and also by an independent rear volume feature found in the THEATER-SURROUND menu. Use the audio and video inputs to connect external devices, such as VCRs, camcorders, laserdisc players, DVD players etc. (If you to a different source such as a cable box, when ANT B is displayed as a sub-picture.) The antenna output labeled TO CONVERTER...
... connection, the audio can only be displayed as a main picture or sub-picture. The volume level is controlled by the television s main volume and also by an independent rear volume feature found in the THEATER-SURROUND menu. Use the audio and video inputs to connect external devices, such as VCRs, camcorders, laserdisc players, DVD players etc. (If you to a different source such as a cable box, when ANT B is displayed as a sub-picture.) The antenna output labeled TO CONVERTER...

Owners Guide
Page 12
... adjust TINT and 54.) or turn AUTO COLOR-ON to obtain optimum picture quality when using the Y-CBCR To ensure no copyright infringement, the MONITOR OUT output will be abnormal, when using the Y-CBCR jacks, Input 2 will be viewed as a DVD player. With this connection, the audio can be labeled Y, B-Y, and R-Y. NOTES: DO NOT connect standard VIDEO or S-VIDEO to Input 2 when using input jacks. FIRST TIME USE ቨ S-Video Inputs 1 and 2 Inputs 1 and 2 provide S-Video (Super Video...
... adjust TINT and 54.) or turn AUTO COLOR-ON to obtain optimum picture quality when using the Y-CBCR To ensure no copyright infringement, the MONITOR OUT output will be abnormal, when using the Y-CBCR jacks, Input 2 will be viewed as a DVD player. With this connection, the audio can be labeled Y, B-Y, and R-Y. NOTES: DO NOT connect standard VIDEO or S-VIDEO to Input 2 when using input jacks. FIRST TIME USE ቨ S-Video Inputs 1 and 2 Inputs 1 and 2 provide S-Video (Super Video...
Owners Guide
Page 13
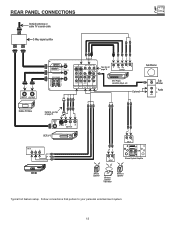
REAR PANEL CONNECTIONS Outside antenna or cable TV coaxial cable 2-Way signal splitter INPUT OUTPUT STOP CONNECT ONLY 8 OHM SPEAKERS DO NOT SHORT CIRCUIT THESE TERMINALS (Such damage is NOT COVERED by your personal entertainment system. 13 Follow connections that pertain to your television warranty) ANT A TO CONVERTER REAR SPEAKER ANT B R L S-VIDEO S-VIDEO Y COMPONENT C B CR VIDEO VIDEO S-VIDEO SUB WOOFER (MONO) (MONO) VIDEO L L L L L R R R R R AUDIO AUDIO AUDIO INPUT 1 INPUT 2 MONITOR OUT WIRELESS AUDIO OUT TO HI-FI See tips on Y page 15 CB...
REAR PANEL CONNECTIONS Outside antenna or cable TV coaxial cable 2-Way signal splitter INPUT OUTPUT STOP CONNECT ONLY 8 OHM SPEAKERS DO NOT SHORT CIRCUIT THESE TERMINALS (Such damage is NOT COVERED by your personal entertainment system. 13 Follow connections that pertain to your television warranty) ANT A TO CONVERTER REAR SPEAKER ANT B R L S-VIDEO S-VIDEO Y COMPONENT C B CR VIDEO VIDEO S-VIDEO SUB WOOFER (MONO) (MONO) VIDEO L L L L L R R R R R AUDIO AUDIO AUDIO INPUT 1 INPUT 2 MONITOR OUT WIRELESS AUDIO OUT TO HI-FI See tips on Y page 15 CB...
Owners Guide
Page 15
... a VCR cannot record its own video or line output. (INPUT:1 in example on page 11.) Refer to the left audio jack on line input-output connection. COMPONENT: Y-CBCR connections are provided for high performance laserdisc players, VCRs etc. You may be labeled Y, B-Y, and R-Y. Use these may be necessary to adjust TINT or turn AUTO COLOR-ON to the TV s CR input. that only one audio output (mono sound), connect it to your hook-up cables.
... a VCR cannot record its own video or line output. (INPUT:1 in example on page 11.) Refer to the left audio jack on line input-output connection. COMPONENT: Y-CBCR connections are provided for high performance laserdisc players, VCRs etc. You may be labeled Y, B-Y, and R-Y. Use these may be necessary to adjust TINT or turn AUTO COLOR-ON to the TV s CR input. that only one audio output (mono sound), connect it to your hook-up cables.

Owners Guide
Page 16
EXTERNAL CONNECTIONS CONNECTING EXTERNAL AUDIO AMPLIFIER To control the audio level of an external audio amplifier with the remote control, connect the system as shown below. (REAR OF TV SET) AUDIO TO HI-FI TERMINAL L R AUDIO TO HI-FI TO AUDIO INPUT TERMINAL OF EXTERNAL AMPLIFIER EXTERNAL SPEAKERS AUDIO AMPLIFIER EXTERNAL SPEAKERS NOTES: To prevent damage to the REAR SPEAKER terminal of the TV set the volume control of the audio amplifier lower and adjust the sound using the remote control of the Projection TV and an external amplifier. 16 Do...
EXTERNAL CONNECTIONS CONNECTING EXTERNAL AUDIO AMPLIFIER To control the audio level of an external audio amplifier with the remote control, connect the system as shown below. (REAR OF TV SET) AUDIO TO HI-FI TERMINAL L R AUDIO TO HI-FI TO AUDIO INPUT TERMINAL OF EXTERNAL AMPLIFIER EXTERNAL SPEAKERS AUDIO AMPLIFIER EXTERNAL SPEAKERS NOTES: To prevent damage to the REAR SPEAKER terminal of the TV set the volume control of the audio amplifier lower and adjust the sound using the remote control of the Projection TV and an external amplifier. 16 Do...
Owners Guide
Page 17
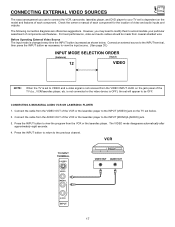
... video device is OFF), the set will appear to view the program from the VCR or the laserdisc player. Check the owner s manual of video and audio inputs and outputs. For best performance, video and audio cables should be OFF. Before Operating External Video Source The input mode is changed every time the INPUT button is dependent on the model and features of each component for the location of each component. CONNECTING A MONAURAL AUDIO VCR OR LASERDISC PLAYER 1. Press the INPUT button...
... video device is OFF), the set will appear to view the program from the VCR or the laserdisc player. Check the owner s manual of video and audio inputs and outputs. For best performance, video and audio cables should be OFF. Before Operating External Video Source The input mode is changed every time the INPUT button is dependent on the model and features of each component for the location of each component. CONNECTING A MONAURAL AUDIO VCR OR LASERDISC PLAYER 1. Press the INPUT button...
Owners Guide
Page 24
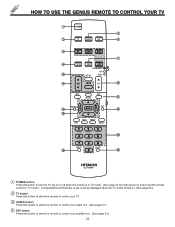
... control your cable box. (See page 31.) ብ SAT button Press this button to allow the remote to control your satellite box. (See page 31.) 24 HOW TO USE THE GENIUS REMOTE TO CONTROL YOUR TV ቢ POWER ቤ ባ TV CABLE SAT ብ ቦ PIP SWAP MOVE ቨ ቧ PIP CH HELP FRZ TV/CABLE/SAT VCR ቩ LST-CH AUDIO ቪ VOL MUTE CH ቫ INFO EXIT GUIDE ቭ L I G H RECALL...
... control your cable box. (See page 31.) ብ SAT button Press this button to allow the remote to control your satellite box. (See page 31.) 24 HOW TO USE THE GENIUS REMOTE TO CONTROL YOUR TV ቢ POWER ቤ ባ TV CABLE SAT ብ ቦ PIP SWAP MOVE ቨ ቧ PIP CH HELP FRZ TV/CABLE/SAT VCR ቩ LST-CH AUDIO ቪ VOL MUTE CH ቫ INFO EXIT GUIDE ቭ L I G H RECALL...

Owners Guide
Page 26
... video input jacks and both antenna signals and the three sets of video input jacks each time the button is up to a maximum of three hours. If the SLEEP button is pressed while the timer is connected to view time remaining. Y - Every subsequent press of this button will exit all On-Screen Displays. ቮ RECALL button Press this button when no menu is displayed and the TV will select between both antenna sources when main channel...
... video input jacks and both antenna signals and the three sets of video input jacks each time the button is up to a maximum of three hours. If the SLEEP button is pressed while the timer is connected to view time remaining. Y - Every subsequent press of this button will exit all On-Screen Displays. ቮ RECALL button Press this button when no menu is displayed and the TV will select between both antenna sources when main channel...
Owners Guide
Page 27
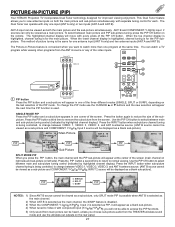
... to change the PIP mode use the wireless out outputs on the remote. POWER Back of the screen. To change between main and sub-picture tuning control (indicated by highlighted channel display.) Press the INPUT button when sub-picture channel tuning is being controlled, to access the PIP functions. 5) Only sound from the THEATER wireless sound mode and use the CURSOR ̆ or ̄ buttons and the new selection will be viewed as a sub-picture, only SPLIT mode PIP...
... to change the PIP mode use the wireless out outputs on the remote. POWER Back of the screen. To change between main and sub-picture tuning control (indicated by highlighted channel display.) Press the INPUT button when sub-picture channel tuning is being controlled, to access the PIP functions. 5) Only sound from the THEATER wireless sound mode and use the CURSOR ̆ or ̄ buttons and the new selection will be viewed as a sub-picture, only SPLIT mode PIP...
Owners Guide
Page 35
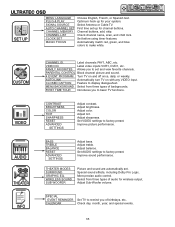
... precise audio control. Select Antenna or Cable TV. First time set up for channel buttons. CLOSED CAPTION Feature to factory preset. Adjust brightness. Improve picture performance. Adjust treble. Set AUDIO settings to remind you of birthdays, etc.. SPECIAL EVENT REMINDER Set TV to factory preset. ULTRATEC OSD SET UP CUSTOM VIDEO AUDIO THEATER INFO SET UP MENU LANGUAGE PLUG & PLAY SIGNAL SOURCE AUTO CHANNEL SET CHANNEL MEMORY CHANNEL LIST CLOCK SET MAGIC FOCUS Choose English, French, or Spanish text. Optimum hook up for your system. Check channel name, scan, and...
... precise audio control. Select Antenna or Cable TV. First time set up for channel buttons. CLOSED CAPTION Feature to factory preset. Adjust brightness. Improve picture performance. Adjust treble. Set AUDIO settings to remind you of birthdays, etc.. SPECIAL EVENT REMINDER Set TV to factory preset. ULTRATEC OSD SET UP CUSTOM VIDEO AUDIO THEATER INFO SET UP MENU LANGUAGE PLUG & PLAY SIGNAL SOURCE AUTO CHANNEL SET CHANNEL MEMORY CHANNEL LIST CLOCK SET MAGIC FOCUS Choose English, French, or Spanish text. Optimum hook up for your system. Check channel name, scan, and...
Owners Guide
Page 39
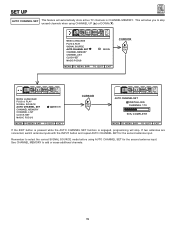
... store active TV channels in CHANNEL MEMORY. See CHANNEL MEMORY to add or erase additional channels. 39 If two antennas are connected, switch antenna inputs with the INPUT button and repeat AUTO CHANNEL SET for the second antenna input. SET UP SET UP AUTO CHANNEL SET This feature will allow you to skip unused channels when using AUTO CHANNEL SET for the second antenna input. SET UP CUSTOM VIDEO AUDIO THEATER INFO MENU LANGUAGE PLUG & PLAY SIGNAL SOURCE AUTO CHANNEL SET CHANNEL MEMORY CHANNEL LIST CLOCK SET MAGIC FOCUS BEGIN MENU TO MENU BAR...
... store active TV channels in CHANNEL MEMORY. See CHANNEL MEMORY to add or erase additional channels. 39 If two antennas are connected, switch antenna inputs with the INPUT button and repeat AUTO CHANNEL SET for the second antenna input. SET UP SET UP AUTO CHANNEL SET This feature will allow you to skip unused channels when using AUTO CHANNEL SET for the second antenna input. SET UP CUSTOM VIDEO AUDIO THEATER INFO MENU LANGUAGE PLUG & PLAY SIGNAL SOURCE AUTO CHANNEL SET CHANNEL MEMORY CHANNEL LIST CLOCK SET MAGIC FOCUS BEGIN MENU TO MENU BAR...
Owners Guide
Page 43
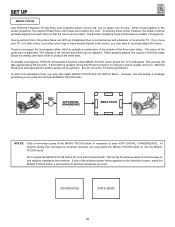
... SET UP MAGIC FOCUS Your HITACHI Projection TV has three color projection tubes: one for red, one for green, one of the pictures shown below appears on the television screen, press the MAGIC FOCUS button a second time to exit this manual set up mode. The output of the MAGIC FOCUS button is stationary. To simplify convergence, HITACHI incorporates a function called convergence . This process will display a message prompting you may want to exit the MAGIC FOCUS mode. MAGIC FOCUS AUTO DIGITAL CONVERGENCE MAGIC FOCUS...
... SET UP MAGIC FOCUS Your HITACHI Projection TV has three color projection tubes: one for red, one for green, one of the pictures shown below appears on the television screen, press the MAGIC FOCUS button a second time to exit this manual set up mode. The output of the MAGIC FOCUS button is stationary. To simplify convergence, HITACHI incorporates a function called convergence . This process will display a message prompting you may want to exit the MAGIC FOCUS mode. MAGIC FOCUS AUTO DIGITAL CONVERGENCE MAGIC FOCUS...
Owners Guide
Page 48
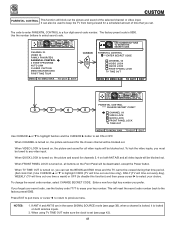
... CHANGE SECRET CODE. PARENTAL CONTROL **** ENTER SECRET CODE CHANNEL 03 VIDEO LOCK QUICK LOCK FRONT PANEL LOCK TV TIME OUT MENU TO MENU BAR TO QUIT EXIT SET UP CUSTOM VIDEO AUDIO THEATER INFO PARENTAL CONTROL 0 0 0 0 **** CHANGE SECRET CODE? CUSTOM CUSTOM PARENTAL CONTROL This function will reset the secret code number back to the factory preset 0000. The code to any video input. The factory preset code is turned on, all video inputs will be tuned to enter PARENTAL CONTROL is turned on, the picture and sound...
... CHANGE SECRET CODE. PARENTAL CONTROL **** ENTER SECRET CODE CHANNEL 03 VIDEO LOCK QUICK LOCK FRONT PANEL LOCK TV TIME OUT MENU TO MENU BAR TO QUIT EXIT SET UP CUSTOM VIDEO AUDIO THEATER INFO PARENTAL CONTROL 0 0 0 0 **** CHANGE SECRET CODE? CUSTOM CUSTOM PARENTAL CONTROL This function will reset the secret code number back to the factory preset 0000. The code to any video input. The factory preset code is turned on, all video inputs will be tuned to enter PARENTAL CONTROL is turned on, the picture and sound...
Owners Guide
Page 51
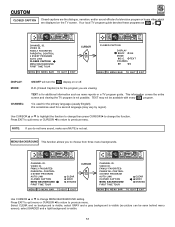
... menu or CURSOR ̇ to return to previous menu. FAMILY FAVORITES PARENTAL CONTROL 4 EVENT PROGRAM AUTO LINK CLOSED CAPTION MENU BACKGROUND FIRST TIME TOUR CLEAR GRAY SHADED MENU TO MENU BAR TO QUIT EXIT CURSOR FAV CH SET UP CUSTOM VIDEO AUDIO THEATER INFO CHANNEL ID. CHANNEL 1 ON TEXT 2 MENU TO MENU BAR TO QUIT EXIT DISPLAY: MODE: CHANNEL: ON/OFF will turn the CC display on the TV screen. NOTE: If you to change MENU BACKGROUND setting...
... menu or CURSOR ̇ to return to previous menu. FAMILY FAVORITES PARENTAL CONTROL 4 EVENT PROGRAM AUTO LINK CLOSED CAPTION MENU BACKGROUND FIRST TIME TOUR CLEAR GRAY SHADED MENU TO MENU BAR TO QUIT EXIT CURSOR FAV CH SET UP CUSTOM VIDEO AUDIO THEATER INFO CHANNEL ID. CHANNEL 1 ON TEXT 2 MENU TO MENU BAR TO QUIT EXIT DISPLAY: MODE: CHANNEL: ON/OFF will turn the CC display on the TV screen. NOTE: If you to change MENU BACKGROUND setting...
Owners Guide
Page 54
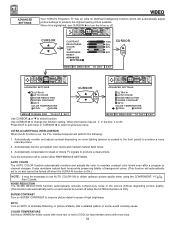
... to change the function setting. VIDEO ADVANCED SETTINGS VIDEO Your HITACHI Projection TV has an Ultra AI (Artificial Intelligence) function which will perform the following: 1. Use CURSOR ̈ to previous menu. Automatically monitor and adjust contrast depending on room lighting (sensor is highlighted, use CURSOR ̈ to turn the AI on , the TVs internal computer will automatically adjust picture settings to produce a more blue. 54 When AI is located in the picture...
... to change the function setting. VIDEO ADVANCED SETTINGS VIDEO Your HITACHI Projection TV has an Ultra AI (Artificial Intelligence) function which will perform the following: 1. Use CURSOR ̈ to previous menu. Automatically monitor and adjust contrast depending on room lighting (sensor is highlighted, use CURSOR ̈ to turn the AI on , the TVs internal computer will automatically adjust picture settings to produce a more blue. 54 When AI is located in the picture...
Owners Guide
Page 56
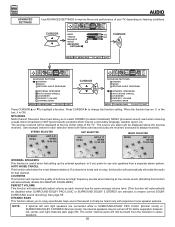
... MODE Multi-Channel Television Sound will automatically eliminate the audio for better separation between stations. The sources received will be displayed at low volume levels. (Enabling this function will allow you to enjoy spectacular bass sound that channel. AUTO NOISE CANCEL This function eliminates the noise between left and right speakers are selected, to ensure correct DOLBY SURROUND sound decoding.) See page 59. AUDIO ADVANCED SETTINGS AUDIO Use ADVANCED SETTINGS...
... MODE Multi-Channel Television Sound will automatically eliminate the audio for better separation between stations. The sources received will be displayed at low volume levels. (Enabling this function will allow you to enjoy spectacular bass sound that channel. AUTO NOISE CANCEL This function eliminates the noise between left and right speakers are selected, to ensure correct DOLBY SURROUND sound decoding.) See page 59. AUDIO ADVANCED SETTINGS AUDIO Use ADVANCED SETTINGS...


