Owners Guide
Page 1
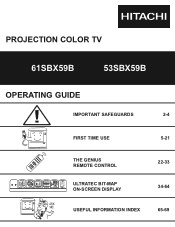
PROJECTION COLOR TV 61SBX59B 53SBX59B OPERATING GUIDE IMPORTANT SAFEGUARDS 2-4 FIRST TIME USE 5-21 THE GENIUS REMOTE CONTROL SET UP CUSTOM VIDEO AUDIO THEATER INFO ULTRATEC BIT-MAP ON-SCREEN DISPLAY 22-33 34-64 USEFUL INFORMATION INDEX 65-69
PROJECTION COLOR TV 61SBX59B 53SBX59B OPERATING GUIDE IMPORTANT SAFEGUARDS 2-4 FIRST TIME USE 5-21 THE GENIUS REMOTE CONTROL SET UP CUSTOM VIDEO AUDIO THEATER INFO ULTRATEC BIT-MAP ON-SCREEN DISPLAY 22-33 34-64 USEFUL INFORMATION INDEX 65-69

Owners Guide
Page 3
...or other .) This plug will be discovered in a shock or fire hazard. NO! 5. Never spill liquid of any kind into the television set is provided. Do not subject your product model. ! Unplug the television from the wall outlet and refer servicing to qualified service personnel. 8. Coins.... PROTECTION AND LOCATION OF YOUR TELEVISION 12. SAFETY POINTS YOU SHOULD KNOW ABOUT YOUR HITACHI PROJECTION TELEVISION Our reputation has been built on an unstable cart, stand, or table. This television set , unplug it to the proper operation of your electrician to damage the picture tube ...
...or other .) This plug will be discovered in a shock or fire hazard. NO! 5. Never spill liquid of any kind into the television set is provided. Do not subject your product model. ! Unplug the television from the wall outlet and refer servicing to qualified service personnel. 8. Coins.... PROTECTION AND LOCATION OF YOUR TELEVISION 12. SAFETY POINTS YOU SHOULD KNOW ABOUT YOUR HITACHI PROJECTION TELEVISION Our reputation has been built on an unstable cart, stand, or table. This television set , unplug it to the proper operation of your electrician to damage the picture tube ...
Owners Guide
Page 4
... SERVICE GROUNDING ELECTRODE SYSTEM (NEC ART 250 PART H) EXAMPLE OF ANTENNA GROUNDING AS PER NATIONAL ELECTRICAL CODE INSTRUCTIONS. 18. If your HITACHI Factory Warranty. ¥ When using Picture-in damage and will prevent damage due to operate from the wall outlet. Unplug the television...WIRE ANTENNA DISCHARGE UNIT (NEC SECTION 810-20) 17. When installing an outside antenna is continuous Pop Snap or frequent, unplug the set and consult your dealer or service technician. Service 23. FOR SERVICING AND MODIFICATION 25. If the television does not operate normally by ...
... SERVICE GROUNDING ELECTRODE SYSTEM (NEC ART 250 PART H) EXAMPLE OF ANTENNA GROUNDING AS PER NATIONAL ELECTRICAL CODE INSTRUCTIONS. 18. If your HITACHI Factory Warranty. ¥ When using Picture-in damage and will prevent damage due to operate from the wall outlet. Unplug the television...WIRE ANTENNA DISCHARGE UNIT (NEC SECTION 810-20) 17. When installing an outside antenna is continuous Pop Snap or frequent, unplug the set and consult your dealer or service technician. Service 23. FOR SERVICING AND MODIFICATION 25. If the television does not operate normally by ...
Owners Guide
Page 6
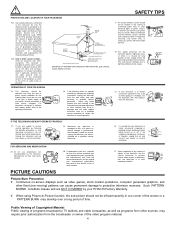
... 5' 10' 15' 20' 50 VIEWING ANGLE S CAUTION: Magnetic fields, such as the viewer moves to the left and right of set . HOW TO SET UP YOUR NEW HITACHI PROJECTION TV ANTENNA Unless your TV is connected to a cable TV system or to a centralized antenna system, a good outdoor color TV ...chance of the receiver. During daylight hours, reflections from the perforated back cover of the set failure, do not place the TV where temperatures can be obtained by sitting directly in front of the HITACHI Projection Television is its best, test various locations in direct sunlight or near a heating...
... 5' 10' 15' 20' 50 VIEWING ANGLE S CAUTION: Magnetic fields, such as the viewer moves to the left and right of set . HOW TO SET UP YOUR NEW HITACHI PROJECTION TV ANTENNA Unless your TV is connected to a cable TV system or to a centralized antenna system, a good outdoor color TV ...chance of the receiver. During daylight hours, reflections from the perforated back cover of the set failure, do not place the TV where temperatures can be obtained by sitting directly in front of the HITACHI Projection Television is its best, test various locations in direct sunlight or near a heating...
Owners Guide
Page 8
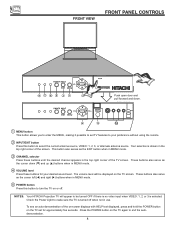
...when in MENU mode. ብ VOLUME level Press these buttons until the desired channel appears in the top right corner of the screen. NOTES: Your HITACHI Projection TV will be turned OFF if there is no video input when VIDEO: 1, 2, or 3 is shown in the top right corner of the...CH+ VOL- These buttons also serve as the cursor down . ቢ MENU button This button allows you to enter the MENU, making it possible to set for your preference without using the remote. ባ INPUT/EXIT button Press this button to end the autodemonstration. 8 CURSOR VOL+ CH- Your selection is ...
...when in MENU mode. ብ VOLUME level Press these buttons until the desired channel appears in the top right corner of the screen. NOTES: Your HITACHI Projection TV will be turned OFF if there is no video input when VIDEO: 1, 2, or 3 is shown in the top right corner of the...CH+ VOL- These buttons also serve as the cursor down . ቢ MENU button This button allows you to enter the MENU, making it possible to set for your preference without using the remote. ባ INPUT/EXIT button Press this button to end the autodemonstration. 8 CURSOR VOL+ CH- Your selection is ...

Owners Guide
Page 11
... have S-Video output, S-Video signal needs to be input to input 1 or input 2, or input 3. ብ Wireless Out These jacks provide variable audio output to a set of these jacks for another stereo system amplifier. Use these may use VIDEO, S-VIDEO, or COMPONENT: Y-CBCR inputs to connect to a separate stereo amplifier. With...
... have S-Video output, S-Video signal needs to be input to input 1 or input 2, or input 3. ብ Wireless Out These jacks provide variable audio output to a set of these jacks for another stereo system amplifier. Use these may use VIDEO, S-VIDEO, or COMPONENT: Y-CBCR inputs to connect to a separate stereo amplifier. With...

Owners Guide
Page 16
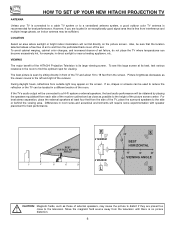
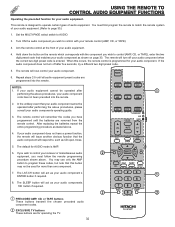
Do not connect speakers simultaneously to the speaker and distorted sound, set the volume control of the audio amplifier lower and adjust the sound using the remote control of the Projection TV and an external amplifier. 16 ... AUDIO AMPLIFIER To control the audio level of an external audio amplifier with the remote control, connect the system as shown below. (REAR OF TV SET) AUDIO TO HI-FI TERMINAL L R AUDIO TO HI-FI TO AUDIO INPUT TERMINAL OF EXTERNAL AMPLIFIER EXTERNAL SPEAKERS AUDIO AMPLIFIER EXTERNAL SPEAKERS NOTES: To prevent...
Do not connect speakers simultaneously to the speaker and distorted sound, set the volume control of the audio amplifier lower and adjust the sound using the remote control of the Projection TV and an external amplifier. 16 ... AUDIO AMPLIFIER To control the audio level of an external audio amplifier with the remote control, connect the system as shown below. (REAR OF TV SET) AUDIO TO HI-FI TERMINAL L R AUDIO TO HI-FI TO AUDIO INPUT TERMINAL OF EXTERNAL AMPLIFIER EXTERNAL SPEAKERS AUDIO AMPLIFIER EXTERNAL SPEAKERS NOTES: To prevent...
Owners Guide
Page 17
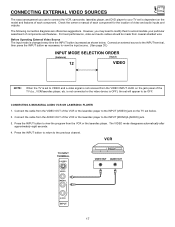
... button to return to view the input source. (See page 26.) INPUT MODE SELECTION ORDER (Antenna) (Input) 12 VIDEO NOTE: When the TV is set is dependent on the model and features of each component for the location of video and audio inputs and outputs. CONNECTING EXTERNAL VIDEO SOURCES The... exact arrangement you may need to modify them to accommodate your TV set to VIDEO and a video signal is not received from the VIDEO INPUT JACK on the jack panel of the TV (i.e., VCR/laserdisc player, etc. ...
... button to return to view the input source. (See page 26.) INPUT MODE SELECTION ORDER (Antenna) (Input) 12 VIDEO NOTE: When the TV is set is dependent on the model and features of each component for the location of video and audio inputs and outputs. CONNECTING EXTERNAL VIDEO SOURCES The... exact arrangement you may need to modify them to accommodate your TV set to VIDEO and a video signal is not received from the VIDEO INPUT JACK on the jack panel of the TV (i.e., VCR/laserdisc player, etc. ...
Owners Guide
Page 18
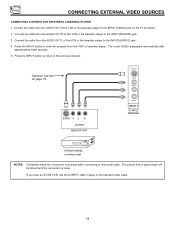
... to the INPUT (VIDEO) jack on page 15 S-VHS V L R OUTPUT BACK OF VCR S-VIDEO 1 VIDEO (MONO) L R AUDIO INPUT 1 TV INPUT TERMINAL HITACHI MODEL or similar model NOTES: Completely insert the connection cord plugs when connecting to rear panel jacks. Connect the cable from the VIDEO OUT of... the standard video cable. 18 Optional, see tips on the TV set below. 2. The mode VIDEO disappears automatically after approximately eight seconds. 5. The picture that is played back will be abnormal if the connection is...
... to the INPUT (VIDEO) jack on page 15 S-VHS V L R OUTPUT BACK OF VCR S-VIDEO 1 VIDEO (MONO) L R AUDIO INPUT 1 TV INPUT TERMINAL HITACHI MODEL or similar model NOTES: Completely insert the connection cord plugs when connecting to rear panel jacks. Connect the cable from the VIDEO OUT of... the standard video cable. 18 Optional, see tips on the TV set below. 2. The mode VIDEO disappears automatically after approximately eight seconds. 5. The picture that is played back will be abnormal if the connection is...
Owners Guide
Page 19
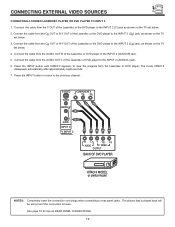
... seconds. 7. S-VIDEO VIDEO COMPONENT Y CB CR (MONO) L R AUDIO INPUT 2 TV INPUT 2 TERMINAL R L Y CB CR AUDIO VIDEO OUTPUT BACK OF DVD PLAYER HITACHI MODEL or similar model NOTES: Completely insert the connection cord plugs when connecting to the previous channel. Connect the cable from the CB OUT or... . 3. Press the INPUT button until VIDEO:2 appears, to the INPUT 2 (CR) jack, as shown on the TV set below . 2. See page 15 for tips on the TV set below. 4. Connect the cable from the AUDIO OUT R of the Laserdisc or DVD player to the INPUT 2 (AUDIO/R) jack. 5. Connect...
... seconds. 7. S-VIDEO VIDEO COMPONENT Y CB CR (MONO) L R AUDIO INPUT 2 TV INPUT 2 TERMINAL R L Y CB CR AUDIO VIDEO OUTPUT BACK OF DVD PLAYER HITACHI MODEL or similar model NOTES: Completely insert the connection cord plugs when connecting to the previous channel. Connect the cable from the CB OUT or... . 3. Press the INPUT button until VIDEO:2 appears, to the INPUT 2 (CR) jack, as shown on the TV set below . 2. See page 15 for tips on the TV set below. 4. Connect the cable from the AUDIO OUT R of the Laserdisc or DVD player to the INPUT 2 (AUDIO/R) jack. 5. Connect...
Owners Guide
Page 23
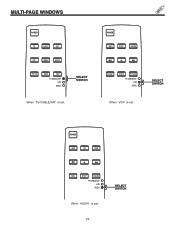
MULTI-PAGE WINDOWS POWER TV CABLE SAT PIP SWAP MOVE PIP CH HELP FRZ TV/CABLE/SAT VCR AUDIO SELECT SWITCH When TV/CABLE/SAT is set. 23 SELECT SWITCH SELECT SWITCH POWER AMP CD TAPE ̇̇ ̈ ̈̈ REC STOP PAUSE TV/CABLE/SAT VCR AUDIO When AUDIO is set . POWER REC STOP PAUSE ̇̇ ̈ ̈̈ SLOW PROG TV/VCR TV/CABLE/SAT VCR AUDIO When VCR is set .
MULTI-PAGE WINDOWS POWER TV CABLE SAT PIP SWAP MOVE PIP CH HELP FRZ TV/CABLE/SAT VCR AUDIO SELECT SWITCH When TV/CABLE/SAT is set. 23 SELECT SWITCH SELECT SWITCH POWER AMP CD TAPE ̇̇ ̈ ̈̈ REC STOP PAUSE TV/CABLE/SAT VCR AUDIO When AUDIO is set . POWER REC STOP PAUSE ̇̇ ̈ ̈̈ SLOW PROG TV/VCR TV/CABLE/SAT VCR AUDIO When VCR is set .
Owners Guide
Page 24
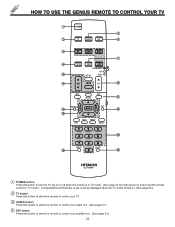
... or off when the remote is in TV mode. (See page 22 for instructions on how to set the remote control to TV mode.) If a Special Event Reminder is set, it will be displayed when the TV is first turned on. (See page 63.) ባ TV button Press this button to allow...
... or off when the remote is in TV mode. (See page 22 for instructions on how to set the remote control to TV mode.) If a Special Event Reminder is set, it will be displayed when the TV is first turned on. (See page 63.) ባ TV button Press this button to allow...
Owners Guide
Page 25
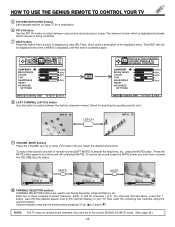
...etc.) ANT A 10 LST-CH ANT A 39 ቪ VOLUME, MUTE buttons Press the VOLUME up (̆) or down ( ) button until two dashes appear next to set Family Favorites, Channel Memory, etc. HOW TO USE THE GENIUS REMOTE TO CONTROL YOUR TV ቦ PICTURE-IN-PICTURE buttons See separate section on your...50% 50% 50% HELP P R E S S ̈ FOR A DEEPER PICTURE, PRESS ̇ TO SVEIDTEUOP DECREASE CONTRAST CONTRAST BRIGHTNESS COLOR TINT SHARPNESS RESET A D VA N C E D SETTINGS 100% 50% 50% 50% MENU TO MENU BAR TO QUIT EXIT MENU TO MENU BAR TO QUIT EXIT ቩ LAST CHANNEL (LST-CH) button Use ...
...etc.) ANT A 10 LST-CH ANT A 39 ቪ VOLUME, MUTE buttons Press the VOLUME up (̆) or down ( ) button until two dashes appear next to set Family Favorites, Channel Memory, etc. HOW TO USE THE GENIUS REMOTE TO CONTROL YOUR TV ቦ PICTURE-IN-PICTURE buttons See separate section on your...50% 50% 50% HELP P R E S S ̈ FOR A DEEPER PICTURE, PRESS ̇ TO SVEIDTEUOP DECREASE CONTRAST CONTRAST BRIGHTNESS COLOR TINT SHARPNESS RESET A D VA N C E D SETTINGS 100% 50% 50% 50% MENU TO MENU BAR TO QUIT EXIT MENU TO MENU BAR TO QUIT EXIT ቩ LAST CHANNEL (LST-CH) button Use ...

Owners Guide
Page 26
...video input jacks and the ANT A antenna source (ANT B source cannot be displayed as a PIP sub-picture and COMPONENT: Y-CBCR Input 2 source will be set , it will reset to the last channel viewed when the selected time is up to Video: 2. ቯ MENU, CURSOR buttons All the On-Screen Display ... (SAP), the time, CHANNEL ID, if the Channel Skip (C.S.) function is activated, if SPECIAL EVENT REMINDER is set, and if the SLEEP timer is set , use RECALL when you want to view time remaining. Once set . IN: 1 INPUT Y - The MENU button will add 15 minutes to this timer, up . If the Picture-...
...video input jacks and the ANT A antenna source (ANT B source cannot be displayed as a PIP sub-picture and COMPONENT: Y-CBCR Input 2 source will be set , it will reset to the last channel viewed when the selected time is up to Video: 2. ቯ MENU, CURSOR buttons All the On-Screen Display ... (SAP), the time, CHANNEL ID, if the Channel Skip (C.S.) function is activated, if SPECIAL EVENT REMINDER is set, and if the SLEEP timer is set , use RECALL when you want to view time remaining. Once set . IN: 1 INPUT Y - The MENU button will add 15 minutes to this timer, up . If the Picture-...

Owners Guide
Page 28
... 1. The SWAP function will not operate if ANT B input is tuned during this SURF scanning, sub-pictures will automatically scan all active channel numbers (those set as the main channel (ANT B input cannot be removed from the screen. SURF MODE PIP This feature will be displayed as a sub-picture.) ቤ...; MOVE button To move the sub-picture to another corner, press the MOVE button. If a channel is set in SURF mode, auto-scanning will only operate when SINGLE PIP mode or split mode PIP is pressed. ANT A 10 VIDEO: 1 SINGLE SPLIT SURF ...
... 1. The SWAP function will not operate if ANT B input is tuned during this SURF scanning, sub-pictures will automatically scan all active channel numbers (those set as the main channel (ANT B input cannot be removed from the screen. SURF MODE PIP This feature will be displayed as a sub-picture.) ቤ...; MOVE button To move the sub-picture to another corner, press the MOVE button. If a channel is set in SURF mode, auto-scanning will only operate when SINGLE PIP mode or split mode PIP is pressed. ANT A 10 VIDEO: 1 SINGLE SPLIT SURF ...
Owners Guide
Page 29
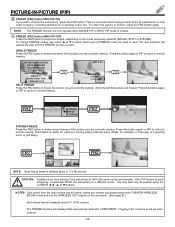
... to freeze one frame of the picture you are currently viewing. The new selection will only operate when SINGLE PIP or SPLIT PIP mode is set as main channel. 29 SINGLE FREEZE Press the FRZ button to a different corner. PICTURE-IN-PICTURE (PIP) ብ FREEZE (FRZ) button (With PIP ON) If...
... to freeze one frame of the picture you are currently viewing. The new selection will only operate when SINGLE PIP or SPLIT PIP mode is set as main channel. 29 SINGLE FREEZE Press the FRZ button to a different corner. PICTURE-IN-PICTURE (PIP) ብ FREEZE (FRZ) button (With PIP ON) If...

Owners Guide
Page 30
Set the MULTI-PAGE select switch to page 33.) 1. Hold down the PROG. button on page 33. If the VCR does not turn off after performing ... unlikely event that matches your VCR as your VCR ENTER button if required. 7. If your VCR does not have programmed until the batteries are for HITACHI VCRs. 6. This button will act as the VCR record button when the remote is entered. If your VCR cannot be pressed two times to operate...
Set the MULTI-PAGE select switch to page 33.) 1. Hold down the PROG. button on page 33. If the VCR does not turn off after performing ... unlikely event that matches your VCR as your VCR ENTER button if required. 7. If your VCR does not have programmed until the batteries are for HITACHI VCRs. 6. This button will act as the VCR record button when the remote is entered. If your VCR cannot be pressed two times to operate...

Owners Guide
Page 31
... that matches your cable/satellite box operating guide. 3. If your cable/satellite box cannot be operated after five seconds, try another two digit preset code. 6. Set the MULTI-PAGE select switch to SAT mode. 4. The LST-CH button will act as the cable box ENTER button if required. 6. The INPUT button...
... that matches your cable/satellite box operating guide. 3. If your cable/satellite box cannot be operated after five seconds, try another two digit preset code. 6. Set the MULTI-PAGE select switch to SAT mode. 4. The LST-CH button will act as the cable box ENTER button if required. 6. The INPUT button...
Owners Guide
Page 32
... be operated after performing the above . You must follow the remote programming procedure shown above procedures, please consult your audio component s ENTER button if required. 8. Set the MULTI-PAGE select switch to page 33.) 1. Hold down the button on page 33. The remote will remember the codes you must first program...
... be operated after performing the above . You must follow the remote programming procedure shown above procedures, please consult your audio component s ENTER button if required. 8. Set the MULTI-PAGE select switch to page 33.) 1. Hold down the button on page 33. The remote will remember the codes you must first program...
Owners Guide
Page 34
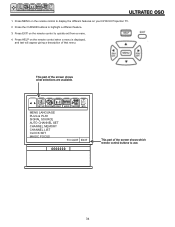
...will appear giving a description of that menu. Press HELP on your HITACHI Projection TV. 2. SET UP CUSTOM VIDEO AUDIO THEATER INFO MENU LANGUAGE PLUG & PLAY SIGNAL SOURCE AUTO CHANNEL SET CHANNEL MEMORY CHANNEL LIST CLOCK SET MAGIC FOCUS TO QUIT EXIT This part of the screen shows what selections... are available. SET UP CUSTOM VIDEO AUDIO THEATER INFO ULTRATEC OSD 1. Press EXIT on the ...
...will appear giving a description of that menu. Press HELP on your HITACHI Projection TV. 2. SET UP CUSTOM VIDEO AUDIO THEATER INFO MENU LANGUAGE PLUG & PLAY SIGNAL SOURCE AUTO CHANNEL SET CHANNEL MEMORY CHANNEL LIST CLOCK SET MAGIC FOCUS TO QUIT EXIT This part of the screen shows what selections... are available. SET UP CUSTOM VIDEO AUDIO THEATER INFO ULTRATEC OSD 1. Press EXIT on the ...

