
Owners Guide
Page 1
has determined that this product meets the Energy Star® guidelines for 50VS69A 55VS69A and 62VS69A IMPORTANT SAFETY INSTRUCTIONS 2-3 FIRST TIME USE ...4-18 THE REMOTE CONTROL ...19-30 ON-SCREEN DISPLAY ...31-55 LAMP REPLACEMENT ...56-59 USEFUL INFORMATION...60-64 LICENSE AGREEMENT...65-73 APPENDIXES ...74-75 INDEX ...76 As an Energy Star® Partner, Hitachi, Ltd. LCD REAR PROJECTION TELEVISION Operating Guide for energy efficiency.
has determined that this product meets the Energy Star® guidelines for 50VS69A 55VS69A and 62VS69A IMPORTANT SAFETY INSTRUCTIONS 2-3 FIRST TIME USE ...4-18 THE REMOTE CONTROL ...19-30 ON-SCREEN DISPLAY ...31-55 LAMP REPLACEMENT ...56-59 USEFUL INFORMATION...60-64 LICENSE AGREEMENT...65-73 APPENDIXES ...74-75 INDEX ...76 As an Energy Star® Partner, Hitachi, Ltd. LCD REAR PROJECTION TELEVISION Operating Guide for energy efficiency.

Owners Guide
Page 5
... may be sure that is due to the TV's cabinet expanding and contracting due to the left and right of the set up your new HITACHI Projection Television ANTENNA Unless your LCD Rear PTV against a wall, keep it is free from overheating. The LCD Rear PTV cabinet is its best,...best picture is recommended for example, in an exceptionally good signal area that the location selected allows a free flow of the picture screen center. The sound of the HITACHI LCD Rear PTV is constructed with speaker placement for viewing. You may take about 10 to 18 feet from the fan is ...
... may be sure that is due to the TV's cabinet expanding and contracting due to the left and right of the set up your new HITACHI Projection Television ANTENNA Unless your LCD Rear PTV against a wall, keep it is free from overheating. The LCD Rear PTV cabinet is its best,...best picture is recommended for example, in an exceptionally good signal area that the location selected allows a free flow of the picture screen center. The sound of the HITACHI LCD Rear PTV is constructed with speaker placement for viewing. You may take about 10 to 18 feet from the fan is ...

Owners Guide
Page 7
... (TV, DVD, CBL, SAT, VCR) Used to manually enter the TV channel, and used for a complete description of all of the functions on your HITACHI LCD Rear Projection TV, the new remote control is designed to operate different types of devices, such as, DVD Players, CBL (Cable Boxes), set-top...) Controls the precode functions of your TV. Digital Video Disc Player SAT- POWER BUTTON (TV, CBL, VCR, DVD, SAT) Turns the selected device on the screen. ASPECT BUTTON (TV) Changes the aspect ratio while watching TV. MENU BUTTON (CBL, DVD, SAT, TV) Accesses the OSD menu system. EXIT BUTTON (TV,...
... (TV, DVD, CBL, SAT, VCR) Used to manually enter the TV channel, and used for a complete description of all of the functions on your HITACHI LCD Rear Projection TV, the new remote control is designed to operate different types of devices, such as, DVD Players, CBL (Cable Boxes), set-top...) Controls the precode functions of your TV. Digital Video Disc Player SAT- POWER BUTTON (TV, CBL, VCR, DVD, SAT) Turns the selected device on the screen. ASPECT BUTTON (TV) Changes the aspect ratio while watching TV. MENU BUTTON (CBL, DVD, SAT, TV) Accesses the OSD menu system. EXIT BUTTON (TV,...

Owners Guide
Page 8
...; VOLUME level Press these buttons for a quick hook-up from a camcorder , VCR or a Y-PBPR capability device to display the input menu selections of the TV screen. This button also serves as the cursor down (̄) and up (̆) buttons when in the top right corner of CABLE/ AIR, INPUT: 1, 2, 3, 4 and 5. These... the remote control at the level it is turned OFF at a volume level 31 or greater, the volume level will be displayed on the TV screen.
...; VOLUME level Press these buttons for a quick hook-up from a camcorder , VCR or a Y-PBPR capability device to display the input menu selections of the TV screen. This button also serves as the cursor down (̄) and up (̆) buttons when in the top right corner of CABLE/ AIR, INPUT: 1, 2, 3, 4 and 5. These... the remote control at the level it is turned OFF at a volume level 31 or greater, the volume level will be displayed on the TV screen.

Owners Guide
Page 9
...56-59 for Service LONG BLINKING (1 SEC CYCLE) COOL DOWN (FOR 6 MINUTES) (TV CAN ACCEPT REMOTE CONTROL AND FRONT BUTTONS) 2. Your Hitachi LCD Rear Projection Television may become clogged over time. OF COOLDOWN) ACTION Need to replace if LAMP still does not light by Power On " ... POWER Light When the TV is turned ON, the Power Light will first blink to indicate that lights up the TV screen. Consult your Hitachi dealer for long lasting performance. 4. Your Hitachi LCD Rear Projection Television has an internal lamp that the television lamp is warming up . NOTES: 1.
...56-59 for Service LONG BLINKING (1 SEC CYCLE) COOL DOWN (FOR 6 MINUTES) (TV CAN ACCEPT REMOTE CONTROL AND FRONT BUTTONS) 2. Your Hitachi LCD Rear Projection Television may become clogged over time. OF COOLDOWN) ACTION Need to replace if LAMP still does not light by Power On " ... POWER Light When the TV is turned ON, the Power Light will first blink to indicate that lights up the TV screen. Consult your Hitachi dealer for long lasting performance. 4. Your Hitachi LCD Rear Projection Television has an internal lamp that the television lamp is warming up . NOTES: 1.

Owners Guide
Page 11
...you have monitor output. ቤባ ብ NOTE: 1. In order to receive written notification, please complete and return your television screen. The HDMI input is for connecting equipment with personal computers. 2. NOTE: *Manufactured under license from the source all digital interface for consumer...B-Y output to the TV's PB input and the components R-Y output to obtain optimum picture quality when using the Y-PBPR jacks. 6. HITACHI will be labeled Y-CBCR. Component signal to the TV's PR input. 4. Use the HDMI input for high quality video output. S-...
...you have monitor output. ቤባ ብ NOTE: 1. In order to receive written notification, please complete and return your television screen. The HDMI input is for connecting equipment with personal computers. 2. NOTE: *Manufactured under license from the source all digital interface for consumer...B-Y output to the TV's PB input and the components R-Y output to obtain optimum picture quality when using the Y-PBPR jacks. 6. HITACHI will be labeled Y-CBCR. Component signal to the TV's PR input. 4. Use the HDMI input for high quality video output. S-...

Owners Guide
Page 12
...: 123-456-789-1 Unit Address: 123-456-789-1 OR Press EXIT to return Not an Authorized Channel Please take note of all information on the screen (you as Point of the Rear Panel Jacks. 2. Acquiring Data. NOTE: 1. Press the EXIT button to cable terminal of Deployment (POD) module). 1. Digital ... for the CableCARD that will be facing towards you will provide this information to your cable operator). Connect a coaxial cable to exit the second screen. Do not insert a PCMCIA card into the slot (Top of card should be provided by your local cable operator to gain access to start...
...: 123-456-789-1 Unit Address: 123-456-789-1 OR Press EXIT to return Not an Authorized Channel Please take note of all information on the screen (you as Point of the Rear Panel Jacks. 2. Acquiring Data. NOTE: 1. Press the EXIT button to cable terminal of Deployment (POD) module). 1. Digital ... for the CableCARD that will be facing towards you will provide this information to your cable operator). Connect a coaxial cable to exit the second screen. Do not insert a PCMCIA card into the slot (Top of card should be provided by your local cable operator to gain access to start...

Owners Guide
Page 19
...control at the remote sensor of the set -top-box or satellite receiver. To operate your cable box). To operate your television. To operate your HITACHI LCD rear projection Television , the new remote control is designed to operate different types of VCRs, CATV (Cable TV) converters, set -top-box or... satellite receiver, point the remote at the screen of the TV and press the TV button. The Remote Control The Remote Control In addition to controlling all the functions on your cable box...
...control at the remote sensor of the set -top-box or satellite receiver. To operate your cable box). To operate your television. To operate your HITACHI LCD rear projection Television , the new remote control is designed to operate different types of VCRs, CATV (Cable TV) converters, set -top-box or... satellite receiver, point the remote at the screen of the TV and press the TV button. The Remote Control The Remote Control In addition to controlling all the functions on your cable box...

Owners Guide
Page 22
... button When the remote control is connected to INPUT 1 INFO S-IN: 1 480i 3:17PM Auto µ EXIT button This button will exit all On-Screen Displays. INPUTS INFO button display for Analog Channels INFO Show Name 3:00PM- 3:30PM ST TV-G Air 8 KXYZ-HD 480i 3:17PM Auto STEREO Input 4...press the SELECT button to choose INPUT 5. INFO Auto Show Name 3:00PM- 3:30PM ALT U.S. Pressing the INPUTS button repeatedly will start the On-Screen Display. ¾ GUIDE button [Cable Box (CBL), Satellite Receiver (SAT) modes only] The use of this button when you want to check...
... button When the remote control is connected to INPUT 1 INFO S-IN: 1 480i 3:17PM Auto µ EXIT button This button will exit all On-Screen Displays. INPUTS INFO button display for Analog Channels INFO Show Name 3:00PM- 3:30PM ST TV-G Air 8 KXYZ-HD 480i 3:17PM Auto STEREO Input 4...press the SELECT button to choose INPUT 5. INFO Auto Show Name 3:00PM- 3:30PM ALT U.S. Pressing the INPUTS button repeatedly will start the On-Screen Display. ¾ GUIDE button [Cable Box (CBL), Satellite Receiver (SAT) modes only] The use of this button when you want to check...

Owners Guide
Page 24
...other programs from any of the video inputs. Main Picture Sub Picture SWAP NOTE : 1. Please see page 25). The Picture-in -Picture (PIP) Your HITACHI LCD TV incorporates one Tuner technology designed for PIP availability. Use the CURSOR PAD (̆ or ̄) to move with every press of the four... different modes (POP, PIP, or SPLIT), depending on the screen. Press the CURSOR PAD ( ̇ or ̈) to enable the sub-picture sound. 24 Back of the main picture. The Remote Control Picture-in ...
...other programs from any of the video inputs. Main Picture Sub Picture SWAP NOTE : 1. Please see page 25). The Picture-in -Picture (PIP) Your HITACHI LCD TV incorporates one Tuner technology designed for PIP availability. Use the CURSOR PAD (̆ or ̄) to move with every press of the four... different modes (POP, PIP, or SPLIT), depending on the screen. Press the CURSOR PAD ( ̇ or ̈) to enable the sub-picture sound. 24 Back of the main picture. The Remote Control Picture-in ...

Owners Guide
Page 31
... ̆, ̄, ̇ and ̈) to use. Video Audio Channel Manager Locks Timers Setup Move SEL Select This part of the On-Screen Display menu. On-Screen Display 1. On-Screen Display 31 Press EXIT on your HITACHI LCD Rear Projection TV. 2. Press the SELECT button to quickly exit from a menu. This part of the...
... ̆, ̄, ̇ and ̈) to use. Video Audio Channel Manager Locks Timers Setup Move SEL Select This part of the On-Screen Display menu. On-Screen Display 1. On-Screen Display 31 Press EXIT on your HITACHI LCD Rear Projection TV. 2. Press the SELECT button to quickly exit from a menu. This part of the...

Owners Guide
Page 32
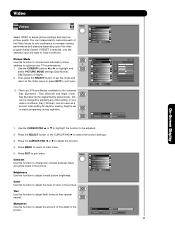
... of the Channel Manager OSD is installed in the rear panel of movies and television programming Black Enhancement Enhance picture brightness in the picture. On-Screen Display On-Screen Display Video Locks Picture Mode Select between 2 Contrast Mode based on motion picture ratings. Standard for TV programs. Audio Treble Adjust the treble.
... of the Channel Manager OSD is installed in the rear panel of movies and television programming Black Enhancement Enhance picture brightness in the picture. On-Screen Display On-Screen Display Video Locks Picture Mode Select between 2 Contrast Mode based on motion picture ratings. Standard for TV programs. Audio Treble Adjust the treble.
Owners Guide
Page 33
... function to adjust the amount of fine detail in the picture. Press the CURSOR PAD ̇ or ̈ to adjust overall picture brightness. Video On-Screen Display Video Select VIDEO to quit menu. There are 3 Picture Modes available for daytime viewing. Press EXIT to adjust picture settings and improve picture quality...
... function to adjust the amount of fine detail in the picture. Press the CURSOR PAD ̇ or ̈ to adjust overall picture brightness. Video On-Screen Display Video Select VIDEO to quit menu. There are 3 Picture Modes available for daytime viewing. Press EXIT to adjust picture settings and improve picture quality...

Owners Guide
Page 34
...shadow detail in dark scenes using the settings off, low, middle and high. Black Enhancement Use this function to +10 (video is toward top of screen). 1. If CONTRAST is either 4:3 EXPANDED/ZOOM1/ZOOM2 or 16:9 ZOOM. The additional menu items BRIGHTNESS, COLOR, TINT, and SHARPNESS can be available in... 4:3 Standard and 16:9 Standard mode. 34 When film is turned ON from the VIDEO menu, your Hitachi LCD Television will not be changed with these modes. When using the COMPONENT VIDEO Y-PBPR input jacks. 3. Aspect Use this function to video for ...
...shadow detail in dark scenes using the settings off, low, middle and high. Black Enhancement Use this function to +10 (video is toward top of screen). 1. If CONTRAST is either 4:3 EXPANDED/ZOOM1/ZOOM2 or 16:9 ZOOM. The additional menu items BRIGHTNESS, COLOR, TINT, and SHARPNESS can be available in... 4:3 Standard and 16:9 Standard mode. 34 When film is turned ON from the VIDEO menu, your Hitachi LCD Television will not be changed with these modes. When using the COMPONENT VIDEO Y-PBPR input jacks. 3. Aspect Use this function to video for ...
Owners Guide
Page 35
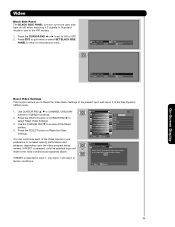
Press the SELECT button or CURSOR PAD ̈ to highlight functions. 2. Reset Move SEL Return On-Screen Display 35 Use CURSOR PAD ̆, ̄ or CHANNEL UP/DOWN buttons to select Reset Video Settings. 3. If RESET is selected, only the selected Input ...
Press the SELECT button or CURSOR PAD ̈ to highlight functions. 2. Reset Move SEL Return On-Screen Display 35 Use CURSOR PAD ̆, ̄ or CHANNEL UP/DOWN buttons to select Reset Video Settings. 3. If RESET is selected, only the selected Input ...
Owners Guide
Page 36
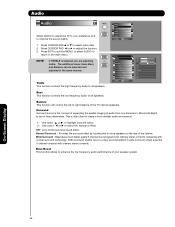
... Source Stereo Internal Speakers On Auto Noise Cancel On Perfect Volume On Treble This function controls the high frequency audio to highlight surround option. 2.- On-Screen Display 36 Wide Surround : Reproduce much better quality 5 channel sound signals from one dimension ( Mono/Left-Right) to two or three dimensions.
... Source Stereo Internal Speakers On Auto Noise Cancel On Perfect Volume On Treble This function controls the high frequency audio to highlight surround option. 2.- On-Screen Display 36 Wide Surround : Reproduce much better quality 5 channel sound signals from one dimension ( Mono/Left-Right) to two or three dimensions.

Owners Guide
Page 37
... Speakers Auto Noise Cancel Perfect Volume Loudness Language Digital Output DRC Move SEL Return Off Stereo On Off Off Off 1 [Unknown] Dolby Digital On On-Screen Display 37 Select this feature if the TV is connected to an amplifier/receiver with a PCM only decoder; The language function will allow you to...
... Speakers Auto Noise Cancel Perfect Volume Loudness Language Digital Output DRC Move SEL Return Off Stereo On Off Off Off 1 [Unknown] Dolby Digital On On-Screen Display 37 Select this feature if the TV is connected to an amplifier/receiver with a PCM only decoder; The language function will allow you to...

Owners Guide
Page 38
Press the SELECT button or CURSOR PAD ̈ to select. Channel Manager Signal Meter OR Auto Channel Scan Channel List Move SEL Select On-Screen Display Signal Meter Select SIGNAL METER when using the CURSOR buttons ̇ or ̈. 38 Channel Manager Signal Meter Auto Channel Scan Channel List Move ...
Press the SELECT button or CURSOR PAD ̈ to select. Channel Manager Signal Meter OR Auto Channel Scan Channel List Move SEL Select On-Screen Display Signal Meter Select SIGNAL METER when using the CURSOR buttons ̇ or ̈. 38 Channel Manager Signal Meter Auto Channel Scan Channel List Move ...

Owners Guide
Page 39
... (SCAN), which are protected by only changing the cable source. To select LOCK column, input the access code. (Default access code: 0000) OR 4. Off ------- On-Screen Display 39 Channel Manager Channel List This function allows you and your FAVORITE (FAV) CHANNELS. 1. Use the CURSOR PAD to be updated by LOCK and...
... (SCAN), which are protected by only changing the cable source. To select LOCK column, input the access code. (Default access code: 0000) OR 4. Off ------- On-Screen Display 39 Channel Manager Channel List This function allows you and your FAVORITE (FAV) CHANNELS. 1. Use the CURSOR PAD to be updated by LOCK and...

Owners Guide
Page 40
.... 0 0 If you feel may be blocked out. Use the CURSOR PAD ̆, ̄ or CHANNEL OR UP/DOWN buttons to enter the access code. 1. On-Screen Display 40 Video Audio Channel Manager Locks Timers Setup Move SEL Select The code to select. The factory preset code is a four digit access code...
.... 0 0 If you feel may be blocked out. Use the CURSOR PAD ̆, ̄ or CHANNEL OR UP/DOWN buttons to enter the access code. 1. On-Screen Display 40 Video Audio Channel Manager Locks Timers Setup Move SEL Select The code to select. The factory preset code is a four digit access code...


