
Owners Guide
Page 2
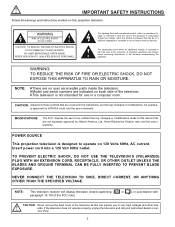
... modifications made to operate on 120 Volts 60Hz, AC current. NO USER SERVICEABLE PARTS INSIDE. CAUTION: Adjust only those controls that are covered in the literature accompanying the appliance. NOTE: This television receiver will display television closed captioning, ( CC or paragraph 15.119 of the television as improper changes or modifications not expressly approved by Hitachi America, Ltd. The lightning flash with CAUTION: Never remove the back cover of the...
... modifications made to operate on 120 Volts 60Hz, AC current. NO USER SERVICEABLE PARTS INSIDE. CAUTION: Adjust only those controls that are covered in the literature accompanying the appliance. NOTE: This television receiver will display television closed captioning, ( CC or paragraph 15.119 of the television as improper changes or modifications not expressly approved by Hitachi America, Ltd. The lightning flash with CAUTION: Never remove the back cover of the...
Owners Guide
Page 3
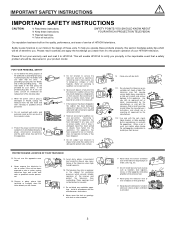
... television. 7. Do not attempt to service the television yourself as opening or removing covers may cause failure of any way, such as they exit from being walked on the quality, performance, and ease of service of your television to the proper operation of HITACHI televisions. Refer all instructions. Be careful not to qualified service personnel. 3. Accumulated dust inside the chassis may expose you . Clean...
... television. 7. Do not attempt to service the television yourself as opening or removing covers may cause failure of any way, such as they exit from being walked on the quality, performance, and ease of service of your television to the proper operation of HITACHI televisions. Refer all instructions. Be careful not to qualified service personnel. 3. Accumulated dust inside the chassis may expose you . Clean...
Owners Guide
Page 4
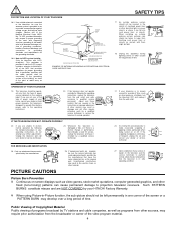
... POWER SERVICE GROUNDING ELECTRODE SYSTEM (NEC ART 250 PART H) EXAMPLE OF ANTENNA GROUNDING AS PER NATIONAL ELECTRICAL CODE INSTRUCTIONS. 18. If the television does not operate normally by the manufacturer that the cable ground shall be connected to the grounding system of the building, as close to qualified service personnel. the television OFF and unplug it checked by your operating instructions, do not attempt any service or repairs...
... POWER SERVICE GROUNDING ELECTRODE SYSTEM (NEC ART 250 PART H) EXAMPLE OF ANTENNA GROUNDING AS PER NATIONAL ELECTRICAL CODE INSTRUCTIONS. 18. If the television does not operate normally by the manufacturer that the cable ground shall be connected to the grounding system of the building, as close to qualified service personnel. the television OFF and unplug it checked by your operating instructions, do not attempt any service or repairs...
Owners Guide
Page 5
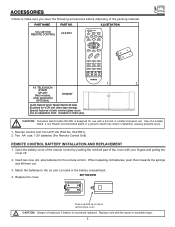
... incorrectly replaced. Use of the packing material. REMOTE CONTROL BATTERY INSTALLATION AND REPLACEMENT 1. ILLUSTRATION CLU-4311UG REMOTE CONTROL HL01651 POWER TV CBL/SAT DVD/VCR SWAP MOVE PIP FREEZE HELP PIP CH MENU SELECT MUTE EXIT LAST CH VOL CH 1 4 7 INPUT 2 3 5 6 8 9 0 STATUS REC TV/VCR PIX 1. 2. 43 TELEVISION STAND SP-43H (Not included, order separately) OPTIONAL H530047 CUSTOM HITACHI TELEVISION STAND Excellent for the remote control. Insert two new AA size batteries for VCR and video...
... incorrectly replaced. Use of the packing material. REMOTE CONTROL BATTERY INSTALLATION AND REPLACEMENT 1. ILLUSTRATION CLU-4311UG REMOTE CONTROL HL01651 POWER TV CBL/SAT DVD/VCR SWAP MOVE PIP FREEZE HELP PIP CH MENU SELECT MUTE EXIT LAST CH VOL CH 1 4 7 INPUT 2 3 5 6 8 9 0 STATUS REC TV/VCR PIX 1. 2. 43 TELEVISION STAND SP-43H (Not included, order separately) OPTIONAL H530047 CUSTOM HITACHI TELEVISION STAND Excellent for the remote control. Insert two new AA size batteries for VCR and video...
Owners Guide
Page 8
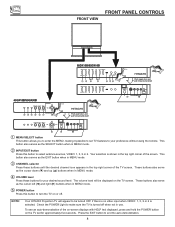
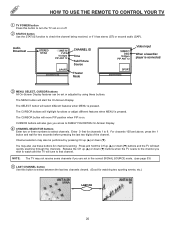
... as the EXIT button when in MENU mode. ቤ CHANNEL selector Press these buttons for approximately five seconds. NOTE: Your HITACHI Projection TV will be turned OFF if there is no video input when VIDEO: 1, 2, 3 or 4 is shown in the top right corner of the on-screen displays with HELP text displayed, press and hold the POWER button on the TV screen. Check the POWER Light to select antenna sources, VIDEO: 1, 2, 3 or 4. VOL+ CH...
... as the EXIT button when in MENU mode. ቤ CHANNEL selector Press these buttons for approximately five seconds. NOTE: Your HITACHI Projection TV will be turned OFF if there is no video input when VIDEO: 1, 2, 3 or 4 is shown in the top right corner of the on-screen displays with HELP text displayed, press and hold the POWER button on the TV screen. Check the POWER Light to select antenna sources, VIDEO: 1, 2, 3 or 4. VOL+ CH...
Owners Guide
Page 9
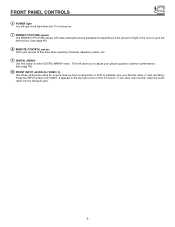
... automatic picture adjustments depending on the amount of the TV screen. Press the INPUT button until VIDEO: 3 appears in the top right corner of light in the room to give the best picture. (see page 48) ቩ REMOTE CONTROL sensor Point your remote at this area when selecting channels, adjusting volume, etc. ቪ DIGITAL ARRAY Use this button to instantly view your picture quality to optimum performance. (see a red light when the TV is turned...
... automatic picture adjustments depending on the amount of the TV screen. Press the INPUT button until VIDEO: 3 appears in the top right corner of light in the room to give the best picture. (see page 48) ቩ REMOTE CONTROL sensor Point your remote at this area when selecting channels, adjusting volume, etc. ቪ DIGITAL ARRAY Use this button to instantly view your picture quality to optimum performance. (see a red light when the TV is turned...
Owners Guide
Page 10
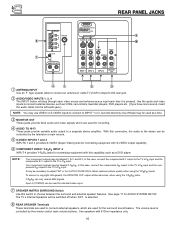
... provide fixed audio and video signals which are used to the TV s PR input. The TV s Internal Speakers will step through each video source and antenna source input each time it is controlled by your television warranty) S-VIDEO S-VIDEO VIDEO VIDEO Y/VIDEO VIDEO (MONO)/L (MONO)/L R R AUDIO AUDIO INPUT 1 INPUT 2 PB (MONO)/L L PR R R AUDIO AUDIO INPUT 4 MONITOR OUT ᕇ ቧ ᕆ ᕃ ᕄ ᕅ ቢ ANTENNA INPUT Use an F type coaxial cable to connect an antenna or cable TV (CATV) output to this connection, the audio to connect external devices...
... provide fixed audio and video signals which are used to the TV s PR input. The TV s Internal Speakers will step through each video source and antenna source input each time it is controlled by your television warranty) S-VIDEO S-VIDEO VIDEO VIDEO Y/VIDEO VIDEO (MONO)/L (MONO)/L R R AUDIO AUDIO INPUT 1 INPUT 2 PB (MONO)/L L PR R R AUDIO AUDIO INPUT 4 MONITOR OUT ᕇ ቧ ᕆ ᕃ ᕄ ᕅ ቢ ANTENNA INPUT Use an F type coaxial cable to connect an antenna or cable TV (CATV) output to this connection, the audio to connect external devices...
Owners Guide
Page 12
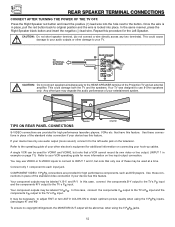
... television. Use these connections in place of your hook-up cables. It may use 8-Ohm speakers only. Your TV was designed to use VIDEO or S-VIDEO inputs to connect to INPUT 1 and 2, but note that a VCR cannot record its own video or line output. (INPUT 1 in place, pull the red button back to original position and the wire is in example on line input-output connection. that only one audio output (mono sound), connect it to the TV s PR input...
... television. Use these connections in place of your hook-up cables. It may use 8-Ohm speakers only. Your TV was designed to use VIDEO or S-VIDEO inputs to connect to INPUT 1 and 2, but note that a VCR cannot record its own video or line output. (INPUT 1 in place, pull the red button back to original position and the wire is in example on line input-output connection. that only one audio output (mono sound), connect it to the TV s PR input...
Owners Guide
Page 14
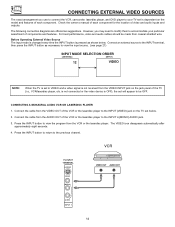
... VIDEO INPUT jack on the jack panel of each component for the location of the VCR or the laserdisc player to the INPUT L/(MONO) AUDIO jack. 3. For best performance, video and audio cables should be OFF. Connect an external source to the INPUT terminal, then press the INPUT button as necessary to view the input source. (see page 21) INPUT MODE SELECTION ORDER (ANTENNA) (INPUT) 12 VIDEO NOTE: When the TV is set to VIDEO and a video signal...
... VIDEO INPUT jack on the jack panel of each component for the location of the VCR or the laserdisc player to the INPUT L/(MONO) AUDIO jack. 3. For best performance, video and audio cables should be OFF. Connect an external source to the INPUT terminal, then press the INPUT button as necessary to view the input source. (see page 21) INPUT MODE SELECTION ORDER (ANTENNA) (INPUT) 12 VIDEO NOTE: When the TV is set to VIDEO and a video signal...
Owners Guide
Page 15
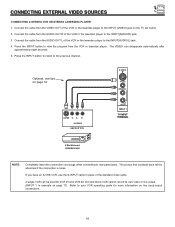
... the INPUT(AUDIO/L) jack. 4. Connect the cable from the VCR or laserdisc player. Press the INPUT button to view the program from the VIDEO OUT of the VCR or the laserdisc player to rear panel jacks. The VIDEO icon disappears automatically after approximately eight seconds. 5. The picture that a VCR cannot record its own video or line output. (INPUT 1 in place of the VCR or the laserdisc player to the previous channel...
... the INPUT(AUDIO/L) jack. 4. Connect the cable from the VCR or laserdisc player. Press the INPUT button to view the program from the VIDEO OUT of the VCR or the laserdisc player to rear panel jacks. The VIDEO icon disappears automatically after approximately eight seconds. 5. The picture that a VCR cannot record its own video or line output. (INPUT 1 in place of the VCR or the laserdisc player to the previous channel...
Owners Guide
Page 19
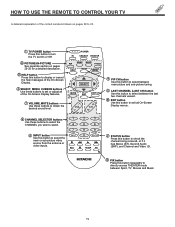
... received, or if it has Stereo (ST), Second Audio (SAP), and Channel and Video I.D. ቮ PIX button Press this button to display or cancel the help messages of the On-Screen Display. ቤ SELECT, MENU, CURSOR buttons Use these buttons to set or adjust all of the On-Screen Display features. ቨ VOLUME, MUTE buttons Use these buttons to select between Sport, TV, Movies and Music. 19 POWER TV CBL/SAT DVD/VCR SWAP MOVE PIP...
... received, or if it has Stereo (ST), Second Audio (SAP), and Channel and Video I.D. ቮ PIX button Press this button to display or cancel the help messages of the On-Screen Display. ቤ SELECT, MENU, CURSOR buttons Use these buttons to set or adjust all of the On-Screen Display features. ቨ VOLUME, MUTE buttons Use these buttons to select between Sport, TV, Movies and Music. 19 POWER TV CBL/SAT DVD/VCR SWAP MOVE PIP...
Owners Guide
Page 20
... or adjust different features when MENU is connected SPORT ቤ MENU, SELECT, CURSOR buttons All On-Screen Display features can be performed by using these buttons for channel scanning. Release the CH up (̆) or down (̄). Audio Broadcast STEREO ST/SA ANT 10 YUTA 10:00pm PIP ANT 12 SPORT CHANNEL ID Time Sub Picture Source Theater Mode VIDEO 1 DISC 10:00pm PIP ANT 12 Video Input When a laserdisc player is...
... or adjust different features when MENU is connected SPORT ቤ MENU, SELECT, CURSOR buttons All On-Screen Display features can be performed by using these buttons for channel scanning. Release the CH up (̆) or down (̄). Audio Broadcast STEREO ST/SA ANT 10 YUTA 10:00pm PIP ANT 12 SPORT CHANNEL ID Time Sub Picture Source Theater Mode VIDEO 1 DISC 10:00pm PIP ANT 12 Video Input When a laserdisc player is...
Owners Guide
Page 23
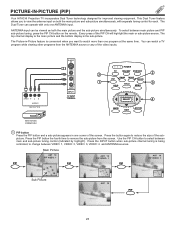
... main or sub-picture source. To select between VIDEO: 1, VIDEO: 2, VIDEO: 3, VIDEO: 4 and ANTENNA sources. Use the PIP CH button to reduce the size of the video inputs. Press the PIP button the fourth time to watch a TV program while viewing other programs from the screen. This Dual Tuner feature allows you want to remove the sub-picture from the ANTENNA source or any of the sub- PICTURE-IN-PICTURE (PIP) Your HITACHI Projection TV incorporates Dual Tuner technology designed for...
... main or sub-picture source. To select between VIDEO: 1, VIDEO: 2, VIDEO: 3, VIDEO: 4 and ANTENNA sources. Use the PIP CH button to reduce the size of the video inputs. Press the PIP button the fourth time to watch a TV program while viewing other programs from the screen. This Dual Tuner feature allows you want to remove the sub-picture from the ANTENNA source or any of the sub- PICTURE-IN-PICTURE (PIP) Your HITACHI Projection TV incorporates Dual Tuner technology designed for...
Owners Guide
Page 31
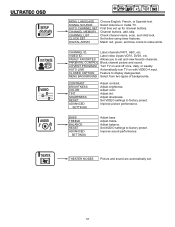
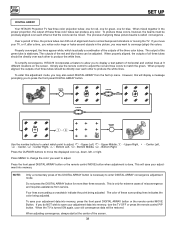
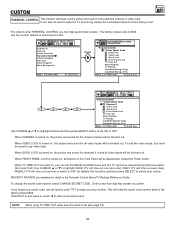
...CLOSED CAPTION Feature to factory preset. MENU BACKGROUND Select from two types of backgrounds. Improve picture performance. Adjust treble. Set AUDIO settings to display dialogue/text. First time set and view favorite channels. Check channel name, scan, and child lock. PARENTAL CONTROL Block channel picture and sound. 4 EVENT PROGRAM Turn TV on with VIDEO:4 input. Adjust tint. Improve sound performance. VIDEO ID. BASS TREBLE BALANCE RESET ADVANCED SETTINGS Adjust bass. Select Antenna or Cable TV. FAMILY FAVORITES Allows you to set up for channel buttons. Adjust color...
...CLOSED CAPTION Feature to factory preset. MENU BACKGROUND Select from two types of backgrounds. Improve picture performance. Adjust treble. Set AUDIO settings to display dialogue/text. First time set and view favorite channels. Check channel name, scan, and child lock. PARENTAL CONTROL Block channel picture and sound. 4 EVENT PROGRAM Turn TV on with VIDEO:4 input. Adjust tint. Improve sound performance. VIDEO ID. BASS TREBLE BALANCE RESET ADVANCED SETTINGS Adjust bass. Select Antenna or Cable TV. FAMILY FAVORITES Allows you to set up for channel buttons. Adjust color...
Owners Guide
Page 34
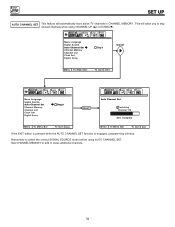
...SETUP CUSTOMIZE VIDEO SEL AUDIO THEATER Menu Language Signal Source Auto Channel Set Channel Memory Channel List Clock Set Digital Array Begin SELECT SETUP CUSTOMIZE VIDEO AUDIO THEATER Auto Channel Set Installing Channel 110 88% Complete M e n u To M e n u B a r To Q u i t E x i t M e n u To M e n u B a r To Q u i t E x i t If the EXIT button is pressed while the AUTO CHANNEL SET function is engaged, programming will automatically store active TV channels in CHANNEL MEMORY. See CHANNEL MEMORY to skip unused channels when using AUTO CHANNEL SET. SETUP SET UP AUTO CHANNEL...
...SETUP CUSTOMIZE VIDEO SEL AUDIO THEATER Menu Language Signal Source Auto Channel Set Channel Memory Channel List Clock Set Digital Array Begin SELECT SETUP CUSTOMIZE VIDEO AUDIO THEATER Auto Channel Set Installing Channel 110 88% Complete M e n u To M e n u B a r To Q u i t E x i t M e n u To M e n u B a r To Q u i t E x i t If the EXIT button is pressed while the AUTO CHANNEL SET function is engaged, programming will automatically store active TV channels in CHANNEL MEMORY. See CHANNEL MEMORY to skip unused channels when using AUTO CHANNEL SET. SETUP SET UP AUTO CHANNEL...
Owners Guide
Page 38
... DIGITAL ARRAY convergence adjustment mode. Properly converged, the lines appear white, which point to produce the white lines. When properly aligned, the outputs of aligning these surrounding lines indicates the color being adjusted. To simplify convergence, HITACHI incorporates a feature to allow you move the displayed color up, down, left, or right. Simply use the remote control to adjust the red and blue colors to save your adjustment into memory, press the front panel DIGITAL ARRAY button or the remote control...
... DIGITAL ARRAY convergence adjustment mode. Properly converged, the lines appear white, which point to produce the white lines. When properly aligned, the outputs of aligning these surrounding lines indicates the color being adjusted. To simplify convergence, HITACHI incorporates a feature to allow you move the displayed color up, down, left, or right. Simply use the remote control to adjust the red and blue colors to save your adjustment into memory, press the front panel DIGITAL ARRAY button or the remote control...
Owners Guide
Page 43
..., use the factory code 7777 to erase your choice. If you prefer. Family Favorites Parental Control 4 Event Program Auto Link Closed Caption Menu Background M e n u To M e n u B a r To Q u i t E x i t Cursor CUSTOMIZE Use number buttons to enter SEL the secret code Parental Control **** Enter Secret Code Channel 3 Video Lock Quick Lock Front Panel Lock TV Time Out Movie Ratings TV Ratings Canadian Ratings (Eng) Canadian Ratings (Frn) M e n u To M e n u B a r To Q u i t Exit SETUP CUSTOMIZE VIDEO SEL AUDIO THEATER 0 0 0 0 Parental Control **** Enter Secret Code Channel...
..., use the factory code 7777 to erase your choice. If you prefer. Family Favorites Parental Control 4 Event Program Auto Link Closed Caption Menu Background M e n u To M e n u B a r To Q u i t E x i t Cursor CUSTOMIZE Use number buttons to enter SEL the secret code Parental Control **** Enter Secret Code Channel 3 Video Lock Quick Lock Front Panel Lock TV Time Out Movie Ratings TV Ratings Canadian Ratings (Eng) Canadian Ratings (Frn) M e n u To M e n u B a r To Q u i t Exit SETUP CUSTOMIZE VIDEO SEL AUDIO THEATER 0 0 0 0 Parental Control **** Enter Secret Code Channel...
Owners Guide
Page 45
...change AUTO LINK setting. Video Id. Family Favorites Parental Control 4 Event Program Auto Link Closed Caption Menu Background Video:4 Auto Remote Off Cursor SETUP CUSTOMIZE VIDEO SEL AUDIO THEATER Channel Id. Family Favorites Parental Control 4 Event Program Auto Link Closed Caption Menu Background Video:4 Auto Remote Off M e n u To M e n u B a r To Q u i t E x i t M e n u To M e n u B a r To Q u i t E x i t Use CURSOR ̆ or ̄, then press SELECT , to previous menu. When REMOTE is selected, the TV will turn on and tune to VIDEO: 4 automatically, when the VIDEO...
...change AUTO LINK setting. Video Id. Family Favorites Parental Control 4 Event Program Auto Link Closed Caption Menu Background Video:4 Auto Remote Off Cursor SETUP CUSTOMIZE VIDEO SEL AUDIO THEATER Channel Id. Family Favorites Parental Control 4 Event Program Auto Link Closed Caption Menu Background Video:4 Auto Remote Off M e n u To M e n u B a r To Q u i t E x i t M e n u To M e n u B a r To Q u i t E x i t Use CURSOR ̆ or ̄, then press SELECT , to previous menu. When REMOTE is selected, the TV will turn on and tune to VIDEO: 4 automatically, when the VIDEO...
Owners Guide
Page 46
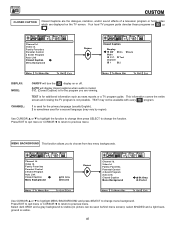
... Parental Control 4 Event Program Auto Link Closed Caption Menu Background Cursor SETUP CUSTOMIZE VIDEO SEL AUDIO THEATER Closed Caption Display Off Mode C.C. SETUP CUSTOMIZE VIDEO SEL AUDIO THEATER Channel Id. TEXT is visible. 46 Video Id. Select dark GRAY and a gray background is visible (no picture can be available with every CC program. 1 is used for a second language (may not be seen behind menu screen), select SHADED and a light background is for the program you to change...
... Parental Control 4 Event Program Auto Link Closed Caption Menu Background Cursor SETUP CUSTOMIZE VIDEO SEL AUDIO THEATER Closed Caption Display Off Mode C.C. SETUP CUSTOMIZE VIDEO SEL AUDIO THEATER Channel Id. TEXT is visible. 46 Video Id. Select dark GRAY and a gray background is visible (no picture can be available with every CC program. 1 is used for a second language (may not be seen behind menu screen), select SHADED and a light background is for the program you to change...
Owners Guide
Page 48
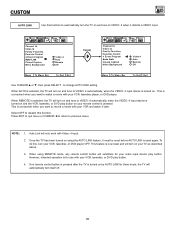
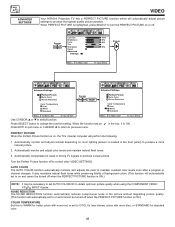
... . Automatically compensate for less intense colors with more red, or set AUTO COLOR-ON to obtain optimum picture quality when using the COMPONENT VIDEO: Y-PBPR INPUT 4 jacks. It also maintains natural flesh tones while preserving fidelity of background colors. (This function will automatically adjust picture settings to COOL for weak or strong TV signals to maintain constant color levels even after a program or channel changes. When the function has an...
... . Automatically compensate for less intense colors with more red, or set AUTO COLOR-ON to obtain optimum picture quality when using the COMPONENT VIDEO: Y-PBPR INPUT 4 jacks. It also maintains natural flesh tones while preserving fidelity of background colors. (This function will automatically adjust picture settings to COOL for weak or strong TV signals to maintain constant color levels even after a program or channel changes. When the function has an...


