
Owners Guide
Page 1
has determined that this product meets the ENERGY STAR® guidelines for energy efficiency. 21-37 38-62 63-68 PROJECTION COLOR TV 65SWX20B 57SWX20B 51SWX20B OPERATING GUIDE 65TWX20B 57TWX20B IMPORTANT SAFETY INSTRUCTIONS 2-3 FIRST TIME USE 4-20 THE REMOTE CONTROL Video Audio Ch. Manager Locks Setup Move SEL Sel ON-SCREEN DISPLAY USEFUL INFORMATION INDEX As an ENERGY STAR® Partner, Hitachi, Ltd.
has determined that this product meets the ENERGY STAR® guidelines for energy efficiency. 21-37 38-62 63-68 PROJECTION COLOR TV 65SWX20B 57SWX20B 51SWX20B OPERATING GUIDE 65TWX20B 57TWX20B IMPORTANT SAFETY INSTRUCTIONS 2-3 FIRST TIME USE 4-20 THE REMOTE CONTROL Video Audio Ch. Manager Locks Setup Move SEL Sel ON-SCREEN DISPLAY USEFUL INFORMATION INDEX As an ENERGY STAR® Partner, Hitachi, Ltd.

Owners Guide
Page 4
.... CAUTION: Danger of the packing material. SELECT VOL + MUTE CH - HL01822). 3. Two "AAA" size, 1.5V batteries (for the remote control. Open the battery cover of the remote control by pushing the notched part of the cover with the same or equivalent type. 4 BOTTOM VIEW (Simple... pulling the cover off. 2. ACCESSORIES Check to make sure you have the following accessories before disposing of explosion if battery is incorrectly replaced. Remote Control Unit CLU-5722TSI (Part No. Two IR Mouse Cables (Part No. Replace the cover. CLU-5722TSI 2. 4. 5. 1. Lift up...
.... CAUTION: Danger of the packing material. SELECT VOL + MUTE CH - HL01822). 3. Two "AAA" size, 1.5V batteries (for the remote control. Open the battery cover of the remote control by pushing the notched part of the cover with the same or equivalent type. 4 BOTTOM VIEW (Simple... pulling the cover off. 2. ACCESSORIES Check to make sure you have the following accessories before disposing of explosion if battery is incorrectly replaced. Remote Control Unit CLU-5722TSI (Part No. Two IR Mouse Cables (Part No. Replace the cover. CLU-5722TSI 2. 4. 5. 1. Lift up...

Owners Guide
Page 6
... an outdoor antenna, connect the VHF or UHF antenna leads to the antenna mixer. Plug the adapter into the antenna terminal on your external component's remote control. To UHF ANT A/ANT B Antenna To outdoor antenna or CATV system Antenna mixer 6 S-Video (Super Video) Connector This connector is used on the television...
... an outdoor antenna, connect the VHF or UHF antenna leads to the antenna mixer. Plug the adapter into the antenna terminal on your external component's remote control. To UHF ANT A/ANT B Antenna To outdoor antenna or CATV system Antenna mixer 6 S-Video (Super Video) Connector This connector is used on the television...

Owners Guide
Page 7
...as the cursor down (̄) and up from a camcorder or VCR to instantly view your picture quality to your desired sound level. NOTES: Your remote control does not have mono sound, insert the audio cable into the left (̇) and right (̈) buttons when in the top right corner...for a quick hook-up (̆) buttons when in MENU mode. ብ VOLUME level Press these audio/video jacks for your preference without using the remote. If you to enter the MENU, making it possible to set TV features to optimum performance (see page 27). ቤ CHANNEL selector Press these ...
...as the cursor down (̄) and up from a camcorder or VCR to instantly view your picture quality to your desired sound level. NOTES: Your remote control does not have mono sound, insert the audio cable into the left (̇) and right (̈) buttons when in the top right corner...for a quick hook-up (̆) buttons when in MENU mode. ብ VOLUME level Press these audio/video jacks for your preference without using the remote. If you to enter the MENU, making it possible to set TV features to optimum performance (see page 27). ቤ CHANNEL selector Press these ...

Owners Guide
Page 9
...)/L AUDIO PR PB Y/VIDEO R (MONO)/L AUDIO INPUT 3 R (MONO)/L VIDEO INPUT 4 R (MONO)/L VIDEO MONITOR OUT R L AUDIO VIDEO S-VIDEO S-VIDEO S-VIDEO ቧ ቢ Antenna Input/Output The remote control allows you have mono sound, insert the audio cable into the left audio jack.) NOTE: You may use VIDEO or S-VIDEO inputs to connect...
...)/L AUDIO PR PB Y/VIDEO R (MONO)/L AUDIO INPUT 3 R (MONO)/L VIDEO INPUT 4 R (MONO)/L VIDEO MONITOR OUT R L AUDIO VIDEO S-VIDEO S-VIDEO S-VIDEO ቧ ቢ Antenna Input/Output The remote control allows you have mono sound, insert the audio cable into the left audio jack.) NOTE: You may use VIDEO or S-VIDEO inputs to connect...

Owners Guide
Page 10
... input. 4. In this case, connect the components B-Y output to the TV's PB input and the components R-Y output to control the external components with your television's remote control (see page 18). ቪ DVI-HDTV Input Use this DVI-HDTV Input for your external devices with a copy-protect digital out terminal, a high definition...
... input. 4. In this case, connect the components B-Y output to the TV's PB input and the components R-Y output to control the external components with your television's remote control (see page 18). ቪ DVI-HDTV Input Use this DVI-HDTV Input for your external devices with a copy-protect digital out terminal, a high definition...

Owners Guide
Page 13
... NOTE: To prevent damage to the speaker and distorted sound, set the volume control of the audio amplifier lower and adjust the sound using the remote control of an external audio amplifier with the remote control, connect the system as shown below.
... NOTE: To prevent damage to the speaker and distorted sound, set the volume control of the audio amplifier lower and adjust the sound using the remote control of an external audio amplifier with the remote control, connect the system as shown below.

Owners Guide
Page 18
... IR Mouse must be placed in front of the infrared sensor of the Audio/Video components for the A/V Network to control your equipment using your Hitachi remote control to 2 external Audio/Video components. This feature helps to the Rear Panel jacks as shown on pages 13~17. 2. Each IR Mouse cable ...can use your Hitachi TV Remote Control. Connect the IR Mouse cable to the IR BLASTER input of the external components infrared sensor for each of the external components you can...
... IR Mouse must be placed in front of the infrared sensor of the Audio/Video components for the A/V Network to control your equipment using your Hitachi remote control to 2 external Audio/Video components. This feature helps to the Rear Panel jacks as shown on pages 13~17. 2. Each IR Mouse cable ...can use your Hitachi TV Remote Control. Connect the IR Mouse cable to the IR BLASTER input of the external components infrared sensor for each of the external components you can...

Owners Guide
Page 19
... CH UP? BACK YES 6. Enter "9999" to uninstall) BACK NEXT Proper Code Entered from your VCR 0 4 3 6 BACK NEXT DONE HITACHI AV NET Wizard Congratulations! See Remote Control A/V NET button usage on the remote control. Please check and re-enter a valid code - - - - HELP DONE HELP TROUBLE SHOOTING Please check connections shown in this wizard...
... CH UP? BACK YES 6. Enter "9999" to uninstall) BACK NEXT Proper Code Entered from your VCR 0 4 3 6 BACK NEXT DONE HITACHI AV NET Wizard Congratulations! See Remote Control A/V NET button usage on the remote control. Please check and re-enter a valid code - - - - HELP DONE HELP TROUBLE SHOOTING Please check connections shown in this wizard...

Owners Guide
Page 21
... -top-box. Basic operation keys are in a dark room, press the light button ባ on your television. The TV button will blink, indicating that the remote will now control your HITACHI Projection TV, the new remote control is too bright. ቤ REC CLU-5722TSI 21 The STB button will blink, indicating that the...
... -top-box. Basic operation keys are in a dark room, press the light button ባ on your television. The TV button will blink, indicating that the remote will now control your HITACHI Projection TV, the new remote control is too bright. ቤ REC CLU-5722TSI 21 The STB button will blink, indicating that the...

Owners Guide
Page 22
... CLU-5722TSI ᕃ POWER button Press this button to turn the TV set on or off when the remote is in TV mode. (See page 21 for instructions on how to set the remote control to TV mode.) ባ TV button When the TV button is pressed, it will blink, to indicate... in CABLE mode. (see page 32) ቦ SET-TOP-BOX (STB) When the STB button is pressed, it will blink to indicate the remote is in STB mode. (see page 33) If you have a Satellite receiver, use this button to program your Satellite receiver. (see page 33) ቧ DVD ...
... CLU-5722TSI ᕃ POWER button Press this button to turn the TV set on or off when the remote is in TV mode. (See page 21 for instructions on how to set the remote control to TV mode.) ባ TV button When the TV button is pressed, it will blink, to indicate... in CABLE mode. (see page 32) ቦ SET-TOP-BOX (STB) When the STB button is pressed, it will blink to indicate the remote is in STB mode. (see page 33) If you have a Satellite receiver, use this button to program your Satellite receiver. (see page 33) ቧ DVD ...

Owners Guide
Page 23
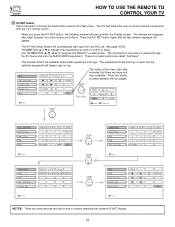
... button when you wish to tune then wait a few seconds for channels 1 to 9, or simply press the single digit channel you want to indicate the remote is in the lower left corner of the screen. Ant A 10 ANT Ant B 28 ቮ C.C. You can also access this button to the channel... 10:10 AM PIP Ant C 46-1234 16:9 Standard 1080i Movies C.C. button Press this timer, up (̆) or down (̄). HOW TO USE THE REMOTE TO CONTROL YOUR TV ቨ CD, TAPE, AMP buttons When pressed, each time the button is pressed. Every subsequent press of three hours. YPBPR:1 When...
... button when you wish to tune then wait a few seconds for channels 1 to 9, or simply press the single digit channel you want to indicate the remote is in the lower left corner of the screen. Ant A 10 ANT Ant B 28 ቮ C.C. You can also access this button to the channel... 10:10 AM PIP Ant C 46-1234 16:9 Standard 1080i Movies C.C. button Press this timer, up (̆) or down (̄). HOW TO USE THE REMOTE TO CONTROL YOUR TV ቨ CD, TAPE, AMP buttons When pressed, each time the button is pressed. Every subsequent press of three hours. YPBPR:1 When...
Owners Guide
Page 24
...774; SETUP The button at the lower right side indicates that don't have a function matching the softkey A/V NET display. 24 HOW TO USE THE REMOTE TO CONTROL YOUR TV ቯ AV/NET button Press this button to access the Audio/Video network (A/V Net) menu. When you wish to highlight ...on top. The equipment list will scroll up within the Display screen. Use THUMBSTICK to navigate and SELECT to control external components with the TV's remote control. Press the A/V NET button again and the last window displayed will automatically start upon the very first use. (see page 18-20). ...
...774; SETUP The button at the lower right side indicates that don't have a function matching the softkey A/V NET display. 24 HOW TO USE THE REMOTE TO CONTROL YOUR TV ቯ AV/NET button Press this button to access the Audio/Video network (A/V Net) menu. When you wish to highlight ...on top. The equipment list will scroll up within the Display screen. Use THUMBSTICK to navigate and SELECT to control external components with the TV's remote control. Press the A/V NET button again and the last window displayed will automatically start upon the very first use. (see page 18-20). ...

Owners Guide
Page 25
.... Side panels (gray areas) are placed to the left and right of the image to prevent uneven aging of the source. HOW TO USE THE REMOTE TO CONTROL YOUR TV ተ ASPECT button Press this button to display conventional (4:3) images. Depending on conventional (4:3) sources. 16:9 STANDARD Use this aspect mode to...
.... Side panels (gray areas) are placed to the left and right of the image to prevent uneven aging of the source. HOW TO USE THE REMOTE TO CONTROL YOUR TV ተ ASPECT button Press this button to display conventional (4:3) images. Depending on conventional (4:3) sources. 16:9 STANDARD Use this aspect mode to...

Owners Guide
Page 26
Depending on the Remote Control when planning to use all On-Screen Displays. ቴ THUMB STICK/SELECT button All the On-Screen Display features can be available. 2. Set up (&#... channel to turn the sound off completely (MUTE). To reduce the sound to answer the telephone, etc., press the MUTE button. HOW TO USE THE REMOTE TO CONTROL YOUR TV NOTES: 1. Press the THUMB STICK toward desired direction and press down (̄) button until you obtain the desired sound level. To...
Depending on the Remote Control when planning to use all On-Screen Displays. ቴ THUMB STICK/SELECT button All the On-Screen Display features can be available. 2. Set up (&#... channel to turn the sound off completely (MUTE). To reduce the sound to answer the telephone, etc., press the MUTE button. HOW TO USE THE REMOTE TO CONTROL YOUR TV NOTES: 1. Press the THUMB STICK toward desired direction and press down (̄) button until you obtain the desired sound level. To...

Owners Guide
Page 27
...between main picture and sub-picture tuning. The channel number which is highlighted indicates what channel is being controlled. 23 VID1 ~ VID5 When the remote control is in TV mode, press these buttons will control the Set-Top-Box or satellite receiver, and execute the secondary function labelled. Video...Ant Video:5 VID5 Video:4 VID4 VID 5 VID 4 24 VIDEO button Press this button to select between the five video inputs. HOW TO USE THE REMOTE TO CONTROL YOUR TV 1 PICTURE-IN-PICTURE buttons See separate section on pages 28~30 for a description. PIP CH button Use the PIP CH button...
...between main picture and sub-picture tuning. The channel number which is highlighted indicates what channel is being controlled. 23 VID1 ~ VID5 When the remote control is in TV mode, press these buttons will control the Set-Top-Box or satellite receiver, and execute the secondary function labelled. Video...Ant Video:5 VID5 Video:4 VID4 VID 5 VID 4 24 VIDEO button Press this button to select between the five video inputs. HOW TO USE THE REMOTE TO CONTROL YOUR TV 1 PICTURE-IN-PICTURE buttons See separate section on pages 28~30 for a description. PIP CH button Use the PIP CH button...

Owners Guide
Page 28
... one of the PIP mode. In POP mode, thumb stick CURSOR ̆ , ̄ will move the sub picture up/down. PICTURE-IN-PICTURE (PIP) Your HITACHI Projection TV incorporates Dual Tuner technology designed for the main picture. The Dual Tuner can watch more than one of the video inputs. ANT A input... button to remove the sub-picture from the ANT A source or any of the four different modes (POP, PIP, SPLIT or SURF), depending on the remote. Press the PIP button again to cycle through the four different modes.
... one of the PIP mode. In POP mode, thumb stick CURSOR ̆ , ̄ will move the sub picture up/down. PICTURE-IN-PICTURE (PIP) Your HITACHI Projection TV incorporates Dual Tuner technology designed for the main picture. The Dual Tuner can watch more than one of the video inputs. ANT A input... button to remove the sub-picture from the ANT A source or any of the four different modes (POP, PIP, SPLIT or SURF), depending on the remote. Press the PIP button again to cycle through the four different modes.

Owners Guide
Page 31
... precoded VCR codes. The remote will act as your VCR. 2. If your VCR cannot be operated after performing the above procedures, please consult your VCR when the correct two digit preset code is designed to control your VCR, as the VCR MENU button for HITACHI VCRs. 5. After replacing ...the batteries repeat the entire programming procedure as your VCR '100' button if required. ቢ VCR Button This button allows the remote to operate different types of your VCR's code has not been ...
... precoded VCR codes. The remote will act as your VCR. 2. If your VCR cannot be operated after performing the above procedures, please consult your VCR when the correct two digit preset code is designed to control your VCR, as the VCR MENU button for HITACHI VCRs. 5. After replacing ...the batteries repeat the entire programming procedure as your VCR '100' button if required. ቢ VCR Button This button allows the remote to operate different types of your VCR's code has not been ...

Owners Guide
Page 32
...mode. ባ PRECODED CABLE BOX buttons These buttons transmit the chosen precoded cable codes. ቤ EXCLUSIVE TV buttons These buttons are removed from the remote control. Turn ON your cable box when the correct two digit preset code is designed to Cable pre-coded mode. 4. Hold down the CBL ...button on page 37. When this occurs, the remote control is programmed for your cable box cannot be operated after performing the above procedures, please consult your cable box code has not been precoded...
...mode. ባ PRECODED CABLE BOX buttons These buttons transmit the chosen precoded cable codes. ቤ EXCLUSIVE TV buttons These buttons are removed from the remote control. Turn ON your cable box when the correct two digit preset code is designed to Cable pre-coded mode. 4. Hold down the CBL ...button on page 37. When this occurs, the remote control is programmed for your cable box cannot be operated after performing the above procedures, please consult your cable box code has not been precoded...

Owners Guide
Page 33
...-box/satellite receiver cannot be operated after performing the above procedures, please consult your set -topbox/satellite receiver code has not been precoded into the remote. 2. NOTES: 1. If your set-top-box/satellite receiver cannot be operated after performing the above . 4. In the unlikely event that matches ... entire programming procedure as the TV/STB button when in STB mode. ቢ SET-TOP-BOX (STB) button This button allows the remote to control your satellite receiver by setting it to page 37) 1. The indicator light will remember the codes you have programmed until the ...
...-box/satellite receiver cannot be operated after performing the above procedures, please consult your set -topbox/satellite receiver code has not been precoded into the remote. 2. NOTES: 1. If your set-top-box/satellite receiver cannot be operated after performing the above . 4. In the unlikely event that matches ... entire programming procedure as the TV/STB button when in STB mode. ቢ SET-TOP-BOX (STB) button This button allows the remote to control your satellite receiver by setting it to page 37) 1. The indicator light will remember the codes you have programmed until the ...


