

User Manual
Page 1
... Apple and Mac are registered trademarks of these manuals to incorrect handling. About this manual Various symbols are the property of this projector. All other trademarks are used in this symbol. NOTE • The information in this manual. • The reproduction, transmission...any errors that may appear in this manual is not permitted without notice. • The manufacturer assumes no responsibility for future reference. Projector User's Manual - WARNING This symbol indicates information that , if ignored, could possibly result in personal injury or physical damage due to...
... Apple and Mac are registered trademarks of these manuals to incorrect handling. About this manual Various symbols are the property of this projector. All other trademarks are used in this symbol. NOTE • The information in this manual. • The reproduction, transmission...any errors that may appear in this manual is not permitted without notice. • The manufacturer assumes no responsibility for future reference. Projector User's Manual - WARNING This symbol indicates information that , if ignored, could possibly result in personal injury or physical damage due to...

User Manual
Page 2
... 9 My memory IMAGE menu 30 Aspect, Over scan, V. Contents Contents About this manual 1 EASY MENU 25 Contents 2 Projector features 3 Aspect, Zoom, Keystone, Mode, Bright, Contrast, Color, Tint, Sharpness, Whisper, Mirror, Reset, About contents of package . . ...3 Filter time, Language, Part names 4 Go to advanced menu Projector 4 PICTURE menu 27 Controls 5 Bright, Contrast, Gamma, Color temp, Remote control 5 Color, Tint, Sharpness, Progressive, Preparations 6 Fastening the ...
... 9 My memory IMAGE menu 30 Aspect, Over scan, V. Contents Contents About this manual 1 EASY MENU 25 Contents 2 Projector features 3 Aspect, Zoom, Keystone, Mode, Bright, Contrast, Color, Tint, Sharpness, Whisper, Mirror, Reset, About contents of package . . ...3 Filter time, Language, Part names 4 Go to advanced menu Projector 4 PICTURE menu 27 Controls 5 Bright, Contrast, Gamma, Color temp, Remote control 5 Color, Tint, Sharpness, Progressive, Preparations 6 Fastening the ...

User Manual
Page 3
... use it where you a higher brightness image on a screen. Quick Guide". NOTE • Keep the original packing materials for the lens part. 3 Projector features / About contents of the "User's Manual - About contents of package Please see the "Contents of package" of package... Projector features This projector is equipped for installation and gets a large image from short distance. High Brightness Newly developed 165W UHB (Ultra High Brightness) lamp gives ...
... use it where you a higher brightness image on a screen. Quick Guide". NOTE • Keep the original packing materials for the lens part. 3 Projector features / About contents of the "User's Manual - About contents of package Please see the "Contents of package" of package... Projector features This projector is equipped for installation and gets a large image from short distance. High Brightness Newly developed 165W UHB (Ultra High Brightness) lamp gives ...

User Manual
Page 4
Part names Part names Projector Vent (10) Lens (16, 45) Lens cover (6, 16) Front-Right side Focus ring (19) Remote sensor (8) Speaker Elevator button (...
Part names Part names Projector Vent (10) Lens (16, 45) Lens cover (6, 16) Front-Right side Focus ring (19) Remote sensor (8) Speaker Elevator button (...

User Manual
Page 6
... operating, make sure that the power switch is off, that the projector is not plugged in a high temperature could cause a burn and/or malfunction to the projector using the strap. 1. Fix the strap to the strap ring of projector. Fix the strap to the strap ring of lens cover. Handling... while the projector is in , and that the power cord is cool adequately. Preparations ...
... operating, make sure that the power switch is off, that the projector is not plugged in a high temperature could cause a burn and/or malfunction to the projector using the strap. 1. Fix the strap to the strap ring of projector. Fix the strap to the strap ring of lens cover. Handling... while the projector is in , and that the power cord is cool adequately. Preparations ...

User Manual
Page 8
...malfunction. • When strong lights such as direct sunlight or light from an extremely close range (such as from directly hitting the projector's remote sensor. Preparations Using the remote control CAUTION ►Be careful in the screen etc. Incorrect handling could block the remote control...'s output signal to the projector (Class1 LED), be available. Adjust the direction of the remote sensor). • Also a remote signal reflected in handling the...
...malfunction. • When strong lights such as direct sunlight or light from an extremely close range (such as from directly hitting the projector's remote sensor. Preparations Using the remote control CAUTION ►Be careful in the screen etc. Incorrect handling could block the remote control...'s output signal to the projector (Class1 LED), be available. Adjust the direction of the remote sensor). • Also a remote signal reflected in handling the...

User Manual
Page 9
...64257;lter (New or cleaned) Rail of air filter Filter cover for bottom-up use . When the projector is facing up , hold the projector. 2. Then slowly turn the projector so that the lens-side is installed bottom up, please use the accessory filter cover for bottom-up use...immediately after use . Filter cover's knob Air filter's knob 3. Disconnect all the connectors and adapters that the projector is facing up use 5. Slowly turn the projector so that the bottom is cool adequately. Make the claws slide along the rail, and set the air fi...
...64257;lter (New or cleaned) Rail of air filter Filter cover for bottom-up use . When the projector is facing up , hold the projector. 2. Then slowly turn the projector so that the lens-side is installed bottom up, please use the accessory filter cover for bottom-up use...immediately after use . Filter cover's knob Air filter's knob 3. Disconnect all the connectors and adapters that the projector is facing up use 5. Slowly turn the projector so that the bottom is cool adequately. Make the claws slide along the rail, and set the air fi...

User Manual
Page 10
...or the like, contact your dealer before installation. ►Place the projection in a cool place, and pay attention enough to the projector. • Don't place the projector in a bathroom or the outdoors. • Put nothing containing the liquid near a humidifier, a smoking space or a...Put nothing about lens and vents of the projector. A fall or a turnover could cause a fire, an electric shock and/or malfunction to the projector. • Don't place the projector near the projector. Damping the projector or inserting liquid in the projector could result in a fire and/or...
...or the like, contact your dealer before installation. ►Place the projection in a cool place, and pay attention enough to the projector. • Don't place the projector in a bathroom or the outdoors. • Put nothing containing the liquid near a humidifier, a smoking space or a...Put nothing about lens and vents of the projector. A fall or a turnover could cause a fire, an electric shock and/or malfunction to the projector. • Don't place the projector near the projector. Damping the projector or inserting liquid in the projector could result in a fire and/or...

User Manual
Page 12
...the elevator feet. ►Except for inclining by hand. 12 Raise or lower the projector to 9 degrees. Setting up Adjusting the projector's elevator WARNING ►Do not adjust the projector's elevator during use or immediately after use the elevator feet to make sure that the... release the elevator buttons, the elevator feet will lock into position. 3. To prevent damaging the projector and injuring yourself, always hold in the elevator buttons while holding the projector, the projector might crash down, overturn, smash your fingers and possibly result in a high temperature could...
...the elevator feet. ►Except for inclining by hand. 12 Raise or lower the projector to 9 degrees. Setting up Adjusting the projector's elevator WARNING ►Do not adjust the projector's elevator during use or immediately after use the elevator feet to make sure that the... release the elevator buttons, the elevator feet will lock into position. 3. To prevent damaging the projector and injuring yourself, always hold in the elevator buttons while holding the projector, the projector might crash down, overturn, smash your fingers and possibly result in a high temperature could...

User Manual
Page 13
...other type of connection is attempted. • Please use other abnormalities that may result in malfunction and/or damage to the projector. Please consult with this projector. • For some RGB signal modes, the optional Mac adapter is necessary. • When the image resolution is done...for details. Use of some of the computer, its operating system and peripheral equipment (i.e. Attempting to connect a live device to the projector may generate extremely loud noises or other CRT or LCD monitors to the original. About Plug-and-Play capability Plug-and-Play is ...
...other type of connection is attempted. • Please use other abnormalities that may result in malfunction and/or damage to the projector. Please consult with this projector. • For some RGB signal modes, the optional Mac adapter is necessary. • When the image resolution is done...for details. Use of some of the computer, its operating system and peripheral equipment (i.e. Attempting to connect a live device to the projector may generate extremely loud noises or other CRT or LCD monitors to the original. About Plug-and-Play capability Plug-and-Play is ...

User Manual
Page 15
... cord's specified voltage range. • Never modify the power cord. If it is damaged, contact your dealer to the AC inlet of the projector. 2. Setting up Connecting power supply WARNING ►Please use extra caution when connecting the power cord as incorrect or faulty connections may result in fi...
... cord's specified voltage range. • Never modify the power cord. If it is damaged, contact your dealer to the AC inlet of the projector. 2. Setting up Connecting power supply WARNING ►Please use extra caution when connecting the power cord as incorrect or faulty connections may result in fi...

User Manual
Page 16
POWER (Solid orange) 3. POWER (Blinking green) POWER (Solid green) To display the picture, select an input signal according to the projector and outlet. 2. VIDEO RGB SEARCH ASPECT AUTO BLANK MAGNIFY ON OFF FREEZE VOLUME MUTE KEYSTONE POSITION - Then wait several seconds because buttons ...may not function for these several seconds. Do not look into the lens or vents of the projector. NOTE • Turn the power on the projector or remote control. When the power is emitted. The power indicator will begin blinking green. The...
POWER (Solid orange) 3. POWER (Blinking green) POWER (Solid green) To display the picture, select an input signal according to the projector and outlet. 2. VIDEO RGB SEARCH ASPECT AUTO BLANK MAGNIFY ON OFF FREEZE VOLUME MUTE KEYSTONE POSITION - Then wait several seconds because buttons ...may not function for these several seconds. Do not look into the lens or vents of the projector. NOTE • Turn the power on the projector or remote control. When the power is emitted. The power indicator will begin blinking green. The...

User Manual
Page 17
... exceptional instances. • When a power supply is shut off with a power failure or the restart switch, before turning on again, make the projector cool down at least 10 minutes without operating. 1. Close the lens cover. Then the POWER indicator will go off, and the POWER indicator will ...appear on the screen for an emergency, whenever you turn the projector off, obey the procedure of the following "Turning off ? 2. Neglect causes a damage of the electrode and un-lighting of time. 17 The...
... exceptional instances. • When a power supply is shut off with a power failure or the restart switch, before turning on again, make the projector cool down at least 10 minutes without operating. 1. Close the lens cover. Then the POWER indicator will go off, and the POWER indicator will ...appear on the screen for an emergency, whenever you turn the projector off, obey the procedure of the following "Turning off ? 2. Neglect causes a damage of the electrode and un-lighting of time. 17 The...

User Manual
Page 18
...ASPECT AUTO BLANK MAGNIFY ON OFF FREEZE VOLUME MUTE KEYSTONE POSITION - Operating Operating Adjusting the volume 1. Press the VOLUME button on the projector. ZOOM + MENU ESC ENTER RESET VIDEO RGB SEARCH ASPECT AUTO BLANK MAGNIFY ON OFF VOLUME MUTE 2. FREEZE KEYSTONE To close the dialog... RESET TEMP POWER INPUT MENU STANDBY/ON 1. Press the RGB button on the remote control to aid you press the button, the projector switches its video input port as below . VIDEO RGB SEARCH ASPECT AUTO BLANK MAGNIFY ON OFF FREEZE VOLUME MUTE KEYSTONE POSITION - S-...
...ASPECT AUTO BLANK MAGNIFY ON OFF FREEZE VOLUME MUTE KEYSTONE POSITION - Operating Operating Adjusting the volume 1. Press the VOLUME button on the projector. ZOOM + MENU ESC ENTER RESET VIDEO RGB SEARCH ASPECT AUTO BLANK MAGNIFY ON OFF VOLUME MUTE 2. FREEZE KEYSTONE To close the dialog... RESET TEMP POWER INPUT MENU STANDBY/ON 1. Press the RGB button on the remote control to aid you press the button, the projector switches its video input port as below . VIDEO RGB SEARCH ASPECT AUTO BLANK MAGNIFY ON OFF FREEZE VOLUME MUTE KEYSTONE POSITION - S-...

User Manual
Page 19
...initializes the aspect ratio setting. VIDEO RGB SEARCH ASPECT AUTO BLANK MAGNIFY ON OFF FREEZE VOLUME MUTE KEYSTONE POSITION - button on the remote control. The projector will begin to check its input ports in turn. At a RGB signal NORMAL 4:3 16:9 At ...a video signal /no signal is found , the projector will return to find any input signals. Press the ASPECT button on the remote control. A dialog will stop searching and display the image. ...
...initializes the aspect ratio setting. VIDEO RGB SEARCH ASPECT AUTO BLANK MAGNIFY ON OFF FREEZE VOLUME MUTE KEYSTONE POSITION - button on the remote control. The projector will begin to check its input ports in turn. At a RGB signal NORMAL 4:3 16:9 At ...a video signal /no signal is found , the projector will return to find any input signals. Press the ASPECT button on the remote control. A dialog will stop searching and display the image. ...

User Manual
Page 21
...button in FREEZE mode for long time, the LCD panel might possibly be printed. ZOOM + MENU ESC ENTER RESET ● The projector automatically exits the FREEZE mode when the input signal changes, or when one of section SCREEN menu (35). VIDEO RGB SEARCH ...21 ZOOM + MENU ENTER 2. Press the ON button of changing the display condition (automatic adjustment, etc.) is pressed. ● If the projector continues projecting a still image for too long. VIDEO RGB SEARCH ASPECT AUTO BLANK MAGNIFY ON OFF FREEZE VOLUME MUTE KEYSTONE POSITION - Press the...
...button in FREEZE mode for long time, the LCD panel might possibly be printed. ZOOM + MENU ESC ENTER RESET ● The projector automatically exits the FREEZE mode when the input signal changes, or when one of section SCREEN menu (35). VIDEO RGB SEARCH ...21 ZOOM + MENU ENTER 2. Press the ON button of changing the display condition (automatic adjustment, etc.) is pressed. ● If the projector continues projecting a still image for too long. VIDEO RGB SEARCH ASPECT AUTO BLANK MAGNIFY ON OFF FREEZE VOLUME MUTE KEYSTONE POSITION - Press the...
User Manual
Page 22
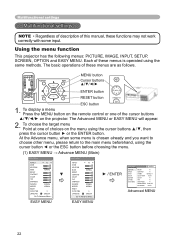
... + MENU ESC ENTER RESET ESC ENTER RESET ENTER button RESET button MENU STANDBY/ON ESC button 1. The basic operations of the cursor buttons on the projector. To display a menu Press the MENU button on the menu using the same methods. Multifunctional settings Multifunctional settings NOTE • Regardless of description of ...OFF MY MEMORY SAVE 1 Advanced MENU EASY MENU EASY MENU 22 VIDEO RGB SEARCH ASPECT AUTO BLANK Using the menu function MAGNIFY VOLUME ON This projector has the following menus: PICTURE, IMAGE, INPUT, SETUP, SCREEN, OPOTFFION and EAMUSTE Y MENU.
... + MENU ESC ENTER RESET ESC ENTER RESET ENTER button RESET button MENU STANDBY/ON ESC button 1. The basic operations of the cursor buttons on the projector. To display a menu Press the MENU button on the menu using the same methods. Multifunctional settings Multifunctional settings NOTE • Regardless of description of ...OFF MY MEMORY SAVE 1 Advanced MENU EASY MENU EASY MENU 22 VIDEO RGB SEARCH ASPECT AUTO BLANK Using the menu function MAGNIFY VOLUME ON This projector has the following menus: PICTURE, IMAGE, INPUT, SETUP, SCREEN, OPOTFFION and EAMUSTE Y MENU.

User Manual
Page 25
...) • This item can be performed. See the item COLOR of GAMMA and COLOR TEMP differs from pre-assigned modes above, the display on the projector or remote control. See the item KEYSTONE of section SETUP menu. (34, 20) Using the buttons ◄/► switches the mode of section PICTURE...
...) • This item can be performed. See the item COLOR of GAMMA and COLOR TEMP differs from pre-assigned modes above, the display on the projector or remote control. See the item KEYSTONE of section SETUP menu. (34, 20) Using the buttons ◄/► switches the mode of section PICTURE...
User Manual
Page 27
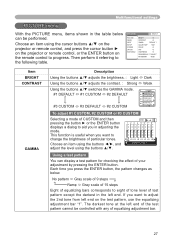
... an item using the buttons ◄/►, and adjust the level using the cursor buttons ▲/▼ on the projector or remote control, and press the cursor button ► on the projector or remote control, or the ENTER button on the test pattern, use the equalizing adjustment bar "1". Multifunctional settings PICTURE menu...
... an item using the buttons ◄/►, and adjust the level using the cursor buttons ▲/▼ on the projector or remote control, and press the cursor button ► on the projector or remote control, or the ENTER button on the test pattern, use the equalizing adjustment bar "1". Multifunctional settings PICTURE menu...
User Manual
Page 29
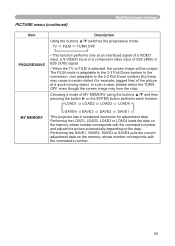
... or LOAD4 loads the data on the data. LOAD1 LOAD2 LOAD3 LOAD4 MY MEMORY SAVE4 SAVE3 SAVE2 SAVE1 This projector has 4 numbered memories for example, jagged line) of the picture at an interlaced signal of a VIDEO input, a S-VIDEO input or a component video input of MY...
... or LOAD4 loads the data on the data. LOAD1 LOAD2 LOAD3 LOAD4 MY MEMORY SAVE4 SAVE3 SAVE2 SAVE1 This projector has 4 numbered memories for example, jagged line) of the picture at an interlaced signal of a VIDEO input, a S-VIDEO input or a component video input of MY...


