

User Manual
Page 4
... lock function is working as the default settings. In simultaneous control of menus will collectively return to the initial setting. By this function, all the items in all of multiple projectors by a daisy chain, you can 't be selected for no signal and sync out. • When the MY TEXT DISPLAY is set to identify projectors connected in the INPUTINFORMATION- Note that the items LAMP TIME, FILTER TIME...
... lock function is working as the default settings. In simultaneous control of menus will collectively return to the initial setting. By this function, all the items in all of multiple projectors by a daisy chain, you can 't be selected for no signal and sync out. • When the MY TEXT DISPLAY is set to identify projectors connected in the INPUTINFORMATION- Note that the items LAMP TIME, FILTER TIME...

User Manual
Page 15
... yet written, the lines will be displayed on the START UP screen and the INPUTINFORMATION- Use the buttons and the ENTER or VIDEO button to select the MY TEXT WRITING menu and press the ► button. Then, follow the same procedure as described at a time. To revert to the previous MY TEXT without saving changes, move the cursor on the character...
... yet written, the lines will be displayed on the START UP screen and the INPUTINFORMATION- Use the buttons and the ENTER or VIDEO button to select the MY TEXT WRITING menu and press the ► button. Then, follow the same procedure as described at a time. To revert to the previous MY TEXT without saving changes, move the cursor on the character...

User Manual
Page 16
... keep a spare lamp unit on the OPTION menu as ceiling mount, or if the lamp bulb has broken, also ask the dealer to replace the lamp unit when the projected image darkens or color reproduction becomes poor. Then retighten the screws of the lamp cover. Loosen the screw (marked by arrow) of the lamp cover. Gently set the new lamp unit into place, and retighten the screw of the lamp unit. Maintenance Maintenance Lamp...
... keep a spare lamp unit on the OPTION menu as ceiling mount, or if the lamp bulb has broken, also ask the dealer to replace the lamp unit when the projected image darkens or color reproduction becomes poor. Then retighten the screws of the lamp cover. Loosen the screw (marked by arrow) of the lamp cover. Gently set the new lamp unit into place, and retighten the screw of the lamp unit. Maintenance Maintenance Lamp...
User Manual
Page 18
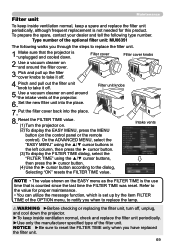
... the control panel or the remote control). Intake vents NOTE • The value shown on and around the filter cover. 3.Pick and pull up by the item FILTER TIME of the projector. 6.Set the new filter unit into the place. 7.Put the filter cover back into the place. 8.Reset the FILTER TIME value. (1) Turn the projector on. (2) To display the EASY MENU, press the MENU button (on...
... the control panel or the remote control). Intake vents NOTE • The value shown on and around the filter cover. 3.Pick and pull up by the item FILTER TIME of the projector. 6.Set the new filter unit into the place. 7.Put the filter cover back into the place. 8.Reset the FILTER TIME value. (1) Turn the projector on. (2) To display the EASY MENU, press the MENU button (on...

User Manual
Page 20
... such message is displayed on the screen, please follow the instructions described below may be ignored, when all the input ports belonging to the category the button's name shows are set to cool down for the LENS SHIFT indicator stopping blinking. - Remember resetting the FILTER TIME is needed soon after the remedy, or if a message other than the following appears, please contact your projector or the signal source specs. Replacement...
... such message is displayed on the screen, please follow the instructions described below may be ignored, when all the input ports belonging to the category the button's name shows are set to cool down for the LENS SHIFT indicator stopping blinking. - Remember resetting the FILTER TIME is needed soon after the remedy, or if a message other than the following appears, please contact your projector or the signal source specs. Replacement...

User Manual
Page 21
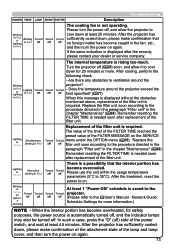
... the air filter dirty? • Does the peripheral temperature exceed 35°C? POWER TEMP LAMP SECURITY SHUTTER Description Lighting In Orange Turned off Blinking In Green Turned off Turned off Turned off Turned off Turned off Turned off Turned off The projector is displayed after the remedy, please change the lamp referring to cool down , please make confirmation of the attachment state of the POWER indicator, the TEMP indicator, the LAMP indicator, the SECURITY indicator...
... the air filter dirty? • Does the peripheral temperature exceed 35°C? POWER TEMP LAMP SECURITY SHUTTER Description Lighting In Orange Turned off Blinking In Green Turned off Turned off Turned off Turned off Turned off Turned off Turned off The projector is displayed after the remedy, please change the lamp referring to cool down , please make confirmation of the attachment state of the POWER indicator, the TEMP indicator, the LAMP indicator, the SECURITY indicator...
User Manual
Page 22
... projector? - Please use the unit within the usage temperature parameters (5°C to the procedure directed in the paragraph "Filter unit" in the chapter "Maintenance" ( 69). Remember resetting the FILTER TIME is needed soon after replacement of the power switch, and wait at least 20 minutes. Lighting In Green Alternative blinking in the fan, etc., and then turn the power off ) side of the filter unit. Network Guide...
... projector? - Please use the unit within the usage temperature parameters (5°C to the procedure directed in the paragraph "Filter unit" in the chapter "Maintenance" ( 69). Remember resetting the FILTER TIME is needed soon after replacement of the power switch, and wait at least 20 minutes. Lighting In Green Alternative blinking in the fan, etc., and then turn the power off ) side of the filter unit. Network Guide...

User Manual
Page 24
... with some equipment 14 pictures are the projector may not work properly. Press the SHUTTER button. 26 The HDMI cable is displayed. The signal format on HDMI input. Correctly connect the HDMI cable. 11 Your HDMI equipment is The computer cannot detect the projector as a plug and play monitor. Press the BLANK button on the remote control. 26 The shutter is adjusted to a higher level using another equipment that the...
... with some equipment 14 pictures are the projector may not work properly. Press the SHUTTER button. 26 The HDMI cable is displayed. The signal format on HDMI input. Correctly connect the HDMI cable. 11 Your HDMI equipment is The computer cannot detect the projector as a plug and play monitor. Press the BLANK button on the remote control. 26 The shutter is adjusted to a higher level using another equipment that the...
User Manual
Page 26
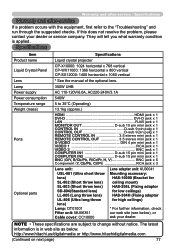
... name Liquid Crystal Panel Lens Lamp Power supply Power consumption Temperature range Weight (mass) Ports Optional parts Specifications Liquid crystal projector CP-X10000: 1024 horizontal x 768 vertical CP-WX11000: 1366 horizontal x 800 vertical CP-SX12000: 1400 horizontal x 1050 vertical * See the manual of the optional lens. 350W UHB AC 110-120V/6.0A, AC220-240V/3.1A 540W 5 to 35°C (Operating) 13.1kg (approx.) HDMI HDMI jack x 1 DVI...
... name Liquid Crystal Panel Lens Lamp Power supply Power consumption Temperature range Weight (mass) Ports Optional parts Specifications Liquid crystal projector CP-X10000: 1024 horizontal x 768 vertical CP-WX11000: 1366 horizontal x 800 vertical CP-SX12000: 1400 horizontal x 1050 vertical * See the manual of the optional lens. 350W UHB AC 110-120V/6.0A, AC220-240V/3.1A 540W 5 to 35°C (Operating) 13.1kg (approx.) HDMI HDMI jack x 1 DVI...

User Manual
Page 42
... or BNC ports using ◄/► buttons. SETUP menu Item KEYSTONE ECO MODE Description Using the ◄/► buttons corrects the horizontal keystone distortion. NORMAL ECO • When the ECO is on ( 64). Using the ▲/▼ buttons switches the mode for the optional lens typeUSL-801 only ( 51), this function may not work well. • When the zoom adjustment is on screen. (1) Choose a picture input port using ▲/▼ buttons. • Choose STANDBY, to...
... or BNC ports using ◄/► buttons. SETUP menu Item KEYSTONE ECO MODE Description Using the ◄/► buttons corrects the horizontal keystone distortion. NORMAL ECO • When the ECO is on ( 64). Using the ▲/▼ buttons switches the mode for the optional lens typeUSL-801 only ( 51), this function may not work well. • When the zoom adjustment is on screen. (1) Choose a picture input port using ▲/▼ buttons. • Choose STANDBY, to...
User Manual
Page 49
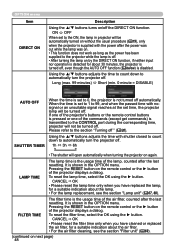
... set time, the projector lamp will open automatically when turning the projector on by the DIRECT ON function, if neither input nor operation is detected for about 30 minutes, the projector is disabled. OPTION menu Item DIRECT ON Description Using the ▲/▼ buttons turns on the remote control or the ► button of the projector displays a dialog. Long (max. 99 minutes) Short (min. 0 minute = DISABLE) AUTO OFF When the time...
... set time, the projector lamp will open automatically when turning the projector on by the DIRECT ON function, if neither input nor operation is detected for about 30 minutes, the projector is disabled. OPTION menu Item DIRECT ON Description Using the ▲/▼ buttons turns on the remote control or the ► button of the projector displays a dialog. Long (max. 99 minutes) Short (min. 0 minute = DISABLE) AUTO OFF When the time...

User Manual
Page 51
OPTION menu Item Description Selecting this feature to keep the air filter clean, setting the suitable time according to your environment of the mode. FAN SPEED Using the ▲/▼ buttons switches the rotation speed of the filter unit. (continued on next page) 50 FINE FAST DISABLE SERVICE FINE: Finer tuning including H.SIZE adjustment. FILTER MESSAGE Use the ▲/▼ button to set the timer for notifying by the message when...
OPTION menu Item Description Selecting this feature to keep the air filter clean, setting the suitable time according to your environment of the mode. FAN SPEED Using the ▲/▼ buttons switches the rotation speed of the filter unit. (continued on next page) 50 FINE FAST DISABLE SERVICE FINE: Finer tuning including H.SIZE adjustment. FILTER MESSAGE Use the ▲/▼ button to set the timer for notifying by the message when...
User Manual
Page 54
...17 SOURCE SKIP, AUTO SEARCH, AUTO KEYSTONE, Changing the frequency of package . . 4 BRIGHTNESS, CONTRAST, GAMMA, COLOR TEMP, Attaching the lens unit 4 COLOR, TINT, SHARPNESS, ACTIVE IRIS, MY MEMORY Part names 5 IMAGE menu 34 Projector 5 ASPECT, OVER SCAN, V POSITION, H POSITION, Control panel 6 H PHASE, H SIZE, AUTO ADJUST EXECUTE Indicator lamp 6 INPUT menu 36 Rear panel 6 PROGRESSIVE, VIDEO NR, 3D-YCS, COLOR Remote control 7 SPACE, COMPONENT, VIDEO FORMAT, DIGITAL Setting up 8 FOMAT, DIGITAL RANGE, COMPUTER IN, FRAME Installation environment 8 LOCK, RESOLUTION Projection...
...17 SOURCE SKIP, AUTO SEARCH, AUTO KEYSTONE, Changing the frequency of package . . 4 BRIGHTNESS, CONTRAST, GAMMA, COLOR TEMP, Attaching the lens unit 4 COLOR, TINT, SHARPNESS, ACTIVE IRIS, MY MEMORY Part names 5 IMAGE menu 34 Projector 5 ASPECT, OVER SCAN, V POSITION, H POSITION, Control panel 6 H PHASE, H SIZE, AUTO ADJUST EXECUTE Indicator lamp 6 INPUT menu 36 Rear panel 6 PROGRESSIVE, VIDEO NR, 3D-YCS, COLOR Remote control 7 SPACE, COMPONENT, VIDEO FORMAT, DIGITAL Setting up 8 FOMAT, DIGITAL RANGE, COMPUTER IN, FRAME Installation environment 8 LOCK, RESOLUTION Projection...

User Manual
Page 66
...@50/60 -PC signals : See User's Manual (detailed) Technical • This projector can display signals with resolution up Connecting your computer as this model are compatible with . display devices). Be sure to consult to the administrator of the cable's connector fits the port to connect with HDCP (High-bandwidth Digital Content Protection) and therefore capable of connection is attempted. • Please use an HDMI cable that might be...
...@50/60 -PC signals : See User's Manual (detailed) Technical • This projector can display signals with resolution up Connecting your computer as this model are compatible with . display devices). Be sure to consult to the administrator of the cable's connector fits the port to connect with HDCP (High-bandwidth Digital Content Protection) and therefore capable of connection is attempted. • Please use an HDMI cable that might be...

User Manual
Page 67
... the power cord Power switch WARNING ►Do not connect the projector to a power supply when the lens unit is not attached. ►Use this projector from only the specified power supply in a fire or an electric shock. ►Use only the power cord that came with the label indication on or pinched by items placed upon or against them. ►Connect firmly the power cord not...
... the power cord Power switch WARNING ►Do not connect the projector to a power supply when the lens unit is not attached. ►Use this projector from only the specified power supply in a fire or an electric shock. ►Use only the power cord that came with the label indication on or pinched by items placed upon or against them. ►Connect firmly the power cord not...

User Manual
Page 72
... the POWER indicator lights in steady orange, and press down , and result in an injury or damaging the projector. NOTICE ►Turn your device off and drop the projector down the side marled "O" on the power switch. For other devices, follow the manual of the projector. 20 Turn the elevator feet each . The POWER indicator will appear on the projector or the remote control. Press the STANDBY/ON button...
... the POWER indicator lights in steady orange, and press down , and result in an injury or damaging the projector. NOTICE ►Turn your device off and drop the projector down the side marled "O" on the power switch. For other devices, follow the manual of the projector. 20 Turn the elevator feet each . The POWER indicator will appear on the projector or the remote control. Press the STANDBY/ON button...

User Manual
Page 75
... CP-WX11000. ● The NORMAL mode keeps the original aspect ratio of the SERVICE item in the OPTION menu ( 50). 23 Press the ASPECT button on the remote control. Each time you press the button, the projector switches the mode for a video signal, a certain extra such as a line may vary when the FINE or DISABLE is set to the default. Using the automatic adjustment feature ENTER FREEZE MENU ASPECT SHUTTER RESET...
... CP-WX11000. ● The NORMAL mode keeps the original aspect ratio of the SERVICE item in the OPTION menu ( 50). 23 Press the ASPECT button on the remote control. Each time you press the button, the projector switches the mode for a video signal, a certain extra such as a line may vary when the FINE or DISABLE is set to the default. Using the automatic adjustment feature ENTER FREEZE MENU ASPECT SHUTTER RESET...
User Manual
Page 78
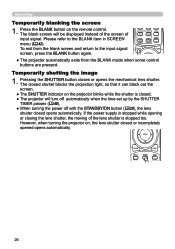
... opening or closing the lens shutter, the moving of input signal. Operating Temporarily blanking the screen 1. Pressing the SHUTTER button closes or opens the mechanical lens shutter. However, when turning the projector on the projector blinks while the shutter is stopped too. Temporarily shutting the image 1. To exit from the BLANK mode when some control buttons are pressed. Press the BLANK button on the remote control. ENTER FREEZE MENU ASPECT SHUTTER RESET Pb P AUTO...
... opening or closing the lens shutter, the moving of input signal. Operating Temporarily blanking the screen 1. Pressing the SHUTTER button closes or opens the mechanical lens shutter. However, when turning the projector on the projector blinks while the shutter is stopped too. Temporarily shutting the image 1. To exit from the BLANK mode when some control buttons are pressed. Press the BLANK button on the remote control. ENTER FREEZE MENU ASPECT SHUTTER RESET Pb P AUTO...

Brochure
Page 1
....hsct.com.tw Hitachi Australia Pty Ltd. protruding part] 13.1kg (28.9 lbs.)(without lens) Computer cable, Power cord, Remote control, Batteries, Security label, Users manual • Specifications are extremely hot. • HDMI, the HDMI logo and High-Definition Multimedia interface am trademarks or registered tmdemarks of 1,366 x 800, Aspect Full mode OPTIONAL ACCESSORIES 7_ Cable cover CC1OOOO Lens adapter C hus4 ) KUOOO41 CP-SX12000 Ultra Short Lens: USL-801 Screen Size (inch) [4:3 Screen] a min. 40 0.36m...
....hsct.com.tw Hitachi Australia Pty Ltd. protruding part] 13.1kg (28.9 lbs.)(without lens) Computer cable, Power cord, Remote control, Batteries, Security label, Users manual • Specifications are extremely hot. • HDMI, the HDMI logo and High-Definition Multimedia interface am trademarks or registered tmdemarks of 1,366 x 800, Aspect Full mode OPTIONAL ACCESSORIES 7_ Cable cover CC1OOOO Lens adapter C hus4 ) KUOOO41 CP-SX12000 Ultra Short Lens: USL-801 Screen Size (inch) [4:3 Screen] a min. 40 0.36m...

Brochure
Page 2
... Picture Quality Digital processing of possible locations. * CP-SX12000: 2.7 screens, 85% • Figures are ideal for use in retail, digital signage and other environments where the projector is 10-bit from LOAD 1-3 on Side • Source Skip • Security LED TERMINALS Control in laser pointer. The shutter mechanically blocks off light, acting as a valuable tool for any number of the video signal is in 1 - Video 2 - BNC - Component Video - L Remote Control...
... Picture Quality Digital processing of possible locations. * CP-SX12000: 2.7 screens, 85% • Figures are ideal for use in retail, digital signage and other environments where the projector is 10-bit from LOAD 1-3 on Side • Source Skip • Security LED TERMINALS Control in laser pointer. The shutter mechanically blocks off light, acting as a valuable tool for any number of the video signal is in 1 - Video 2 - BNC - Component Video - L Remote Control...

