

User Manual
Page 1
Operating Guide Thank you for purchasing this product. WARNING Before using the product, please read the "User's Manual Safety Guide" and related manuals to change without express written consent. TEMP LAMP STANDBY/ON LENS SHIFT BNG COMPONENT S-VIDEO VIDEO MENU INTER RESET FOCUS ZOOM RGB M1-D INPUT KEYSTONE SEARCH Projector CP-SX1350 User's Manual - NOTE • The information in a safe place for any errors that may appear in this manual. • The reproduction, transfer or copy of all...
Operating Guide Thank you for purchasing this product. WARNING Before using the product, please read the "User's Manual Safety Guide" and related manuals to change without express written consent. TEMP LAMP STANDBY/ON LENS SHIFT BNG COMPONENT S-VIDEO VIDEO MENU INTER RESET FOCUS ZOOM RGB M1-D INPUT KEYSTONE SEARCH Projector CP-SX1350 User's Manual - NOTE • The information in a safe place for any errors that may appear in this manual. • The reproduction, transfer or copy of all...

User Manual
Page 3
...;ʜ20 Displaying The Child Window ʜ21 Selecting An Audio Input ʜʜʜ21 Multifunctional Settings ʜʜʜʜ22 Using The Menu Functions ʜʜ22 MAIN Menu 23 PICTURE-1 Menu 24 PICTURE-2 Menu 26 INPUT Menu 27 AUTO Menu 29 SCREEN Menu 31 OPTION Menu 33 NETWORK Menu 35 Network Setting Up 36 Lamp 37 Replacing The Lamp ʜʜʜʜʜ38 Air Filter 39 Caring For The Air Filterʜʜʜ...
...;ʜ20 Displaying The Child Window ʜ21 Selecting An Audio Input ʜʜʜ21 Multifunctional Settings ʜʜʜʜ22 Using The Menu Functions ʜʜ22 MAIN Menu 23 PICTURE-1 Menu 24 PICTURE-2 Menu 26 INPUT Menu 27 AUTO Menu 29 SCREEN Menu 31 OPTION Menu 33 NETWORK Menu 35 Network Setting Up 36 Lamp 37 Replacing The Lamp ʜʜʜʜʜ38 Air Filter 39 Caring For The Air Filterʜʜʜ...
User Manual
Page 6
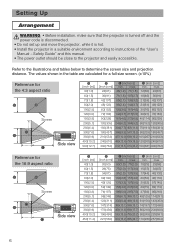
....7) 110(280) 257(654) 6 Setting Up Arrangement WARNING • Before installation, make sure that the projector is turned off and the power code is disconnected. • Do not set up and move the projector, while it is hot. • Install the projector in the table are calculated for a full size screen. (±10%) Reference for the 16:9 aspect ratio B A D B Screen Side view C A [inch (m)] 40(1.0) 60...
....7) 110(280) 257(654) 6 Setting Up Arrangement WARNING • Before installation, make sure that the projector is turned off and the power code is disconnected. • Do not set up and move the projector, while it is hot. • Install the projector in the table are calculated for a full size screen. (±10%) Reference for the 16:9 aspect ratio B A D B Screen Side view C A [inch (m)] 40(1.0) 60...
User Manual
Page 8
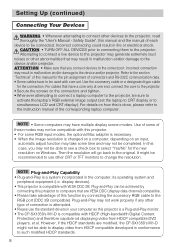
... this projector to computers that have multiple display screen modes. Then the resolution will go back to be able to display video from HDCP compatible DVD players, et al. For details on Windows. In this is done, please refer to the instruction manual of connectors and RS-232C communication data. • Some cables have to be achieved by connecting the accessory RGB cable to...
... this projector to computers that have multiple display screen modes. Then the resolution will go back to be able to display video from HDCP compatible DVD players, et al. For details on Windows. In this is done, please refer to the instruction manual of connectors and RS-232C communication data. • Some cables have to be achieved by connecting the accessory RGB cable to...

User Manual
Page 13
... OFF KEYSTONE SEARCH 1 2 3 ID CHANGE ID CHANGE switch 13 approximately 3 meters FOCUS ZOOM 30 degrees 30 degrees 20 degrees 20 degrees KEYSTONE SEARCH RESET MENU M1-D INPUT TEMP LAMP INTER RGB LENS SHIFT BNG COMPONENT S-VIDEO STANDBY/ON VIDEO LENS SHIFT COMPONENTBNG S-VIDEO RGB M1-D INPUT INTER KEYSTONE SEARCH RESET VIDEO MENU STANDBY/ON TEMP LAMP FOCUS ZOOM AUDIO IN1 REMOTE CONTROL CONTROL NETWORK AUDIO IN2 RGB RGB OUT R/CR/PR G/Y B/CB/PB H V AUDIO OUT CR/PR Ca/Pa Y BNC R-AUDIO IN-L VIDEO S-VIDEO approximately 3 meters • Also a remote signal...
... OFF KEYSTONE SEARCH 1 2 3 ID CHANGE ID CHANGE switch 13 approximately 3 meters FOCUS ZOOM 30 degrees 30 degrees 20 degrees 20 degrees KEYSTONE SEARCH RESET MENU M1-D INPUT TEMP LAMP INTER RGB LENS SHIFT BNG COMPONENT S-VIDEO STANDBY/ON VIDEO LENS SHIFT COMPONENTBNG S-VIDEO RGB M1-D INPUT INTER KEYSTONE SEARCH RESET VIDEO MENU STANDBY/ON TEMP LAMP FOCUS ZOOM AUDIO IN1 REMOTE CONTROL CONTROL NETWORK AUDIO IN2 RGB RGB OUT R/CR/PR G/Y B/CB/PB H V AUDIO OUT CR/PR Ca/Pa Y BNC R-AUDIO IN-L VIDEO S-VIDEO approximately 3 meters • Also a remote signal...
User Manual
Page 14
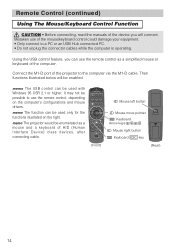
... computer via the M1-D cable. LASER INDICATOR STANDBY/ON VIDEO RGB ++ LENS SHIFT FOCUS -- + ZOOM - memo The USB control can be used with Windows 95 OSR 2.1 or higher. memo The projector would be enumerated as a simplified mouse or keyboard of the computer. Remote Control (continued) Using The Mouse/Keyboard Control Function CAUTION • Before connecting, read the manuals of the device you can use the remote control as a mouse and a keyboard...
... computer via the M1-D cable. LASER INDICATOR STANDBY/ON VIDEO RGB ++ LENS SHIFT FOCUS -- + ZOOM - memo The USB control can be used with Windows 95 OSR 2.1 or higher. memo The projector would be enumerated as a simplified mouse or keyboard of the computer. Remote Control (continued) Using The Mouse/Keyboard Control Function CAUTION • Before connecting, read the manuals of the device you can use the remote control as a mouse and a keyboard...
User Manual
Page 15
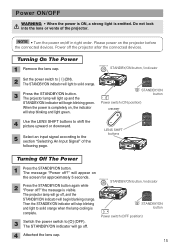
...off. 4 Attached the lens cap. 15 Power switch (OFF position) 3 Switch the power switch to [ | ] (ON). The STANDBY/ON indicator will begin blinking green. Power off ?" The STANDBY/ON indicator will stop blinking and light green. 4 Use the LENS SHIFT buttons to shift the picture upward or downward. 5 Select an input signal according to the section "Selecting An Input Signal" of the projector. LENS SHIFT COMPONENTBNG S-VIDEO RGB M1-D INPUT INTER KEYSTONE SEARCH RESET VIDEO STANDBY/ON MENU TEMP LAMP FOCUS ZOOM AUDIO IN1 REMOTE CONTROL CONTROL NETWORK AUDIO IN2 RGB RGB OUT...
...off. 4 Attached the lens cap. 15 Power switch (OFF position) 3 Switch the power switch to [ | ] (ON). The STANDBY/ON indicator will begin blinking green. Power off ?" The STANDBY/ON indicator will stop blinking and light green. 4 Use the LENS SHIFT buttons to shift the picture upward or downward. 5 Select an input signal according to the section "Selecting An Input Signal" of the projector. LENS SHIFT COMPONENTBNG S-VIDEO RGB M1-D INPUT INTER KEYSTONE SEARCH RESET VIDEO STANDBY/ON MENU TEMP LAMP FOCUS ZOOM AUDIO IN1 REMOTE CONTROL CONTROL NETWORK AUDIO IN2 RGB RGB OUT...
User Manual
Page 22
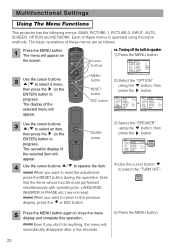
... PICTURE-1 PICTURE-2 INPUT AUTO SCREEN OPTION NETWORK : SELECT VOLUME SPEAKER IR REMOTE IR REMOTE ID LAMP TIME FILTER TIME SERVICE RESET 16 TURN ON ALL 1234 h 4321 h 3 Use the cursor buttons / to select an item, then press the (or the ENTER) button to operate the item. LANGUAGE, WHISPER, H PHASE etc.) are as follows. 1 Press the MENU button. memo Even if you want to return to select the "TURN OFF". LASER INDICATOR STANDBY/ON VIDEO RGB ++ LENS...
... PICTURE-1 PICTURE-2 INPUT AUTO SCREEN OPTION NETWORK : SELECT VOLUME SPEAKER IR REMOTE IR REMOTE ID LAMP TIME FILTER TIME SERVICE RESET 16 TURN ON ALL 1234 h 4321 h 3 Use the cursor buttons / to select an item, then press the (or the ENTER) button to operate the item. LANGUAGE, WHISPER, H PHASE etc.) are as follows. 1 Press the MENU button. memo Even if you want to return to select the "TURN OFF". LASER INDICATOR STANDBY/ON VIDEO RGB ++ LENS...
User Manual
Page 24
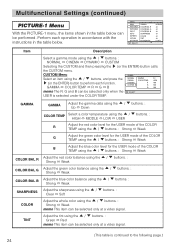
... function. MENU MAIN PICTURE-1 PICTURE-2 INPUT AUTO SCREEN OPTION NETWORK : SELECT GAMMA COLOR BAL R COLOR BAL G COLOR BAL B SHARPNESS COLOR TINT MY MEMORY NORMAL +0 +0 +0 +0 +0 +0 LOAD1 Item Description Select a gamma mode using the / buttons, and press the NORMAL CINEMA GAMMA COLOR TEMP 2.2 HIGH (or the ENTER) button to the following page.) 24 Multifunctional Settings (continued) PICTURE-1 Menu With the PICTURE-1 menu, the items shown in the table below can be selected only at a video signal. (This...
... function. MENU MAIN PICTURE-1 PICTURE-2 INPUT AUTO SCREEN OPTION NETWORK : SELECT GAMMA COLOR BAL R COLOR BAL G COLOR BAL B SHARPNESS COLOR TINT MY MEMORY NORMAL +0 +0 +0 +0 +0 +0 LOAD1 Item Description Select a gamma mode using the / buttons, and press the NORMAL CINEMA GAMMA COLOR TEMP 2.2 HIGH (or the ENTER) button to the following page.) 24 Multifunctional Settings (continued) PICTURE-1 Menu With the PICTURE-1 menu, the items shown in the table below can be selected only at a video signal. (This...
User Manual
Page 27
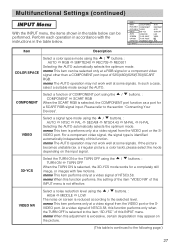
... MENU MAIN PICTURE-1 PICTURE-2 INPUT AUTO SCREEN OPTION NETWORK : SELECT COLOR SPACE AUTO COMPONENT COMPONENT VIDEO AUTO 3D-YCS TURN OFF VIDEO NR LOW P. VIDEO NR Select a noise reduction level using the / buttons. : TURN ON TURN OFF When the TURN ON is continued to the selected level. VIDEO Select a signal type mode using the / buttons. : AUTO RGB SMPTE240 REC709 REC601 Selecting the AUTO automatically selects the optimum mode. INP. memo This item can be selected only at a video signal...
... MENU MAIN PICTURE-1 PICTURE-2 INPUT AUTO SCREEN OPTION NETWORK : SELECT COLOR SPACE AUTO COMPONENT COMPONENT VIDEO AUTO 3D-YCS TURN OFF VIDEO NR LOW P. VIDEO NR Select a noise reduction level using the / buttons. : TURN ON TURN OFF When the TURN ON is continued to the selected level. VIDEO Select a signal type mode using the / buttons. : AUTO RGB SMPTE240 REC709 REC601 Selecting the AUTO automatically selects the optimum mode. INP. memo This item can be selected only at a video signal...
User Manual
Page 29
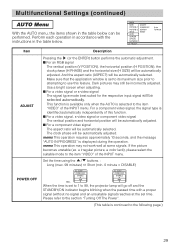
... video signal, the signal type is continued to the section "Turning Off The Power". (This table is identified automatically independently of this feature. Set the time using the / buttons. : Long (max. 99 minutes) Short (min. 0 minute = DISABLE) AUTO POWER OFF ENABLE AUTO POWER OFF DISABLE 1min 0min ex. Please refer to the following page.) 29 MENU MAIN PICTURE-1 PICTURE-2 INPUT AUTO SCREEN OPTION NETWORK : SELECT ADJUST POWER OFF SEARCH RESET 0 min TURN ON Item ADJUST POWER...
... video signal, the signal type is continued to the section "Turning Off The Power". (This table is identified automatically independently of this feature. Set the time using the / buttons. : Long (max. 99 minutes) Short (min. 0 minute = DISABLE) AUTO POWER OFF ENABLE AUTO POWER OFF DISABLE 1min 0min ex. Please refer to the following page.) 29 MENU MAIN PICTURE-1 PICTURE-2 INPUT AUTO SCREEN OPTION NETWORK : SELECT ADJUST POWER OFF SEARCH RESET 0 min TURN ON Item ADJUST POWER...
User Manual
Page 31
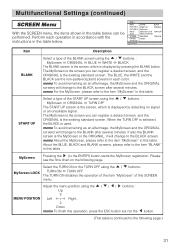
... ORIGINAL screens will change to the BLACK screen. If also the BLANK screen is displayed by detecting no signal or an unsuitable signal. MENU MAIN PICTURE-1 PICTURE-2 INPUT AUTO SCREEN OPTION NETWORK : SELECT BLANK BLACK START UP ORIGINAL MyScreen MyScreen LOCK TURN OFF MENU POSITION MESSAGE TURN ON RESET Item Description BLANK Select a type of this table. START UP Select a type of the START UP screen using the / buttons.: TURN ON TURN OFF The TURN ON disables the operation of...
... ORIGINAL screens will change to the BLACK screen. If also the BLANK screen is displayed by detecting no signal or an unsuitable signal. MENU MAIN PICTURE-1 PICTURE-2 INPUT AUTO SCREEN OPTION NETWORK : SELECT BLANK BLACK START UP ORIGINAL MyScreen MyScreen LOCK TURN OFF MENU POSITION MESSAGE TURN ON RESET Item Description BLANK Select a type of this table. START UP Select a type of the START UP screen using the / buttons.: TURN ON TURN OFF The TURN ON disables the operation of...

User Manual
Page 33
... cleaning or replacement, to 0. Select the RESET using button to reset the timer. : RESET CANCEL Selecting the RESET resets the count of the lamp timer to 0. memo Perform this function only when you have cleaned or replaced the air filter. FILTER TIME Pressing the button or RESET button displays the FILTER TIME menu. Multifunctional Settings (continued) OPTION Menu With the OPTION menu, the items shown in the table below . MENU MAIN PICTURE-1 PICTURE-2 INPUT AUTO SCREEN OPTION NETWORK : SELECT VOLUME SPEAKER IR REMOTE IR REMOTE ID LAMP TIME FILTER TIME SERVICE RESET 16 TURN...
... cleaning or replacement, to 0. Select the RESET using button to reset the timer. : RESET CANCEL Selecting the RESET resets the count of the lamp timer to 0. memo Perform this function only when you have cleaned or replaced the air filter. FILTER TIME Pressing the button or RESET button displays the FILTER TIME menu. Multifunctional Settings (continued) OPTION Menu With the OPTION menu, the items shown in the table below . MENU MAIN PICTURE-1 PICTURE-2 INPUT AUTO SCREEN OPTION NETWORK : SELECT VOLUME SPEAKER IR REMOTE IR REMOTE ID LAMP TIME FILTER TIME SERVICE RESET 16 TURN...

User Manual
Page 34
... AUTO ADJUST LENS TYPE LENS LOCK GHOST FILTER MESSAGE SERVICE FANSPEED AUTO ADJUST LENS TYPE LENS LOCK GHOST FILTER MESSAGE : SELECT NORMAL ENABLE AUTO TURN OFF 100 FANSPEED Select the fan speed level using the / buttons. : LENS LOCK TURN ON TURN OFF Selecting the TURN ON locks the adjustment of air filter, especially when "200h", "300h" or "TURN OFF" is recommended to choose "100h" in using the button to the initial setting. Select the TURN ON or the TURN OFF using the / buttons. : HIGH NORMAL The HIGH ups rotation speeds...
... AUTO ADJUST LENS TYPE LENS LOCK GHOST FILTER MESSAGE SERVICE FANSPEED AUTO ADJUST LENS TYPE LENS LOCK GHOST FILTER MESSAGE : SELECT NORMAL ENABLE AUTO TURN OFF 100 FANSPEED Select the fan speed level using the / buttons. : LENS LOCK TURN ON TURN OFF Selecting the TURN ON locks the adjustment of air filter, especially when "200h", "300h" or "TURN OFF" is recommended to choose "100h" in using the button to the initial setting. Select the TURN ON or the TURN OFF using the / buttons. : HIGH NORMAL The HIGH ups rotation speeds...
User Manual
Page 38
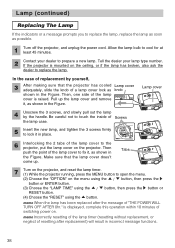
... VIDEO STANDBY/ON COMPONENT S-VIDEO INTER LENS SHIFT BNG M1-D INPUT RGB KEYSTONE SEARCH TEMP LAMP 6 Interlocking the 2 tabs of switching power on the projector. is mounted on the menu using the / button, then press the button or ENTER button. (3) Choose the "LAMP TIME" using the / button, then press the button or RESET button. (4) Choose the "RESET" using the button. Then push the point of a lamp cover lock as knob shown in the Figure. Allow the lamp bulb to fix it in incorrect message...
... VIDEO STANDBY/ON COMPONENT S-VIDEO INTER LENS SHIFT BNG M1-D INPUT RGB KEYSTONE SEARCH TEMP LAMP 6 Interlocking the 2 tabs of switching power on the projector. is mounted on the menu using the / button, then press the button or ENTER button. (3) Choose the "LAMP TIME" using the / button, then press the button or RESET button. (4) Choose the "RESET" using the button. Then push the point of a lamp cover lock as knob shown in the Figure. Allow the lamp bulb to fix it in incorrect message...
User Manual
Page 39
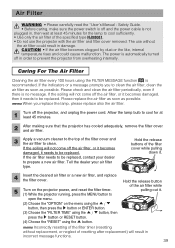
.... TEMP LAMP STANDBY/ON LENS SHIFT BNG COMPONENT S-VIDEO VIDEO MENU INTER RESET FOCUS ZOOM RGB M1-D INPUT SEARCH KEYSTONE open the menu. (2) Choose the "OPTION" on the projector power, and reset the filter timer. (1) While the projector running, press the MENU button to clean the air filter, clean the air filter as soon as possible. memo Incorrectly resetting of the filter cover while pulling down it . Air Filter WARNING • Please carefully read the "User's Manual - Caring For The Air Filter Cleaning the air filter every 100 hours using the button. memo...
.... TEMP LAMP STANDBY/ON LENS SHIFT BNG COMPONENT S-VIDEO VIDEO MENU INTER RESET FOCUS ZOOM RGB M1-D INPUT SEARCH KEYSTONE open the menu. (2) Choose the "OPTION" on the projector power, and reset the filter timer. (1) While the projector running, press the MENU button to clean the air filter, clean the air filter as soon as possible. memo Incorrectly resetting of the filter cover while pulling down it . Air Filter WARNING • Please carefully read the "User's Manual - Caring For The Air Filter Cleaning the air filter every 100 hours using the button. memo...

User Manual
Page 41
... LAMP TIMER. Please immediately turn the power off . Please be automatically turned off , and change the lamp by referring to reset the lamp timer. Message CHANGE THE LAMP AFTER REPLACING LAMP, RESET THE LAMP TIMER. Description The time the lamp timer has counted is recommended. When lamp usage reaches 2000 hours, the power will be reappeared every time the power is displayed on , messages such as described below may thus fail to light even prior to the section "Lamp". This projector...
... LAMP TIMER. Please immediately turn the power off . Please be automatically turned off , and change the lamp by referring to reset the lamp timer. Message CHANGE THE LAMP AFTER REPLACING LAMP, RESET THE LAMP TIMER. Description The time the lamp timer has counted is recommended. When lamp usage reaches 2000 hours, the power will be reappeared every time the power is displayed on , messages such as described below may thus fail to light even prior to the section "Lamp". This projector...
User Manual
Page 43
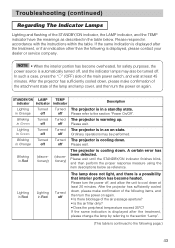
... Blinking in Green Turned off Ordinary operations may also be performed. off Turned The projector is a possibility that interior portion has become overheated, for safety purposes, the power source is in an on again. Please wait until the STANDBY/ON indicator finishes blink, and then perform the proper response measure using the item descriptions below . A certain error has been detected. STANDBY/ON LAMP TEMP indicator indicator indicator Description Lighting in Orange Turned off...
... Blinking in Green Turned off Ordinary operations may also be performed. off Turned The projector is a possibility that interior portion has become overheated, for safety purposes, the power source is in an on again. Please wait until the STANDBY/ON indicator finishes blink, and then perform the proper response measure using the item descriptions below . A certain error has been detected. STANDBY/ON LAMP TEMP indicator indicator indicator Description Lighting in Orange Turned off...

User Manual
Page 45
... input changeover settings are outputted. NOTE • Although bright spots or dark spots may appear on the screen, this is a unique characteristic of these has not been properly fixed. Set the power switch to [ | ] (On). 15 The main power source has been interrupted during operation such as smoke, strange odor, excessive sound, damaged casing or elements or cables, penetration of the lamp and lamp cover, and then turn...
... input changeover settings are outputted. NOTE • Although bright spots or dark spots may appear on the screen, this is a unique characteristic of these has not been properly fixed. Set the power switch to [ | ] (On). 15 The main power source has been interrupted during operation such as smoke, strange odor, excessive sound, damaged casing or elements or cables, penetration of the lamp and lamp cover, and then turn...

User Manual
Page 47
... Product name Liquid crystal panel Panel size Drive system Pixels Lens Lamp Speaker Power supply Power consumption Temperature range Size Weight (mass) Ports Optional Parts Lamp Air filter Others Specification Liquid crystal projector 2.5 cm (0.99 type) TFT active matrix 1,470,000 pixels (1400 horizontal x 1050 vertical) Zoom lens F=1.7 ~ 2.4 f=30.5 ~ 45.8 mm 310W UHB 1.0W + 1.0W (Stereo) AC100 ~ 120V, 5.2A AC220 ~ 240V, 2.2A 470W 0 ~ 35°C (Operating) 420 (W) x 150 (H) x 310 (D) mm...
... Product name Liquid crystal panel Panel size Drive system Pixels Lens Lamp Speaker Power supply Power consumption Temperature range Size Weight (mass) Ports Optional Parts Lamp Air filter Others Specification Liquid crystal projector 2.5 cm (0.99 type) TFT active matrix 1,470,000 pixels (1400 horizontal x 1050 vertical) Zoom lens F=1.7 ~ 2.4 f=30.5 ~ 45.8 mm 310W UHB 1.0W + 1.0W (Stereo) AC100 ~ 120V, 5.2A AC220 ~ 240V, 2.2A 470W 0 ~ 35°C (Operating) 420 (W) x 150 (H) x 310 (D) mm...

