
User Manual
Page 1
Projector CP-X2514WN/CP-X3014WN/ CP-X4014WN/CP-WX3014WN User's Manual (detailed) Operating Guide Thank you for purchasing this product. About this manual Various symbols are registered trademarks of causing trouble. The meanings of this manual. • The reproduction, transfer or copy of all manuals for any part of...used in this document is a trademark. After reading them, store them in a safe place for trademark rights in this manual is subject to change without express written consent. This symbol indicates information that may appear in this symbol. Please refer ...
Projector CP-X2514WN/CP-X3014WN/ CP-X4014WN/CP-WX3014WN User's Manual (detailed) Operating Guide Thank you for purchasing this product. About this manual Various symbols are registered trademarks of causing trouble. The meanings of this manual. • The reproduction, transfer or copy of all manuals for any part of...used in this document is a trademark. After reading them, store them in a safe place for trademark rights in this manual is subject to change without express written consent. This symbol indicates information that may appear in this symbol. Please refer ...
User Manual
Page 3
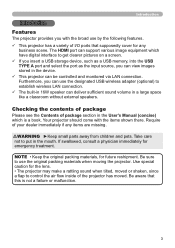
... this is a book. The HDMI port can support various image equipment which is not a failure or malfunction. 3 Take care not to put in the User's Manual (concise) which have digital interface to establish wireless LAN connection.
... this is a book. The HDMI port can support various image equipment which is not a failure or malfunction. 3 Take care not to put in the User's Manual (concise) which have digital interface to establish wireless LAN connection.
User Manual
Page 4
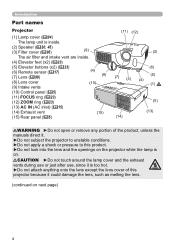
...) (14) Exhaust vent (15) (15) Rear panel ( 5) (11) (12) (2) (7) (3) (6) (5) (4) (1) (5) (13) (14) WARNING ►Do not open or remove any portion of the product, unless the manuals direct it. ►Do not subject the projector to unstable conditions. ►Do not apply a shock or pressure to this projector because it could damage...
...) (14) Exhaust vent (15) (15) Rear panel ( 5) (11) (12) (2) (7) (3) (6) (5) (4) (1) (5) (13) (14) WARNING ►Do not open or remove any portion of the product, unless the manuals direct it. ►Do not subject the projector to unstable conditions. ►Do not apply a shock or pressure to this projector because it could damage...

User Manual
Page 7
... following to the environment and manner the projector will be required. For the case of User's Manual (concise) as well as ceiling mount, the specified mounting accessories ( Specifications in the User's Manual (concise)) and service may be used in the table are calculated for a full size screen. The...
... following to the environment and manner the projector will be required. For the case of User's Manual (concise) as well as ceiling mount, the specified mounting accessories ( Specifications in the User's Manual (concise)) and service may be used in the table are calculated for a full size screen. The...
User Manual
Page 8
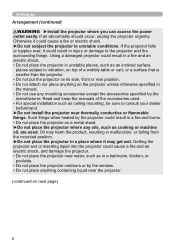
... install the projector near the projector. (continued on next page) 8 If the projector falls or topples over, it may get wet. Read and keep the manuals of a wobbly table or cart, or a surface that is smaller than the projector. • Do not put the projector on its side, front or rear... the projector could result in a fire and burns. • Do not place the projector on the projector unless otherwise specified in the manual. • Do not use any oils, such as cooking or machine oil, are used . • For special installation such as in a place where it could...
... install the projector near the projector. (continued on next page) 8 If the projector falls or topples over, it may get wet. Read and keep the manuals of a wobbly table or cart, or a surface that is smaller than the projector. • Do not put the projector on its side, front or rear... the projector could result in a fire and burns. • Do not place the projector on the projector unless otherwise specified in the manual. • Do not use any oils, such as cooking or machine oil, are used . • For special installation such as in a place where it could...

User Manual
Page 10
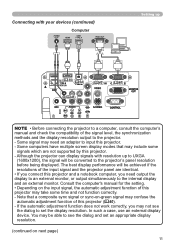
... this projector is damaged. Setting up Connecting with your devices Before connecting the projector to a device, consult the manual of the device to confirm that the device is directed in the manual of the device. Otherwise it could cause a fire or damage the projector and devices. • Use only...
... this projector is damaged. Setting up Connecting with your devices Before connecting the projector to a device, consult the manual of the device to confirm that the device is directed in the manual of the device. Otherwise it could cause a fire or damage the projector and devices. • Use only...
User Manual
Page 11
...not supported by this projector and a notebook computer, you need an adapter to input this projector ( 40). - Consult the computer's manual for the setting. • Depending on the input signal, the automatic adjustment function of this projector may need output the display to an...with resolution up ( 39) ( 54) ( 40) ( 40) ( 45) NOTE • Before connecting the projector to a computer, consult the computer's manual and check the compatibility of the signal level, the synchronization methods and the display resolution output to the projector. - Some signal may take some signals...
...not supported by this projector and a notebook computer, you need an adapter to input this projector ( 40). - Consult the computer's manual for the setting. • Depending on the input signal, the automatic adjustment function of this projector may need output the display to an...with resolution up ( 39) ( 54) ( 40) ( 40) ( 45) NOTE • Before connecting the projector to a computer, consult the computer's manual and check the compatibility of the signal level, the synchronization methods and the display resolution output to the projector. - Some signal may take some signals...
User Manual
Page 16
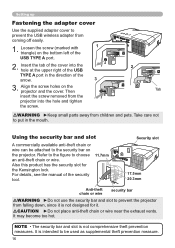
...) on the projector and the cover. Also this product has the security slot for it is not comprehensive theft prevention measures. For details, see the manual of the security tool. 11.7mm Security slot 17.5mm 20.3mm Anti-theft chain or wire security bar WARNING ►Do not use the...
...) on the projector and the cover. Also this product has the security slot for it is not comprehensive theft prevention measures. For details, see the manual of the security tool. 11.7mm Security slot 17.5mm 20.3mm Anti-theft chain or wire security bar WARNING ►Do not use the...

User Manual
Page 18
... MOUSE is warming up. (The POWER indicator blinks in green.) - Remote control Changing the frequency of the simple mouse & keyboard function could damage your computer's manuals before connecting this product to the computer. (3) (5) POSITION MENU ENTER ESC RESET (4) (6) NOTE When the simple mouse & keyboard function of two buttons listed below simultaneously...
... MOUSE is warming up. (The POWER indicator blinks in green.) - Remote control Changing the frequency of the simple mouse & keyboard function could damage your computer's manuals before connecting this product to the computer. (3) (5) POSITION MENU ENTER ESC RESET (4) (6) NOTE When the simple mouse & keyboard function of two buttons listed below simultaneously...
User Manual
Page 23
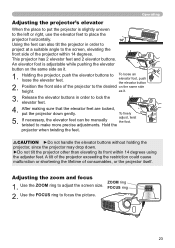
... foot is slightly uneven to the left or right, use the elevator feet to place the projector horizontally. 14° Using the feet can be manually adjust, twist the foot. Holding the projector, push the elevator buttons to adjust the screen size. as it . 3. Hold the projector when twisting the feet...
... foot is slightly uneven to the left or right, use the elevator feet to place the projector horizontally. 14° Using the feet can be manually adjust, twist the foot. Holding the projector, push the elevator buttons to adjust the screen size. as it . 3. Hold the projector when twisting the feet...
User Manual
Page 25
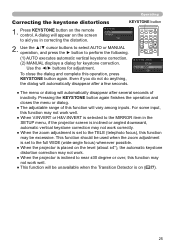
Press KEYSTONE button on ( 77). 25 Use the ▲/▼ cursor buttons to select AUTO or MANUAL operation, and press the ► button to aid you do not do anything, the dialog will automatically disappear after a few seconds. VIDEO ...● This function will vary among inputs. A dialog will appear on the screen to perform the following. (1) AUTO executes automatic vertical keystone correction. (2) MANUAL displays a dialog for adjustment. To close the dialog and complete this function may be unavailable when the Transition Detector is inclined or angled downward, automatic...
Press KEYSTONE button on ( 77). 25 Use the ▲/▼ cursor buttons to select AUTO or MANUAL operation, and press the ► button to aid you do not do anything, the dialog will automatically disappear after a few seconds. VIDEO ...● This function will vary among inputs. A dialog will appear on the screen to perform the following. (1) AUTO executes automatic vertical keystone correction. (2) MANUAL displays a dialog for adjustment. To close the dialog and complete this function may be unavailable when the Transition Detector is inclined or angled downward, automatic...
User Manual
Page 57
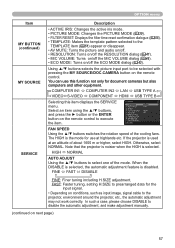
.... When the DISABLE is selected, the automatic adjustment feature is selected. In such a case, please choose DISABLE to disable the automatic adjustment, and make adjustment manually. (continued on /off the MIC VOLUME dialog ( 46). • ECO MODE: Turns on next page) 57 OPTION menu Item MY BUTTON (continued) MY SOURCE SERVICE...
.... When the DISABLE is selected, the automatic adjustment feature is selected. In such a case, please choose DISABLE to disable the automatic adjustment, and make adjustment manually. (continued on /off the MIC VOLUME dialog ( 46). • ECO MODE: Turns on next page) 57 OPTION menu Item MY BUTTON (continued) MY SOURCE SERVICE...
User Manual
Page 67
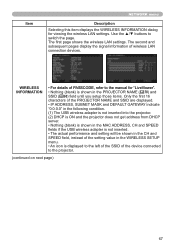
... projector. (continued on next page) 67 The first page shows the wireless LAN settings. WIRELESS INFORMATION • For details of PASSCODE, refer to the manual for viewing the wireless LAN settings. The second and subsequent pages display the signal information of the device connected to switch the page.
... projector. (continued on next page) 67 The first page shows the wireless LAN settings. WIRELESS INFORMATION • For details of PASSCODE, refer to the manual for viewing the wireless LAN settings. The second and subsequent pages display the signal information of the device connected to switch the page.
User Manual
Page 69
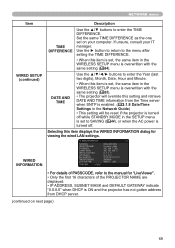
NETWORK menu Item WIRED SETUP (continued) Description TIME DIFFERENCE Use the ▲/▼ buttons to the manual for viewing the wired LAN settings. WIRED INFORMATION • For details of PASSCODE, refer to enter the TIME DIFFERENCE. Use the ► button to return ...
NETWORK menu Item WIRED SETUP (continued) Description TIME DIFFERENCE Use the ▲/▼ buttons to the manual for viewing the wired LAN settings. WIRED INFORMATION • For details of PASSCODE, refer to enter the TIME DIFFERENCE. Use the ► button to return ...
User Manual
Page 72
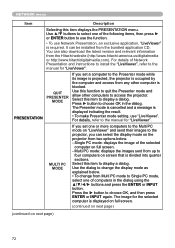
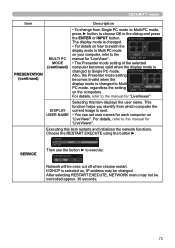
... "LiveViewer" is displayed indicating the result. • To make Presenter mode setting, use "LiveViewer". Press the ► button to the manual for "LiveViewer". For details of the selected computer on next page) 72 Multi PC mode: displays the images sent from up to four ... to the Presenter mode while its image is projected, the projector is occupied by the computer and access from the Hitachi website (http://www.hitachi-america.us/digitalmedia or http://www.hitachidigitalmedia.com). NETWORK menu Item Description Selecting this function to quit the Presenter mode and...
... "LiveViewer" is displayed indicating the result. • To make Presenter mode setting, use "LiveViewer". Press the ► button to the manual for "LiveViewer". For details of the selected computer on next page) 72 Multi PC mode: displays the images sent from up to four ... to the Presenter mode while its image is projected, the projector is occupied by the computer and access from the Hitachi website (http://www.hitachi-america.us/digitalmedia or http://www.hitachidigitalmedia.com). NETWORK menu Item Description Selecting this function to quit the Presenter mode and...
User Manual
Page 73
... may not be once cut off when choose restart. For details, refer to execute. SERVICE Then use the button ► to the manual for "LiveViewer". DISPLAY USER NAME Selecting this item restarts and initializes the network functions. This function helps you identify from Single PC mode ...to Multi PC mode, press ► button to the manual for "LiveViewer". Executing this item displays the user name. Network will be controlled approx. 30 seconds. 73 The display mode is changed . ...
... may not be once cut off when choose restart. For details, refer to execute. SERVICE Then use the button ► to the manual for "LiveViewer". DISPLAY USER NAME Selecting this item restarts and initializes the network functions. This function helps you identify from Single PC mode ...to Multi PC mode, press ► button to the manual for "LiveViewer". Executing this item displays the user name. Network will be controlled approx. 30 seconds. 73 The display mode is changed . ...

User Manual
Page 90
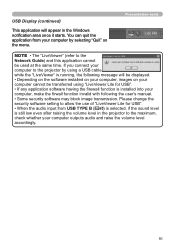
... : 1 piece Starting USB Display Select the USB DISPLAY for USB", will be ready on your computer for the latest version of the software and its manual. ( User's Manual (concise)) Follow the instructions that can display images transferred from the computer is suspended while the passwordprotected screen saver is unplugged. The application, "LiveViewer...
... : 1 piece Starting USB Display Select the USB DISPLAY for USB", will be ready on your computer for the latest version of the software and its manual. ( User's Manual (concise)) Follow the instructions that can display images transferred from the computer is suspended while the passwordprotected screen saver is unplugged. The application, "LiveViewer...
User Manual
Page 91
... "LiveViewer Lite for USB". • When the audio input from USB TYPE B ( 45) is selected, if the sound level is running, the following the user's manual. • Some security software may block image transmission. Presentation tools NOTE • The "LiveViewer" (refer to the maximum, check whether your computer, images on the...
... "LiveViewer Lite for USB". • When the audio input from USB TYPE B ( 45) is selected, if the sound level is running, the following the user's manual. • Some security software may block image transmission. Presentation tools NOTE • The "LiveViewer" (refer to the maximum, check whether your computer, images on the...
User Manual
Page 98
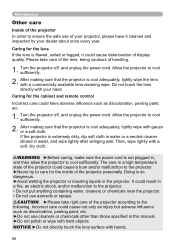
... such as discoloration, peeling paint, etc. ►Do not use aerosols or sprays. Allow the projector to cool sufficiently. The care in this manual. ►Do not polish or wipe with your dealer about once every year. Caring for the lens If the lens is cool adequately, lightly wipe...
... such as discoloration, peeling paint, etc. ►Do not use aerosols or sprays. Allow the projector to cool sufficiently. The care in this manual. ►Do not polish or wipe with your dealer about once every year. Caring for the lens If the lens is cool adequately, lightly wipe...
User Manual
Page 100
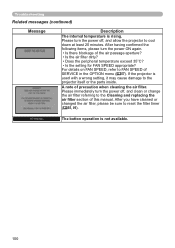
... off , and allow the projector to cool down at least 20 minutes. Please immediately turn the power ON again. • Is there blockage of this manual. Troubleshooting Related messages (continued) Message Description The internal temperature is not available. 100 The button operation is rising. For details on FAN SPEED, refer to...
... off , and allow the projector to cool down at least 20 minutes. Please immediately turn the power ON again. • Is there blockage of this manual. Troubleshooting Related messages (continued) Message Description The internal temperature is not available. 100 The button operation is rising. For details on FAN SPEED, refer to...

