

User Manual
Page 3
...and large images can easily be reduced. If anything is used to ensure correct usage through understanding. Projector Liquid Crystal Projector CP-X430W USER'S MANUAL Please read this manual) Safety Instructions Carrying Bag ENGLISH-2 TECHNICAL PORTGÊS NORSK NEDERLANDS ESPAÑOL ...low Noise Function Acoustic noise level from the unit can be magnified for Remote Control Transmitter AUTO MENU KEYSTONE MENU SELECT POSITION RESET FREEZE PinP MAGNIFY MUTE OFF VOLUME Remote Control Transmitter MANUEL D'UTILISATION Nous vous recommandons de lire attentivement ce manuel ...
...and large images can easily be reduced. If anything is used to ensure correct usage through understanding. Projector Liquid Crystal Projector CP-X430W USER'S MANUAL Please read this manual) Safety Instructions Carrying Bag ENGLISH-2 TECHNICAL PORTGÊS NORSK NEDERLANDS ESPAÑOL ...low Noise Function Acoustic noise level from the unit can be magnified for Remote Control Transmitter AUTO MENU KEYSTONE MENU SELECT POSITION RESET FREEZE PinP MAGNIFY MUTE OFF VOLUME Remote Control Transmitter MANUEL D'UTILISATION Nous vous recommandons de lire attentivement ce manuel ...

User Manual
Page 4
... BEFORE USE (continued) Part Names Speaker Carrying Handle AC Inlet (to the Power Cord) Power Switch Foot Adjuster Ventilation Openings (Intake) Zoom Knob Focus Ring Remote Control Sensor Lens Foot Adjuster Lens Cap FRONT/LEFT VIEW OF THE PROJECTOR Control Panel (Refer to P.9 "OPERATIONS") STANDBY/ON Button KEYSTONE Button Foot Adjuster...
... BEFORE USE (continued) Part Names Speaker Carrying Handle AC Inlet (to the Power Cord) Power Switch Foot Adjuster Ventilation Openings (Intake) Zoom Knob Focus Ring Remote Control Sensor Lens Foot Adjuster Lens Cap FRONT/LEFT VIEW OF THE PROJECTOR Control Panel (Refer to P.9 "OPERATIONS") STANDBY/ON Button KEYSTONE Button Foot Adjuster...

User Manual
Page 5
.... CAUTION • Use of controls or adjustments or performance of a finger or rod. PinP Button FREEZE Button MUTE Button VOLUME Button REMOTE CONTROL TRANSMITTER (Refer to P.9 "OPERATIONS") These functions works when the mouse control function is used in hazardous radiation exposure. Take care ...not to drop. • Do not place the heavy objects on the remote control transmitter. • Do not wet the remote control transmitter or place it on any physical impact. ENGLISH-4 BEFORE USE (continued) Part Names (continued) STANDBY...
.... CAUTION • Use of controls or adjustments or performance of a finger or rod. PinP Button FREEZE Button MUTE Button VOLUME Button REMOTE CONTROL TRANSMITTER (Refer to P.9 "OPERATIONS") These functions works when the mouse control function is used in hazardous radiation exposure. Take care ...not to drop. • Do not place the heavy objects on the remote control transmitter. • Do not wet the remote control transmitter or place it on any physical impact. ENGLISH-4 BEFORE USE (continued) Part Names (continued) STANDBY...

User Manual
Page 6
... the battery away from children and pets. • When not to be used for an extended period, remove the batteries from the remote control transmitter. ENGLISH-5 Push the knob while lifting up the battery cover. 2. Incorrect orientation could cause battery cracking or leakage, which could... result in personal injury or pollution of the surrounding environment. • When you dispose the battery, you should obey the law in the remote control transmitter. Make sure the plus and minus terminals are correctly oriented. 1 2 3. Load the batteries. Also, do not mix new ...
... the battery away from children and pets. • When not to be used for an extended period, remove the batteries from the remote control transmitter. ENGLISH-5 Push the knob while lifting up the battery cover. 2. Incorrect orientation could cause battery cracking or leakage, which could... result in personal injury or pollution of the surrounding environment. • When you dispose the battery, you should obey the law in the remote control transmitter. Make sure the plus and minus terminals are correctly oriented. 1 2 3. Load the batteries. Also, do not mix new ...
User Manual
Page 10
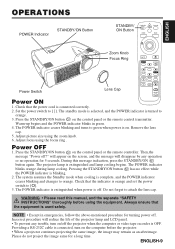
...off . The standby mode is selected, and the POWER indicator is connected, turn on . Press the STANDBY/ON button on the control panel or the remote control transmitter. Do not forget to orange. 3. NOTE • Except in green. 4. Set the power switch to [O]. 3. Warm-up begins and the... indicator is extinguished when power is orange and set the power switch to [ | ]. Press the STANDBY/ON button on the control panel or the remote controller. Remove the lens cap. 5. The projector lamp is blinking. 2. Pressing the STANDBY/ON button has no operation for a long time. Please ...
...off . The standby mode is selected, and the POWER indicator is connected, turn on . Press the STANDBY/ON button on the control panel or the remote control transmitter. Do not forget to orange. 3. NOTE • Except in green. 4. Set the power switch to [O]. 3. Warm-up begins and the... indicator is extinguished when power is orange and set the power switch to [ | ]. Press the STANDBY/ON button on the control panel or the remote controller. Remove the lens cap. 5. The projector lamp is blinking. 2. Pressing the STANDBY/ON button has no operation for a long time. Please ...

User Manual
Page 11
...the POSITION in MAGNIFY mode. NOTE • Strong light and obstacles will interfere with a video signal is input. • After approximately 10 seconds of the remote control transmitter. ENGLISH-10 RGB IN 1 / RGB IN 2 / DVI → VIDEO IN / S-VIDEO IN / COMPONENT VIDEO VIDEO IN → S-...8226; The selected signal name is displayed for the VOLUME, LANGUAGE and H PHASE. • The RESET button may be used from the supplied remote control transmitter or the projector control panel. Refer to page 4. Adjust Magnification : Press the MAGNIFY / button in the MAGNIFY mode. Set/Clear ...
...the POSITION in MAGNIFY mode. NOTE • Strong light and obstacles will interfere with a video signal is input. • After approximately 10 seconds of the remote control transmitter. ENGLISH-10 RGB IN 1 / RGB IN 2 / DVI → VIDEO IN / S-VIDEO IN / COMPONENT VIDEO VIDEO IN → S-...8226; The selected signal name is displayed for the VOLUME, LANGUAGE and H PHASE. • The RESET button may be used from the supplied remote control transmitter or the projector control panel. Refer to page 4. Adjust Magnification : Press the MAGNIFY / button in the MAGNIFY mode. Set/Clear ...
User Manual
Page 16
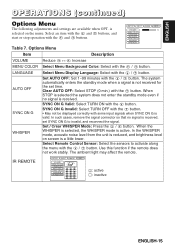
... following adjustments and settings are available when OPT. Options Menu SETUP INPUT VOLUME MENU COLOR LANGUAGE AUTO OFF SYNC ON G WHISPER IR REMOTE IMAGE OPT. 16 Item Description VOLUME Reduce ↔ Increase MENU COLOR Select Menu Background Color: Select with the button. Clear AUTO...: Select with the / button. The system automatically enters the standby mode when a signal is active. IR REMOTE SETUP INPUT IMAGE VOLUME MENU COLOR LANGUAGE AUTO OFF SYNC ON G WHISPER IR REMOTE 2 3 1 123 OPT. : active : inactive ENGLISH-15 Set / Crear WHISPER Mode: Press the /...
... following adjustments and settings are available when OPT. Options Menu SETUP INPUT VOLUME MENU COLOR LANGUAGE AUTO OFF SYNC ON G WHISPER IR REMOTE IMAGE OPT. 16 Item Description VOLUME Reduce ↔ Increase MENU COLOR Select Menu Background Color: Select with the button. Clear AUTO...: Select with the / button. The system automatically enters the standby mode when a signal is active. IR REMOTE SETUP INPUT IMAGE VOLUME MENU COLOR LANGUAGE AUTO OFF SYNC ON G WHISPER IR REMOTE 2 3 1 123 OPT. : active : inactive ENGLISH-15 Set / Crear WHISPER Mode: Press the /...

User Manual
Page 17
...with the SYNC ON G WHISPER and buttons, and start or stop operation with the and buttons. The ambient light may affect the remote. IR REMOTE Table 8. The volume adjustment bar is automatically switched to video. This is the blue screen at the factory setting. START UP ...the screen in case of no signal is received, set time. MyScreen is a mode that the customer-customized screen is displayed. Select Remote Control Sensor: Select the sensors to the black after several minutes. OPERATIONS (continued) No Signal Menu VOLUME 16 The same adjustments and settings...
...with the SYNC ON G WHISPER and buttons, and start or stop operation with the and buttons. The ambient light may affect the remote. IR REMOTE Table 8. The volume adjustment bar is automatically switched to video. This is the blue screen at the factory setting. START UP ...the screen in case of no signal is received, set time. MyScreen is a mode that the customer-customized screen is displayed. Select Remote Control Sensor: Select the sensors to the black after several minutes. OPERATIONS (continued) No Signal Menu VOLUME 16 The same adjustments and settings...

User Manual
Page 19
... the CHANGE THE LAMP message is not reset correctly. Also steadily push the opposite side of switching power ON. Press the MENU button on the remote control transmitter, or the RESET button on the bottom of the lamp case may result in uneven coloring. 6. Switch power ON, and press the RESET...
... the CHANGE THE LAMP message is not reset correctly. Also steadily push the opposite side of switching power ON. Press the MENU button on the remote control transmitter, or the RESET button on the bottom of the lamp case may result in uneven coloring. 6. Switch power ON, and press the RESET...
User Manual
Page 20
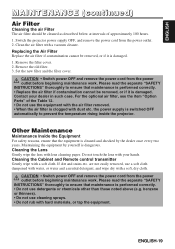
... Lens Gently wipe the lens with a soft cloth. Do not touch the lens with your dealer in such case. ENGLISH-19 Cleaning the Cabinet and Remote control transmitter Gently wipe with lens cleaning paper. are not easily removed, use the equipment with the air filter removed. • When the air filter...
... Lens Gently wipe the lens with a soft cloth. Do not touch the lens with your dealer in such case. ENGLISH-19 Cleaning the Cabinet and Remote control transmitter Gently wipe with lens cleaning paper. are not easily removed, use the equipment with the air filter removed. • When the air filter...

User Manual
Page 23
... fully clockwise. Adjust the focus or H PHASE. 9,12 ENGLISH-22 Symptom Symptom Possible cause Remedy Page The power is turned on . Press VOLUME on the remote control or display the menu screen and adjust the volume. 7,8 11,15 Mute is not turned on . Brightness and contrast are dark. The main power... no video. Connect correctly. Connect correctly. 7,8 Audio is not correctly set . If the situation cannot be corrected, then contact your dealer. Use the projector or remote control transmitter to minimum.
... fully clockwise. Adjust the focus or H PHASE. 9,12 ENGLISH-22 Symptom Symptom Possible cause Remedy Page The power is turned on . Press VOLUME on the remote control or display the menu screen and adjust the volume. 7,8 11,15 Mute is not turned on . Brightness and contrast are dark. The main power... no video. Connect correctly. Connect correctly. 7,8 Audio is not correctly set . If the situation cannot be corrected, then contact your dealer. Use the projector or remote control transmitter to minimum.

Brochure
Page 1
... RGB Audio Audio output Video input S-video Composite video Component video Audio Control terminals Input/Output terminals Compatible controls Dimensions Weight Supplied accessories Chassis Lamp Remote control CP-X430 series 0.9" polysilicon active-matrix TFT x 3 786, 432 pixels (H 1,024 x V 768) 540 TV lines 1024 dots x 768 lines 16.7 million colors Native 4:3/16:9 compatible...
... RGB Audio Audio output Video input S-video Composite video Component video Audio Control terminals Input/Output terminals Compatible controls Dimensions Weight Supplied accessories Chassis Lamp Remote control CP-X430 series 0.9" polysilicon active-matrix TFT x 3 786, 432 pixels (H 1,024 x V 768) 540 TV lines 1024 dots x 768 lines 16.7 million colors Native 4:3/16:9 compatible...

