

User Manual
Page 2
...cations 54 Technical (English only) (Please see the end of package 3 Fastening the lens cap 3 Part names 4 Projector 4 Control buttons 5 Remote control 5 EASY Menu 24 Aspect, Mode, Bright, Contrast, Color, Tint, Sharpness, Whisper, Mirror, Reset, Filter time, Language, ...Video format, Connecting your devices 10 DVI, Information Connecting power supply 13 SETUP Menu 34 Remote control 14 Whisper, Mirror, Volume, Stereo, IR remote Laser pointer 14 Putting batteries 14 Using the remote control 15 SCREEN Menu 35 Language, Menu position, OSD bright, Blank, Start up 6...
...cations 54 Technical (English only) (Please see the end of package 3 Fastening the lens cap 3 Part names 4 Projector 4 Control buttons 5 Remote control 5 EASY Menu 24 Aspect, Mode, Bright, Contrast, Color, Tint, Sharpness, Whisper, Mirror, Reset, Filter time, Language, ...Video format, Connecting your devices 10 DVI, Information Connecting power supply 13 SETUP Menu 34 Remote control 14 Whisper, Mirror, Volume, Stereo, IR remote Laser pointer 14 Putting batteries 14 Using the remote control 15 SCREEN Menu 35 Language, Menu position, OSD bright, Blank, Start up 6...

User Manual
Page 4
...(18) Focus ring (18) Vent (6) Lens (16) Front-Right side Lamp cover (45) (Lamp unit is inside.) Remote sensor (15) Speaker Elevator button (8) Elevator foot (8) Filter cover (46) (Air filter and intake vent are inside.) ...(11) AUDIO IN L/R port (12) VIDEO port (12) S-VIDEO port (12) R-AUDIO IN-L VIDEO S-VIDEO Ports WIRED REMOTE port CONTROL port (11) RGB OUT port (11) NOTE (*) About Restart switch: This Projector is controlled by using a cocktail stick or ...
...(18) Focus ring (18) Vent (6) Lens (16) Front-Right side Lamp cover (45) (Lamp unit is inside.) Remote sensor (15) Speaker Elevator button (8) Elevator foot (8) Filter cover (46) (Air filter and intake vent are inside.) ...(11) AUDIO IN L/R port (12) VIDEO port (12) S-VIDEO port (12) R-AUDIO IN-L VIDEO S-VIDEO Ports WIRED REMOTE port CONTROL port (11) RGB OUT port (11) NOTE (*) About Restart switch: This Projector is controlled by using a cocktail stick or ...

User Manual
Page 5
...(23) LAMP TEMP POWER MENU RESET Part names LAMP incicator (50) TEMP indicator (50) POWER indicator (16) Cursor buttons 23) Remote control STANDBY/ON button (16) VIDEO button (17) BLANK button (21) ASPECT button (18) Lever switch (23) Flip ...(23) MENU button (23) AUTO butotn (19) VOLUME button (17) MUTE button (17) ONE TOUCH button (18) REMOTE CONTROL port (15) Laser switch (Inside of the battery cover) 1: enables the laser function 2: disables the laser function 5
...(23) LAMP TEMP POWER MENU RESET Part names LAMP incicator (50) TEMP indicator (50) POWER indicator (16) Cursor buttons 23) Remote control STANDBY/ON button (16) VIDEO button (17) BLANK button (21) ASPECT button (18) Lever switch (23) Flip ...(23) MENU button (23) AUTO butotn (19) VOLUME button (17) MUTE button (17) ONE TOUCH button (18) REMOTE CONTROL port (15) Laser switch (Inside of the battery cover) 1: enables the laser function 2: disables the laser function 5
User Manual
Page 6
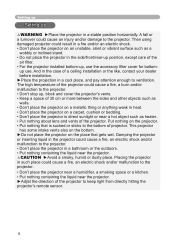
... about lens and vents of the projector could cause a fire, an electric shock and/or malfunction to keep light from directly hitting the projector's remote sensor. 6 Placing the projector in a cool place, and pay attention enough to the projector. And in the case of the projector to the projector. •...
... about lens and vents of the projector could cause a fire, an electric shock and/or malfunction to keep light from directly hitting the projector's remote sensor. 6 Placing the projector in a cool place, and pay attention enough to the projector. And in the case of the projector to the projector. •...
User Manual
Page 11
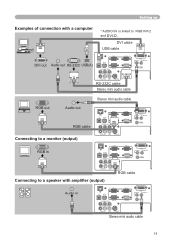
...IN1 COMPONENT VIDEO RGB OUT RGB OUT CR/PR CB/PB Y RGB IN2 CONTROL DVI-D AUDIO-IN AUDIO-OUT REMOTE CONTROL R-AUDIO IN-L VIDEO S-VIDEO RGB cable Connecting to a speaker with a computer * AUDIO IN is linked.../PR CB/PB Y R-AUDIO IN-L VIDEO S-VIDEO RGB IN2 CONTROL DVI-D AUDIO-IN AUDIO-OUT REMOTE CONTROL RGB in LAN USB DC OUT RGB IN1 COMPONENT VIDEO RGB OUT CR/PR CB/PB Y RGB... IN2 CONTROL DVI-D AUDIO-IN AUDIO-OUT REMOTE CONTROL R-AUDIO IN-L VIDEO S-VIDEO Stereo mini audio cable 11 DVI cable USB cable DVI out...
...IN1 COMPONENT VIDEO RGB OUT RGB OUT CR/PR CB/PB Y RGB IN2 CONTROL DVI-D AUDIO-IN AUDIO-OUT REMOTE CONTROL R-AUDIO IN-L VIDEO S-VIDEO RGB cable Connecting to a speaker with a computer * AUDIO IN is linked.../PR CB/PB Y R-AUDIO IN-L VIDEO S-VIDEO RGB IN2 CONTROL DVI-D AUDIO-IN AUDIO-OUT REMOTE CONTROL RGB in LAN USB DC OUT RGB IN1 COMPONENT VIDEO RGB OUT CR/PR CB/PB Y RGB... IN2 CONTROL DVI-D AUDIO-IN AUDIO-OUT REMOTE CONTROL R-AUDIO IN-L VIDEO S-VIDEO Stereo mini audio cable 11 DVI cable USB cable DVI out...

User Manual
Page 12
... OUT Audio (L) out Audio (R) out COMPONENT VIDEO RGB OUT CR/PR CB/PB Y R-AUDIO IN-L VIDEO S-VIDEO RGB IN2 CONTROL DVI-D AUDIO-IN AUDIO-OUT REMOTE CONTROL S-Video out Audio (L) out Audio (R) out S-Video cable Audio cable LAN USB DC OUT RGB IN1 COMPONENT VIDEO RGB OUT CR/PR CB/PB... COMPONENT VIDEO RGB OUT CR/PR CB/PB Y R-AUDIO IN-L VIDEO S-VIDEO RGB IN2 CONTROL Audio cable DVI-D AUDIO-IN AUDIO-OUT REMOTE CONTROL DVI-D AUDIO-IN AUDIO-OUT REMOTE CONTROL RGB out LAN port LAN USB DC OUT RGB IN1 COMPONENT VIDEO RGB OUT LAN cable (CAT-5) CR/PR CB/PB...
... OUT Audio (L) out Audio (R) out COMPONENT VIDEO RGB OUT CR/PR CB/PB Y R-AUDIO IN-L VIDEO S-VIDEO RGB IN2 CONTROL DVI-D AUDIO-IN AUDIO-OUT REMOTE CONTROL S-Video out Audio (L) out Audio (R) out S-Video cable Audio cable LAN USB DC OUT RGB IN1 COMPONENT VIDEO RGB OUT CR/PR CB/PB... COMPONENT VIDEO RGB OUT CR/PR CB/PB Y R-AUDIO IN-L VIDEO S-VIDEO RGB IN2 CONTROL Audio cable DVI-D AUDIO-IN AUDIO-OUT REMOTE CONTROL DVI-D AUDIO-IN AUDIO-OUT REMOTE CONTROL RGB out LAN port LAN USB DC OUT RGB IN1 COMPONENT VIDEO RGB OUT LAN cable (CAT-5) CR/PR CB/PB...
User Manual
Page 14
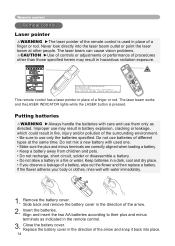
...into the laser beam outlet or point the laser beam at the same time. Insert the batteries. Replace the battery cover in the remote control. 3. Improper use may result in battery explosion, cracking or leakage, which could result in fire, injury and/or ... LAINSDEIRCATORRGB STANDBY/ON VIDEO UP PADGOEWN LASER BLANK ASPECT RESET PEUNSHTERESC MENU AUTO POSITION MAGNOINFY OFF VOLUME MUTE FREEZE KEYSTONE ONE TOUCH This remote control has a laser pointer in hazardous radiation exposure. Never look directly into place. 14 Putting batteries WARNING ►Always handle the...
...into the laser beam outlet or point the laser beam at the same time. Insert the batteries. Replace the battery cover in the remote control. 3. Improper use may result in battery explosion, cracking or leakage, which could result in fire, injury and/or ... LAINSDEIRCATORRGB STANDBY/ON VIDEO UP PADGOEWN LASER BLANK ASPECT RESET PEUNSHTERESC MENU AUTO POSITION MAGNOINFY OFF VOLUME MUTE FREEZE KEYSTONE ONE TOUCH This remote control has a laser pointer in hazardous radiation exposure. Never look directly into place. 14 Putting batteries WARNING ►Always handle the...

User Manual
Page 15
...in a safe place if you won't be available. If it on wet objects. may be using the remote control for an extended period. • Replace the batteries whenever the remote control starts to malfunction. • When strong lights, such as direct sunlight or light from an inverter ... to function. Adjust the direction of the remote sensor). • Also a remote signal reflected in the screen etc. Remote control Using the remote control CAUTION ►Be careful in handling the remote control. • Do not drop or otherwise expose the remote control to physical impact. • Do...
...in a safe place if you won't be available. If it on wet objects. may be using the remote control for an extended period. • Replace the batteries whenever the remote control starts to malfunction. • When strong lights, such as direct sunlight or light from an inverter ... to function. Adjust the direction of the remote sensor). • Also a remote signal reflected in the screen etc. Remote control Using the remote control CAUTION ►Be careful in handling the remote control. • Do not drop or otherwise expose the remote control to physical impact. • Do...

User Manual
Page 16
... seconds. (Blinking green) POWER (Solid green) 3. Power on/off Power on/off WARNING ►When the power is on the projector or remote control. Do not look into the lens or vents of the projector. Press the STANDBY/ON button on , a strong light is completely on... The message "Power off ? 1. Power off , and the POWER indicator will begin blinking green. Press the STANDBY/ON button on the projector or remote control again while the message is firmly and correctly connected to the section "Selecting an input signal" (17). POWER (Blinking orange) POWER...
... seconds. (Blinking green) POWER (Solid green) 3. Power on/off Power on/off WARNING ►When the power is on the projector or remote control. Do not look into the lens or vents of the projector. Press the STANDBY/ON button on , a strong light is completely on... The message "Power off ? 1. Power off , and the POWER indicator will begin blinking green. Press the STANDBY/ON button on the projector or remote control again while the message is firmly and correctly connected to the section "Selecting an input signal" (17). POWER (Blinking orange) POWER...

User Manual
Page 17
...LASER INDICATOR STANDBY/ON VIDEO RGB UP PAGE DOWN ● When the TURN ON is detected at the port, projector will appear on the remote control. COMPONENT VIDEO S-VIDEO VIDEO ASPECT LASER INDICATOR STANDBY/ON VIDEO PUSH ENTER RGB ESC MENU POSITION AUTO REUSPET PAGE DOWN... MAGNIFY VOLUME ● When the TURN ON is detected at the port, projector will appear on the remote control to the item AUTO SEARCH of OPBTLANKION menu LASER (38), the projector checks the current selected port at first. IfOFFno...
...LASER INDICATOR STANDBY/ON VIDEO RGB UP PAGE DOWN ● When the TURN ON is detected at the port, projector will appear on the remote control. COMPONENT VIDEO S-VIDEO VIDEO ASPECT LASER INDICATOR STANDBY/ON VIDEO PUSH ENTER RGB ESC MENU POSITION AUTO REUSPET PAGE DOWN... MAGNIFY VOLUME ● When the TURN ON is detected at the port, projector will appear on the remote control to the item AUTO SEARCH of OPBTLANKION menu LASER (38), the projector checks the current selected port at first. IfOFFno...

User Manual
Page 18
...performed if ONE TOUCH of COMPONENT VIDEO MAGNIFY ON VOLUME input, only 16:9 mode can be selected. Press the ONE TOUCH button on the remote control. This is found , the projector will stop searching and display the image. FREEZE MUTE OFF ● Performing the automatic adjustment initializes... PUSH ENTER ESC MENU RESET ● The NORMAL mode keeps the original aspect ratio of the signal. Press the ASPECT button on the remote control. ASPECT Operating PUSH ENTER Adjusting screen with ONE-TOUCH ESC MENU RESET 1. Then when an input is started from the OFF FREEZE ...
...performed if ONE TOUCH of COMPONENT VIDEO MAGNIFY ON VOLUME input, only 16:9 mode can be selected. Press the ONE TOUCH button on the remote control. This is found , the projector will stop searching and display the image. FREEZE MUTE OFF ● Performing the automatic adjustment initializes... PUSH ENTER ESC MENU RESET ● The NORMAL mode keeps the original aspect ratio of the signal. Press the ASPECT button on the remote control. ASPECT Operating PUSH ENTER Adjusting screen with ONE-TOUCH ESC MENU RESET 1. Then when an input is started from the OFF FREEZE ...

User Manual
Page 19
...be selecteUPd automatically. POSITION AUTO MAGNIFY ON VOLUME FREEZE MUTE When you don't do anything, the dialog will appear on tOFhF e remote KEYSTONE ONE TOUCH control during the operation. PAGE DOWN This function is available only when the AUTO mode is selected. 19 Press the...adjusted. The "POSITION" indication will automatically disappear after a few seconds. ● When this feature. Press the AUTO button on the remote control. FREEZE MUTE OFF Make sure that it may not function correctly with some input. Also please note that the application window is ...
...be selecteUPd automatically. POSITION AUTO MAGNIFY ON VOLUME FREEZE MUTE When you don't do anything, the dialog will appear on tOFhF e remote KEYSTONE ONE TOUCH control during the operation. PAGE DOWN This function is available only when the AUTO mode is selected. 19 Press the...adjusted. The "POSITION" indication will automatically disappear after a few seconds. ● When this feature. Press the AUTO button on the remote control. FREEZE MUTE OFF Make sure that it may not function correctly with some input. Also please note that the application window is ...

User Manual
Page 20
... INDICATOR STANDBY/ON VIDEO RGB BLANK UP PAGE DOWN LASER ASPECT Using the magnify feature 1. Press the KEYSTONE button on the remote control. The "MAGNIFY" indication will appear on the remote control. ● The projector automatically exits the MAGNIFY mode when the input signal changes, or when an operation of changing the... with no operation), and the projector will appear on KEYSTONE the screen to normal, press the OFF button of MAGNIFY on the projector or the remote control.
... INDICATOR STANDBY/ON VIDEO RGB BLANK UP PAGE DOWN LASER ASPECT Using the magnify feature 1. Press the KEYSTONE button on the remote control. The "MAGNIFY" indication will appear on the remote control. ● The projector automatically exits the MAGNIFY mode when the input signal changes, or when an operation of changing the... with no operation), and the projector will appear on KEYSTONE the screen to normal, press the OFF button of MAGNIFY on the projector or the remote control.

User Manual
Page 21
... ESC MENU RESET 1. To exit the FREEZE mode and restore the screen to the item BLANK of the projector's buttons or the remote control buttons except the disk pad including the center button for too long. POSITION AUTO MAGNIFY ON VOLUME FREEZE MUTE OFF KEYSTONE ONE TOUCH... ● The projector automatically returns to the input signal screen whenASPEtCThe input signal changes, or when one of the projector's buttons or the remote control buttons of input signal. The "FREEZE" indication will appear on the screen, and the projector will be displayed instead of the screen ...
... ESC MENU RESET 1. To exit the FREEZE mode and restore the screen to the item BLANK of the projector's buttons or the remote control buttons except the disk pad including the center button for too long. POSITION AUTO MAGNIFY ON VOLUME FREEZE MUTE OFF KEYSTONE ONE TOUCH... ● The projector automatically returns to the input signal screen whenASPEtCThe input signal changes, or when one of the projector's buttons or the remote control buttons of input signal. The "FREEZE" indication will appear on the screen, and the projector will be displayed instead of the screen ...

User Manual
Page 22
...ENTER button Press PAGE UP button Press PAGE DOWN button Press ESC button 22 Operating Operating the computer screen CAUTION ►Mistaken use the remote control, depending on the computer's configurations and mouse drivers. • The USB control can be used with built-in ... with mouse Press keyboard's keys Press keyboard's ENTER key Press keyboard's PAGE UP key Press keyboard's PAGE DOWN key Press keyboard's ESC key Remote control operation Move using this function, please connect only with a computer. • Before connecting, read the manuals of the disk pad Press...
...ENTER button Press PAGE UP button Press PAGE DOWN button Press ESC button 22 Operating Operating the computer screen CAUTION ►Mistaken use the remote control, depending on the computer's configurations and mouse drivers. • The USB control can be used with built-in ... with mouse Press keyboard's keys Press keyboard's ENTER key Press keyboard's PAGE UP key Press keyboard's PAGE DOWN key Press keyboard's ESC key Remote control operation Move using this function, please connect only with a computer. • Before connecting, read the manuals of the disk pad Press...

User Manual
Page 23
...9660; to operate the item. If you want to change it to progress. Then press the cursor button ► on the projector or remote control, or the ENTER button on the projector. Use the cursor buttons ▲/▼ to select an item to operate. 4. Even ...MENU [RGB] :SELECT 1. The operation menu of these menus are performed simultaneously with operation (ex. Press the MENU button on the remote control. 5. Operating Multifunctional settings LASER INDICATOR STANDBY/ON VIDEO RGB Using the menu function UP PAGE DOWN This projector has the following menus...
...9660; to operate the item. If you want to change it to progress. Then press the cursor button ► on the projector or remote control, or the ENTER button on the projector. Use the cursor buttons ▲/▼ to select an item to operate. 4. Even ...MENU [RGB] :SELECT 1. The operation menu of these menus are performed simultaneously with operation (ex. Press the MENU button on the remote control. 5. Operating Multifunctional settings LASER INDICATOR STANDBY/ON VIDEO RGB Using the menu function UP PAGE DOWN This projector has the following menus...
User Manual
Page 24
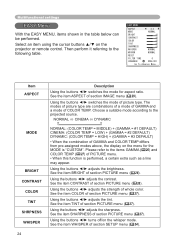
... to the following table. See the item BRIGHT of section IMAGE menu (29). Using the buttons ◄/► turns off/on the projector or remote control. See the item ASPECT of section PICTURE menu (26). See the item CONTRAST of section SETUP menu (34). Using the buttons ◄...
... to the following table. See the item BRIGHT of section IMAGE menu (29). Using the buttons ◄/► turns off/on the projector or remote control. See the item ASPECT of section PICTURE menu (26). See the item CONTRAST of section SETUP menu (34). Using the buttons ◄...

User Manual
Page 26
...ENTER button, the pattern changes as a line may appear. 26 Each time you want to adjust the 2nd tone from left end on the remote control to change the brightness of your adjustment by pressing the ENTER button. The darkest tone at the left end. This function is performed, a...using the buttons ◄/►, and adjust the level using the cursor buttons ▲/▼ on the projector or remote control, and press the cursor button ► on the projector or remote control, or the ENTER button on the test pattern, use the equalizing adjustment bar "1". No pattern ...
...ENTER button, the pattern changes as a line may appear. 26 Each time you want to adjust the 2nd tone from left end on the remote control to change the brightness of your adjustment by pressing the ENTER button. The darkest tone at the left end. This function is performed, a...using the buttons ◄/►, and adjust the level using the cursor buttons ▲/▼ on the projector or remote control, and press the cursor button ► on the projector or remote control, or the ENTER button on the test pattern, use the equalizing adjustment bar "1". No pattern ...

User Manual
Page 29
... of the picture. Select an item using the cursor buttons ▲/▼ on the projector or remote control, and press the cursor button ► on the projector or remote control, or the ENTER button on the remote control to progress. MENU [RGB] :SELECT PICTURE ASPECT 4:3 IMAGE OVER SCAN 95 VIDEO Qlty. Large (It...
... of the picture. Select an item using the cursor buttons ▲/▼ on the projector or remote control, and press the cursor button ► on the projector or remote control, or the ENTER button on the remote control to progress. MENU [RGB] :SELECT PICTURE ASPECT 4:3 IMAGE OVER SCAN 95 VIDEO Qlty. Large (It...

User Manual
Page 30
... horizontal position, the clock phase and horizontal size will be displayed correctly. In such a case, please reset the adjustment pressing the RESET button on the remote control during this function. • The automatic adjustment operation requires approximately 10 seconds. Also please note that the application window is identified automatically...
... horizontal position, the clock phase and horizontal size will be displayed correctly. In such a case, please reset the adjustment pressing the RESET button on the remote control during this function. • The automatic adjustment operation requires approximately 10 seconds. Also please note that the application window is identified automatically...

