
User Manual
Page 3
...with the items shown below . 2. Be sure to the lens cover in front of the lens when the projector is mounted upside down , hang the lens cover on the side of package Your projector should come with the broad use by the following features. The unique optics system produces a large projected image... the figure for step 1. Please note that the strap is used to the strap hole as when mounted on the side of your dealer immediately if any items are included. When mounting the projector upside down such as shown in a short distance, which may cause damage to it to use .
...with the items shown below . 2. Be sure to the lens cover in front of the lens when the projector is mounted upside down , hang the lens cover on the side of package Your projector should come with the broad use by the following features. The unique optics system produces a large projected image... the figure for step 1. Please note that the strap is used to the strap hole as when mounted on the side of your dealer immediately if any items are included. When mounting the projector upside down such as shown in a short distance, which may cause damage to it to use .
User Manual
Page 7
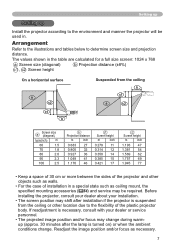
...mounting accessories ( 64) and service may be used in a special state such as necessary. 7 If readjustment is necessary, consult with your installation. • The screen position may change . Arrangement Refer to the illustrations and tables below to the flexibility of installation in . Setting up Setting up Install the projector... from the ceiling or other objects such as walls. • For the case of the plastic projector body. Before installing the projector, consult your dealer about your dealer or service personnel. • The projected image position and/or...
...mounting accessories ( 64) and service may be used in a special state such as necessary. 7 If readjustment is necessary, consult with your installation. • The screen position may change . Arrangement Refer to the illustrations and tables below to the flexibility of installation in . Setting up Setting up Install the projector... from the ceiling or other objects such as walls. • For the case of the plastic projector body. Before installing the projector, consult your dealer about your dealer or service personnel. • The projected image position and/or...

User Manual
Page 8
...) WARNING ►Place the projector in a bathroom or the outdoors. • Do not place anything containing liquid near the projector. ►Use only the mounting accessories the manufacturer specified, and leave installing and removing the projector with your dealer before a special... installation such as heaters. This projector has some intake vents also on the ...
...) WARNING ►Place the projector in a bathroom or the outdoors. • Do not place anything containing liquid near the projector. ►Use only the mounting accessories the manufacturer specified, and leave installing and removing the projector with your dealer before a special... installation such as heaters. This projector has some intake vents also on the ...
User Manual
Page 53
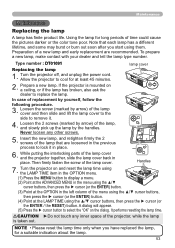
... dealer and tell the lamp type number. Loosen the screw (marked by the handles. While putting the interlocking parts of the lamp cover. Allow the projector to display a menu. (2) Point at the ADVANCED MENU in the menu using the ▲/▼ cursor buttons, then press the ► cursor (...other screws. 5. Insert the new lamp, and retighten firmly the 2 screws of the projector, while the lamp is mounted on and reset the lamp time using the LAMP TIME item in place. 6. Turn the projector on a ceiling, or if the lamp has broken, also ask the dealer to remove it...
... dealer and tell the lamp type number. Loosen the screw (marked by the handles. While putting the interlocking parts of the lamp cover. Allow the projector to display a menu. (2) Point at the ADVANCED MENU in the menu using the ▲/▼ cursor buttons, then press the ► cursor (...other screws. 5. Insert the new lamp, and retighten firmly the 2 screws of the projector, while the lamp is mounted on and reset the lamp time using the LAMP TIME item in place. 6. Turn the projector on a ceiling, or if the lamp has broken, also ask the dealer to remove it...
User Manual
Page 64
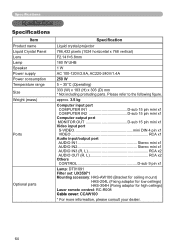
... Product name Liquid Crystal Panel Lens Lamp Speaker Power supply Power consumption Temperature range Size Weight (mass) Ports Optional parts Specification Liquid crystal projector 786,432 pixels (1024 horizontal x 768 vertical) F2.14 f=6.8mm 180 W UHB 1 W AC 100-120V/2.8A, AC220-240V/1.4A 250 W 5 ~ 35&#...IN3 (R, L RCA x2 AUDIO OUT (R, L RCA x2 Others CONTROL D-sub 9 pin x1 Lamp: DT01091 Filter set: UX35971 Mounting accessary: HAS-AW100 (Bracket for ceiling mount) HAS-204L (Fixing adaptor for low ceilings) HAS-304H (Fixing adaptor for high ceilings) Laser remote control: RC-R008 Cable ...
... Product name Liquid Crystal Panel Lens Lamp Speaker Power supply Power consumption Temperature range Size Weight (mass) Ports Optional parts Specification Liquid crystal projector 786,432 pixels (1024 horizontal x 768 vertical) F2.14 f=6.8mm 180 W UHB 1 W AC 100-120V/2.8A, AC220-240V/1.4A 250 W 5 ~ 35&#...IN3 (R, L RCA x2 AUDIO OUT (R, L RCA x2 Others CONTROL D-sub 9 pin x1 Lamp: DT01091 Filter set: UX35971 Mounting accessary: HAS-AW100 (Bracket for ceiling mount) HAS-204L (Fixing adaptor for low ceilings) HAS-304H (Fixing adaptor for high ceilings) Laser remote control: RC-R008 Cable ...


