
User Manual
Page 3
... cover Strap slit 1 2 Strap CAUTION ►Do not hang the lens cover in front of the lens when the projector is inserted to the strap hole as when mounted on the projector. Put the strap end into the slit of the lens cover with the knot on the strap is expected to... 1. Be sure to fasten it . Otherwise, the lens cover may cause damage to it to function longer and offers you less maintenance frequency. When mounting the projector upside down such as shown in the figure for future reshipment. The double layer filter system is used to use by the following...
... cover Strap slit 1 2 Strap CAUTION ►Do not hang the lens cover in front of the lens when the projector is inserted to the strap hole as when mounted on the projector. Put the strap end into the slit of the lens cover with the knot on the strap is expected to... 1. Be sure to fasten it . Otherwise, the lens cover may cause damage to it to function longer and offers you less maintenance frequency. When mounting the projector upside down such as shown in the figure for future reshipment. The double layer filter system is used to use by the following...
User Manual
Page 7
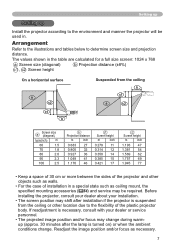
... screen position may shift after the lamp is turned on) or when the ambient conditions change during warmup (approx. 30 minutes after installation if the projector is suspended from the ceiling b c1 a c2 a Screen size (diagonal) type(inch) m 60 1.5 70 1.8 80 2.0 90 2.3 100 2.5 b Projection distance m ... surface a c2 c1 b Suspended from the ceiling or other objects such as walls. • For the case of the plastic projector body. Readjust the image position and/or focus as ceiling mount, the specified mounting accessories ( 64) and service may change .
... screen position may shift after the lamp is turned on) or when the ambient conditions change during warmup (approx. 30 minutes after installation if the projector is suspended from the ceiling b c1 a c2 a Screen size (diagonal) type(inch) m 60 1.5 70 1.8 80 2.0 90 2.3 100 2.5 b Projection distance m ... surface a c2 c1 b Suspended from the ceiling or other objects such as walls. • For the case of the plastic projector body. Readjust the image position and/or focus as ceiling mount, the specified mounting accessories ( 64) and service may change .

User Manual
Page 8
... stick to the vents on carpet, cushions or bedding. • Do not place the projector in direct sunlight or near the projector. ►Use only the mounting accessories the manufacturer specified, and leave installing and removing the projector with your dealer before a special installation such as suspending from a ceiling or somewhere else...
... stick to the vents on carpet, cushions or bedding. • Do not place the projector in direct sunlight or near the projector. ►Use only the mounting accessories the manufacturer specified, and leave installing and removing the projector with your dealer before a special installation such as suspending from a ceiling or somewhere else...
User Manual
Page 53
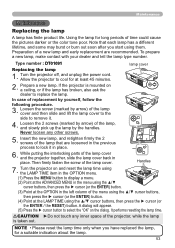
...after you have replaced the lamp, for a suitable indication about the lamp. 53 Loosen the 2 screws (marked by arrow) of the projector, while the lamp is mounted on the dialog. Never loosen any inner space of the lamp, and slowly pick up the lamp by yourself, follow the following procedure... the ► cursor (or the ENTER) button. (3) Point at the OPTION in place. While putting the interlocking parts of the lamp cover and the projector together, slide the lamp cover back in the left column of a new lamp and early replacement are loosened in place. 6. A dialog will appear. (5)...
...after you have replaced the lamp, for a suitable indication about the lamp. 53 Loosen the 2 screws (marked by arrow) of the projector, while the lamp is mounted on the dialog. Never loosen any inner space of the lamp, and slowly pick up the lamp by yourself, follow the following procedure... the ► cursor (or the ENTER) button. (3) Point at the OPTION in place. While putting the interlocking parts of the lamp cover and the projector together, slide the lamp cover back in the left column of a new lamp and early replacement are loosened in place. 6. A dialog will appear. (5)...
User Manual
Page 64
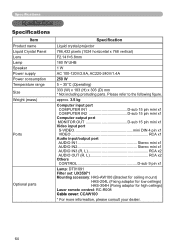
...IN3 (R, L RCA x2 AUDIO OUT (R, L RCA x2 Others CONTROL D-sub 9 pin x1 Lamp: DT01091 Filter set: UX35971 Mounting accessary: HAS-AW100 (Bracket for ceiling mount) HAS-204L (Fixing adaptor for low ceilings) HAS-304H (Fixing adaptor for high ceilings) Laser remote control: RC-R008 Cable ... Product name Liquid Crystal Panel Lens Lamp Speaker Power supply Power consumption Temperature range Size Weight (mass) Ports Optional parts Specification Liquid crystal projector 786,432 pixels (1024 horizontal x 768 vertical) F2.14 f=6.8mm 180 W UHB 1 W AC 100-120V/2.8A, AC220-240V/1.4A 250 W 5 ~ 35&#...
...IN3 (R, L RCA x2 AUDIO OUT (R, L RCA x2 Others CONTROL D-sub 9 pin x1 Lamp: DT01091 Filter set: UX35971 Mounting accessary: HAS-AW100 (Bracket for ceiling mount) HAS-204L (Fixing adaptor for low ceilings) HAS-304H (Fixing adaptor for high ceilings) Laser remote control: RC-R008 Cable ... Product name Liquid Crystal Panel Lens Lamp Speaker Power supply Power consumption Temperature range Size Weight (mass) Ports Optional parts Specification Liquid crystal projector 786,432 pixels (1024 horizontal x 768 vertical) F2.14 f=6.8mm 180 W UHB 1 W AC 100-120V/2.8A, AC220-240V/1.4A 250 W 5 ~ 35&#...


