

User Manual
Page 2
...COLOR, TINT, SHARPNESS, Preparations 3 MY MEMORY Checking the contents of package. . . 3 IMAGE menu 29 Fastening the lens cover 3 ASPECT, OVER SCAN, V POSITION, H POSITION, Part names 4 H PHASE, H SIZE, AUTO ADJUST EXECUTE Projector 4 INPUT menu 31 Control panel 5 PROGRESSIVE, VIDEO NR, COLOR SPACE, Rear panel 5 ... menu 47 Searching an input signal 17 SECURITY PASSWORD CHANGE, Selecting an aspect ratio 17 MyScreen PASSWORD, PIN LOCK, Adjusting the projector's elevator . . 18 TRANSITION DETECTOR, MY TEXT PASSWORD, Adjusting the focus 18 MY TEXT DISPLAY, MY TEXT WRITING Using the...
...COLOR, TINT, SHARPNESS, Preparations 3 MY MEMORY Checking the contents of package. . . 3 IMAGE menu 29 Fastening the lens cover 3 ASPECT, OVER SCAN, V POSITION, H POSITION, Part names 4 H PHASE, H SIZE, AUTO ADJUST EXECUTE Projector 4 INPUT menu 31 Control panel 5 PROGRESSIVE, VIDEO NR, COLOR SPACE, Rear panel 5 ... menu 47 Searching an input signal 17 SECURITY PASSWORD CHANGE, Selecting an aspect ratio 17 MyScreen PASSWORD, PIN LOCK, Adjusting the projector's elevator . . 18 TRANSITION DETECTOR, MY TEXT PASSWORD, Adjusting the focus 18 MY TEXT DISPLAY, MY TEXT WRITING Using the...

User Manual
Page 3
...lens cover To avoid losing the cover, please fasten the lens cover to use the original packing materials when moving the projector. The unique optics system produces a large projected image in front of use by the following features. Check that the strap is expected to it on the side of ...your dealer immediately if any items are included. Please note that the knot on the ceiling. Otherwise, the lens cover may block the light from the projector or ...
...lens cover To avoid losing the cover, please fasten the lens cover to use the original packing materials when moving the projector. The unique optics system produces a large projected image in front of use by the following features. Check that the strap is expected to it on the side of ...your dealer immediately if any items are included. Please note that the knot on the ceiling. Otherwise, the lens cover may block the light from the projector or ...
User Manual
Page 7
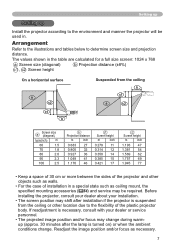
... Refer to the illustrations and tables below to determine screen size and projection distance. Before installing the projector, consult your dealer about your dealer or service personnel. • The projected image position and/or focus may change . If readjustment is necessary, consult with your installation. •...69 1.945 77 • Keep a space of 30 cm or more between the sides of the projector and other location due to the flexibility of installation in . Readjust the image position and/or focus as necessary. 7 The values shown in the table are calculated for a ...
... Refer to the illustrations and tables below to determine screen size and projection distance. Before installing the projector, consult your dealer about your dealer or service personnel. • The projected image position and/or focus may change . If readjustment is necessary, consult with your installation. •...69 1.945 77 • Keep a space of 30 cm or more between the sides of the projector and other location due to the flexibility of installation in . Readjust the image position and/or focus as necessary. 7 The values shown in the table are calculated for a ...
User Manual
Page 17
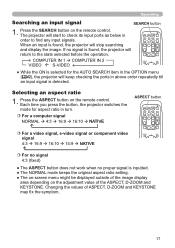
... may fix the symptom. 17 Press the ASPECT button on the remote control. Operating Searching an input signal SEARCH button 1. The projector will start to check its input ports as below in order to the state selected before the operation. Selecting an aspect ratio 1. Press... the SEARCH button on the remote control. If no proper signal is found , the projector will stop searching and display the image. For a computer signal NORMAL 4:3 16:9 16:10 NATIVE For a video signal, s-video signal or component video signal 4:3 16...
... may fix the symptom. 17 Press the ASPECT button on the remote control. Operating Searching an input signal SEARCH button 1. The projector will start to check its input ports as below in order to the state selected before the operation. Selecting an aspect ratio 1. Press... the SEARCH button on the remote control. If no proper signal is found , the projector will stop searching and display the image. For a computer signal NORMAL 4:3 16:9 16:10 NATIVE For a video signal, s-video signal or component video signal 4:3 16...
User Manual
Page 20
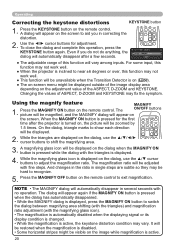
...The adjustable range of this operation, press the KEYSTONE button again. For some input, this function may not work well. ● When the projector is active. 20 While the triangles are subtle so they may vary. And changes in the ratio in single steps are displayed on the ...the keystone distortions KEYSTONE button 1. When the MAGNIFY ON button is disabled. • Some horizontal stripes might be displayed outside of the image display area depending on the screen. Press the KEYSTONE button on the remote control. It will be restored when the magnification...
...The adjustable range of this operation, press the KEYSTONE button again. For some input, this function may not work well. ● When the projector is active. 20 While the triangles are subtle so they may vary. And changes in the ratio in single steps are displayed on the ...the keystone distortions KEYSTONE button 1. When the MAGNIFY ON button is disabled. • Some horizontal stripes might be displayed outside of the image display area depending on the screen. Press the KEYSTONE button on the remote control. It will be restored when the magnification...
User Manual
Page 21
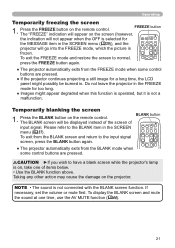
...into the FREEZE mode, which the picture is on, take one time, use the AV MUTE function ( 44). 21 Do not leave the projector in the FREEZE mode for MY SOURCE/ VIDEO COMPUTER DOC.CAMERA the MESSAGE item in the SCREEN menu ( 37). CAUTION ►If you... MY BUTTON MUTE 1 2 press the FREEZE button again. ● The projector automatically exits from the FREEZE mode when some control buttons are pressed. ● If the projector continues projecting a still image for a long time, the LCD panel might appear degraded when this function is operated, but it is not connected...
...into the FREEZE mode, which the picture is on, take one time, use the AV MUTE function ( 44). 21 Do not leave the projector in the FREEZE mode for MY SOURCE/ VIDEO COMPUTER DOC.CAMERA the MESSAGE item in the SCREEN menu ( 37). CAUTION ►If you... MY BUTTON MUTE 1 2 press the FREEZE button again. ● The projector automatically exits from the FREEZE mode when some control buttons are pressed. ● If the projector continues projecting a still image for a long time, the LCD panel might appear degraded when this function is operated, but it is not connected...
User Manual
Page 22
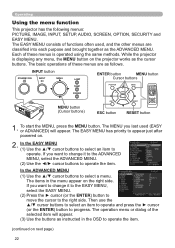
...MENU, select the EASY MENU. (2) Press the ► cursor (or the ENTER) button to move the cursor to operate the item. (continued on the projector works as follows. In the EASY MENU (1) Use the ▲/▼ cursor buttons to select an item to select a menu. If you last used ...the ► cursor (or the ENTER) button to appear just after powered on the right side. Operating Using the menu function This projector has the following menus: PICTURE, IMAGE, INPUT, SETUP, AUDIO, SCREEN, OPTION, SECURITY and EASY MENU. The EASY MENU consists of these menus are classified ...
...MENU, select the EASY MENU. (2) Press the ► cursor (or the ENTER) button to move the cursor to operate the item. (continued on the projector works as follows. In the EASY MENU (1) Use the ▲/▼ cursor buttons to select an item to select a menu. If you last used ...the ► cursor (or the ENTER) button to appear just after powered on the right side. Operating Using the menu function This projector has the following menus: PICTURE, IMAGE, INPUT, SETUP, AUDIO, SCREEN, OPTION, SECURITY and EASY MENU. The EASY MENU consists of these menus are classified ...
User Manual
Page 24
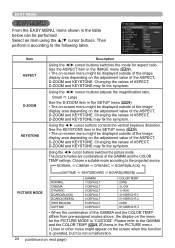
... the vertical keystone distortion. See the KEYSTONE item in the SETUP menu ( 34). • The on-screen menu might be displayed outside of the image display area depending on the adjustment value of the ASPECT, D-ZOOM and KEYSTONE. Choose a suitable mode according to the following table. Item ASPECT D-ZOOM...and the COLOR TEMP settings. EASY MENU EASY MENU From the EASY MENU, items shown in the table below can be displayed outside of the image display area depending on the adjustment value of ASPECT, D-ZOOM and KEYSTONE may fix the symptom. Select an item using the ▲/▼...
... the vertical keystone distortion. See the KEYSTONE item in the SETUP menu ( 34). • The on-screen menu might be displayed outside of the image display area depending on the adjustment value of the ASPECT, D-ZOOM and KEYSTONE. Choose a suitable mode according to the following table. Item ASPECT D-ZOOM...and the COLOR TEMP settings. EASY MENU EASY MENU From the EASY MENU, items shown in the table below can be displayed outside of the image display area depending on the adjustment value of ASPECT, D-ZOOM and KEYSTONE may fix the symptom. Select an item using the ▲/▼...

User Manual
Page 29
... this occurs, please reset the horizontal position to the default setting. If this occurs, please reset the vertical position to the default setting. IMAGE menu Item Description Using the ▲/▼ cursor buttons switches the mode for a video, s-video and component video signal. • When...When this function is performed on the remote control when the V POSITION is too large, certain degradation may fix the symptom. IMAGE menu From the IMAGE menu, items shown in the table below can be selected only for aspect ratio. Pressing the RESET button on a video signal ...
... this occurs, please reset the horizontal position to the default setting. If this occurs, please reset the vertical position to the default setting. IMAGE menu Item Description Using the ▲/▼ cursor buttons switches the mode for a video, s-video and component video signal. • When...When this function is performed on the remote control when the V POSITION is too large, certain degradation may fix the symptom. IMAGE menu From the IMAGE menu, items shown in the table below can be selected only for aspect ratio. Pressing the RESET button on a video signal ...
User Manual
Page 30
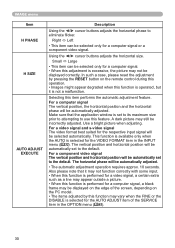
... that the application window is selected for a computer signal, a black frame may be displayed on the remote control during this operation. • Images might appear degraded when this feature. IMAGE menu Item H PHASE H SIZE AUTO ADJUST EXECUTE Description Using the ◄/► cursor buttons adjusts the horizontal phase to use this function...
... that the application window is selected for a computer signal, a black frame may be displayed on the remote control during this operation. • Images might appear degraded when this feature. IMAGE menu Item H PHASE H SIZE AUTO ADJUST EXECUTE Description Using the ◄/► cursor buttons adjusts the horizontal phase to use this function...
User Manual
Page 31
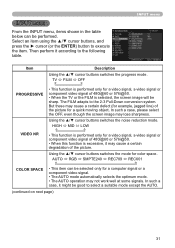
In such a case, please select the OFF, even though the screen image may cause a certain defect (for example, jagged line) of the picture. Using the ▲/▼ cursor buttons switches the mode for color space. In such a ... performed only for a video signal, s-video signal or component video signal of 480i@60 or 576i@50. • When this function is selected, the screen image will be sharp. The FILM adapts to execute the item. AUTO RGB SMPTE240 REC709 REC601 COLOR SPACE • This item can be performed. Using the...
In such a case, please select the OFF, even though the screen image may cause a certain defect (for example, jagged line) of the picture. Using the ▲/▼ cursor buttons switches the mode for color space. In such a ... performed only for a video signal, s-video signal or component video signal of 480i@60 or 576i@50. • When this function is selected, the screen image will be sharp. The FILM adapts to execute the item. AUTO RGB SMPTE240 REC709 REC601 COLOR SPACE • This item can be performed. Using the...
User Manual
Page 34
... input signal has an aspect ratio of 4:3 or vertically larger than 4:3, while the ASPECT is set to NORMAL. • Vertical size of the displayed image is full on the effective display area, while the ASPECT is selected. TOP MID BOTTOM The PICTURE POSITION is not changed if any of the...-screen menu might be performed. SETUP menu SETUP menu From the SETUP menu, items shown in the table below can be displayed outside of the image display area depending on the adjustment value of the ASPECT, D-ZOOM and KEYSTONE. D-SHIFT V Using the ◄/► cursor buttons adjusts the vertical ...
... input signal has an aspect ratio of 4:3 or vertically larger than 4:3, while the ASPECT is set to NORMAL. • Vertical size of the displayed image is full on the effective display area, while the ASPECT is selected. TOP MID BOTTOM The PICTURE POSITION is not changed if any of the...-screen menu might be performed. SETUP menu SETUP menu From the SETUP menu, items shown in the table below can be displayed outside of the image display area depending on the adjustment value of the ASPECT, D-ZOOM and KEYSTONE. D-SHIFT V Using the ◄/► cursor buttons adjusts the vertical ...
User Manual
Page 35
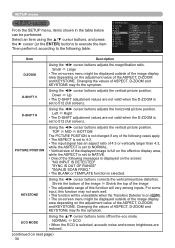
...the SAVING is selected, the RS-232C communication control is disabled except to the MONITOR OUT port while an image from the port chosen in the (1) is on while the projector is in the standby state. • When the SAVING is selected, the STANDBY setting of MONITOR OUT ... The OFF disables the MONITOR OUT port. 35 MIRROR NORMAL H:INVERT V:INVERT H&V:INVERT STANDBY MODE If the Transition Detector is output to turn the projector on screen. (1) Choose a picture input port using the ◄/► cursor buttons. COMPUTER IN1 COMPUTER IN2 STANDBY VIDEO S-VIDEO MONITOR OUT &#...
...the SAVING is selected, the RS-232C communication control is disabled except to the MONITOR OUT port while an image from the port chosen in the (1) is on while the projector is in the standby state. • When the SAVING is selected, the STANDBY setting of MONITOR OUT ... The OFF disables the MONITOR OUT port. 35 MIRROR NORMAL H:INVERT V:INVERT H&V:INVERT STANDBY MODE If the Transition Detector is output to turn the projector on screen. (1) Choose a picture input port using the ◄/► cursor buttons. COMPUTER IN1 COMPUTER IN2 STANDBY VIDEO S-VIDEO MONITOR OUT &#...
User Manual
Page 36
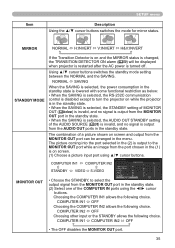
The audio coming into the port selected in the (2) is output while an image from the port chosen in the (1) is selected, pressing the ◄ cursor (or the ENTER) button returns to the following table. The built-in speaker ...
The audio coming into the port selected in the (2) is output while an image from the port chosen in the (1) is selected, pressing the ◄ cursor (or the ENTER) button returns to the following table. The built-in speaker ...
User Manual
Page 38
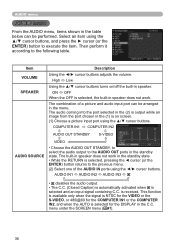
... several minutes. Registration takes several seconds: "MyScreen registration is displayed. It will appear. Using the cursor buttons adjusts the frame position. The image will freeze and the frame for some input signals. The frame may not be able to be displayed, and press the ENTER (or the...To stop performing, press the RESET (or press the ◄ cursor and the INPUT buttons at the same time) button. To start capturing an image from the current screen. To restore the screen and return to the MyScreen PASSWORD item in the SECURITY menu ( 48). (continued on the remote ...
... several minutes. Registration takes several seconds: "MyScreen registration is displayed. It will appear. Using the cursor buttons adjusts the frame position. The image will freeze and the frame for some input signals. The frame may not be able to be displayed, and press the ENTER (or the...To stop performing, press the RESET (or press the ◄ cursor and the INPUT buttons at the same time) button. To start capturing an image from the current screen. To restore the screen and return to the MyScreen PASSWORD item in the SECURITY menu ( 48). (continued on the remote ...
User Manual
Page 42
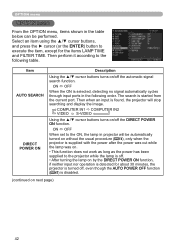
ON OFF When set to the ON, the lamp in projector will stop searching and display the image. The search is selected, detecting no signal automatically cycles through input... port. Then perform it according to execute the item, except for about 30 minutes, the projector is found, the projector will be performed. Then when an input is turned off the DIRECT POWER ON function. OPTION...in the table below can be automatically turned on without the usual procedure ( 14), only when the projector is supplied with the power after the power was cut while the lamp was on. • This ...
ON OFF When set to the ON, the lamp in projector will stop searching and display the image. The search is selected, detecting no signal automatically cycles through input... port. Then perform it according to execute the item, except for about 30 minutes, the projector is found, the projector will be performed. Then when an input is turned off the DIRECT POWER ON function. OPTION...in the table below can be automatically turned on without the usual procedure ( 14), only when the projector is supplied with the power after the power was cut while the lamp was on. • This ...

User Manual
Page 45
... an item using the ◄/► cursor buttons. 2. HIGH NORMAL AUTO ADJUST Using the ▲/▼ cursor buttons to your environment of this projector. • Please take care of the filter unit. (continued on next page) 45 In such a case, please choose the DISABLE to... ▲/▼ cursor buttons, and press the ► cursor (or the ENTER) button on conditions, such as input image, signal cable to the projector, environment around the projector, etc., the automatic adjustment may not work correctly. FILTER MESSAGE Use the ▲/▼ cursor button to execute the item...
... an item using the ◄/► cursor buttons. 2. HIGH NORMAL AUTO ADJUST Using the ▲/▼ cursor buttons to your environment of this projector. • Please take care of the filter unit. (continued on next page) 45 In such a case, please choose the DISABLE to... ▲/▼ cursor buttons, and press the ► cursor (or the ENTER) button on conditions, such as input image, signal cable to the projector, environment around the projector, etc., the automatic adjustment may not work correctly. FILTER MESSAGE Use the ▲/▼ cursor button to execute the item...
User Manual
Page 48
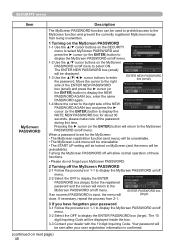
... menu Item Description MyScreen PASSWORD The MyScreen PASSWORD function can be used to prohibit access to the MyScreen function and prevent the currently registered MyScreen image from 2-1. 3 If you have forgotten your password 3-1 Follow the procedure in 1-1 to display the MyScreen PASSWORD on/off menu. 2-2 Select the OFF to display the...
... menu Item Description MyScreen PASSWORD The MyScreen PASSWORD function can be used to prohibit access to the MyScreen function and prevent the currently registered MyScreen image from 2-1. 3 If you have forgotten your password 3-1 Follow the procedure in 1-1 to display the MyScreen PASSWORD on/off menu. 2-2 Select the OFF to display the...

User Manual
Page 63
... effective display area. The ECO MODE function is working . The lens is a unique characteristic of its product lifetime. the vertical size 34 of the displayed image does not fit visually on the screen, this is dirty or misty.
... effective display area. The ECO MODE function is working . The lens is a unique characteristic of its product lifetime. the vertical size 34 of the displayed image does not fit visually on the screen, this is dirty or misty.
Parts Diagram
Page 1
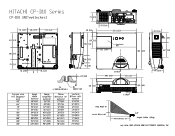
HITACHI CP-D10 Series CP-D10 UNITinn[Inches] -81 [3.2]-100 [3.9} 124 4.9] O a • • 153 [6.0 Hi • 100 [3.9] .10 ... [0.5 202 [8.0] 131 [5.1]- 78 [3.1]- )83 3.3] 122 4.8] Screen size (413 Diagonal) inch 60' 66' 70' 77' 80' 90' 100' 120' 150' Image Width Inch(cm) 48'(122) 53'(134) 56'(142) 62'(156) 64'(163) 72'(183) 80'(203) 96'(244) 120'(305) 4 THREAD DETAILS M4 INSERT... NUT Image height(b) inch(cm) 36'(91) 401(101) 42'(107) 46'(117) 48'(122) 54'(137) 60'(152) 72'(183) 90...
HITACHI CP-D10 Series CP-D10 UNITinn[Inches] -81 [3.2]-100 [3.9} 124 4.9] O a • • 153 [6.0 Hi • 100 [3.9] .10 ... [0.5 202 [8.0] 131 [5.1]- 78 [3.1]- )83 3.3] 122 4.8] Screen size (413 Diagonal) inch 60' 66' 70' 77' 80' 90' 100' 120' 150' Image Width Inch(cm) 48'(122) 53'(134) 56'(142) 62'(156) 64'(163) 72'(183) 80'(203) 96'(244) 120'(305) 4 THREAD DETAILS M4 INSERT... NUT Image height(b) inch(cm) 36'(91) 401(101) 42'(107) 46'(117) 48'(122) 54'(137) 60'(152) 72'(183) 90...

