
User Manual
Page 1
...used in personal injury or even death due to the pages written following this projector. Trademark acknowledgment • Mac® is a registered trademark of Apple Inc. • Windows® is a registered trademark of this manual is not permitted without notice. • The manufacturer assumes no responsibility for ..., could possibly result in this product. Please refer to incorrect handling. This entry notices of fear of their respective owners. 1 Projector CP-X2010/CP-X2510/CP-X3010 User's Manual (detailed) Operating Guide Thank you for purchasing this symbol.
...used in personal injury or even death due to the pages written following this projector. Trademark acknowledgment • Mac® is a registered trademark of Apple Inc. • Windows® is a registered trademark of this manual is not permitted without notice. • The manufacturer assumes no responsibility for ..., could possibly result in this product. Please refer to incorrect handling. This entry notices of fear of their respective owners. 1 Projector CP-X2010/CP-X2510/CP-X3010 User's Manual (detailed) Operating Guide Thank you for purchasing this symbol.

User Manual
Page 2
...for machine defects. . 61 ADVANCED MENU, EXIT Specifications 64 2 Contents Contents About this manual 1 PICTURE menu 26 Contents 2 Projector features 3 BRIGHTNESS, CONTRAST, GAMMA, COLOR TEMP, COLOR, TINT, SHARPNESS, ACTIVE IRIS, MY MEMORY Preparations 3 Checking the... contents of package. . . 3 IMAGE menu 29 ASPECT, OVER SCAN, V POSITION, H POSITION, Part names 4 Projector 4 H PHASE, H SIZE, AUTO ADJUST EXECUTE Control panel 5 INPUT menu 31 Rear panel 5 PROGRESSIVE, VIDEO NR, COLOR SPACE, Remote control ...
...for machine defects. . 61 ADVANCED MENU, EXIT Specifications 64 2 Contents Contents About this manual 1 PICTURE menu 26 Contents 2 Projector features 3 BRIGHTNESS, CONTRAST, GAMMA, COLOR TEMP, COLOR, TINT, SHARPNESS, ACTIVE IRIS, MY MEMORY Preparations 3 Checking the... contents of package. . . 3 IMAGE menu 29 ASPECT, OVER SCAN, V POSITION, H POSITION, Part names 4 Projector 4 H PHASE, H SIZE, AUTO ADJUST EXECUTE Control panel 5 INPUT menu 31 Rear panel 5 PROGRESSIVE, VIDEO NR, COLOR SPACE, Remote control ...

User Manual
Page 3
... new double layer filter system is expected to use by the following features. This projector has a variety of package Your projector should come with two AA batteries (1) MY SOURCE/ VIDEO COMPUTER DOC.CAMERA ASPECT AUTO SEARCH BLANK MAGNIFY... FREEZE ON PAGUEP VOLUME 㧗 DOWN OFF KEYSTONE MY BUTTON MUTE 1 2 POSITION MENU ESC ENTER RESET (4) (5) (2) Power cord (2) (3) Computer cable (4) Lens cover (6) (5) User's manuals...
... new double layer filter system is expected to use by the following features. This projector has a variety of package Your projector should come with two AA batteries (1) MY SOURCE/ VIDEO COMPUTER DOC.CAMERA ASPECT AUTO SEARCH BLANK MAGNIFY... FREEZE ON PAGUEP VOLUME 㧗 DOWN OFF KEYSTONE MY BUTTON MUTE 1 2 POSITION MENU ESC ENTER RESET (4) (5) (2) Power cord (2) (3) Computer cable (4) Lens cover (6) (5) User's manuals...

User Manual
Page 8
...as suspending from directly hitting the projector's remote sensor. 8 Placing the projector in such places could cause injury and/or damage to the service personnel. • Read and keep the user's manual of the mounting accessories used. Setting up , block or otherwise cover the projector's vents. • Keep a... space of 30 cm or more between the sides of the projector and other objects such as walls. • Do not ...
...as suspending from directly hitting the projector's remote sensor. 8 Placing the projector in such places could cause injury and/or damage to the service personnel. • Read and keep the user's manual of the mounting accessories used. Setting up , block or otherwise cover the projector's vents. • Keep a... space of 30 cm or more between the sides of the projector and other objects such as walls. • Do not ...

User Manual
Page 9
...(with straight plugs, not L-shaped ones, as the input ports of the projector are connected to the device and the projector. ►Use appropriate accessory or designated cables. Ask your devices Be sure to read the manuals for devices before connecting them to connect them to damage the cables, and do... not use damaged cables. NOTICE ►Use the cables with an amplifier) VCR/DVD player WARNING ►Do not disassemble or modify the projector and accessories. ►...
...(with straight plugs, not L-shaped ones, as the input ports of the projector are connected to the device and the projector. ►Use appropriate accessory or designated cables. Ask your devices Be sure to read the manuals for devices before connecting them to connect them to damage the cables, and do... not use damaged cables. NOTICE ►Use the cables with an amplifier) VCR/DVD player WARNING ►Do not disassemble or modify the projector and accessories. ►...

User Manual
Page 10
...PC. • When the picture resolution is a Plug-andPlay monitor. 10 Although the projector can be sure to activate the PC's external RGB output. (Set the laptop PC to CRT display or to simultaneous LCD and CRT display.) For details on how this product. And be recommended to use ...please refer to the COMPUTER IN1 port (DDC 2B compatible). The best display performance will go back to read the manuals for the new resolution on G may confuse this projector, so the projector may not be completed. It might be sure to tighten the screws on connectors with this is attempted. •...
...PC. • When the picture resolution is a Plug-andPlay monitor. 10 Although the projector can be sure to activate the PC's external RGB output. (Set the laptop PC to CRT display or to simultaneous LCD and CRT display.) For details on how this product. And be recommended to use ...please refer to the COMPUTER IN1 port (DDC 2B compatible). The best display performance will go back to read the manuals for the new resolution on G may confuse this projector, so the projector may not be completed. It might be sure to tighten the screws on connectors with this is attempted. •...

User Manual
Page 11
The power outlet should be close to be attached to prevent the projector from falling down, since it . For details, see the manual of seconds after the power supply connection, the POWER indicator will light up in steady orange. CAUTION ►Do not place anti-theft chain or... wire near the exhaust vents. Please remember that came with the projector. In a couple of the security tool. ...
The power outlet should be close to be attached to prevent the projector from falling down, since it . For details, see the manual of seconds after the power supply connection, the POWER indicator will light up in steady orange. CAUTION ►Do not place anti-theft chain or... wire near the exhaust vents. Please remember that came with the projector. In a couple of the security tool. ...

User Manual
Page 13
... In order to Mode 1:NORMAL... VOLUME - Be sure to a PC. Remote control Changing the frequency of this projector with a PC having a built-in pointing device (e.g. And also this product only to check your equipment. While ...DOWN OFF (1) (2) KEYSTONE MY BUTTON MUTE 1 2 WARNING ►Improper use of the PC, when the projector's USB port (B type) connects with the PC which can work depending on the PC's configurations and mouse... the simple mouse & keyboard function could damage your PC's manuals before connecting this product to Mode 2:HIGH...
... In order to Mode 1:NORMAL... VOLUME - Be sure to a PC. Remote control Changing the frequency of this projector with a PC having a built-in pointing device (e.g. And also this product only to check your equipment. While ...DOWN OFF (1) (2) KEYSTONE MY BUTTON MUTE 1 2 WARNING ►Improper use of the PC, when the projector's USB port (B type) connects with the PC which can work depending on the PC's configurations and mouse... the simple mouse & keyboard function could damage your PC's manuals before connecting this product to Mode 2:HIGH...

User Manual
Page 18
...twist the foot. CAUTION ►Do not handle the elevator buttons without holding the projector, since the projector may drop down gently. 5. Adjusting the zoom and focus 1. Using the feet can be manually twisted to make more precise adjustments. Use the zoom ring to the screen, ...elevating the front side of the 14° projector within 14 degrees using the adjuster feet. This projector has 2 elevator feet and 2 elevator buttons. Release...
...twist the foot. CAUTION ►Do not handle the elevator buttons without holding the projector, since the projector may drop down gently. 5. Adjusting the zoom and focus 1. Using the feet can be manually twisted to make more precise adjustments. Use the zoom ring to the screen, ...elevating the front side of the 14° projector within 14 degrees using the adjuster feet. This projector has 2 elevator feet and 2 elevator buttons. Release...
User Manual
Page 20
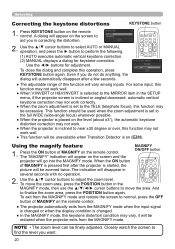
... KEYSTONE MY BUTTON MUTE 1 2 POSITION MENU ESC ENTER RESET ● The adjustable range of MAGNIFY on the screen and the projector will disappear in the KEYSTONE MY BUTTON MUTE 1 2 MAGNIFY mode, then use the cursor buttons to the MIRROR item in correcting..."MAGNIFY" indication will appear on the remote control. ● The projector automatically exits from the MAGNIFY mode. Closely watch the screen to perform the following. (1) AUTO executes automatic vertical keystone correction. (2) MANUAL displays a dialog for adjustment. When the ON button of MAGNIFY on ...
... KEYSTONE MY BUTTON MUTE 1 2 POSITION MENU ESC ENTER RESET ● The adjustable range of MAGNIFY on the screen and the projector will disappear in the KEYSTONE MY BUTTON MUTE 1 2 MAGNIFY mode, then use the cursor buttons to the MIRROR item in correcting..."MAGNIFY" indication will appear on the remote control. ● The projector automatically exits from the MAGNIFY mode. Closely watch the screen to perform the following. (1) AUTO executes automatic vertical keystone correction. (2) MANUAL displays a dialog for adjustment. When the ON button of MAGNIFY on ...

User Manual
Page 45
...In such a case, please choose DISABLE to execute the item. FILTER MESSAGE Use the ▲/▼ button to the projector, environment around the projector, etc., the automatic adjustment may not work correctly. FINE FAST DISABLE SERVICE FINE: Finer tuning including ... of the filter unit. (continued on the remote control to disable the automatic adjustment, and make adjustment manually. OPTION menu Item Description Selecting this projector. HIGH NORMAL AUTO ADJUST Using the ▲/▼ buttons to disappear ghost. Adjust the selected element ...
...In such a case, please choose DISABLE to execute the item. FILTER MESSAGE Use the ▲/▼ button to the projector, environment around the projector, etc., the automatic adjustment may not work correctly. FINE FAST DISABLE SERVICE FINE: Finer tuning including ... of the filter unit. (continued on the remote control to disable the automatic adjustment, and make adjustment manually. OPTION menu Item Description Selecting this projector. HIGH NORMAL AUTO ADJUST Using the ▲/▼ buttons to disappear ghost. Adjust the selected element ...

User Manual
Page 57
...sure the power cord is extremely dirty, dip soft cloth in water or a neutral cleaner diluted in , and then allow the projector to cool sufficiently. If the projector is not plugged in water, and wipe lightly after wringing well. It could cause a burn and/or malfunction to the... a fire, an electric shock, and/or malfunction to the projector. • Do not put anything containing water, cleaners or chemicals near the projector. • Do not use cleaners or chemicals other than those specified in this manual. ►Do not polish or wipe with a soft, dry cloth....
...sure the power cord is extremely dirty, dip soft cloth in water or a neutral cleaner diluted in , and then allow the projector to cool sufficiently. If the projector is not plugged in water, and wipe lightly after wringing well. It could cause a burn and/or malfunction to the... a fire, an electric shock, and/or malfunction to the projector. • Do not put anything containing water, cleaners or chemicals near the projector. • Do not use cleaners or chemicals other than those specified in this manual. ►Do not polish or wipe with a soft, dry cloth....

User Manual
Page 58
...the signal input connection, and the status of precaution when cleaning the air filter. Please confirm the specs for your projector or the signal source specs. Otherwise if a problem occurs with it will be automatically disappeared around several minutes, it according to reset .... Please immediately turn the power off , and allow the projector to the "Cleaning and replacing the air filter" section of this does not resolve the problem, please contact your dealer or service company. If this manual. An improper signal is not within the specified ...
...the signal input connection, and the status of precaution when cleaning the air filter. Please confirm the specs for your projector or the signal source specs. Otherwise if a problem occurs with it will be automatically disappeared around several minutes, it according to reset .... Please immediately turn the power off , and allow the projector to the "Cleaning and replacing the air filter" section of this does not resolve the problem, please contact your dealer or service company. If this manual. An improper signal is not within the specified ...

User Manual
Page 61
... signal cables are outputted. AV MUTE may be easy to be active. Please disconnect the power plug from the power outlet, and allow the projector to cool down at least 45 minutes. Correctly connect the connection cables. Select the input signal, and correct the settings. Neither sounds nor pictures... come out" and "No pictures are mismatched. Correctly connect the power cord. The input changeover settings are displayed" on the next page to the manual of the lamp and lamp cover, and then turn the power off the MUTE and BLANK functions. Reference page 11 11, 14 53, 54 9...
... signal cables are outputted. AV MUTE may be easy to be active. Please disconnect the power plug from the power outlet, and allow the projector to cool down at least 45 minutes. Correctly connect the connection cables. Select the input signal, and correct the settings. Neither sounds nor pictures... come out" and "No pictures are mismatched. Correctly connect the power cord. The input changeover settings are displayed" on the next page to the manual of the lamp and lamp cover, and then turn the power off the MUTE and BLANK functions. Reference page 11 11, 14 53, 54 9...

Technical Manual
Page 1
... signal is a composite sync or a sync on the input signal, full-size display may have multiple display screen modes. frequency (kHz) V. Projector CP-X2010/CP-X2510/CP-X3010 User's Manual (detailed) Operating Guide - frequency (Hz) 720 x 400 37.9 85.0 640 x 480 31.5 59.9 640 x 480 37.9 72.8 640...(60Hz) VGA (72Hz) VGA (75Hz) VGA (85Hz) SVGA (56Hz) SVGA (60Hz) SVGA (72Hz) SVGA (75Hz) SVGA (85Hz) Mac 16" mode XGA (60Hz) XGA (70Hz) XGA (75Hz) XGA (85Hz) 1152 x 864 (75Hz) W-XGA (60Hz) 1280 x 800 (60Hz) 1280 x 960 (60Hz) SXGA (60Hz) SXGA (75Hz) SXGA (85Hz) SXGA+ (60Hz) UXGA (60Hz) NOTE ...
... signal is a composite sync or a sync on the input signal, full-size display may have multiple display screen modes. frequency (kHz) V. Projector CP-X2010/CP-X2510/CP-X3010 User's Manual (detailed) Operating Guide - frequency (Hz) 720 x 400 37.9 85.0 640 x 480 31.5 59.9 640 x 480 37.9 72.8 640...(60Hz) VGA (72Hz) VGA (75Hz) VGA (85Hz) SVGA (56Hz) SVGA (60Hz) SVGA (72Hz) SVGA (75Hz) SVGA (85Hz) Mac 16" mode XGA (60Hz) XGA (70Hz) XGA (75Hz) XGA (85Hz) 1152 x 864 (75Hz) W-XGA (60Hz) 1280 x 800 (60Hz) 1280 x 960 (60Hz) SXGA (60Hz) SXGA (75Hz) SXGA (85Hz) SXGA+ (60Hz) UXGA (60Hz) NOTE ...

