

User Manual
Page 1
...is not permitted without notice. • The manufacturer assumes no responsibility for any errors that may appear in a safe place for purchasing this projector. About this product. The meanings of these symbols are used in this manual is subject to read all or any part of Microsoft Corporation. ... if ignored, could possibly result in personal injury or physical damage due to incorrect handling. Please refer to incorrect handling. Projector CP-X253 User's Manual (detailed) Operating Guide Thank you for future reference. WARNING ►Before using this symbol.
...is not permitted without notice. • The manufacturer assumes no responsibility for any errors that may appear in a safe place for purchasing this projector. About this product. The meanings of these symbols are used in this manual is subject to read all or any part of Microsoft Corporation. ... if ignored, could possibly result in personal injury or physical damage due to incorrect handling. Please refer to incorrect handling. Projector CP-X253 User's Manual (detailed) Operating Guide Thank you for future reference. WARNING ►Before using this symbol.

User Manual
Page 2
... Go to be mistaken for bottom-up use 3 PICTURE menu 23 Brightness, Contrast, Gamma, Color temp, Color, Tint, Sharpness, My memory Part names 4 Projector 4 Control panel 5 Remote control 5 Setting up , MyScreen, MyScreen Lock, Message, Source name simple PC mouse & keyboard . . . 12 OPTION menu ... Selecting an input signal 14 Searching an input signal 15 Air filter 50 Other care 51 Selecting an aspect ratio 15 Troubleshooting 52 Adjusting the projector's elevator . . 16 Related messages 52 Adjusting the zoom and focus. . . . . 16 Regarding the indicator lamps. . . . . 53 ...
... Go to be mistaken for bottom-up use 3 PICTURE menu 23 Brightness, Contrast, Gamma, Color temp, Color, Tint, Sharpness, My memory Part names 4 Projector 4 Control panel 5 Remote control 5 Setting up , MyScreen, MyScreen Lock, Message, Source name simple PC mouse & keyboard . . . 12 OPTION menu ... Selecting an input signal 14 Searching an input signal 15 Air filter 50 Other care 51 Selecting an aspect ratio 15 Troubleshooting 52 Adjusting the projector's elevator . . 16 Related messages 52 Adjusting the zoom and focus. . . . . 16 Regarding the indicator lamps. . . . . 53 ...

User Manual
Page 3
... missing. Fastening the lens cover To avoid losing the lens cover, please fasten the lens cover to the strap hole of the projector. Fix the strap to the projector using the enclosed strap. Please refer to the "Air filter" (50) for how to keep necessary ventilation space. Preparations ...Contents of package Please see the "Contents of package" in the strap at the end, and let the other end of the projector and make high bright image on screen. Strap hole 1. Let the lens cover with the items shown there. Use special caution for future reshipment....
... missing. Fastening the lens cover To avoid losing the lens cover, please fasten the lens cover to the strap hole of the projector. Fix the strap to the projector using the enclosed strap. Please refer to the "Air filter" (50) for how to keep necessary ventilation space. Preparations ...Contents of package Please see the "Contents of package" in the strap at the end, and let the other end of the projector and make high bright image on screen. Strap hole 1. Let the lens cover with the items shown there. Use special caution for future reshipment....
User Manual
Page 4
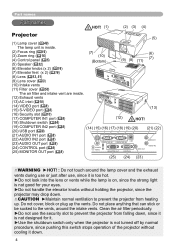
... be sucked to the vents, around the lamp cover and the exhaust vents during use or just after use the security slot to prevent the projector from falling down, since it is not designed for it. ►Use the shutdown switch only when the... projector is not turned off by normal procedure, since pushing this switch stops operation of the projector without cooling it is too hot. ►Do not look into the lens or vents while the lamp...
... be sucked to the vents, around the lamp cover and the exhaust vents during use or just after use the security slot to prevent the projector from falling down, since it is not designed for it. ►Use the shutdown switch only when the... projector is not turned off by normal procedure, since pushing this switch stops operation of the projector without cooling it is too hot. ►Do not look into the lens or vents while the lamp...

User Manual
Page 6
Arrangement Refer to the illustrations and tables below to the environment and manner the projector will be used in the table are calculated for a full size screen: 1024×768. (a) Screen size (diagonal) (b) Projection distance (±10%) (c) Screen height (±... . before a specia(lci)ndsotwalnlation such as suspending from the ceiling (c) up (a) (c) down (b) • Keep a space of 30 cm or more between the sides of the(b)projector a•(anC)donosthue(ltcr)wouibtphjeycotsusr udcehalaesr walls. Setting up Setting up Install the...
Arrangement Refer to the illustrations and tables below to the environment and manner the projector will be used in the table are calculated for a full size screen: 1024×768. (a) Screen size (diagonal) (b) Projection distance (±10%) (c) Screen height (±... . before a specia(lci)ndsotwalnlation such as suspending from the ceiling (c) up (a) (c) down (b) • Keep a space of 30 cm or more between the sides of the(b)projector a•(anC)donosthue(ltcr)wouibtphjeycotsusr udcehalaesr walls. Setting up Setting up Install the...
User Manual
Page 7
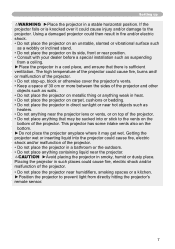
...-up WARNING ►Place the projector in a stable horizontal position. Getting the projector wet or inserting liquid into or stick to the projector. Placing the projector in such places could cause fire, electric shock and/or malfunction of the projector. • Do not place the projector near the projector. If the projector falls or is sufficient ventilation. Setting...
...-up WARNING ►Place the projector in a stable horizontal position. Getting the projector wet or inserting liquid into or stick to the projector. Placing the projector in such places could cause fire, electric shock and/or malfunction of the projector. • Do not place the projector near the projector. If the projector falls or is sufficient ventilation. Setting...

User Manual
Page 8
... product, and prepare the cables required to connect. Ask your devices Be sure to read the manuals for devices before connecting them to the projector. An incorrect connection may generate extremely loud noises or other abnormalities that devices are suitable to be of the INPUT menu (29). &#...61581; Please use damaged cables. CAUTION ►Turn off all the devices are connected to the device and the projector. ►Use appropriate accessory or otherwise designed cables. For cables with a core only at one end, connect the end with the core to ...
... product, and prepare the cables required to connect. Ask your devices Be sure to read the manuals for devices before connecting them to the projector. An incorrect connection may generate extremely loud noises or other abnormalities that devices are suitable to be of the INPUT menu (29). &#...61581; Please use damaged cables. CAUTION ►Turn off all the devices are connected to the device and the projector. ►Use appropriate accessory or otherwise designed cables. For cables with a core only at one end, connect the end with the core to ...

User Manual
Page 9
... When the picture resolution is attempted. • Please use other CRT or LCD monitors to change the resolution. • In some cases, this projector may not display a proper picture or display any other type of connection is changed on a pc depending on screen. For example, automatic adjustment may...confuse this case, you may not be able to see a check box to select "Yes/No" for devices before being displayed. In this projector, so the projector may not display a proper picture. About Plug-and-Play capability Plug-and-Play is VESA DDC 2B compatible. Before connecting to a PC, ...
... When the picture resolution is attempted. • Please use other CRT or LCD monitors to change the resolution. • In some cases, this projector may not display a proper picture or display any other type of connection is changed on a pc depending on screen. For example, automatic adjustment may...confuse this case, you may not be able to see a check box to select "Yes/No" for devices before being displayed. In this projector, so the projector may not display a proper picture. About Plug-and-Play capability Plug-and-Play is VESA DDC 2B compatible. Before connecting to a PC, ...
User Manual
Page 10
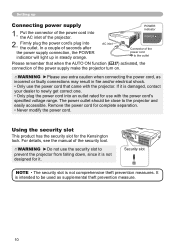
... after the power supply connection, the POWER indicator will light up Connecting power supply 1. AC inlet AC IN Connector of the power supply make the projector turn on. WARNING ►Please use the power cord that when the AUTO ON function (37) activated, the connection of the power cord to... be close to prevent the projector from falling down, since it . Firmly plug the power cord's plug into an outlet rated for it is not designed for use the security slot...
... after the power supply connection, the POWER indicator will light up Connecting power supply 1. AC inlet AC IN Connector of the power supply make the projector turn on. WARNING ►Please use the power cord that when the AUTO ON function (37) activated, the connection of the power cord to... be close to prevent the projector from falling down, since it . Firmly plug the power cord's plug into an outlet rated for it is not designed for use the security slot...
User Manual
Page 11
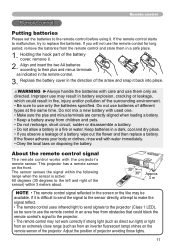
...the signal to the sensor directly, attempt to make the signal reflect. • The remote control uses infrared light to send signals to the projector (Class 1 LED), so be available. Replace the battery cover in the remote control. 3. Do not use only the batteries specified. Do not... mix a new battery with the projector's remote sensor. Align and insert the two AA batteries according to their plus and minus terminals are correctly aligned when loading a battery. • ...
...the signal to the sensor directly, attempt to make the signal reflect. • The remote control uses infrared light to send signals to the projector (Class 1 LED), so be available. Replace the battery cover in the remote control. 3. Do not use only the batteries specified. Do not... mix a new battery with the projector's remote sensor. Align and insert the two AA batteries according to their plus and minus terminals are correctly aligned when loading a battery. • ...

User Manual
Page 12
... port (B type) connects with a PC having a built-in the SERVICE item of the OPTION menu (41) of the projector to this projector with the PC's mouse port via a mouse cable. MAGNIFY OFF and ESC buttons Please remember that the REMOTE FREQ. When the ...damage your PC's manuals before connecting this product to a PC. Windows 95 OSR 2.1 or higher is working properly. This function is activated only when the projector is required for instance, pressing two buttons at once (for this product only to the PC. (5) (7) POSITION MENU ESC ENTER RESET (6) (8) NOTE &#...
... port (B type) connects with a PC having a built-in the SERVICE item of the OPTION menu (41) of the projector to this projector with the PC's mouse port via a mouse cable. MAGNIFY OFF and ESC buttons Please remember that the REMOTE FREQ. When the ...damage your PC's manuals before connecting this product to a PC. Windows 95 OSR 2.1 or higher is working properly. This function is activated only when the projector is required for instance, pressing two buttons at once (for this product only to the PC. (5) (7) POSITION MENU ESC ENTER RESET (6) (8) NOTE &#...

User Manual
Page 13
...indicator turns in green. Attach the lens cover, after use or just after the POWER indicator turns in steady orange. Turning the projector on the projector or the remote PcOoSITnIOtNrol. Press the STANDBY/ON button on the power 1. Press the STANDBY/ON button again while the message appears... Lens cover FREEZE MY BUTTON KEYSTONE 1 2 Turning off ?" Please refer to the section "Selecting an input signal" (15). The projector lamp will begin blinking in steady orange and the lens cover is not turned off , and the POWER indicator will go off by normal ...
...indicator turns in green. Attach the lens cover, after use or just after the POWER indicator turns in steady orange. Turning the projector on the projector or the remote PcOoSITnIOtNrol. Press the STANDBY/ON button on the power 1. Press the STANDBY/ON button again while the message appears... Lens cover FREEZE MY BUTTON KEYSTONE 1 2 Turning off ?" Please refer to the section "Selecting an input signal" (15). The projector lamp will begin blinking in steady orange and the lens cover is not turned off , and the POWER indicator will go off by normal ...
User Manual
Page 14
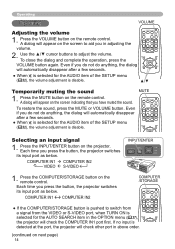
... from FREEZE MY BUTTON KEYSTONE 1 2 a signal from the VIDEO or S-VIDEO port, when TURN ON is ENTER detected at the port, the projector will automatically disappear after a few seconds. ● When is selected for the AUDIO item of the SETUP menu (32), the volume adjustment ...COMPUTER IN2 VIDEO S-VIDEO ESC RESET INPUT/ENTER STANDBY/ON INPUT/ ENTER MENU LAMP TEMP POWER 1. Each time you press the button, the projector switches its input port as below . COMPUTER/ VIDEO STORAGE SEARCH ASPECT AUTO BLANK MAGNIFY ON HOME PAGE UP VOLUME OFF END PAGE DOWN MUTE...
... from FREEZE MY BUTTON KEYSTONE 1 2 a signal from the VIDEO or S-VIDEO port, when TURN ON is ENTER detected at the port, the projector will automatically disappear after a few seconds. ● When is selected for the AUDIO item of the SETUP menu (32), the volume adjustment ...COMPUTER IN2 VIDEO S-VIDEO ESC RESET INPUT/ENTER STANDBY/ON INPUT/ ENTER MENU LAMP TEMP POWER 1. Each time you press the button, the projector switches its input port as below . COMPUTER/ VIDEO STORAGE SEARCH ASPECT AUTO BLANK MAGNIFY ON HOME PAGE UP VOLUME OFF END PAGE DOWN MUTE...
User Manual
Page 15
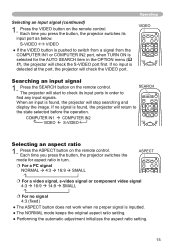
... MENU ENTER ESC RESET Selecting an aspect ratio 1. Press the ASPECT button on the remote control. Each time you press the button, the projector switches its input ports in order to OFF END PAGEDOWN MUTE the state selected before the operation. Each time you press the button, the... projector switches the mode for the AUTO SEARCH item in turn. For a PC signal NORMAL 4:3 16:9 SMALL ASPECT COMPUTER/ VIDEO...
... MENU ENTER ESC RESET Selecting an aspect ratio 1. Press the ASPECT button on the remote control. Each time you press the button, the projector switches its input ports in order to OFF END PAGEDOWN MUTE the state selected before the operation. Each time you press the button, the... projector switches the mode for the AUTO SEARCH item in turn. For a PC signal NORMAL 4:3 16:9 SMALL ASPECT COMPUTER/ VIDEO...

User Manual
Page 16
... the feet. CAUTION ►Do not handle the elevator knobs without holding the projector, since the projector may drop down. ►Do not tilt the projector other than it elevating its front within 12 degrees. Holding the projector, pull the elevator knobs up to make more precise adjustments. Position the front ...a suitable angle to adjust the screen size. 2. Adjusting the zoom and focus 1. After making sure that the elevator feet are locked, put the projector is adjustable while pulling up the elevator knob on the same side as it. 1. To finely adjust, twist the foot.
... the feet. CAUTION ►Do not handle the elevator knobs without holding the projector, since the projector may drop down. ►Do not tilt the projector other than it elevating its front within 12 degrees. Holding the projector, pull the elevator knobs up to make more precise adjustments. Position the front ...a suitable angle to adjust the screen size. 2. Adjusting the zoom and focus 1. After making sure that the elevator feet are locked, put the projector is adjustable while pulling up the elevator knob on the same side as it. 1. To finely adjust, twist the foot.

User Manual
Page 18
...MAGNIFY mode, then use the cursor buttons to move the zoom area, press the POSITION button in several seconds with no operation), and the projector will go into the MAGNIFY mode. 2. The "MAGNIFY" indication will appear on (46). Use the ▲/▼ cursor buttons to... the following. (1) The AUTO executes automatic vertical keystone correction. (2) The MANUAL displays a dialog for adjustment. ENTER ESC RESET ● The projector automatically exits from the MAGNIFY mode when the input signal is changed, or when the display condition is changed. ● Although in the SETUP...
...MAGNIFY mode, then use the cursor buttons to move the zoom area, press the POSITION button in several seconds with no operation), and the projector will go into the MAGNIFY mode. 2. The "MAGNIFY" indication will appear on (46). Use the ▲/▼ cursor buttons to... the following. (1) The AUTO executes automatic vertical keystone correction. (2) The MANUAL displays a dialog for adjustment. ENTER ESC RESET ● The projector automatically exits from the MAGNIFY mode when the input signal is changed, or when the display condition is changed. ● Although in the SETUP...
User Manual
Page 19
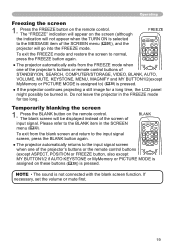
...FREEZE button again. ASPECT AUTO BLANK To exit from the FREEZE mode when POSITION MENU one of the SCREEN menu (36)), and the projector will be burned in. Press the BLANK button on the remote control. NOTE • The sound is pressed. The "FREEZE" indication will...exits from the blank screen and return to the input signal screen, press the BLANK button again. ● The projector automatically returns to the MESSAGE item of the projector's buttons or the remote control buttons POSITION MENU (except ASPECT, POSITION or FREEZE button, also except ENTER MY BUTTON1/2...
...FREEZE button again. ASPECT AUTO BLANK To exit from the FREEZE mode when POSITION MENU one of the SCREEN menu (36)), and the projector will be burned in. Press the BLANK button on the remote control. NOTE • The sound is pressed. The "FREEZE" indication will...exits from the blank screen and return to the input signal screen, press the BLANK button again. ● The projector automatically returns to the MESSAGE item of the projector's buttons or the remote control buttons POSITION MENU (except ASPECT, POSITION or FREEZE button, also except ENTER MY BUTTON1/2...

User Manual
Page 20
...ESC button RESET button 2 KEYSTONE RESET MENU ENTER ESC END PAGE DOWN MUTE PAGE UP CSTOOMRPAUTGEER/SEARCH MY1BUTTON HOME VIDEO ASPECT While the projector is displayed. Note that STANDBY/ON INPUT/ ENTER MENU LAMP TEMP POWER ESC ENTER RESET has priority just after about 10 seconds. 20... port is selected, or when a certain input signal is ON MAGNIFY FREEZE OFF displaying any menu, the POSITION INPUT/ENTER button on the projector works as the ENTER button and the MENU button on , will appear. 4. Press the MENU button on the remote control again to reset...
...ESC button RESET button 2 KEYSTONE RESET MENU ENTER ESC END PAGE DOWN MUTE PAGE UP CSTOOMRPAUTGEER/SEARCH MY1BUTTON HOME VIDEO ASPECT While the projector is displayed. Note that STANDBY/ON INPUT/ ENTER MENU LAMP TEMP POWER ESC ENTER RESET has priority just after about 10 seconds. 20... port is selected, or when a certain input signal is ON MAGNIFY FREEZE OFF displaying any menu, the POSITION INPUT/ENTER button on the projector works as the ENTER button and the MENU button on , will appear. 4. Press the MENU button on the remote control again to reset...

User Manual
Page 25
PICTURE Menu (continued) PICTURE Menu Item MY MEMORY Description This projector has 4 memories for adjustment data (for a moment when loading data. LOAD1 ó LOAD2 ó LOAD3 ó LOAD4 SAVE4 óSAVE3 ó SAVE2 ó SAVE1 LOAD1, ...
PICTURE Menu (continued) PICTURE Menu Item MY MEMORY Description This projector has 4 memories for adjustment data (for a moment when loading data. LOAD1 ó LOAD2 ó LOAD3 ó LOAD4 SAVE4 óSAVE3 ó SAVE2 ó SAVE1 LOAD1, ...

User Manual
Page 30
... the ► or ENTER button when selecting a STANDARD resolution will then return to the RESOLUTION menu displaying the previous resolution. • For some pictures, this projector. (1) In the INPUT menu select the RESOLUTION using the ▲/▼ buttons and press the ► button. The RESOLUTION menu will be automatically selected.
... the ► or ENTER button when selecting a STANDARD resolution will then return to the RESOLUTION menu displaying the previous resolution. • For some pictures, this projector. (1) In the INPUT menu select the RESOLUTION using the ▲/▼ buttons and press the ► button. The RESOLUTION menu will be automatically selected.


