
User Manual
Page 1
...WARNING This symbol indicates information that , if ignored, could possibly result in personal injury or even death due to the pages written following this projector. WARNING ►Before using, read the "User's Manual - About this manual Various symbols are the property of this manual. NOTE •... for any errors that may appear in personal injury or physical damage due to incorrect handling. Please refer to incorrect handling. Projector CP-S335W/X340W/X345W/X340WF/X345WF User's Manual - Operating Guide Thank you for future reference. All other trademarks are used in a...
...WARNING This symbol indicates information that , if ignored, could possibly result in personal injury or even death due to the pages written following this projector. WARNING ►Before using, read the "User's Manual - About this manual Various symbols are the property of this manual. NOTE •... for any errors that may appear in personal injury or physical damage due to incorrect handling. Please refer to incorrect handling. Projector CP-S335W/X340W/X345W/X340WF/X345WF User's Manual - Operating Guide Thank you for future reference. All other trademarks are used in a...
User Manual
Page 2
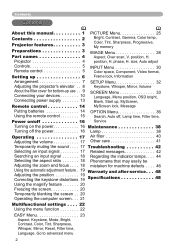
... About this manual 1 PICTURE Menu 25 Contents 2 Projector features 3 Bright, Contrast, Gamma, Color temp, Color, Tint, Sharpness, Progressive, My memory Preparations 3 IMAGE Menu 28 Part names 4 Aspect, Over scan, V. position, H. Projector 4 position, H. size, Auto adjust Controls 5 INPUT Menu... 30 Remote control 5 Color space, Component, Video format, Setting up 6 Frame lock, Information Arrangement 7 SETUP Menu 32 Adjusting the projector's elevator . . 8 Keystone, Whisper, Mirror, Volume About the filter cover for bottom-up use . . 9 Connecting your...
... About this manual 1 PICTURE Menu 25 Contents 2 Projector features 3 Bright, Contrast, Gamma, Color temp, Color, Tint, Sharpness, Progressive, My memory Preparations 3 IMAGE Menu 28 Part names 4 Aspect, Over scan, V. position, H. Projector 4 position, H. size, Auto adjust Controls 5 INPUT Menu... 30 Remote control 5 Color space, Component, Video format, Setting up 6 Frame lock, Information Arrangement 7 SETUP Menu 32 Adjusting the projector's elevator . . 8 Keystone, Whisper, Mirror, Volume About the filter cover for bottom-up use . . 9 Connecting your...
User Manual
Page 3
...WHISPER mode is used to make your dealer if anything is extremely compact and slim, which gives you want. Projector features / Preparations Projector features This projector is equipped for reducing acoustic noise to realize quieter operation. The image can be still kept as bright and ...distance. High Brightness Newly developed 165W UHB (Ultra High Brightness) lamp gives you more important than brightness. Rich Connectivity This projector has a variety of the "User's manual - It requires just a little space for the lens part. 3 The rich connectivity provides you a...
...WHISPER mode is used to make your dealer if anything is extremely compact and slim, which gives you want. Projector features / Preparations Projector features This projector is equipped for reducing acoustic noise to realize quieter operation. The image can be still kept as bright and ...distance. High Brightness Newly developed 165W UHB (Ultra High Brightness) lamp gives you more important than brightness. Rich Connectivity This projector has a variety of the "User's manual - It requires just a little space for the lens part. 3 The rich connectivity provides you a...

User Manual
Page 4
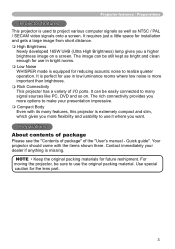
... not operate correctly and the microprocessor will need to be reset. Only push the Restart switch in these exceptional instances. 4 Part names Part names Projector Zoom knob (18) Focus ring (18) Vent (6) Lens cover (16) (Slide door) Lens (16) Lamp cover (Lamp unit is inside.) (&#... port (11) RGB IN2 port (11) RGB OUT port (11) CONTROL port (11) Kensington lock slot NOTE (*) About Restart switch: This Projector is controlled by using a cocktail stick or similar and before turning on again, make the...
... not operate correctly and the microprocessor will need to be reset. Only push the Restart switch in these exceptional instances. 4 Part names Part names Projector Zoom knob (18) Focus ring (18) Vent (6) Lens cover (16) (Slide door) Lens (16) Lamp cover (Lamp unit is inside.) (&#... port (11) RGB IN2 port (11) RGB OUT port (11) CONTROL port (11) Kensington lock slot NOTE (*) About Restart switch: This Projector is controlled by using a cocktail stick or similar and before turning on again, make the...
User Manual
Page 6
... installation or the like, contact your dealer before installation. ►Place the projection in a cool place, and pay attention enough to the projector. • Don't place the projector in a bathroom or the outdoors. • Put nothing containing the liquid near a hot object such as a wobbly or inclined stand.... • Do not place the projector in a fire and/or an electric shock. • Don't place the projector on the projector. • Put nothing that gets wet. Put nothing on an unstable, slant or vibrant surface ...
... installation or the like, contact your dealer before installation. ►Place the projection in a cool place, and pay attention enough to the projector. • Don't place the projector in a bathroom or the outdoors. • Put nothing containing the liquid near a hot object such as a wobbly or inclined stand.... • Do not place the projector in a fire and/or an electric shock. • Don't place the projector on the projector. • Put nothing that gets wet. Put nothing on an unstable, slant or vibrant surface ...

User Manual
Page 7
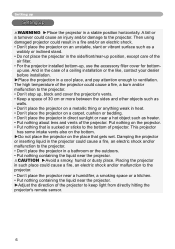
The values shown in the table are calculated for a full size screen: 1280 x 720 (a) The screen size (diagonal) (b) Distance from the projector to determine the screen size and projection distance. down At 4:3 screen (a) Screen size (b) Projection distance [m (inch)] [inch (m)] min. max. max. 30 (0.8) 0.9 (35) 1.1 (42) 40 (1.0) 1.2 (47) 1.4 (...
The values shown in the table are calculated for a full size screen: 1280 x 720 (a) The screen size (diagonal) (b) Distance from the projector to determine the screen size and projection distance. down At 4:3 screen (a) Screen size (b) Projection distance [m (inch)] [inch (m)] min. max. max. 30 (0.8) 0.9 (35) 1.1 (42) 40 (1.0) 1.2 (47) 1.4 (...
User Manual
Page 8
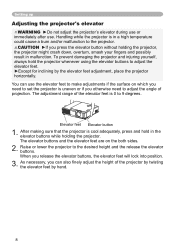
... to the desired height and the release the elevator buttons. The adjustment range of projection. Handling while the projector is cool adequately, press and hold the projector whenever using the elevator buttons to adjust the angle of the elevator feet is uneven or if you need ...and the elevator feet are on which you otherwise need to set the projector is 0 to 9 degrees. Raise or lower the projector to the projector. Setting up Adjusting the projector's elevator WARNING ►Do not adjust the projector's elevator during use or immediately after use the elevator feet to make...
... to the desired height and the release the elevator buttons. The adjustment range of projection. Handling while the projector is cool adequately, press and hold the projector whenever using the elevator buttons to adjust the angle of the elevator feet is uneven or if you need ...and the elevator feet are on which you otherwise need to set the projector is 0 to 9 degrees. Raise or lower the projector to the projector. Setting up Adjusting the projector's elevator WARNING ►Do not adjust the projector's elevator during use or immediately after use the elevator feet to make...

User Manual
Page 9
..., please use and snap it . 3. Replace the filter cover for bottom-up use the accessory filter cover for bottom-up . 9 When the projector is facing up use . Please be careful for intake ventilation. Putting a finger on the filter cover's knob, slide the filter cover in... , then wait at least 45 minutes. Please change in the following procedure. Slowly turn the projector so that the top is not plugged in the direction of the arrow to fall. Setting up About the filter cover for bottom-up...
..., please use and snap it . 3. Replace the filter cover for bottom-up use the accessory filter cover for bottom-up . 9 When the projector is facing up use . Please be careful for intake ventilation. Putting a finger on the filter cover's knob, slide the filter cover in... , then wait at least 45 minutes. Please change in the following procedure. Slowly turn the projector so that the top is not plugged in the direction of the arrow to fall. Setting up About the filter cover for bottom-up...
User Manual
Page 10
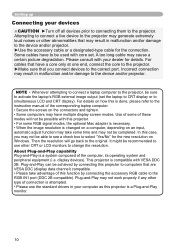
...advantage of the computer, its operating system and peripheral equipment (i.e. Plug-and-Play may have multiple display screen modes. Please consult with this projector. • For some RGB signal modes, the optional Mac adapter is necessary. • When the image resolution is changed on a computer...Plug-and-Play capability Plug-and-Play is done, please refer to change the resolution. Attempting to connect a live device to the projector may generate extremely loud noises or other CRT or LCD monitors to the instruction manual of the corresponding laptop computer. • Secure...
...advantage of the computer, its operating system and peripheral equipment (i.e. Plug-and-Play may have multiple display screen modes. Please consult with this projector. • For some RGB signal modes, the optional Mac adapter is necessary. • When the image resolution is changed on a computer...Plug-and-Play capability Plug-and-Play is done, please refer to change the resolution. Attempting to connect a live device to the projector may generate extremely loud noises or other CRT or LCD monitors to the instruction manual of the corresponding laptop computer. • Secure...

User Manual
Page 13
... the power cord that came with the power cord's specified voltage range. • Never modify the power cord. AC inlet Connector of the projector. 2. Connect the connector of the power cord to defeat the ground connection of the three-pronged plug. Never attempt to the AC inlet of the... caution when connecting the power cord as incorrect or faulty connections may result in fire and/or electrical shock. • Only use with the projector.
... the power cord that came with the power cord's specified voltage range. • Never modify the power cord. AC inlet Connector of the projector. 2. Connect the connector of the power cord to defeat the ground connection of the three-pronged plug. Never attempt to the AC inlet of the... caution when connecting the power cord as incorrect or faulty connections may result in fire and/or electrical shock. • Only use with the projector.

User Manual
Page 15
... degree range (30 degrees to physical impact. • Do not get the remote control wet or place it is 3 meters with the projector's remote sensor. Remote control Using the remote control CAUTION ►Be careful in handling the remote control. • Do not drop or otherwise expose ... signal reflected in an area free from obstacles that could block the remote control's output signal to keep light from directly hitting the projector's remote sensor. Doing so may result in malfunction. • Remove the batteries from the remote control and store them in a safe place if you ...
... degree range (30 degrees to physical impact. • Do not get the remote control wet or place it is 3 meters with the projector's remote sensor. Remote control Using the remote control CAUTION ►Be careful in handling the remote control. • Do not drop or otherwise expose ... signal reflected in an area free from obstacles that could block the remote control's output signal to keep light from directly hitting the projector's remote sensor. Doing so may result in malfunction. • Remove the batteries from the remote control and store them in a safe place if you ...

User Manual
Page 16
... will appear on the screen for these several seconds. (Blinking green) POWER (Solid green) 3. Do not look into the lens or vents of the projector. Turning off the power Power off in right order. Press the STANDBY/ON button on the power POWER 1. VIDEO STANDBY/ON RGB SEARCH ASPECT AUTO... FREEZE KEYSTONE POSITION MENU ESC ENTER RESET STANDBY/ON button STANDBY/ON LAMP TEMP POWER MENU INPUT POWER indicator Power switch Turning on the projector or remote control again while the message is visible. Press the STANDBY/ON button on , a strong light is emitted. The...
... will appear on the screen for these several seconds. (Blinking green) POWER (Solid green) 3. Do not look into the lens or vents of the projector. Turning off the power Power off in right order. Press the STANDBY/ON button on the power POWER 1. VIDEO STANDBY/ON RGB SEARCH ASPECT AUTO... FREEZE KEYSTONE POSITION MENU ESC ENTER RESET STANDBY/ON button STANDBY/ON LAMP TEMP POWER MENU INPUT POWER indicator Power switch Turning on the projector or remote control again while the message is visible. Press the STANDBY/ON button on , a strong light is emitted. The...
User Manual
Page 17
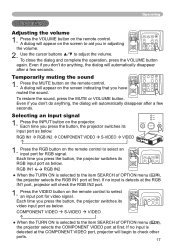
... RGB IN2 COMPONENT VIDEO S-VIDEO VIDEO STANDBY/ON LAMP TEMP POWER MENU INPUT 1. Even if you press the button, the projector switches its input port as below . Each time you don't do anything , the dialog will appear on the remote control to the item SEARCH of... sound 1. POSITION MENU Even if you don't do anything , the dialog will appear on the screen to aid you press the button, the projector switches its RGB input port as below. VIDEO STANDBY/ON RGB SEARCH ASPECT AUTO BLANK MAGNIFY HOME ON PAGE UP VOLUME OFF END PAGE DOWN...
... RGB IN2 COMPONENT VIDEO S-VIDEO VIDEO STANDBY/ON LAMP TEMP POWER MENU INPUT 1. Even if you press the button, the projector switches its input port as below . Each time you don't do anything , the dialog will appear on the remote control to the item SEARCH of... sound 1. POSITION MENU Even if you don't do anything , the dialog will appear on the screen to aid you press the button, the projector switches its RGB input port as below. VIDEO STANDBY/ON RGB SEARCH ASPECT AUTO BLANK MAGNIFY HOME ON PAGE UP VOLUME OFF END PAGE DOWN...
User Manual
Page 18
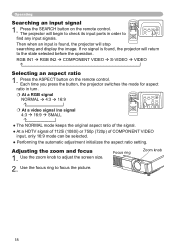
Operating Searching an input signal VIDEO STANDBY/ON RGB SEARCH ASPECT AUTO BLANK 1. If no signal is found , the projector will begin to check its input ports in turn. At a RGB signal NORMAL 4:3 16:9 VIDEO STANDBY/ON RGB SEARCH ASPECT AUTO ...knob 2. Use the focus ring to adjust the screen size. Each time you press the button, the projector switches the mode for aspect ratio in order to the state selected before the operation. The projector will return to find any input signals. Press the ASPECT button on the remote control. Use...
Operating Searching an input signal VIDEO STANDBY/ON RGB SEARCH ASPECT AUTO BLANK 1. If no signal is found , the projector will begin to check its input ports in turn. At a RGB signal NORMAL 4:3 16:9 VIDEO STANDBY/ON RGB SEARCH ASPECT AUTO ...knob 2. Use the focus ring to adjust the screen size. Each time you press the button, the projector switches the mode for aspect ratio in order to the state selected before the operation. The projector will return to find any input signals. Press the ASPECT button on the remote control. Use...

User Manual
Page 20
... (33). Please refer to normal, press the OFF button of MAGNIFY on the remote control. POSITION MENU ENTER ● The projector automatically returns to the input signal screen, press the BLANK button again. Operating Using the magnify feature 1. VIDEO STANDBY/ON RGB SEARCH ... button again. Press the BLANK button on the screen (although the indication will disappear after several seconds with no operation.), and the projector will appear on the remote control. The "MAGNIFY" indication will enter the MAGNIFY mode. STANDBY/ON VIDEO RGB SEARCH ASPECT AUTO BLANK...
... (33). Please refer to normal, press the OFF button of MAGNIFY on the remote control. POSITION MENU ENTER ● The projector automatically returns to the input signal screen, press the BLANK button again. Operating Using the magnify feature 1. VIDEO STANDBY/ON RGB SEARCH ... button again. Press the BLANK button on the screen (although the indication will disappear after several seconds with no operation.), and the projector will appear on the remote control. The "MAGNIFY" indication will enter the MAGNIFY mode. STANDBY/ON VIDEO RGB SEARCH ASPECT AUTO BLANK...

User Manual
Page 21
...-in on the computer's configurations and mouse drivers. • The USB control can be used only for the functions listed below. Connect the projector's USB port to use of the computer you will connect. USB mouse and keyboard control 1. Available function Move pointer Left click with mouse Right click...
...-in on the computer's configurations and mouse drivers. • The USB control can be used only for the functions listed below. Connect the projector's USB port to use of the computer you will connect. USB mouse and keyboard control 1. Available function Move pointer Left click with mouse Right click...
User Manual
Page 22
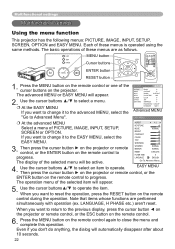
... EASY MENU. The basic operations of the cursor buttons on the remote control to the previous display, press the cursor button ◄ on the projector or remote control, or the ESC button on the remote control during the operation. BRIGHT +0 CONTRAST +0 If you want to return to progress....following menus: PICTURE, IMAGE, INPUT, END PAGEDOWN MSUTE ETUP, SCREEN, OPTION and EASY MENU. Then press the cursor button ► on the projector or remote control, or the ENTER button on the remote control again to Advanced Menu". Use the cursor buttons ▲/▼ to progress. TINT...
... EASY MENU. The basic operations of the cursor buttons on the remote control to the previous display, press the cursor button ◄ on the projector or remote control, or the ESC button on the remote control during the operation. BRIGHT +0 CONTRAST +0 If you want to return to progress....following menus: PICTURE, IMAGE, INPUT, END PAGEDOWN MSUTE ETUP, SCREEN, OPTION and EASY MENU. Then press the cursor button ► on the projector or remote control, or the ENTER button on the remote control again to Advanced Menu". Use the cursor buttons ▲/▼ to progress. TINT...
User Manual
Page 23
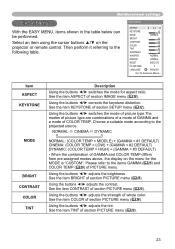
... of section PICTURE menu (26). See the item ASPECT of GAMMA and COLOR TEMP differs from pre-assigned modes above, the display on the projector or remote control. NORMAL CINEMA DYNAMIC NORMAL: (COLOR TEMP = MIDDLE) + (GAMMA = #1 DEFAULT) CINEMA: (COLOR TEMP = LOW) + (GAMMA = #2 DEFAULT) DYNAMIC: (COLOR TEMP = HIGH) + (GAMMA...
... of section PICTURE menu (26). See the item ASPECT of GAMMA and COLOR TEMP differs from pre-assigned modes above, the display on the projector or remote control. NORMAL CINEMA DYNAMIC NORMAL: (COLOR TEMP = MIDDLE) + (GAMMA = #1 DEFAULT) CINEMA: (COLOR TEMP = LOW) + (GAMMA = #2 DEFAULT) DYNAMIC: (COLOR TEMP = HIGH) + (GAMMA...
User Manual
Page 25
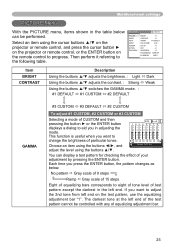
... the following table. Choose an item using the buttons ◄/►, and adjust the level using the cursor buttons ▲/▼ on the projector or remote control, and press the cursor button ► on the projector or remote control, or the ENTER button on the test pattern, use the equalizing adjustment bar "1".
... the following table. Choose an item using the buttons ◄/►, and adjust the level using the cursor buttons ▲/▼ on the projector or remote control, and press the cursor button ► on the projector or remote control, or the ENTER button on the test pattern, use the equalizing adjustment bar "1".

User Manual
Page 27
... image may cause a certain defect (for adjustment data. LOAD1 LOAD2 LOAD3 LOAD4 MY MEMORY SAVE4 SAVE3 SAVE2 SAVE1 This projector has 4 numbered memories for example, jagged line) of the picture at an interlaced signal of a VIDEO input, a S-VIDEO input or a COMPONENT VIDEO input of MY...
... image may cause a certain defect (for adjustment data. LOAD1 LOAD2 LOAD3 LOAD4 MY MEMORY SAVE4 SAVE3 SAVE2 SAVE1 This projector has 4 numbered memories for example, jagged line) of the picture at an interlaced signal of a VIDEO input, a S-VIDEO input or a COMPONENT VIDEO input of MY...


