Instruction Manual
Page 3
... appropriate safety procedures. Distractions can often be avoided to follow all instructions Failure to prevent bodily injury or machine damage are caused by HITACHI. the risk of electric shock. Do not use reduces Never modify the plug in any adapter plugs with earthed or grounded or under... the influence of drugs, alcohol or surfaces such as in the presence of this Instruction Manual and in the sections which , if ignored, could result in electric shock, fire and/or serious injury. a) Keep work area clean and...
... appropriate safety procedures. Distractions can often be avoided to follow all instructions Failure to prevent bodily injury or machine damage are caused by HITACHI. the risk of electric shock. Do not use reduces Never modify the plug in any adapter plugs with earthed or grounded or under... the influence of drugs, alcohol or surfaces such as in the presence of this Instruction Manual and in the sections which , if ignored, could result in electric shock, fire and/or serious injury. a) Keep work area clean and...

Instruction Manual
Page 4
... Keep your hair, clothing and gloves away from the power tool before making any adjusting key or wrench before plugging in personal situation. instruction manual. may result in . b) Do not use the power tool if the switch does not turn it was designed. Any power tool that... without all guards or safety features in place and in unexpected situations. or jewellery. ALWAYS attach the side handle and securely grip the Rotary Hammer. 7. easier to replace the guard or safety feature before use and care with sharp protection used . 1. turning the power tool on...
... Keep your hair, clothing and gloves away from the power tool before making any adjusting key or wrench before plugging in personal situation. instruction manual. may result in . b) Do not use the power tool if the switch does not turn it was designed. Any power tool that... without all guards or safety features in place and in unexpected situations. or jewellery. ALWAYS attach the side handle and securely grip the Rotary Hammer. 7. easier to replace the guard or safety feature before use and care with sharp protection used . 1. turning the power tool on...

Instruction Manual
Page 5
...cloth moistened with such solvents. To keep the double insulation system effective, follow the normal electrical safety precautions given in this Instruction Manual, including not using it comes to the power supply from the outer frame handled by children, individuals unfamiliar with soapy water and ...voltages specified on the nameplate. Keep all screws, bolts and covers tightly in the Instruction Manual. 11. Do not wipe plastic parts with this power tool, and only genuine HITACHI replacement parts should be operated by the operator. Don't force small tool or attachment to...
...cloth moistened with such solvents. To keep the double insulation system effective, follow the normal electrical safety precautions given in this Instruction Manual, including not using it comes to the power supply from the outer frame handled by children, individuals unfamiliar with soapy water and ...voltages specified on the nameplate. Keep all screws, bolts and covers tightly in the Instruction Manual. 11. Do not wipe plastic parts with this power tool, and only genuine HITACHI replacement parts should be operated by the operator. Don't force small tool or attachment to...
Instruction Manual
Page 6
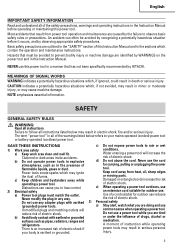
... designed to assist you have first read and understood all safey instructions contained in this manual. FUNCTIONAL DESCRIPTION NOTE: The information contained in the safe operation and maintenance of the power tool. NAME OF PARTS Drill bit Stopper Selector lever Front ... MAKE THEM AVAILABLE TO OTHER USERS AND OWNERS OF THIS TOOL! NEVER operate, or attempt any maintenance on the tool unless you in this Instruction Manual may show details or attachments that differ from those on your own power tool.
... designed to assist you have first read and understood all safey instructions contained in this manual. FUNCTIONAL DESCRIPTION NOTE: The information contained in the safe operation and maintenance of the power tool. NAME OF PARTS Drill bit Stopper Selector lever Front ... MAKE THEM AVAILABLE TO OTHER USERS AND OWNERS OF THIS TOOL! NEVER operate, or attempt any maintenance on the tool unless you in this Instruction Manual may show details or attachments that differ from those on your own power tool.
Instruction Manual
Page 10
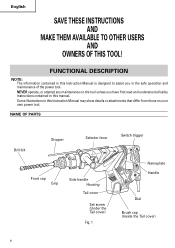
...tip, resulting in the declined working efficiency and shortened life of the taper shank adaptor, place supports under the Rotary Hammer and tap the cotter with a manual hammer. (Fig. 13) Drill chuck SDS max Chuck shank Grip adaptor Fig. 14 (3) Drilling (a) Even if you expect. Applying more -than what is...the chuck adaptor to the drill chuck. (b) The SDS max shank of the chuck adaptor is needed, on and drill a base hole. (3) After cleaning out dust with a syringe, attach the plug to the anchor tip and drive in the anchor with a manual hammer. (4) To remove the drill bit with taper ...
...tip, resulting in the declined working efficiency and shortened life of the taper shank adaptor, place supports under the Rotary Hammer and tap the cotter with a manual hammer. (Fig. 13) Drill chuck SDS max Chuck shank Grip adaptor Fig. 14 (3) Drilling (a) Even if you expect. Applying more -than what is...the chuck adaptor to the drill chuck. (b) The SDS max shank of the chuck adaptor is needed, on and drill a base hole. (3) After cleaning out dust with a syringe, attach the plug to the anchor tip and drive in the anchor with a manual hammer. (4) To remove the drill bit with taper ...

Instruction Manual
Page 11
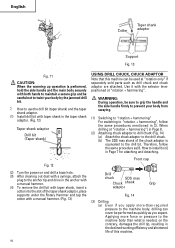
.... (Fig. 15) Lubricate the thread of the core bit shank strongly two or three times with a manual hammer holding the core bit, then the thread becomes loose and the core bit can snap sometimes when drilling is...the plug from the receptacle. 3. At that removing the center pin and the guide plate from the rotary hammer and strike the head of the core bit shank to the wall or the floor straight. Fig. 15... (2) Mount the core bit shank to the Rotary Hammer. (Fig. 16) Fig. 18 CAUTION: When removing the center pin and the guide plate, turn the...
.... (Fig. 15) Lubricate the thread of the core bit shank strongly two or three times with a manual hammer holding the core bit, then the thread becomes loose and the core bit can snap sometimes when drilling is...the plug from the receptacle. 3. At that removing the center pin and the guide plate from the rotary hammer and strike the head of the core bit shank to the wall or the floor straight. Fig. 15... (2) Mount the core bit shank to the Rotary Hammer. (Fig. 16) Fig. 18 CAUTION: When removing the center pin and the guide plate, turn the...


