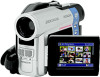
Owners Guide
Page 2
... materials. Important Information For Your Safety The power switch turns the DVD video camera/recorder on and off . REFER SERVICING TO QUALIFIED SERVICE PERSONNEL. CAUTION RISK OF ELECTRIC SHOCK DO NOT OPEN CAUTION: TO REDUCE THE RISK OF ELECTRIC SHOCK, DO NOT OPEN. WARNING: TO PREVENT FIRE OR SHOCK HAZARD, BE SURE TO USE THE SPECIFIED AC ADAPTER/CHARGER (DZ-ACS1). This symbol alerts the user that...
... materials. Important Information For Your Safety The power switch turns the DVD video camera/recorder on and off . REFER SERVICING TO QUALIFIED SERVICE PERSONNEL. CAUTION RISK OF ELECTRIC SHOCK DO NOT OPEN CAUTION: TO REDUCE THE RISK OF ELECTRIC SHOCK, DO NOT OPEN. WARNING: TO PREVENT FIRE OR SHOCK HAZARD, BE SURE TO USE THE SPECIFIED AC ADAPTER/CHARGER (DZ-ACS1). This symbol alerts the user that...
Owners Guide
Page 4
... they are frayed power cables, damaged or cracked wire insulation and broken plugs. Do not use attachments unless recommended by your service technician if appearance indicates damage or deteriorated insulation. 6 Power-Cord Protection - for example, near a swimming pool, and the like. 10 Accessories - Any mounting of DVD video camera/recorder and accessory equipment. English 4 INSTALLATION 1 Read and Follow Instructions - Slots and openings in the cabinet...
... they are frayed power cables, damaged or cracked wire insulation and broken plugs. Do not use attachments unless recommended by your service technician if appearance indicates damage or deteriorated insulation. 6 Power-Cord Protection - for example, near a swimming pool, and the like. 10 Accessories - Any mounting of DVD video camera/recorder and accessory equipment. English 4 INSTALLATION 1 Read and Follow Instructions - Slots and openings in the cabinet...
Owners Guide
Page 7
... DVD video camera/recorder will result in abnormal recording/playback. • Take care that are being recorded. before using this DVD video camera/recorder in the usual way. • Using 8 cm CD lens cleaner could result in displayed image retention or phosphor degradation of normally recorded video and audio, noise may also be faulty. 7 English At worst the DVD video camera/recorder could cause malfunctions. Screen on connected TV: • Never leave the disc navigation screen, still image or camera image displayed...
... DVD video camera/recorder will result in abnormal recording/playback. • Take care that are being recorded. before using this DVD video camera/recorder in the usual way. • Using 8 cm CD lens cleaner could result in displayed image retention or phosphor degradation of normally recorded video and audio, noise may also be faulty. 7 English At worst the DVD video camera/recorder could cause malfunctions. Screen on connected TV: • Never leave the disc navigation screen, still image or camera image displayed...
Owners Guide
Page 8
... the data: − Remove battery − Disconnect AC adapter/charger − Plug or unplug PC connection cable − Remove disc or card − Subject DVD video camera/recorder to severe vibrations or impact. − Violently open the cover of disc or card insertion block if possible. Do not use the DVD video camera/recorder for a long continuous period of time, the temperature of DVD video camera/recorder could exceed a limit and the recording/playback operation could be slowed down: In this time, do...
... the data: − Remove battery − Disconnect AC adapter/charger − Plug or unplug PC connection cable − Remove disc or card − Subject DVD video camera/recorder to severe vibrations or impact. − Violently open the cover of disc or card insertion block if possible. Do not use the DVD video camera/recorder for a long continuous period of time, the temperature of DVD video camera/recorder could exceed a limit and the recording/playback operation could be slowed down: In this time, do...
Owners Guide
Page 13
... REMAINING LEVEL INDICATOR........39 EFFICIENT USE OF BATTERY 39 USING DVD VIDEO CAMERA/RECORDER WITH AC ADAPTER/CHARGER 40 Inserting and Removing Disc 41 INSERTING DISC 41 REMOVING DISC 43 Inserting and Removing Card 44 Basic Techniques Basic Handling of DVD Video Camera/ Recorder 45 TURNING DVD VIDEO CAMERA/RECORDER ON AND OFF 45 VIEWING SUBJECT THROUGH VIEWFINDER... 46 VIEWING IMAGE ON LCD MONITOR SCREEN.. 46 CLOSING LCD MONITOR 47 Setting Date and Time 48 CHANGING DISPLAY FORMAT OF DATE AND TIME 49 Recording Movie 50 USING EXTERNAL MICROPHONE 52 Recording Stills 53 Zooming...
... REMAINING LEVEL INDICATOR........39 EFFICIENT USE OF BATTERY 39 USING DVD VIDEO CAMERA/RECORDER WITH AC ADAPTER/CHARGER 40 Inserting and Removing Disc 41 INSERTING DISC 41 REMOVING DISC 43 Inserting and Removing Card 44 Basic Techniques Basic Handling of DVD Video Camera/ Recorder 45 TURNING DVD VIDEO CAMERA/RECORDER ON AND OFF 45 VIEWING SUBJECT THROUGH VIEWFINDER... 46 VIEWING IMAGE ON LCD MONITOR SCREEN.. 46 CLOSING LCD MONITOR 47 Setting Date and Time 48 CHANGING DISPLAY FORMAT OF DATE AND TIME 49 Recording Movie 50 USING EXTERNAL MICROPHONE 52 Recording Stills 53 Zooming...
Owners Guide
Page 14
... (PHOTO INPUT 88 SELF-TIMER 89 SETTING ON-SCREEN DISPLAY OUTPUT ON OR OFF (OSD OUTPUT 90 LCD Setup 91 SETTING BRIGHTNESS OF LCD SCREEN (BRIGHTNESS 91 SETTING COLOR DENSITY OF LCD SCREEN (COLOR LEVEL 91 Initial Settings 92 SWITCHING OPERATING SOUND ON OR OFF (BEEP 92 TURNING DVD VIDEO CAMERA/RECORDER OFF AUTOMATICALLY (POWER SAVE 92 TURNING RECORD LED ON OR OFF (RECORD LED 93 CHANGING DISPLAY LANGUAGE (LANGUAGE 93 RESETTING MENU SETTINGS TO DEFAULTS (RESET 94 Disc Navigation Using Disc Navigation 95 STARTING DISC NAVIGATION 95 TERMINATING DISC NAVIGATION 97 PLAYING BACK FROM DISC...
... (PHOTO INPUT 88 SELF-TIMER 89 SETTING ON-SCREEN DISPLAY OUTPUT ON OR OFF (OSD OUTPUT 90 LCD Setup 91 SETTING BRIGHTNESS OF LCD SCREEN (BRIGHTNESS 91 SETTING COLOR DENSITY OF LCD SCREEN (COLOR LEVEL 91 Initial Settings 92 SWITCHING OPERATING SOUND ON OR OFF (BEEP 92 TURNING DVD VIDEO CAMERA/RECORDER OFF AUTOMATICALLY (POWER SAVE 92 TURNING RECORD LED ON OR OFF (RECORD LED 93 CHANGING DISPLAY LANGUAGE (LANGUAGE 93 RESETTING MENU SETTINGS TO DEFAULTS (RESET 94 Disc Navigation Using Disc Navigation 95 STARTING DISC NAVIGATION 95 TERMINATING DISC NAVIGATION 97 PLAYING BACK FROM DISC...

Owners Guide
Page 16
... the lens. 8 cm DVD-R disc (in package: Battery (model DZ-BP14S): Portable power supply for emergency treatment. Software CD-ROM: Use this battery away from a distance. DC power cord: When powering the DVD video camera/ recorder from AC outlet, or charge battery. If swallowed, consult a physician immediately for this to external microphone cable if you have all the following accessories in Round DVD Holder): Ferrite core: To record video (movie) on TV screen, or input or output video from/to control the DVD video camera/ recorder...
... the lens. 8 cm DVD-R disc (in package: Battery (model DZ-BP14S): Portable power supply for emergency treatment. Software CD-ROM: Use this battery away from a distance. DC power cord: When powering the DVD video camera/ recorder from AC outlet, or charge battery. If swallowed, consult a physician immediately for this to external microphone cable if you have all the following accessories in Round DVD Holder): Ferrite core: To record video (movie) on TV screen, or input or output video from/to control the DVD video camera/ recorder...
Owners Guide
Page 43
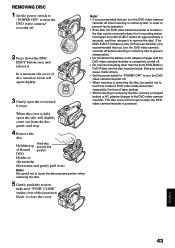
... is turned on the LCD screen will blink.) It is recommended that you turn the DVD video camera/ recorder off . 2 Press down the DISC EJECT button for approximately 2 seconds, and then release it to remove the disc. (The DISC EJECT indicator on , the disc can be careful not to touch the inside of DVD video camera/recorder (especially, the lens of laser pickup). • When inserting or removing the disc, connect a charged battery or AC adapter/charger to turn the DVD video camera/recorder...
... is turned on the LCD screen will blink.) It is recommended that you turn the DVD video camera/ recorder off . 2 Press down the DISC EJECT button for approximately 2 seconds, and then release it to remove the disc. (The DISC EJECT indicator on , the disc can be careful not to touch the inside of DVD video camera/recorder (especially, the lens of laser pickup). • When inserting or removing the disc, connect a charged battery or AC adapter/charger to turn the DVD video camera/recorder...

Owners Guide
Page 45
... DVD video camera/recorder to start because it to "Trouble Messages" on page 149 and take some time for the DVD video camera/recorder to display the Disc navigation screen after power is turned on, it will light or blink to show that the DVD video camera/recorder is turned on SD memory card or multimedia card Power ON status During playback, set the power switch to " VIDEO" or " PHOTO" when using card. However, if you remove the disc, replace it, or if the date changes after power is recognizing the disc...
... DVD video camera/recorder to start because it to "Trouble Messages" on page 149 and take some time for the DVD video camera/recorder to display the Disc navigation screen after power is turned on, it will light or blink to show that the DVD video camera/recorder is turned on SD memory card or multimedia card Power ON status During playback, set the power switch to " VIDEO" or " PHOTO" when using card. However, if you remove the disc, replace it, or if the date changes after power is recognizing the disc...
Owners Guide
Page 50
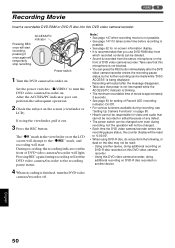
.... • The power switch can be changed . • Each time the DVD video camera/recorder enters the recording pause status, the counter display will be made while "DISC ACCESS" is being displayed Recording will restart after the message disappears. • Take care that power is not interrupted while the ACCESS/PC indicator is blinking. • The minimum recordable time of movie is finished, turn the DVD video camera/recorder on . During recording, the recording indicator on this microphone is not...
.... • The power switch can be changed . • Each time the DVD video camera/recorder enters the recording pause status, the counter display will be made while "DISC ACCESS" is being displayed Recording will restart after the message disappears. • Take care that power is not interrupted while the ACCESS/PC indicator is blinking. • The minimum recordable time of movie is finished, turn the DVD video camera/recorder on . During recording, the recording indicator on this microphone is not...
Owners Guide
Page 64
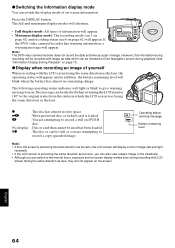
... blink to give warning message to user. Operating status/ warning message Battery remaining level Note: • If the LCD screen is set facing the same direction as the lens, the LCD screen will appear. English 64 ●Switching the information display mode You can also view subject image in the viewfinder. • Although you are attempting to record a still on DVD-R disc. Note: The DVD video camera/recorder does not record the date and time as the lens, you can switch the display mode...
... blink to give warning message to user. Operating status/ warning message Battery remaining level Note: • If the LCD screen is set facing the same direction as the lens, the LCD screen will appear. English 64 ●Switching the information display mode You can also view subject image in the viewfinder. • Although you are attempting to record a still on DVD-R disc. Note: The DVD video camera/recorder does not record the date and time as the lens, you can switch the display mode...

Owners Guide
Page 65
... connected to another device, always power the camera/ recorder from the built-in this DVD video camera/recorder. AV/S input/output cable (provided) To video/ audio output jacks Yellow White Red * If you are using DZ-MV380A and the connected AV device has an S-VIDEO output jack, you use a Hitachi VCR, it will enable you to record clearer images. • The DZ-MV350A cannot record S-VIDEO input. • Reduce the volume of external input sound heard from AC outlet using the AC adapter/charger. • If you can record images from a Hitachi VCR, change the remote control code...
... connected to another device, always power the camera/ recorder from the built-in this DVD video camera/recorder. AV/S input/output cable (provided) To video/ audio output jacks Yellow White Red * If you are using DZ-MV380A and the connected AV device has an S-VIDEO output jack, you use a Hitachi VCR, it will enable you to record clearer images. • The DZ-MV350A cannot record S-VIDEO input. • Reduce the volume of external input sound heard from AC outlet using the AC adapter/charger. • If you can record images from a Hitachi VCR, change the remote control code...
Owners Guide
Page 66
... prohibited by this DVD video camera/recorder is the same as when playing back camera images recorded on this DVD video camera/recorder. "COPY PROTECTED" appears in these images: They cannot be played back in images recorded on this DVD video camera/recorder. • Still images can be recorded on camcorder for personal enjoyment. the input image may not be performed. See "Switching External Input Recording Method (PHOTO Input)" on page 88 for details, and "Recording Stills" on DVD-RAM disc or card. English 66 even in...
... prohibited by this DVD video camera/recorder is the same as when playing back camera images recorded on this DVD video camera/recorder. "COPY PROTECTED" appears in these images: They cannot be played back in images recorded on this DVD video camera/recorder. • Still images can be recorded on camcorder for personal enjoyment. the input image may not be performed. See "Switching External Input Recording Method (PHOTO Input)" on page 88 for details, and "Recording Stills" on DVD-RAM disc or card. English 66 even in...
Owners Guide
Page 93
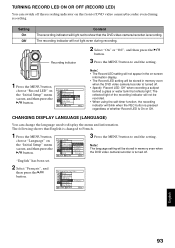
... Setup Be e p Power Save Record LED Language Demo Mode Reset ENTER RETURN On Of f RAM Note: • The Record LED setting will not appear in the on-screen information display. • The Record LED setting will be stored in memory even when the DVD video camera/recorder is changed to end the setting. "English" has been set. Con f i gur a t i on I t a l i ano RAM 3 Press the MENU button to French. 1 Press the MENU button, choose "Language" on the "Initial Setup" menu screen, and...
... Setup Be e p Power Save Record LED Language Demo Mode Reset ENTER RETURN On Of f RAM Note: • The Record LED setting will not appear in the on-screen information display. • The Record LED setting will be stored in memory even when the DVD video camera/recorder is changed to end the setting. "English" has been set. Con f i gur a t i on I t a l i ano RAM 3 Press the MENU button to French. 1 Press the MENU button, choose "Language" on the "Initial Setup" menu screen, and...
Owners Guide
Page 133
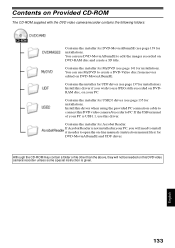
... DVD video camera/recorder unless some special instruction is given. 133 English Although the CD-ROM may contain a folder or file other than the above, they will need to install it in your PC, you wish to use this DVD video camera/recorder to edit the images recorded on DVD-RAM disc and create a 3D title. Contains the installer for UDF driver (see page 135 for installation). Install this driver when using the provided PC connection cable...
... DVD video camera/recorder unless some special instruction is given. 133 English Although the CD-ROM may contain a folder or file other than the above, they will need to install it in your PC, you wish to use this DVD video camera/recorder to edit the images recorded on DVD-RAM disc and create a 3D title. Contains the installer for UDF driver (see page 135 for installation). Install this driver when using the provided PC connection cable...

Owners Guide
Page 135
... following the instruction manual for USB card, before connecting the DVD video camera/recorder to PC. 4 Choose "Search for best driver in these locations", check "Include this location in the search:", and then specify the folder to be browsed: 2 Insert the provided CD-ROM into PC, set the power switch of DVD video camera/recorder to " VIDEO", and then use the provided PC connection cable to connect the DVD video camera/recorder to the USB terminal of drive into which...
... following the instruction manual for USB card, before connecting the DVD video camera/recorder to PC. 4 Choose "Search for best driver in these locations", check "Include this location in the search:", and then specify the folder to be browsed: 2 Insert the provided CD-ROM into PC, set the power switch of DVD video camera/recorder to " VIDEO", and then use the provided PC connection cable to connect the DVD video camera/recorder to the USB terminal of drive into which...
Owners Guide
Page 137
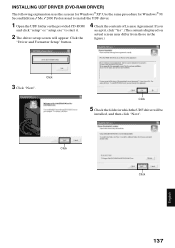
INSTALLING UDF DRIVER (DVD-RAM DRIVER) The following explanation uses the screens for Windows® XP: Use the same procedure for Windows® 98 Second Edition / Me / 2000 Professional to install the UDF driver. 1 Open the UDF folder on the provided CD-ROM and click "setup" or "setup.exe" to start it. 2 The driver setup screen will appear: Click the "Driver and Formatter Setup" button. 4 Check the contents of License Agreement: If you...
INSTALLING UDF DRIVER (DVD-RAM DRIVER) The following explanation uses the screens for Windows® XP: Use the same procedure for Windows® 98 Second Edition / Me / 2000 Professional to install the UDF driver. 1 Open the UDF folder on the provided CD-ROM and click "setup" or "setup.exe" to start it. 2 The driver setup screen will appear: Click the "Driver and Formatter Setup" button. 4 Check the contents of License Agreement: If you...
Owners Guide
Page 160
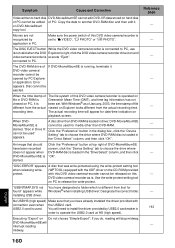
... "Preference" button at top right of PC: Copy the data to operate the USB2.0 card at HS (high speed). connected to choose the drive where DVD-RAM disc is loaded in order to another DVD-RAM disc and then edit it is Greenwich Mean Time (GMT), and time lag information has not been set to " VIDEO", " PHOTO" or " PHOTO". DVD video camera/ recorder cannot be ejected. You will appear for Windows® when installing USB driver: Designate...
... "Preference" button at top right of PC: Copy the data to operate the USB2.0 card at HS (high speed). connected to choose the drive where DVD-RAM disc is loaded in order to another DVD-RAM disc and then edit it is Greenwich Mean Time (GMT), and time lag information has not been set to " VIDEO", " PHOTO" or " PHOTO". DVD video camera/ recorder cannot be ejected. You will appear for Windows® when installing USB driver: Designate...
Owners Guide
Page 163
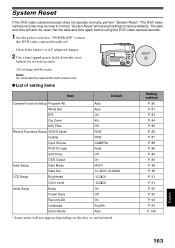
... P. 92 P. 92 P. 93 P. 93 P. 146 English 163 ElS Dig.Zoom MIC.Filter Record Functions Setup VIDEO Mode Quality Input Source PHOTO Input Self Timer OSD Output Date Setup Date Mode Date Set LCD Setup Brightness Auto Auto On 40× Off FINE FINE CAMERA Field Off On M/D/Y 1/1/2003 12:00AM Color Level Initial Setup Beep Power Save Record LED Language Demo Mode On Off On English Auto * Some items will reset all settings to turn the DVD video camera/reorder off. Detach the battery or AC adapter/charger. 2 Use a fine tipped pen to normal.
... P. 92 P. 92 P. 93 P. 93 P. 146 English 163 ElS Dig.Zoom MIC.Filter Record Functions Setup VIDEO Mode Quality Input Source PHOTO Input Self Timer OSD Output Date Setup Date Mode Date Set LCD Setup Brightness Auto Auto On 40× Off FINE FINE CAMERA Field Off On M/D/Y 1/1/2003 12:00AM Color Level Initial Setup Beep Power Save Record LED Language Demo Mode On Off On English Auto * Some items will reset all settings to turn the DVD video camera/reorder off. Detach the battery or AC adapter/charger. 2 Use a fine tipped pen to normal.

Owners Guide
Page 165
...) Movie: Conforming to PC 16.8-140 °F (-20-60 °C) DZ-MV350A approx. 480 g (without battery or disc) DZ-MV380A approx. 505 g (without battery or disc) DZ-MV350A approx. 565 g DZ-MV380A approx. 590 g AC adapter/charger, battery, AV/S input/output cable, infrared remote control, Lithium battery for remote control, lens cap, lens cap string, shoulder strap, power cable, DC power cord, ferrite core, Software CD-ROM, PC connection cable, 8 cm DVD-R disc (in LPCM mode and the finalized DVD-R disc can later be played back on that DVD...
...) Movie: Conforming to PC 16.8-140 °F (-20-60 °C) DZ-MV350A approx. 480 g (without battery or disc) DZ-MV380A approx. 505 g (without battery or disc) DZ-MV350A approx. 565 g DZ-MV380A approx. 590 g AC adapter/charger, battery, AV/S input/output cable, infrared remote control, Lithium battery for remote control, lens cap, lens cap string, shoulder strap, power cable, DC power cord, ferrite core, Software CD-ROM, PC connection cable, 8 cm DVD-R disc (in LPCM mode and the finalized DVD-R disc can later be played back on that DVD...


