
Owners Guide
Page 6
... external or internal terminals could corrode, which would disable normal operation, or the battery connecting terminals could cause it with the LCD screen exposed to appear on the TV screen or in radio broadcasts. Do not use the DVD video camera/recorder near a radio wave tower or electric appliances, noise could result in displayed image retention or phosphor degradation of TV screen. before using this DVD video camera/recorder, when connected to clean the lens, use...
... external or internal terminals could corrode, which would disable normal operation, or the battery connecting terminals could cause it with the LCD screen exposed to appear on the TV screen or in radio broadcasts. Do not use the DVD video camera/recorder near a radio wave tower or electric appliances, noise could result in displayed image retention or phosphor degradation of TV screen. before using this DVD video camera/recorder, when connected to clean the lens, use...

Owners Guide
Page 7
... the LCD monitor The ACCESS/PC indicator will light for at time of the disc or card will discharge as not to damage the data: − Remove battery − Disconnect AC adapter/charger − Plug or unplug PC connection cable − Remove disc or card − Subject DVD video camera/recorder to the DVD video camera/recorder. Do not turn it in it: Repair of purchase: • Charge it before using the DVD video camera/recorder (see page 171). Be sure to set the power switch...
... the LCD monitor The ACCESS/PC indicator will light for at time of the disc or card will discharge as not to damage the data: − Remove battery − Disconnect AC adapter/charger − Plug or unplug PC connection cable − Remove disc or card − Subject DVD video camera/recorder to the DVD video camera/recorder. Do not turn it in it: Repair of purchase: • Charge it before using the DVD video camera/recorder (see page 171). Be sure to set the power switch...

Owners Guide
Page 12
...LENS CAP 33 INSERTING BATTERY INTO REMOTE CONTROL 34 REMOVING BATTERY FROM REMOTE CONTROL 34 VIEWING IMAGE ON LCD MONITOR SCREEN 36 CLOSING LCD MONITOR 37 VIEWING SUBJECT THROUGH VIEWFINDER 37 SETTING DATE AND TIME 38 CHANGING DISPLAY FORMAT OF DATE AND TIME 39 Setting Up the Battery 40 CHARGING BATTERY 40 ATTACHING BATTERY TO DVD VIDEO CAMERA/RECORDER 41 REMOVING BATTERY 41 BATTERY REMAINING LEVEL INDICATOR ...... 43 EFFICIENT USE OF BATTERY 43 USING DVD VIDEO CAMERA/RECORDER WITH AC ADAPTER/CHARGER 44 Turning DVD Video Camera/Recorder On and Off 45 Inserting and Removing Disc...
...LENS CAP 33 INSERTING BATTERY INTO REMOTE CONTROL 34 REMOVING BATTERY FROM REMOTE CONTROL 34 VIEWING IMAGE ON LCD MONITOR SCREEN 36 CLOSING LCD MONITOR 37 VIEWING SUBJECT THROUGH VIEWFINDER 37 SETTING DATE AND TIME 38 CHANGING DISPLAY FORMAT OF DATE AND TIME 39 Setting Up the Battery 40 CHARGING BATTERY 40 ATTACHING BATTERY TO DVD VIDEO CAMERA/RECORDER 41 REMOVING BATTERY 41 BATTERY REMAINING LEVEL INDICATOR ...... 43 EFFICIENT USE OF BATTERY 43 USING DVD VIDEO CAMERA/RECORDER WITH AC ADAPTER/CHARGER 44 Turning DVD Video Camera/Recorder On and Off 45 Inserting and Removing Disc...

Owners Guide
Page 13
...USING LCD MONITOR LIGHT 90 ADJUSTING COLOR (WHITE BALANCE).......... 91 USING THE ELECTRONIC IMAGE STABILIZER (EIS 93 RECORDING SUBJECT USING LARGE MAGNIFICATION (DIGITAL ZOOM 93 REDUCING WIND NOISE DURING RECORDING (MIC.FILTER 93 Setting Up Record Functions 94 SWITCHING MOVIE QUALITY (VIDEO MODE 94 SETTING TO WIDE TV SCREEN MODE (16:9 MODE 95 SWITCHING QUALITY OF STILL IMAGE (QUALITY 97 RECEIVING IMAGE FROM ANOTHER DEVICE (INPUT SOURCE 97 SWITCHING EXTERNAL INPUT RECORDING METHOD (PHOTO INPUT 98 SELF-TIMER 99 SETTING ON-SCREEN DISPLAY OUTPUT ON OR OFF (OSD OUTPUT 100 LCD/EVF Setup...
...USING LCD MONITOR LIGHT 90 ADJUSTING COLOR (WHITE BALANCE).......... 91 USING THE ELECTRONIC IMAGE STABILIZER (EIS 93 RECORDING SUBJECT USING LARGE MAGNIFICATION (DIGITAL ZOOM 93 REDUCING WIND NOISE DURING RECORDING (MIC.FILTER 93 Setting Up Record Functions 94 SWITCHING MOVIE QUALITY (VIDEO MODE 94 SETTING TO WIDE TV SCREEN MODE (16:9 MODE 95 SWITCHING QUALITY OF STILL IMAGE (QUALITY 97 RECEIVING IMAGE FROM ANOTHER DEVICE (INPUT SOURCE 97 SWITCHING EXTERNAL INPUT RECORDING METHOD (PHOTO INPUT 98 SELF-TIMER 99 SETTING ON-SCREEN DISPLAY OUTPUT ON OR OFF (OSD OUTPUT 100 LCD/EVF Setup...

Owners Guide
Page 15
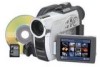
...: Battery (model DZ-BP14S): For DZ-GX20MA only. AC adapter/charger (model DZ-ACS2): Used to power the DVD video camera/ recorder from /to clean discs. For DZ-GX20MA or DZ-MV780MA only. Software CD-ROM: Use this cord to To record videos (movies) on TV screen, or input or output video from AC outlet, or charge battery. Power cable: Connect between household AC outlet and AC adapter/charger. Battery (model DZ-BP7S): For DZ-MV780MA or DZ-MV750MA only. WARNING: Keep this cable when connecting the DVD video camera/recorder to PC. PC connection cable: Use this battery...
...: Battery (model DZ-BP14S): For DZ-GX20MA only. AC adapter/charger (model DZ-ACS2): Used to power the DVD video camera/ recorder from /to clean discs. For DZ-GX20MA or DZ-MV780MA only. Software CD-ROM: Use this cord to To record videos (movies) on TV screen, or input or output video from AC outlet, or charge battery. Power cable: Connect between household AC outlet and AC adapter/charger. Battery (model DZ-BP7S): For DZ-MV780MA or DZ-MV750MA only. WARNING: Keep this cable when connecting the DVD video camera/recorder to PC. PC connection cable: Use this battery...

Owners Guide
Page 28
...; Do not remove the disc or card or turn DVD video camera/recorder off during reading or writing of data − Do not use a brand new card when recording vital images. • Do not touch the card terminal or allow it . • Do not expose card to completely delete the data on this DVD video camera/recorder. ●Note when transferring or discarding discs and memory cards: "Formatting" or "deletion" using an exclusive adapter, a miniSD memory card can be used on it...
...; Do not remove the disc or card or turn DVD video camera/recorder off during reading or writing of data − Do not use a brand new card when recording vital images. • Do not touch the card terminal or allow it . • Do not expose card to completely delete the data on this DVD video camera/recorder. ●Note when transferring or discarding discs and memory cards: "Formatting" or "deletion" using an exclusive adapter, a miniSD memory card can be used on it...

Owners Guide
Page 29
... of video recording quality. English 29 RAM/DVD-RW (VR-mode) disc, it cannot be impossible: Turn the DVD video camera/ recorder off once, wait until the ambient temperature becomes lower, and then operate it . DZ-MV780MA/DZ-MV750MA: Can record up to approx. 999 photos (up to 999 photos with external input). RECORDABLE STILLS (PHOTOS) ON DVD-RAM ●Number of recordable stills on one disc (on single side) (when recording only movies) Recording quality XTRA FINE STD Movie recordable time...
... of video recording quality. English 29 RAM/DVD-RW (VR-mode) disc, it cannot be impossible: Turn the DVD video camera/ recorder off once, wait until the ambient temperature becomes lower, and then operate it . DZ-MV780MA/DZ-MV750MA: Can record up to approx. 999 photos (up to 999 photos with external input). RECORDABLE STILLS (PHOTOS) ON DVD-RAM ●Number of recordable stills on one disc (on single side) (when recording only movies) Recording quality XTRA FINE STD Movie recordable time...

Owners Guide
Page 38
... built-in battery is highlighted first ENTER RETURN RAM depends on the date display format (set up in Date Mode): The digit on . 2 Press the MENU button. The following procedure can be reset. MENU Use f / e / d / c buttons to select, and then press A to choose "Date Setup" and then "Date Set". Zoom : 40x MIC.F i l ter : Of f ENTER RETURN RAM 3 Use the f/e/d/ c buttons to designate. 1 Turn the DVD video camera/recorder on the left end of screen for current date/time, and then...
... built-in battery is highlighted first ENTER RETURN RAM depends on the date display format (set up in Date Mode): The digit on . 2 Press the MENU button. The following procedure can be reset. MENU Use f / e / d / c buttons to select, and then press A to choose "Date Setup" and then "Date Set". Zoom : 40x MIC.F i l ter : Of f ENTER RETURN RAM 3 Use the f/e/d/ c buttons to designate. 1 Turn the DVD video camera/recorder on the left end of screen for current date/time, and then...

Owners Guide
Page 40
... not light when the AC adapter/charger is required in fire. • Be sure to use the DZ-ACS2 AC adapter/charger to charge the battery: Using other chargers could cause electric shock or fire. • Charge the battery at purchase time: Charge it from your dealer. • The AC adapter/charger can be faulty. An AC plug adapter is plugged into AC outlet, unplug it before using the DVD video camera/recorder. Note: When charging a battery...
... not light when the AC adapter/charger is required in fire. • Be sure to use the DZ-ACS2 AC adapter/charger to charge the battery: Using other chargers could cause electric shock or fire. • Charge the battery at purchase time: Charge it from your dealer. • The AC adapter/charger can be faulty. An AC plug adapter is plugged into AC outlet, unplug it before using the DVD video camera/recorder. Note: When charging a battery...

Owners Guide
Page 45
... or blinking, do not violently open or close the LCD monitor. • When the ACCESS/PC or CARD ACCESS indicator is lit or blinking, do not remove the battery or AC adapter/charger. 45 In this time, no operation, such as recording, can immediately record or play back by turning the DVD video camera/ recorder on , the ACCESS indicator will light or blink to display the Disc Navigation screen after the disc was inserted, it will turn the DVD video camera/recorder on...
... or blinking, do not violently open or close the LCD monitor. • When the ACCESS/PC or CARD ACCESS indicator is lit or blinking, do not remove the battery or AC adapter/charger. 45 In this time, no operation, such as recording, can immediately record or play back by turning the DVD video camera/ recorder on , the ACCESS indicator will light or blink to display the Disc Navigation screen after the disc was inserted, it will turn the DVD video camera/recorder on...

Owners Guide
Page 59
... operate the power switch or remove the card while the ACCESS/PC or CARD ACCESS indicator is open during playback of data to be played back, it may take some time for as long as 5 minutes, the DVD video camera/ recorder will not be heard from the speaker. Playback will stop, and recording pause status will enter the pause status at the last image on disc. The DVD video camera/recorder will enter the playback mode, and the scene you stop playback...
... operate the power switch or remove the card while the ACCESS/PC or CARD ACCESS indicator is open during playback of data to be played back, it may take some time for as long as 5 minutes, the DVD video camera/ recorder will not be heard from the speaker. Playback will stop, and recording pause status will enter the pause status at the last image on disc. The DVD video camera/recorder will enter the playback mode, and the scene you stop playback...
Owners Guide
Page 79
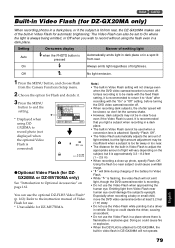
... DZ-MV780MA only) See "Introduction to the instruction manual of Video Flash for use the optional DZ-FLH3 Video Flash* (p. 162): Refer to Optional Accessories" on the subject, but the light amount adjustment may not be made with the "On" or "Off" setting, before turning the DVD video camera/recorder off . Emitting light from the Camera Functions Setup menu. 2 Choose the option for Flash and decide it is approximately 3.2 - 8.2 feet (1 - 2.5 m). • When recording a close-up photo...
... DZ-MV780MA only) See "Introduction to the instruction manual of Video Flash for use the optional DZ-FLH3 Video Flash* (p. 162): Refer to Optional Accessories" on the subject, but the light amount adjustment may not be made with the "On" or "Off" setting, before turning the DVD video camera/recorder off . Emitting light from the Camera Functions Setup menu. 2 Choose the option for Flash and decide it is approximately 3.2 - 8.2 feet (1 - 2.5 m). • When recording a close-up photo...
Owners Guide
Page 84
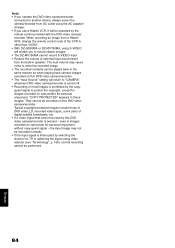
... adapter/ charger. • If you operate the DVD video camera/recorder connected to protect the copyright, except for images recorded on camcorders for personal enjoyment without copy-guard signal - Typical copyright protected images include those of DVD video, LD, recorded video tapes, some parts of most images is present - When recording an image from a Hitachi VCR, change the remote control code of the VCR to other than "VCR2". • With DZ-GX20MA or DZ-MV780MA, using S-VIDEO will enable you to record clearer images. • The DZ...
... adapter/ charger. • If you operate the DVD video camera/recorder connected to protect the copyright, except for images recorded on camcorders for personal enjoyment without copy-guard signal - Typical copyright protected images include those of DVD video, LD, recorded video tapes, some parts of most images is present - When recording an image from a Hitachi VCR, change the remote control code of the VCR to other than "VCR2". • With DZ-GX20MA or DZ-MV780MA, using S-VIDEO will enable you to record clearer images. • The DZ...

Owners Guide
Page 86
... are using a Hitachi VCR, using the remote control provided with this DVD video camera/recorder and the record button on connected device: The DVD video camera/recorder will start playback and the recorded device will deliver clearer images. • Audio is heard from shutting off during recording on another video device as shown in the following figure: Signal flow To AV input/output jack To S-VIDEO input jack of VCR, etc.* To video/audio input jacks AV/S input/output cable (provided) Red White Yellow * If the video device to be played back. 3 Set...
... are using a Hitachi VCR, using the remote control provided with this DVD video camera/recorder and the record button on connected device: The DVD video camera/recorder will start playback and the recorded device will deliver clearer images. • Audio is heard from shutting off during recording on another video device as shown in the following figure: Signal flow To AV input/output jack To S-VIDEO input jack of VCR, etc.* To video/audio input jacks AV/S input/output cable (provided) Red White Yellow * If the video device to be played back. 3 Set...

Owners Guide
Page 88
...) Power save*9 (p. 103) Recording LED*9 (p. 104) Language selection (p. 104) Demo mode (p. 165) Reset (p. 105) English 88 Date setting (p. 38) Display format*9 (p. 39) LCD/EVF Setup*9 LCD / EVF Se t up Ad j us t EVF D i s p l a y : Au t o ENTER RETURN RAM Record Functions Setup Adjust (p. 101) EVF Display (p. 102) Record Funct i ons Se t up Da t e Se t Da t e Mod e : M / D / Y ENTER RETURN RAM Program AE (p. 89) White balance (p. 91) EIS*1 (p. 93) Digital zoom (p. 57) Microphone filter*2 (p. 93) Flash*3 (p. 79) *1: Not displayed when DZ-GX20MA or DZ-MV780MA is...
...) Power save*9 (p. 103) Recording LED*9 (p. 104) Language selection (p. 104) Demo mode (p. 165) Reset (p. 105) English 88 Date setting (p. 38) Display format*9 (p. 39) LCD/EVF Setup*9 LCD / EVF Se t up Ad j us t EVF D i s p l a y : Au t o ENTER RETURN RAM Record Functions Setup Adjust (p. 101) EVF Display (p. 102) Record Funct i ons Se t up Da t e Se t Da t e Mod e : M / D / Y ENTER RETURN RAM Program AE (p. 89) White balance (p. 91) EIS*1 (p. 93) Digital zoom (p. 57) Microphone filter*2 (p. 93) Flash*3 (p. 79) *1: Not displayed when DZ-GX20MA or DZ-MV780MA is...

Owners Guide
Page 141
... ARE AVAILABLE WHEN CONNECTING TO PC Use the provided PC connection cable to connect this DVD video camera/recorder Written media Another DVD-RAM disc Application used DVD-MovieAlbum copy tool** • Copy the data to hard disk of DVD-RAM disc or card. ●Viewing, on PC, DVD-RAM/DVD-RW (VR-mode) disc recorded on this DVD video camera/recorder: Original disc DVD-RAM/DVD-RW (VR-mode) disc recorded on this DVD video camera/ recorder and finalized Application used DVD-MovieAlbumSE** or generally available playback software conforming to DVD video recording (DVD-VR) format (see...
... ARE AVAILABLE WHEN CONNECTING TO PC Use the provided PC connection cable to connect this DVD video camera/recorder Written media Another DVD-RAM disc Application used DVD-MovieAlbum copy tool** • Copy the data to hard disk of DVD-RAM disc or card. ●Viewing, on PC, DVD-RAM/DVD-RW (VR-mode) disc recorded on this DVD video camera/recorder: Original disc DVD-RAM/DVD-RW (VR-mode) disc recorded on this DVD video camera/ recorder and finalized Application used DVD-MovieAlbumSE** or generally available playback software conforming to DVD video recording (DVD-VR) format (see...
Owners Guide
Page 145
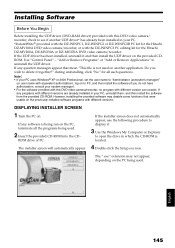
... display it and then install the UDF driver on the PC being run on . If the installer screen does not automatically appear, use the following procedure to delete it together?" English 145 during uninstalling, click "No" for the Hitachi DZ-MV200A, DZ-MV230A or DZ-MV270A DVD video camera/recorder. However, installing the provided software may not appear, depending on the provided CDROM. The ".exe" extension may disable some functions...
... display it and then install the UDF driver on the PC being run on . If the installer screen does not automatically appear, use the following procedure to delete it together?" English 145 during uninstalling, click "No" for the Hitachi DZ-MV200A, DZ-MV230A or DZ-MV270A DVD video camera/recorder. However, installing the provided software may not appear, depending on the provided CDROM. The ".exe" extension may disable some functions...
Owners Guide
Page 183
... operated on file in the "Drive Select" column, and then click "OK". Click the "Preference" button at HS (high speed). Exit Windows® once, and then disconnect the DVD video camera/recorder. when USB2.0 card is You will open the cover of disc insertion block of this DVD video camera/recorder: Remove the disc. DVD-MovieAlbumSE will need to choose the drive where DVD-RAM/DVD-RW (VR-mode) disc is running, clicking the eject button on playback screen. recorder is connected...
... operated on file in the "Drive Select" column, and then click "OK". Click the "Preference" button at HS (high speed). Exit Windows® once, and then disconnect the DVD video camera/recorder. when USB2.0 card is You will open the cover of disc insertion block of this DVD video camera/recorder: Remove the disc. DVD-MovieAlbumSE will need to choose the drive where DVD-RAM/DVD-RW (VR-mode) disc is running, clicking the eject button on playback screen. recorder is connected...

Owners Guide
Page 184
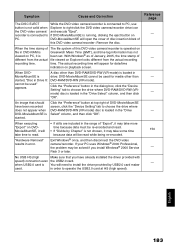
... DVD video camera/recorder turn the DVD video camera/recorder on. Is the infrared receiver on DVD video camera/recorder exposed to remove the disc. Turn it at the infrared receiver on DVD recorder cannot be deleted? English 184 The DVD video camera/recorder could be closed. period of cursors and bar graph on the thumbnail screen. Check the colors of time? Connect a charged battery or the AC adapter/charger, and then press the DISC EJECT button to direct sunlight or strong fluorescent light, etc.? The remote control cannot operate the DVD video camera...
... DVD video camera/recorder turn the DVD video camera/recorder on. Is the infrared receiver on DVD video camera/recorder exposed to remove the disc. Turn it at the infrared receiver on DVD recorder cannot be deleted? English 184 The DVD video camera/recorder could be closed. period of cursors and bar graph on the thumbnail screen. Check the colors of time? Connect a charged battery or the AC adapter/charger, and then press the DISC EJECT button to direct sunlight or strong fluorescent light, etc.? The remote control cannot operate the DVD video camera...

Owners Guide
Page 185
... battery or AC adapter/charger. 2 Use a fine tipped pen to turn the DVD video camera/reorder off. The date and time will be reset: Set the date and time again before using the DVD video camera/recorder. 1 Set the power switch to "OFF" to hold down the reset button for several seconds. ElS Dig.Zoom MIC.Filter Record Functions Setup VIDEO Mode Quality 16:9 Input Source PHOTO Input Self Timer OSD Output Date Setup Date Set Date Mode LCD/EVF Setup LCD Brightness EVF Brightness Color Level EVF Display Initial Setup Beep Power Save Record LED Language Demo Mode Auto Auto...
... battery or AC adapter/charger. 2 Use a fine tipped pen to turn the DVD video camera/reorder off. The date and time will be reset: Set the date and time again before using the DVD video camera/recorder. 1 Set the power switch to "OFF" to hold down the reset button for several seconds. ElS Dig.Zoom MIC.Filter Record Functions Setup VIDEO Mode Quality 16:9 Input Source PHOTO Input Self Timer OSD Output Date Setup Date Set Date Mode LCD/EVF Setup LCD Brightness EVF Brightness Color Level EVF Display Initial Setup Beep Power Save Record LED Language Demo Mode Auto Auto...


