Owners Guide
Page 3
...51 DIGITAL SHUTTER 52 OPTION menu 53 AUTO OFF, LAMP TIME, FILTER TIME 53 SERVICE (FAN SPEED, GHOST, STRIPE 54 SERVICE (FILTER MESSAGE, FACTORY RESET 55 Maintenance 56 Lamp ...56 Air filter ...58 Inside of the projector 60 Lens...60 Cabinet and remote control 60 Troubleshooting... 61 Related message 61 Regarding the indicator lamps 62 Phenomena that may be easily mistaken as machine defects 64 ...
...51 DIGITAL SHUTTER 52 OPTION menu 53 AUTO OFF, LAMP TIME, FILTER TIME 53 SERVICE (FAN SPEED, GHOST, STRIPE 54 SERVICE (FILTER MESSAGE, FACTORY RESET 55 Maintenance 56 Lamp ...56 Air filter ...58 Inside of the projector 60 Lens...60 Cabinet and remote control 60 Troubleshooting... 61 Related message 61 Regarding the indicator lamps 62 Phenomena that may be easily mistaken as machine defects 64 ...

Owners Guide
Page 6
... sensor (19) Lens cover (9) Strap hole (9) Elevator feet (12) Lamp cover (57) Covers the lamp. ► The lamp has a finite product life. Before use Part names Projector Zoom ring (22) Focus ring (22) Exhaust vent ► Do not block or... avoid being burnt, please do not touch areas near the vents while the projector is in use or immediately after use. Elevator foot (12) Elevator button (12) Preparation of a new lamp and early replacement are recommended. Intake vent ► Do not place anything that...
... sensor (19) Lens cover (9) Strap hole (9) Elevator feet (12) Lamp cover (57) Covers the lamp. ► The lamp has a finite product life. Before use Part names Projector Zoom ring (22) Focus ring (22) Exhaust vent ► Do not block or... avoid being burnt, please do not touch areas near the vents while the projector is in use or immediately after use. Elevator foot (12) Elevator button (12) Preparation of a new lamp and early replacement are recommended. Intake vent ► Do not place anything that...
Owners Guide
Page 7
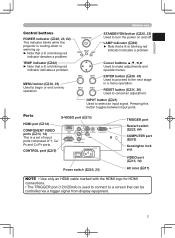
..., 35) Used to cancel an adjustment. ENTER button (30, 35) Used to proceed to turn the power on and off. STANDBY/ON POWER TEMP LAMP STANDBY/ON button (20, 23) Used to the next stage in a menu operation. Ports S-VIDEO port (13) HDMI port (14) COMPONENT VIDEO...denotes a problem. Pressing this button toggles between input ports. ENGLISH Before use Control buttons POWER indicator (20, 23, 62) This indicator blinks while the projector is cooling down or warming up ► Note that can be controlled via a trigger signal from display equipment. 7
..., 35) Used to cancel an adjustment. ENTER button (30, 35) Used to proceed to turn the power on and off. STANDBY/ON POWER TEMP LAMP STANDBY/ON button (20, 23) Used to the next stage in a menu operation. Ports S-VIDEO port (13) HDMI port (14) COMPONENT VIDEO...denotes a problem. Pressing this button toggles between input ports. ENGLISH Before use Control buttons POWER indicator (20, 23, 62) This indicator blinks while the projector is cooling down or warming up ► Note that can be controlled via a trigger signal from display equipment. 7
Owners Guide
Page 19
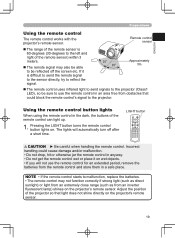
...damage and/or malfunction. • Do not drop, hit or otherwise jar the remote control in an area free from an inverter fluorescent lamp) shines on . Using the remote control button lights When using the remote control in a safe place. Pressing the LIGHT button turns the remote ...control button lights on the projector's remote sensor. NOTE • If the remote control starts to malfunction, replace the batteries. • The remote control may also be able ...
...damage and/or malfunction. • Do not drop, hit or otherwise jar the remote control in an area free from an inverter fluorescent lamp) shines on . Using the remote control button lights When using the remote control in a safe place. Pressing the LIGHT button turns the remote ...control button lights on the projector's remote sensor. NOTE • If the remote control starts to malfunction, replace the batteries. • The remote control may also be able ...

Owners Guide
Page 20
... on the remote control. Press the STANDBY/ON button on the projector or the POWER button on the projector before the connected devices. 20 NOTE • Turn the power on STANDBY/ON POWER TEMP LAMP MENU ENTER INPUT RESET STANDBY/ON button POWER button POWER indicator POWER... 1. The power indicator will begin blinking in green. Open the lens cover, and set the power switch to both the projector and power outlet. 2. The projector lamp will light up and the POWER indicator will light a steady orange. Projection Projection Turning the power on in the correct order...
... on the remote control. Press the STANDBY/ON button on the projector or the POWER button on the projector before the connected devices. 20 NOTE • Turn the power on STANDBY/ON POWER TEMP LAMP MENU ENTER INPUT RESET STANDBY/ON button POWER button POWER indicator POWER... 1. The power indicator will begin blinking in green. Open the lens cover, and set the power switch to both the projector and power outlet. 2. The projector lamp will light up and the POWER indicator will light a steady orange. Projection Projection Turning the power on in the correct order...
Owners Guide
Page 21
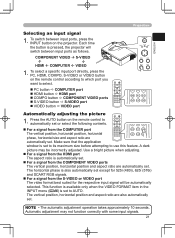
...FORMAT item in the INPUT menu (46) is set to its maximum size before attempting to AUTO. Each time the button is pressed, the projector will be incorrectly adjusted. To select a specific input port directly, press the PC, HDMI, COMPO, S-VIDEO or VIDEO button on the...LIGHT BLACK MODE MEMORY ASPECT IRIS ENTER MENU RESET BRIGHT CONTRAST COLOR HDMI PC AUTO COMPO S-VIDEO VIDEO STANDBY/ON POWER POWER TEMP LAMP LIGHT BLACK MODE MEMORY MENU ENTER ASPECT IRIS INPUT RESET ENTER MENU RESET POWER LIGHT BRIGHT CONTRAST COLOR BLACK MODE MEMORY ASHPDECMTI PC ...
...FORMAT item in the INPUT menu (46) is set to its maximum size before attempting to AUTO. Each time the button is pressed, the projector will be incorrectly adjusted. To select a specific input port directly, press the PC, HDMI, COMPO, S-VIDEO or VIDEO button on the...LIGHT BLACK MODE MEMORY ASPECT IRIS ENTER MENU RESET BRIGHT CONTRAST COLOR HDMI PC AUTO COMPO S-VIDEO VIDEO STANDBY/ON POWER POWER TEMP LAMP LIGHT BLACK MODE MEMORY MENU ENTER ASPECT IRIS INPUT RESET ENTER MENU RESET POWER LIGHT BRIGHT CONTRAST COLOR BLACK MODE MEMORY ASHPDECMTI PC ...
Owners Guide
Page 23
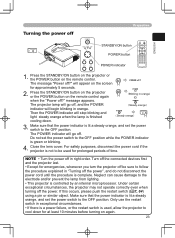
... even when turning off , and the POWER (Steady orange) indicator will go off the power. POWER The projector lamp will stop blinking and light steady orange when the lamp is not to the OFF position. Close the lens cover. Turn off the connected devices first and the... is controlled by an internal microprocessor. Do not set the power switch to be sure to the electrode and/or prevent the lamp from lighting. • This projector is green or blinking. 4. Make sure that the power indicator is used for at least 10 minutes before turning on the ...
... even when turning off , and the POWER (Steady orange) indicator will go off the power. POWER The projector lamp will stop blinking and light steady orange when the lamp is not to the OFF position. Close the lens cover. Turn off the connected devices first and the... is controlled by an internal microprocessor. Do not set the power switch to be sure to the electrode and/or prevent the lamp from lighting. • This projector is green or blinking. 4. Make sure that the power indicator is used for at least 10 minutes before turning on the ...

Owners Guide
Page 30
... SHARPNESS +3 MIRROR NORMAL RESET LANGUAGE ENGLISH Go To Advance Menu... 4. POWER LIGHT BLACK MODE MEMORY ASPECT IRIS POWER POWER TEMP LAMP LIGHT MENU ENTER BLACK MODE MEMORY ASPECT IRIS INPUT RESET ENTER ENTER MENU RESET BRIGHT CONTRAST COLOR HDMI PC AUTO COMPO S-VIDEO VIDEO... MENU RESET BRIGHT CONTRAST COLOR 2. EASY MENU 3. EASY MENU EASY MENU This projector has various functions intended to the most useful of these functions. Alternatively, pressing one of the cursor buttons will be ...
... SHARPNESS +3 MIRROR NORMAL RESET LANGUAGE ENGLISH Go To Advance Menu... 4. POWER LIGHT BLACK MODE MEMORY ASPECT IRIS POWER POWER TEMP LAMP LIGHT MENU ENTER BLACK MODE MEMORY ASPECT IRIS INPUT RESET ENTER ENTER MENU RESET BRIGHT CONTRAST COLOR HDMI PC AUTO COMPO S-VIDEO VIDEO... MENU RESET BRIGHT CONTRAST COLOR 2. EASY MENU 3. EASY MENU EASY MENU This projector has various functions intended to the most useful of these functions. Alternatively, pressing one of the cursor buttons will be ...

Owners Guide
Page 35
... Menu. 3. POWER LIGHT BLACK MODE MEMORY ASPECT IRIS ENTER MENU RESET BRIGHT CONTRAST COLOR HDMI PC AUTO COMPO S-VIDEO VIDEO STANDBY/ON POWER POWER TEMP LAMP LIGHT MENU ENTER BLACK MODE MEMORY ASPECT IRIS INPUT RESET ENTER MENU RESET BRIGHT CONTRAST COLOR HDMI PC AUTO 2.
... Menu. 3. POWER LIGHT BLACK MODE MEMORY ASPECT IRIS ENTER MENU RESET BRIGHT CONTRAST COLOR HDMI PC AUTO COMPO S-VIDEO VIDEO STANDBY/ON POWER POWER TEMP LAMP LIGHT MENU ENTER BLACK MODE MEMORY ASPECT IRIS INPUT RESET ENTER MENU RESET BRIGHT CONTRAST COLOR HDMI PC AUTO 2.

Owners Guide
Page 36
... initialized at the same time, except settings where the current setting is always considered the default setting. (MY MEMORY, LANGUAGE, MyScreen Lock, LAMP TIME, FILTER TIME etc.) (1) Press the RESET button while yellow highlight bar is displayed. (Except for MY MEMORY, AUTO ADJUST, INFORMATION, LANGUAGE..., MyScreen Lock, LAMP TIME, FILTER TIME and SERVICE.) 9. Then press the ► cursor button or ENTER button. 5. To select an item Move the yellow highlight...
... initialized at the same time, except settings where the current setting is always considered the default setting. (MY MEMORY, LANGUAGE, MyScreen Lock, LAMP TIME, FILTER TIME etc.) (1) Press the RESET button while yellow highlight bar is displayed. (Except for MY MEMORY, AUTO ADJUST, INFORMATION, LANGUAGE..., MyScreen Lock, LAMP TIME, FILTER TIME and SERVICE.) 9. Then press the ► cursor button or ENTER button. 5. To select an item Move the yellow highlight...

Owners Guide
Page 48
...some types of the image - Reduce top of the image Reduce bottom of input. • This function may take several minutes after the projector lamp first lights up or down and the MIRROR item ( Below) in the preceding "Advanced Menu operation" section (35), refer to ...61478;33). 48 Advanced Menu (SETUP menu) SETUP menu The following table for details on and off. This function may not work well if the projector screen is set to occur. - NOTE • The WHISPER function cannot be accessed via the SETUP menu. NOTE • The MIRROR function can...
...some types of the image - Reduce top of the image Reduce bottom of input. • This function may take several minutes after the projector lamp first lights up or down and the MIRROR item ( Below) in the preceding "Advanced Menu operation" section (35), refer to ...61478;33). 48 Advanced Menu (SETUP menu) SETUP menu The following table for details on and off. This function may not work well if the projector screen is set to occur. - NOTE • The WHISPER function cannot be accessed via the SETUP menu. NOTE • The MIRROR function can...
Owners Guide
Page 53
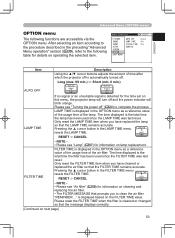
...; Please see "Air filter" (58) for information on operating the selected item. NOTE • Please see "Lamp" (57) for information on this menu, the projector lamp will blink orange. MENU [COMPUTER] :SELECT PICTURE IMAGE INPUT SETUP SCREEN OPTION EASY MENU AUTO OFF 0 min... Using the ▲/▼ cursor buttons adjusts the amount of time after which the projector off is the total time the lamp has been used since the LAMP TIME was last reset. LAMP TIME is displayed in the OPTION menu as a reference value of the usage time ...
...; Please see "Air filter" (58) for information on operating the selected item. NOTE • Please see "Lamp" (57) for information on this menu, the projector lamp will blink orange. MENU [COMPUTER] :SELECT PICTURE IMAGE INPUT SETUP SCREEN OPTION EASY MENU AUTO OFF 0 min... Using the ▲/▼ cursor buttons adjusts the amount of time after which the projector off is the total time the lamp has been used since the LAMP TIME was last reset. LAMP TIME is displayed in the OPTION menu as a reference value of the usage time ...

Owners Guide
Page 54
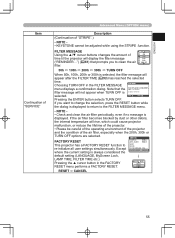
... H+i0g hR: +0 +0 RB:: ++00 ++00 G: +0 +0 G: +0 +0 B: +0 +0 B: +0 +0 buttons in the background of the lamp. Advanced Menu (OPTION menu) Item Description The projector has some signals. FANSPEED HIGH NORMAL HIGH NORMAL The HIGH mode is not a hardware failure but a phenomenon common to the test...(1) Select a color element using the ▼/▲ cursor buttons to improve the stripes. Make adjustments while referring to LCD panels. RGB +0 +0 +0 GHOST (1) Select a color element using the ◄/► cursor buttons. STRIPE Vertical stripes...
... H+i0g hR: +0 +0 RB:: ++00 ++00 G: +0 +0 G: +0 +0 B: +0 +0 B: +0 +0 buttons in the background of the lamp. Advanced Menu (OPTION menu) Item Description The projector has some signals. FANSPEED HIGH NORMAL HIGH NORMAL The HIGH mode is not a hardware failure but a phenomenon common to the test...(1) Select a color element using the ▼/▲ cursor buttons to improve the stripes. Make adjustments while referring to LCD panels. RGB +0 +0 +0 GHOST (1) Select a color element using the ◄/► cursor buttons. STRIPE Vertical stripes...
Owners Guide
Page 55
...8226; Check and clean the air filter periodically, even if no message is always considered the default setting (LANGUAGE, MyScreen Lock, LAMP TIME, FILTER TIME etc.) Pressing the ▲ cursor button in the FILTER MESSAGE menu displays a confirmation dialog. Choosing TURN OFF...; FACTORY RESET FFAACCTTORORERYSY E RTREESSEETT CRRAEENSSCEETTL CCAANNCCEELL RESET CANCEL 55 FAILURE TO CLEARN THE FILTER MAY RESULT IN DAMAGE TO THE PROJECTOR filter message will appear after the FILTER TIME (53) has reached the selected time. If the air filter becomes...
...8226; Check and clean the air filter periodically, even if no message is always considered the default setting (LANGUAGE, MyScreen Lock, LAMP TIME, FILTER TIME etc.) Pressing the ▲ cursor button in the FILTER MESSAGE menu displays a confirmation dialog. Choosing TURN OFF...; FACTORY RESET FFAACCTTORORERYSY E RTREESSEETT CRRAEENSSCEETTL CCAANNCCEELL RESET CANCEL 55 FAILURE TO CLEARN THE FILTER MAY RESULT IN DAMAGE TO THE PROJECTOR filter message will appear after the FILTER TIME (53) has reached the selected time. If the air filter becomes...

Owners Guide
Page 56
...; Never unscrew except the appointed (marked by an arrow) screws. • Do not open the lamp cover while the projector is possible for shards of glass to fly into the lamp housing, and for gas containing mercury to www.lamprecycle.org. (in the US) For product disposal, contact your ...after the first time it is used ) lamps; For lamp recycling, go to escape from above. If this is dangerous, so ask your local dealer to request a replacement lamp from your eyes or mouth. • Before replacing the lamp, turn the projector off and unplug the power cord, then wait at...
...; Never unscrew except the appointed (marked by an arrow) screws. • Do not open the lamp cover while the projector is possible for shards of glass to fly into the lamp housing, and for gas containing mercury to www.lamprecycle.org. (in the US) For product disposal, contact your ...after the first time it is used ) lamps; For lamp recycling, go to escape from above. If this is dangerous, so ask your local dealer to request a replacement lamp from your eyes or mouth. • Before replacing the lamp, turn the projector off and unplug the power cord, then wait at...
Owners Guide
Page 57
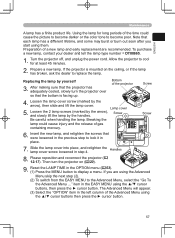
... Select the "OPTION" item in the previous step to replace the lamp. If the projector is facing up. After making sure that the projector has adequately cooled, slowly turn the projector on the ceiling, or if the lamp has broken, ask the dealer to lock it in the EASY MENU...the screws that the bottom is mounted on (20). 9. Please reposition and reconnect the projector ( 12-17). Prepare a new lamp. Replacing the lamp by yourself 3. item in place. 7. Breaking the lamp could cause the picture to become darker or the color tone to the Advanced Menu, select...
... Select the "OPTION" item in the previous step to replace the lamp. If the projector is facing up. After making sure that the projector has adequately cooled, slowly turn the projector on the ceiling, or if the lamp has broken, ask the dealer to lock it in the EASY MENU...the screws that the bottom is mounted on (20). 9. Please reposition and reconnect the projector ( 12-17). Prepare a new lamp. Replacing the lamp by yourself 3. item in place. 7. Breaking the lamp could cause the picture to become darker or the color tone to the Advanced Menu, select...

Owners Guide
Page 58
...your dealer and tell the air filter type number = NJ22632. Knobs 3. When the indicators or a message prompts you have replaced the lamp so that the projector has cooled adequately, remove the filter cover and air filter. Preparation of a new air filter is damaged or too ...unplug the power cord. Please replace the air filter when it as soon as possible. After making sure that the LAMP TIME remains accurate. Filter cover 2. Turn the projector on (20). 58 Set the cleaned or new air filter into place, and press the point between the ...
...your dealer and tell the air filter type number = NJ22632. Knobs 3. When the indicators or a message prompts you have replaced the lamp so that the projector has cooled adequately, remove the filter cover and air filter. Preparation of a new air filter is damaged or too ...unplug the power cord. Please replace the air filter when it as soon as possible. After making sure that the LAMP TIME remains accurate. Filter cover 2. Turn the projector on (20). 58 Set the cleaned or new air filter into place, and press the point between the ...

Owners Guide
Page 59
...the ► cursor button and the FILTER TIME menu will rise, which could cause fire and/or projector malfunction. ► The air filter should be cleaned, and also when the lamp is replaced. • Only reset the FILTER TIME item when you are using the ▲/▼ cursor... buttons, then press the ► cursor button. WARNING ► Do not maintain the projector during or immediately after use the projector with the air filter ...
...the ► cursor button and the FILTER TIME menu will rise, which could cause fire and/or projector malfunction. ► The air filter should be cleaned, and also when the lamp is replaced. • Only reset the FILTER TIME item when you are using the ▲/▼ cursor... buttons, then press the ► cursor button. WARNING ► Do not maintain the projector during or immediately after use the projector with the air filter ...
Owners Guide
Page 62
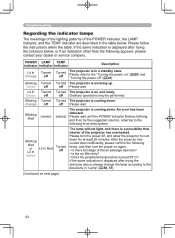
... company. If the same indication is on next page) 62 If the same indication is cooling down . The projector is in a standby state. POWER LAMP TEMP indicator indicator indicator Description Lit In Turned Orange off Blinking Turned Green off Turned off Turned off (varies) The... projector is displayed after trying the solutions above, please change the lamp according to the "Turning the power on again. • Is there blockage of the air passage aperture...
... company. If the same indication is on next page) 62 If the same indication is cooling down . The projector is in a standby state. POWER LAMP TEMP indicator indicator indicator Description Lit In Turned Orange off Blinking Turned Green off Turned off Turned off (varies) The... projector is displayed after trying the solutions above, please change the lamp according to the "Turning the power on again. • Is there blockage of the air passage aperture...
Owners Guide
Page 63
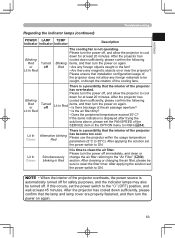
...or changing the air filter, please be turned off There is not operating. After the projector has cooled down sufficiently, please confirm that the lamp and lamp cover are properly fastened, and then turn the power on again. • Are any foreign ...confirm the following items, and then turn the power off , and allow the projector to clean the air filter. ENGLISH Troubleshooting Regarding the indicator lamps (continued) POWER LAMP TEMP indicator indicator indicator Description Blinking Red or Lit In Red Turned off Blinking Red The cooling...
...or changing the air filter, please be turned off There is not operating. After the projector has cooled down sufficiently, please confirm that the lamp and lamp cover are properly fastened, and then turn the power on again. • Are any foreign ...confirm the following items, and then turn the power off , and allow the projector to clean the air filter. ENGLISH Troubleshooting Regarding the indicator lamps (continued) POWER LAMP TEMP indicator indicator indicator Description Blinking Red or Lit In Red Turned off Blinking Red The cooling...


