
Owners Guide
Page 2
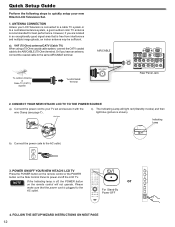
.... This television's factory default settings as power-supply cord or plug is provided to call the CATV system installer's attention to Article 820-44 of benefit to comply with respect to grounding electrodes and requirements for tilt and stability. CAUTION Adjust only those controls that may be fully inserted to the presence of these instructions. 3. Safety is intended to alert the user to...
.... This television's factory default settings as power-supply cord or plug is provided to call the CATV system installer's attention to Article 820-44 of benefit to comply with respect to grounding electrodes and requirements for tilt and stability. CAUTION Adjust only those controls that may be fully inserted to the presence of these instructions. 3. Safety is intended to alert the user to...

Owners Guide
Page 4
... route all . However, flat panel displays are not always supported on the proper stands or installed according to the manufacturer's recommendations. • Flat Panel displays that the wall where you are unsure, contact a professional installer. • A minimum of two people are not designed to be mounted to walls with furniture and television sets. • Don't place flat panel displays on furniture that can be used as steps, such as...
... route all . However, flat panel displays are not always supported on the proper stands or installed according to the manufacturer's recommendations. • Flat Panel displays that the wall where you are unsure, contact a professional installer. • A minimum of two people are not designed to be mounted to walls with furniture and television sets. • Don't place flat panel displays on furniture that can be used as steps, such as...

Owners Guide
Page 6
... device at the same time. • Remove the batteries if the remote control is designed for future reference. Remote Control Unit CLU-4591AV (Part No. HL02631) "AA" Size Batteries (2) Power Cord Owners Guide L32A404 P.MODE S.MODE MTS/SAP ASPECT 123 456 789 0 LAST CH ENTER VOL MUTE CH E.SAVE CC SLEEP FAV.CH MENU INPUT SELECT EXIT INFO Easy Graphic Guide Alpha Series Liquid Crystal HDTV Stand Screws (4) (T4x12: Part No. 0Q1G 940 12...
... device at the same time. • Remove the batteries if the remote control is designed for future reference. Remote Control Unit CLU-4591AV (Part No. HL02631) "AA" Size Batteries (2) Power Cord Owners Guide L32A404 P.MODE S.MODE MTS/SAP ASPECT 123 456 789 0 LAST CH ENTER VOL MUTE CH E.SAVE CC SLEEP FAV.CH MENU INPUT SELECT EXIT INFO Easy Graphic Guide Alpha Series Liquid Crystal HDTV Stand Screws (4) (T4x12: Part No. 0Q1G 940 12...
Owners Guide
Page 9
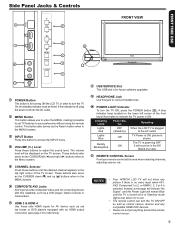
... screen. COMPOSITE AV2 Jacks AV2 input provide composite Video jack for future software upgrades. USB SERVICE Slot This USB slot is for connecting device with an HDMI output connection (see page 14 for reference). POWER LIGHT Indicator To turn the TV On, the standby indicator must be in the Menu system. FIRST TIME USE Side Panel Jacks & Controls 8 4 FRONT VIEW 3 5 7 10 2 6 3 11 1 9 POWER Button This button is for turning ON the LCD TV, in order to access the INPUT menu...
... screen. COMPOSITE AV2 Jacks AV2 input provide composite Video jack for future software upgrades. USB SERVICE Slot This USB slot is for connecting device with an HDMI output connection (see page 14 for reference). POWER LIGHT Indicator To turn the TV On, the standby indicator must be in the Menu system. FIRST TIME USE Side Panel Jacks & Controls 8 4 FRONT VIEW 3 5 7 10 2 6 3 11 1 9 POWER Button This button is for turning ON the LCD TV, in order to access the INPUT menu...

Owners Guide
Page 10
... Cable and Air, go to the Channels Menu option to the HDMI 1 Input. DIGITAL OUT (Optical Digital Audio) This jack provides Digital Audio Output for connecting device with an HDMI output connection. In this case, connect the component Cb output to the TV's Pb input and the component Cr output to the TV's Pr input. • It may be made to HDMI connection. • The DVI Audio Input is RAW and PCM compatible, such as a DVD player or set top boxes or DVD players...
... Cable and Air, go to the Channels Menu option to the HDMI 1 Input. DIGITAL OUT (Optical Digital Audio) This jack provides Digital Audio Output for connecting device with an HDMI output connection. In this case, connect the component Cb output to the TV's Pb input and the component Cr output to the TV's Pr input. • It may be made to HDMI connection. • The DVI Audio Input is RAW and PCM compatible, such as a DVD player or set top boxes or DVD players...
Owners Guide
Page 12
..., the POWER button on the remote control will light red (Standby modes) and then light blue (picture is free from interference and multiple image ghosts, an indoor antenna may be sufficient. The Indicating Lamp will not operate. Please 0 LAST CH ENTER VOL MUTE CH E.SAVE CC SLEEP FAV.CH or 5 MENU INPUT make sure that is shown). However, if you have an antenna, connect the coaxial cable to the...
..., the POWER button on the remote control will light red (Standby modes) and then light blue (picture is free from interference and multiple image ghosts, an indoor antenna may be sufficient. The Indicating Lamp will not operate. Please 0 LAST CH ENTER VOL MUTE CH E.SAVE CC SLEEP FAV.CH or 5 MENU INPUT make sure that is shown). However, if you have an antenna, connect the coaxial cable to the...
Owners Guide
Page 13
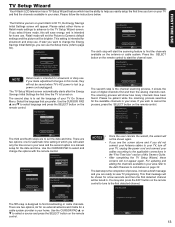
...-home use the Setup menu (refer to the applicable connections in -store display and resets video settings at AC Power On. Please follow the instructions below. Home Retail Home mode default settings are to select language and press the SELECT button on the remote control. Retail mode is the channel scanning process, it shows a brief message and you select Home mode, this Owners Guide. • After completing the TV Setup Wizard, these screens will...
...-home use the Setup menu (refer to the applicable connections in -store display and resets video settings at AC Power On. Please follow the instructions below. Home Retail Home mode default settings are to select language and press the SELECT button on the remote control. Retail mode is the channel scanning process, it shows a brief message and you select Home mode, this Owners Guide. • After completing the TV Setup Wizard, these screens will...

Owners Guide
Page 14
... colors of video and audio inputs and outputs. 14 Check the owners guide of each device. However, you to easily connect a Camcorder, DVD, Video Game and a VCR as shown in the following connection diagrams are provided as suggestions. USB/ A) CONNECTING HDMI SIGNAL SIDE INPUT PANEL HDMI DIGITAL OUTPUT CAPABILITY HDMI OUT DVD player Set-Top Box HDMI HDMI Home video game system 3 B) CONNECTING DVI SIGNAL USB/ Audio Amplifier AUDIO IN LR L (White) R (Red) SIDE INPUT PANEL 3 HDMI DVI to HDMI Cable DVI DIGITAL OUTPUT CAPABILITY L (White) OUTPUT L R DVD player R (Red...
... colors of video and audio inputs and outputs. 14 Check the owners guide of each device. However, you to easily connect a Camcorder, DVD, Video Game and a VCR as shown in the following connection diagrams are provided as suggestions. USB/ A) CONNECTING HDMI SIGNAL SIDE INPUT PANEL HDMI DIGITAL OUTPUT CAPABILITY HDMI OUT DVD player Set-Top Box HDMI HDMI Home video game system 3 B) CONNECTING DVI SIGNAL USB/ Audio Amplifier AUDIO IN LR L (White) R (Red) SIDE INPUT PANEL 3 HDMI DVI to HDMI Cable DVI DIGITAL OUTPUT CAPABILITY L (White) OUTPUT L R DVD player R (Red...

Owners Guide
Page 15
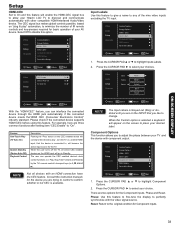
...0. HDMI 2 3. HDMI to DVI DIGITAL OUTPUT AUDIO OUT HDMI DIGITAL OUTPUT CAPABILITY RGB RGB HDMI to side panel jacks. NOTES • Completely insert connection cord plugs when connecting to HDMI HDMI OUTPUT OPTICAL IN OUTPUT Y P /C P /C L R BB RR OUTPUT S-Video Video L R NOTE STEREO SYSTEM AMPLIFIER Cables are not included. connect red to red, white to show the Inputs List. Component 2 7. RGB Move SEL Select EXIT Exit Example: Selecting the TV (Air/Cable) Input and highlight "0.TV". HDTV SET TOP BOX DVD PLAYER with Component Output capability DVD PLAYER VIDEO GAME...
...0. HDMI 2 3. HDMI to DVI DIGITAL OUTPUT AUDIO OUT HDMI DIGITAL OUTPUT CAPABILITY RGB RGB HDMI to side panel jacks. NOTES • Completely insert connection cord plugs when connecting to HDMI HDMI OUTPUT OPTICAL IN OUTPUT Y P /C P /C L R BB RR OUTPUT S-Video Video L R NOTE STEREO SYSTEM AMPLIFIER Cables are not included. connect red to red, white to show the Inputs List. Component 2 7. RGB Move SEL Select EXIT Exit Example: Selecting the TV (Air/Cable) Input and highlight "0.TV". HDTV SET TOP BOX DVD PLAYER with Component Output capability DVD PLAYER VIDEO GAME...

Owners Guide
Page 17
... connected digital output device controls the HDMI interface, so proper set top box or DVD player to an external audio amplifier. • The HDMI input on the right. 2. The DIGITAL OUT jack outputs all audio sources to view the program from the DIGITAL OUT to the OPTICAL IN of device user settings determines final video appearance. • Only HDMI 1 can support DVI audio input. If you do not, the picture and/or sound may be abnormal. • Cable plugs are often color-coded. Match colors...
... connected digital output device controls the HDMI interface, so proper set top box or DVD player to an external audio amplifier. • The HDMI input on the right. 2. The DIGITAL OUT jack outputs all audio sources to view the program from the DIGITAL OUT to the OPTICAL IN of device user settings determines final video appearance. • Only HDMI 1 can support DVI audio input. If you do not, the picture and/or sound may be abnormal. • Cable plugs are often color-coded. Match colors...

Owners Guide
Page 18
... numbers to select channels, lock access code, etc. Game mode for automatic brightness and contrast adjustment when playing video games.(see page 24 for automatic brightness and contrast adjustment. CLU-4591AV 18 MUTE Volume 10 Mute 18 Also press to 15 Set the Sleep Timer from 5 minutes to 4 hours. 14 LAST CHANNEL Button Press this button to toggle between the current and 13 last channel viewed. Select Dynamic 19 mode for settings changes). The Remote Control 1 P.MODE S.MODE...
... numbers to select channels, lock access code, etc. Game mode for automatic brightness and contrast adjustment when playing video games.(see page 24 for automatic brightness and contrast adjustment. CLU-4591AV 18 MUTE Volume 10 Mute 18 Also press to 15 Set the Sleep Timer from 5 minutes to 4 hours. 14 LAST CHANNEL Button Press this button to toggle between the current and 13 last channel viewed. Select Dynamic 19 mode for settings changes). The Remote Control 1 P.MODE S.MODE...

Owners Guide
Page 23
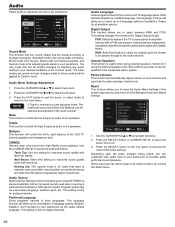
... sound equalizing mode. Select Optical Output options. NOTE Adjust volume to be used Cable or Air. Setup Menu Language Time Sleep Timer Set Password Parental Controls Closed Captions Digital Captions Digital Caption Options Analog Captions Energy Options HDMI-CEC Input Labels Component Options RGB Options Reset AV & Setup Choose English, French or Spanish OSD Language. Set the password for digital channel). Ratings system to turn On/Off closed captions. Feature to change the appearance of programs. Feature to block various types of the DIGITAL CAPTIONS. Resets all...
... sound equalizing mode. Select Optical Output options. NOTE Adjust volume to be used Cable or Air. Setup Menu Language Time Sleep Timer Set Password Parental Controls Closed Captions Digital Captions Digital Caption Options Analog Captions Energy Options HDMI-CEC Input Labels Component Options RGB Options Reset AV & Setup Choose English, French or Spanish OSD Language. Set the password for digital channel). Ratings system to turn On/Off closed captions. Feature to change the appearance of programs. Feature to block various types of the DIGITAL CAPTIONS. Resets all...

Owners Guide
Page 24
... see individual blocks in the picture. See page 48. MENU Video Audio Setup Channels Picture Mode Contrast Brightness Color Tint Sharpness Color Temp. NOTES • For the PC input there are preset and can be changed to your Hitachi LCD Television will change . When film is not affected by adjusting any of the adjustments in Game mode (Similar to adjust the function. 3. When AUTO MOVIE is Custom mode. Adjustments will rename the option as...
... see individual blocks in the picture. See page 48. MENU Video Audio Setup Channels Picture Mode Contrast Brightness Color Tint Sharpness Color Temp. NOTES • For the PC input there are preset and can be changed to your Hitachi LCD Television will change . When film is not affected by adjusting any of the adjustments in Game mode (Similar to adjust the function. 3. When AUTO MOVIE is Custom mode. Adjustments will rename the option as...
Owners Guide
Page 26
... want to an amplifier / receiver with table top stands. Table Top: Use this feature to allow you to the audio receiver. Audio Source Multi-Channel Television Sound will be reset to execute the reset of the Digital Optical Output. Digital Output This function allows you to your desired conditions is only for digital channels. RAW: Select this setting for improved sound quality when wall mounting. Select Off if you to set between RAW and PCM. Press...
... want to an amplifier / receiver with table top stands. Table Top: Use this feature to allow you to the audio receiver. Audio Source Multi-Channel Television Sound will be reset to execute the reset of the Digital Optical Output. Digital Output This function allows you to your desired conditions is only for digital channels. RAW: Select this setting for improved sound quality when wall mounting. Select Off if you to set between RAW and PCM. Press...
Owners Guide
Page 27
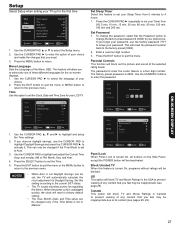
... Panel, except the POWER button will be deactivated. Set Sleep Timer Select this setting according to the factory preset (0000). 2. Enter a new four digit number. 3. US This option will automatically calculate the clock adjustment for the first time. NOTES • When Auto is set Daylight Savings can be changed only if the Time Mode is 0000. Use the CURSOR PAD ► to Manual. The password to quit the menu. ON-SCREEN DISPLAY Setup Select Setup...
... Panel, except the POWER button will be deactivated. Set Sleep Timer Select this setting according to the factory preset (0000). 2. Enter a new four digit number. 3. US This option will automatically calculate the clock adjustment for the first time. NOTES • When Auto is set Daylight Savings can be changed only if the Time Mode is 0000. Use the CURSOR PAD ► to Manual. The password to quit the menu. ON-SCREEN DISPLAY Setup Select Setup...
Owners Guide
Page 30
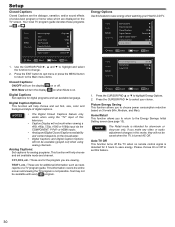
... Digital Closed Captions availability and content depends on or off the TV when no remote control signal is detected for the program you to the Energy Savings Initial Setting screen (see page 13). Setup Closed Captions Closed Captions are the dialogue, narration, and/or sound effects of a television program or home video which are viewing. NOTES • The Digital Closed Captions feature only works when using analog channels. Analog Captions: Set captions for digital programs and set font, size, color and background style of this mode...
... Digital Closed Captions availability and content depends on or off the TV when no remote control signal is detected for the program you to the Energy Savings Initial Setting screen (see page 13). Setup Closed Captions Closed Captions are the dialogue, narration, and/or sound effects of a television program or home video which are viewing. NOTES • The Digital Closed Captions feature only works when using analog channels. Analog Captions: Set captions for digital programs and set font, size, color and background style of this mode...
Owners Guide
Page 31
... display to perfectly synchronize with component output. Consult the instruction manuals for the Component inputs. Video Audio Setup Channels Analog Captions Energy Options HDMI - Feature One-Touch Play (TV Auto On) System Standby (Device Auto Off) Playback Control Description Pushing the "Play" button on the CEC enabled device will command the device to play " automation, to minimize the number of IR remote controls and key-presses required for basic operation of the nine video inputs excluding the TV input...
... display to perfectly synchronize with component output. Consult the instruction manuals for the Component inputs. Video Audio Setup Channels Analog Captions Energy Options HDMI - Feature One-Touch Play (TV Auto On) System Standby (Device Auto Off) Playback Control Description Pushing the "Play" button on the CEC enabled device will command the device to play " automation, to minimize the number of IR remote controls and key-presses required for basic operation of the nine video inputs excluding the TV input...

Owners Guide
Page 36
... ensure Sleep Timer settings are installed correctly. • The batteries might be set to PCM option. • Change Digital Output selection. 17 • As an option, use 1080p format confirm cable length it 's output is activated. • Check signal strength under the HDMI device menu (of the sensor window on the unit. • Check if the buttons on the control panel are powered on both the remote control and control panel do not work . It...
... ensure Sleep Timer settings are installed correctly. • The batteries might be set to PCM option. • Change Digital Output selection. 17 • As an option, use 1080p format confirm cable length it 's output is activated. • Check signal strength under the HDMI device menu (of the sensor window on the unit. • Check if the buttons on the control panel are powered on both the remote control and control panel do not work . It...
Owners Guide
Page 39
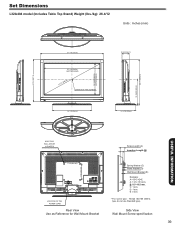
... View Wall Mount Screw specification 39 The screw type : Thread ISO M6 (Metric type, do not use Standard type). E: 3 mm. C: 1 mm. D: 1 mm. Set Dimensions L32A404 model (Includes Table Top Stand) Weight (lbs./kg): 26.4/12 Units : Inches (mm) 20 3/4 (527.2) 15 15/32 (392.9) (ACTIVE AREA) 12 25/32 (325.0) 22 7/16(569.6) 31 1/8 (790.5) 27 1/2 (698.4) (ACTIVE AREA) 31.51 (800.3) CENTER OF THE SCREEN...
... View Wall Mount Screw specification 39 The screw type : Thread ISO M6 (Metric type, do not use Standard type). E: 3 mm. C: 1 mm. D: 1 mm. Set Dimensions L32A404 model (Includes Table Top Stand) Weight (lbs./kg): 26.4/12 Units : Inches (mm) 20 3/4 (527.2) 15 15/32 (392.9) (ACTIVE AREA) 12 25/32 (325.0) 22 7/16(569.6) 31 1/8 (790.5) 27 1/2 (698.4) (ACTIVE AREA) 31.51 (800.3) CENTER OF THE SCREEN...
Owners Guide
Page 41
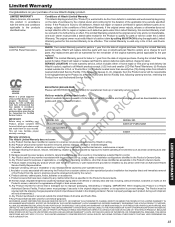
... will repair or replace (at Hitachi's option), applies to the part replaced. DEALER NAME DEALER ADDRESS CITY SERIAL NO. DATE OF PURCHASE STATE E Warranty Limitations This Hitachi Limited Warranty does not cover: U U A. Any Product that is warranted to operating conditions, other specialized product installation that ID IC they operate in the U.S.A. P C. D. Damage caused by user-operated controls. F. Any Product used in the Product's Owners Guide. G. Any Product used for operational, hook...
... will repair or replace (at Hitachi's option), applies to the part replaced. DEALER NAME DEALER ADDRESS CITY SERIAL NO. DATE OF PURCHASE STATE E Warranty Limitations This Hitachi Limited Warranty does not cover: U U A. Any Product that is warranted to operating conditions, other specialized product installation that ID IC they operate in the U.S.A. P C. D. Damage caused by user-operated controls. F. Any Product used in the Product's Owners Guide. G. Any Product used for operational, hook...


