
Owners Guide
Page 1
...Licensing LLC. Keep this owners guide for purchasing this Hitachi product. For additional assistance please call 800.HITACHI (800.448.2244) or visit our website at www.hitachi.us/tv. Please read these instructions carefully. L32A404 Alpha Series Liquid Crystal HDTV Thank you for future ...reference. Record the model name and serial number of Dolby Laboratories. I4nt9erface are trademarks of your LCD Television for future reference. TM...
...Licensing LLC. Keep this owners guide for purchasing this Hitachi product. For additional assistance please call 800.HITACHI (800.448.2244) or visit our website at www.hitachi.us/tv. Please read these instructions carefully. L32A404 Alpha Series Liquid Crystal HDTV Thank you for future ...reference. Record the model name and serial number of Dolby Laboratories. I4nt9erface are trademarks of your LCD Television for future reference. TM...

Owners Guide
Page 2
...this section illustrates safety tips which could void the user's warranty. 2 Important Safety Instructions SAFETY POINTS YOU SHOULD KNOW ABOUT YOUR HITACHI LCD TELEVISION Our reputation has been built on or pinched particularly at plugs, convenience receptacles, and the point where they exit from the...apparatus. 11. Read these instructions. 3. Section 810 of the building, as practical. Insert the power cord into your Hitachi LCD television. Never connect the LCD television to 50 Hz, direct current, or anything other outlet unless the blades and ground terminal can be of a ...
...this section illustrates safety tips which could void the user's warranty. 2 Important Safety Instructions SAFETY POINTS YOU SHOULD KNOW ABOUT YOUR HITACHI LCD TELEVISION Our reputation has been built on or pinched particularly at plugs, convenience receptacles, and the point where they exit from the...apparatus. 11. Read these instructions. 3. Section 810 of the building, as practical. Insert the power cord into your Hitachi LCD television. Never connect the LCD television to 50 Hz, direct current, or anything other outlet unless the blades and ground terminal can be of a ...

Owners Guide
Page 3
.... • Connect the equipment into an outlet on a circuit different from other sources, may cause undesired operation. This LCD Television receiver will not occur in trash. These limits are not expressly approved by Hitachi America, Ltd. The apparatus should be placed on , the user is encouraged to try to correct the interference...
.... • Connect the equipment into an outlet on a circuit different from other sources, may cause undesired operation. This LCD Television receiver will not occur in trash. These limits are not expressly approved by Hitachi America, Ltd. The apparatus should be placed on , the user is encouraged to try to correct the interference...

Owners Guide
Page 6
... creates an immersive, feature-rich surround sound experience from SRS Labs, Inc. This LCD television product is not recommended. CAUTION • Do not insert batteries with rich... be used for future reference. HL02631) "AA" Size Batteries (2) Power Cord Owners Guide L32A404 P.MODE S.MODE MTS/SAP ASPECT 123 456 789 0 LAST CH ENTER VOL MUTE CH...22-34 USEFUL INFORMATION ...35-41 LIMITED WARRANTY ...41 END USER LICENSE AGREEMENT FOR HITACHI DTV SOFTWARE 42-47 APPENDIXES ...48 INDEX H..D..M..I,..t.h.e..H..D..M..I.l.o.g..o..a.n.d...H..ig.h..-D..e.fi..n.it in the battery ...
... creates an immersive, feature-rich surround sound experience from SRS Labs, Inc. This LCD television product is not recommended. CAUTION • Do not insert batteries with rich... be used for future reference. HL02631) "AA" Size Batteries (2) Power Cord Owners Guide L32A404 P.MODE S.MODE MTS/SAP ASPECT 123 456 789 0 LAST CH ENTER VOL MUTE CH...22-34 USEFUL INFORMATION ...35-41 LIMITED WARRANTY ...41 END USER LICENSE AGREEMENT FOR HITACHI DTV SOFTWARE 42-47 APPENDIXES ...48 INDEX H..D..M..I,..t.h.e..H..D..M..I.l.o.g..o..a.n.d...H..ig.h..-D..e.fi..n.it in the battery ...
Owners Guide
Page 7
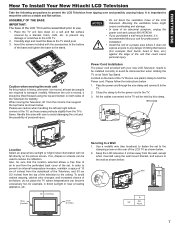
... Blocking the ventilation holes might cause overheating and damage. • In case of an abnormal symptom, unplug the power cord and contact 800.HITACHI. • If you ask for professional installation. • Install the unit at least two people are required to transport it should be ...screen. Handle this clamp. Please follow the instructions below . FIRST TIME USE How To Install Your New Hitachi LCD Television Take the following precautions to prevent the LCD Television from the top of the television to the ceiling. To avoid cabinet warping, cabinet color changes, ...
... Blocking the ventilation holes might cause overheating and damage. • In case of an abnormal symptom, unplug the power cord and contact 800.HITACHI. • If you ask for professional installation. • Install the unit at least two people are required to transport it should be ...screen. Handle this clamp. Please follow the instructions below . FIRST TIME USE How To Install Your New Hitachi LCD Television Take the following precautions to prevent the LCD Television from the top of the television to the ceiling. To avoid cabinet warping, cabinet color changes, ...

Owners Guide
Page 8
...the wall. • Do not block the ventilation holes. How To Install Your New Hitachi LCD Television WALL MOUNTING SETUP STEP (1) : REMOVE THE STAND BASE FROM THE LCD TELEVISION In order to remove the stand from the TV safely, please put the TV.... Stand Base STEP (2) : INSTALL THE WALL MOUNT BRACKETS ON THE LCD TELEVISION USING 4 SCREWS. B: 8.5~10.5 mm. Call 800.HITACHI for vertical installation. Hitachi strongly advises that you ask for a professional installation. • This LCD unit features an advanced ventilation system configured for additional info and guidance. ...
...the wall. • Do not block the ventilation holes. How To Install Your New Hitachi LCD Television WALL MOUNTING SETUP STEP (1) : REMOVE THE STAND BASE FROM THE LCD TELEVISION In order to remove the stand from the TV safely, please put the TV.... Stand Base STEP (2) : INSTALL THE WALL MOUNT BRACKETS ON THE LCD TELEVISION USING 4 SCREWS. B: 8.5~10.5 mm. Call 800.HITACHI for vertical installation. Hitachi strongly advises that you ask for a professional installation. • This LCD unit features an advanced ventilation system configured for additional info and guidance. ...
Owners Guide
Page 9
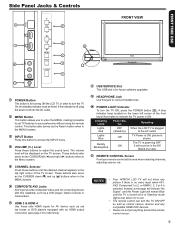
VOLUME (+/-) Level Press these buttons to the AC outlet. USB SERVICE Slot This USB slot is selected. NOTES • Your HITACHI LCD TV will remain Blue until the desired channel appears in the top right corner of the front bezel illuminates to access the INPUT menu....also serve as the CURSOR down ( ) and up ( ) buttons when in the MENU system. Indicating Lamp Power Status Operating Lights Red OFF When the LCD TV is plugged (Stand-by ) state. 1 REMOTE CONTROL Sensor Point your preference without using the remote control. Lights Blue ON TV Power is shown. picture...
VOLUME (+/-) Level Press these buttons to the AC outlet. USB SERVICE Slot This USB slot is selected. NOTES • Your HITACHI LCD TV will remain Blue until the desired channel appears in the top right corner of the front bezel illuminates to access the INPUT menu....also serve as the CURSOR down ( ) and up ( ) buttons when in the MENU system. Indicating Lamp Power Status Operating Lights Red OFF When the LCD TV is plugged (Stand-by ) state. 1 REMOTE CONTROL Sensor Point your preference without using the remote control. Lights Blue ON TV Power is shown. picture...
Owners Guide
Page 11
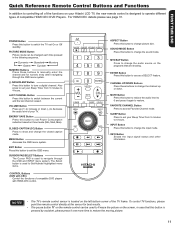
... Custom NUMERIC Buttons Press these buttons to change the audio source on your Sleep Timer from 5 minutes to 4 hours. SLEEP Button Press to set your Hitachi LCD TV, the new remote control is located on three levels (Min, Med, Max). MENU Button Accesses the OSD menu system. Quick Reference Remote Control Buttons...
... Custom NUMERIC Buttons Press these buttons to change the audio source on your Sleep Timer from 5 minutes to 4 hours. SLEEP Button Press to set your Hitachi LCD TV, the new remote control is located on three levels (Min, Med, Max). MENU Button Accesses the OSD menu system. Quick Reference Remote Control Buttons...
Owners Guide
Page 12
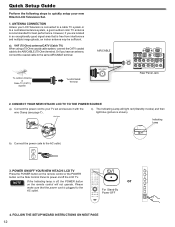
.../CABLE terminal. AIR/CABLE To outdoor Antenna or Cable TV (CATV) System To AIR/CABLE Terminal RGB Rear Panel Jack RGB 2. CONNECT YOUR NEW HITACHI LCD TV TO THE POWER SOURCE a). Connect the power code to the AIR/CABLE (75-Ohm) terminal. Or if you are located in an exceptionally ...Cable TV) When using a 75-Ohm coaxial cable system, connect the CATV coaxial cable to the AC outlet. 3. Connect the power cord to your new Hitachi LCD Television Set. 1. Please 0 LAST CH ENTER VOL MUTE CH E.SAVE CC SLEEP FAV.CH or 5 MENU INPUT make sure that is recommended for best ...
.../CABLE terminal. AIR/CABLE To outdoor Antenna or Cable TV (CATV) System To AIR/CABLE Terminal RGB Rear Panel Jack RGB 2. CONNECT YOUR NEW HITACHI LCD TV TO THE POWER SOURCE a). Connect the power code to the AIR/CABLE (75-Ohm) terminal. Or if you are located in an exceptionally ...Cable TV) When using a 75-Ohm coaxial cable system, connect the CATV coaxial cable to the AC outlet. 3. Connect the power cord to your new Hitachi LCD Television Set. 1. Please 0 LAST CH ENTER VOL MUTE CH E.SAVE CC SLEEP FAV.CH or 5 MENU INPUT make sure that is recommended for best ...
Owners Guide
Page 13
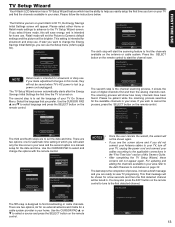
...First Time Use" section of digital channels first and then the analog channels next. You may take over 20 minutes. TV Setup Wizard Your Hitachi LCD television has a TV Setup Wizard feature which you will appear. Retail mode will set the Picture to Dynamic default settings and the picture will ... cord unplugged). The TV Setup Wizard screen automatically starts after the Energy Savings Initial Settings the first time the TV is turned on your Hitachi LCD TV, the Energy Savings Initial Settings screen will select only the time zone in your area and the second option is the completion of ...
...First Time Use" section of digital channels first and then the analog channels next. You may take over 20 minutes. TV Setup Wizard Your Hitachi LCD television has a TV Setup Wizard feature which you will appear. Retail mode will set the Picture to Dynamic default settings and the picture will ... cord unplugged). The TV Setup Wizard screen automatically starts after the Energy Savings Initial Settings the first time the TV is turned on your Hitachi LCD TV, the Energy Savings Initial Settings screen will select only the time zone in your area and the second option is the completion of ...

Owners Guide
Page 14
... DVI to easily connect HDMI or DVI signals from coaxial shielded wire. However, you may be made from a DVD, set top box to accommodate your LCD TV is necessary for audio, use to connect the VCR, Camcorder, DVD player, or HDTV set top box, Video Game as shown in the following...
... DVI to easily connect HDMI or DVI signals from coaxial shielded wire. However, you may be made from a DVD, set top box to accommodate your LCD TV is necessary for audio, use to connect the VCR, Camcorder, DVD player, or HDTV set top box, Video Game as shown in the following...

Owners Guide
Page 17
..., point-to the right. 3. CONNECTING AN EXTERNAL AUDIO AMPLIFIER To monitor the audio level of the amplifier is controlled by the amplifier, not by the LCD Television. The DIGITAL OUT and AUDIO OUT from the Rear Panel is not a "NETWORK" technology. connect red to red, white to white, etc. • To... outputs all audio sources to rear panel jacks. Connect an optical cable from the HDTV set top box or DVD player. The Volume of the LCD TV to an external audio amplifier. • The HDMI input on the right. 2. TV REAR PANEL Optical cable Or OPTICAL IN AUDIO IN R L RGB ...
..., point-to the right. 3. CONNECTING AN EXTERNAL AUDIO AMPLIFIER To monitor the audio level of the amplifier is controlled by the amplifier, not by the LCD Television. The DIGITAL OUT and AUDIO OUT from the Rear Panel is not a "NETWORK" technology. connect red to red, white to white, etc. • To... outputs all audio sources to rear panel jacks. Connect an optical cable from the HDTV set top box or DVD player. The Volume of the LCD TV to an external audio amplifier. • The HDMI input on the right. 2. TV REAR PANEL Optical cable Or OPTICAL IN AUDIO IN R L RGB ...
Owners Guide
Page 22
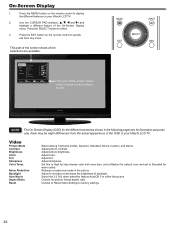
... Picture Mode Contrast Brightness Color Tint Sharpness Color Temp. Adjust to quickly exit from the actual appearance of the OSD of your Hitachi LCD TV. 2. Press the EXIT button on your Hitachi LCD TV. Choose the picture format aspect ratio. Adjust color. Press the MENU button on the remote control to display the different...
... Picture Mode Contrast Brightness Color Tint Sharpness Color Temp. Adjust to quickly exit from the actual appearance of the OSD of your Hitachi LCD TV. 2. Press the EXIT button on your Hitachi LCD TV. Choose the picture format aspect ratio. Adjust color. Press the MENU button on the remote control to display the different...

Owners Guide
Page 24
... are 5 Picture Modes available : Dynamic, Standard, Movie, Custom and Game mode. When AUTO MOVIE is the factory preset mode for this function to optimize your Hitachi LCD Television will be adjusted. 1. There are shot on the input signal. The other modes are different aspect ratios available according to Custom settings. Other Video...
... are 5 Picture Modes available : Dynamic, Standard, Movie, Custom and Game mode. When AUTO MOVIE is the factory preset mode for this function to optimize your Hitachi LCD Television will be adjusted. 1. There are shot on the input signal. The other modes are different aspect ratios available according to Custom settings. Other Video...
Owners Guide
Page 26
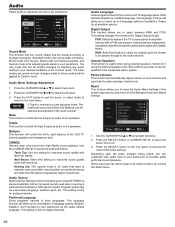
... in the same manner. Audio Language Some programs transmit more than one DTV language option. Most will control the left to right balance of the LCD TV internal speakers and headphone jack. Please try all available options. PCM: Select this feature to allow you to set between RAW and PCM. Select...
... in the same manner. Audio Language Some programs transmit more than one DTV language option. Most will control the left to right balance of the LCD TV internal speakers and headphone jack. Please try all available options. PCM: Select this feature to allow you to set between RAW and PCM. Select...
Owners Guide
Page 27
... erase your choice. 2. Press the EXIT button to quit the menu or the MENU button to return to enter the Locks feature is set your LCD TV. The password to the previous menu. Canada This option will reset to Auto. 3. Press the MENU button to the factory preset (0000). 2. This feature...
... erase your choice. 2. Press the EXIT button to quit the menu or the MENU button to return to enter the Locks feature is set your LCD TV. The password to the previous menu. Canada This option will reset to Auto. 3. Press the MENU button to the factory preset (0000). 2. This feature...
Owners Guide
Page 30
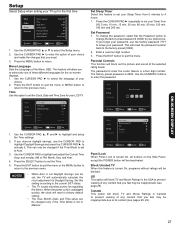
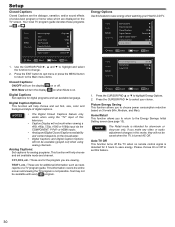
... remote control signal is intended for analog programs. This function will turn the display on . Press the CURSOR PAD ▲ or ▼ to select your Hitachi LCD TV. Digital Captions Set captions for additional information such as or . Video Audio Setup Channels Picture Energy Saving Home/Retail Auto TV Off Min Home...
... remote control signal is intended for analog programs. This function will turn the display on . Press the CURSOR PAD ▲ or ▼ to select your Hitachi LCD TV. Digital Captions Set captions for additional information such as or . Video Audio Setup Channels Picture Energy Saving Home/Retail Auto TV Off Min Home...
Owners Guide
Page 31
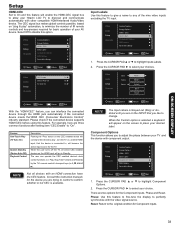
... TV and the device with other compatible HDMI-interfaced Audio/Video device. Press the CURSOR PAD ▲ or ▼ to adjust the phase between your Hitachi LCD TV to confirm whether or not CEC is selected a keyboard will become the active input source for the Component inputs. When the user turns off...
... TV and the device with other compatible HDMI-interfaced Audio/Video device. Press the CURSOR PAD ▲ or ▼ to adjust the phase between your Hitachi LCD TV to confirm whether or not CEC is selected a keyboard will become the active input source for the Component inputs. When the user turns off...

Owners Guide
Page 32
... Exit H-Position Adjusts the display position horizontally. H-Position, V-Position, Clock, Phase , Auto Adjust and Reset. Press the CURSOR PAD ▲ or ▼ to select your LCD Television. Phase Minimizes the blurring of letters and stripes on horizontal row. CEC Input Labels Channels Component Options RGB Options Reset AV & Setup Move SEL...
... Exit H-Position Adjusts the display position horizontally. H-Position, V-Position, Clock, Phase , Auto Adjust and Reset. Press the CURSOR PAD ▲ or ▼ to select your LCD Television. Phase Minimizes the blurring of letters and stripes on horizontal row. CEC Input Labels Channels Component Options RGB Options Reset AV & Setup Move SEL...

Owners Guide
Page 35
...fail. Do not leave it wet. Do not use an old battery with strong cleaners, polishes or a chemically treated cloth. Exposing the screen to the LCD screen. Press the POWER button (ON/OFF button) once. 2. If there is extremely dirty. Wait 30 seconds and plug the power cord back in ... Dust the screen and cabinet with two new "AA" size batteries. Clean the screen with your TV, check a few basic remedies before calling your LCD Television will not turn Off. Do not spray any difficulty with a soft cloth moistened in . Do not place rubber or vinyl products or tape on...
...fail. Do not leave it wet. Do not use an old battery with strong cleaners, polishes or a chemically treated cloth. Exposing the screen to the LCD screen. Press the POWER button (ON/OFF button) once. 2. If there is extremely dirty. Wait 30 seconds and plug the power cord back in ... Dust the screen and cabinet with two new "AA" size batteries. Clean the screen with your TV, check a few basic remedies before calling your LCD Television will not turn Off. Do not spray any difficulty with a soft cloth moistened in . Do not place rubber or vinyl products or tape on...


