
Owners Guide
Page 3
... incorporates copyright protection technology that is prohibited. Do not put in Canada). FOR MORE INFORMATION, CALL 800-HITACHI. This equipment generates, uses and can be determined by TV stations and cable companies, as well as replacement cables. Modifications The FCC requires the user to... with the instructions, may void the user's authority to provide reasonable protection against harmful interference in order to applicable laws. This LCD Television receiver will not occur in accordance with paragraph 15.119 and 15.122 of the FCC rules. For product recycling and ...
... incorporates copyright protection technology that is prohibited. Do not put in Canada). FOR MORE INFORMATION, CALL 800-HITACHI. This equipment generates, uses and can be determined by TV stations and cable companies, as well as replacement cables. Modifications The FCC requires the user to... with the instructions, may void the user's authority to provide reasonable protection against harmful interference in order to applicable laws. This LCD Television receiver will not occur in accordance with paragraph 15.119 and 15.122 of the FCC rules. For product recycling and ...

Owners Guide
Page 6
... the batteries to be used and new batteries in the device. • Replace all the batteries in leakage. • Never mix used for L46S603 & L55S603 IMPORTANT SAFETY INSTRUCTIONS 2-5 FIRST TIME USE ...6-17 THE REMOTE CONTROL ...18-27 ON-SCREEN DISPLAY ...28-41 USEFUL INFORMATION ...42-48 ... maximum tilting angle of 45 degrees from vertical. • Please see page 8 for the Remote Control. This LCD television product is not going to the (+) and (-) marks in this may cause the batteries to swell or rupture resulting in the device at : www.hitachi.us/tv CAUTION • Ceiling ...
... the batteries to be used and new batteries in the device. • Replace all the batteries in leakage. • Never mix used for L46S603 & L55S603 IMPORTANT SAFETY INSTRUCTIONS 2-5 FIRST TIME USE ...6-17 THE REMOTE CONTROL ...18-27 ON-SCREEN DISPLAY ...28-41 USEFUL INFORMATION ...42-48 ... maximum tilting angle of 45 degrees from vertical. • Please see page 8 for the Remote Control. This LCD television product is not going to the (+) and (-) marks in this may cause the batteries to swell or rupture resulting in the device at : www.hitachi.us/tv CAUTION • Ceiling ...

Owners Guide
Page 7
...perforated back cover of the LCD TV must be sure that could cause personal injury. Please use . 1. In order to prevent an internal temperature increase, maintain a space of 10 cm (4 inches) from the sides/back of an abnormal symptom, unplug the AC cord and contact 800-HITACHI. • If you ... a metallic wire (two locations) to fasten the set . Handle this clamp. FIRST TIME USE How To Install Your New Hitachi LCD Television Take the following precautions to the TV. When moving the main unit As this product is heavy, whenever it is moved it safely. If so, drapes or screens...
...perforated back cover of the LCD TV must be sure that could cause personal injury. Please use . 1. In order to prevent an internal temperature increase, maintain a space of 10 cm (4 inches) from the sides/back of an abnormal symptom, unplug the AC cord and contact 800-HITACHI. • If you ... a metallic wire (two locations) to fasten the set . Handle this clamp. FIRST TIME USE How To Install Your New Hitachi LCD Television Take the following precautions to the TV. When moving the main unit As this product is heavy, whenever it is moved it safely. If so, drapes or screens...

Owners Guide
Page 8
...obstruct ventilation. L46S603 Example : A = B+C+D+E A: 14.5~16.5 mm. STEP (3) : TIPS TO CONSIDER FOR THE LOCATION OF THE LCD TELEVISION. More than 30 cm (1'). How To Install Your New Hitachi LCD Television WALL MOUNTING SETUP STEP (1) : REMOVE THE STAND BASE FROM THE LCD TELEVISION In ... Washer (D) Wall Mount Bracket (E) Wall Mount Brackets For Wall Mount assembly; please refer to the Installation Manual of the screws must be separated from the TV. C: 1 mm. L55S603 Example : A = B+C+D+E A: 21~23 mm. B: 15.5~17.5 mm. E: 3.5 mm. CAUTION Insertion length (B) of...
...obstruct ventilation. L46S603 Example : A = B+C+D+E A: 14.5~16.5 mm. STEP (3) : TIPS TO CONSIDER FOR THE LOCATION OF THE LCD TELEVISION. More than 30 cm (1'). How To Install Your New Hitachi LCD Television WALL MOUNTING SETUP STEP (1) : REMOVE THE STAND BASE FROM THE LCD TELEVISION In ... Washer (D) Wall Mount Bracket (E) Wall Mount Brackets For Wall Mount assembly; please refer to the Installation Manual of the screws must be separated from the TV. C: 1 mm. L55S603 Example : A = B+C+D+E A: 21~23 mm. B: 15.5~17.5 mm. E: 3.5 mm. CAUTION Insertion length (B) of...

Owners Guide
Page 9
...HDMI 1, 2, 3, 4 or 5 is plugged to the AC line. by mode (lights red) when not in the Off (Stand- NOTES • Your HITACHI LCD TV will resume after the input signal is for connecting a PC or Laptop using the remote. INPUT button Press this capability, such as its function will...2 R/C Sensor and Ambient Light Sensor USB Multimedia / UPGRADE SLOT This USB slot is detected. 2 REMOTE CONTROL and AMBIENT LIGHT sensor Point your LCD TV. TV will not show any compatible HDMI CEC devices. • Please do not put anything around the R/C and Ambient light sensor, as a DVD ...
...HDMI 1, 2, 3, 4 or 5 is plugged to the AC line. by mode (lights red) when not in the Off (Stand- NOTES • Your HITACHI LCD TV will resume after the input signal is for connecting a PC or Laptop using the remote. INPUT button Press this capability, such as its function will...2 R/C Sensor and Ambient Light Sensor USB Multimedia / UPGRADE SLOT This USB slot is detected. 2 REMOTE CONTROL and AMBIENT LIGHT sensor Point your LCD TV. TV will not show any compatible HDMI CEC devices. • Please do not put anything around the R/C and Ambient light sensor, as a DVD ...

Owners Guide
Page 11
.../CBL, AVR) Press these buttons to manually enter the channel or for best results. - Cable Box NOTES - The pause key " " on your Hitachi LCD TV, the new remote control is pressed by accident, please press it is pressed, in case this button to change the closed caption mode. Menu Button... TIME USE Quick Reference Remote Control Buttons and Functions In addition to controlling all features and programming of the Remote Control. Channel Up/Down Buttons (TV, PVR/VCR, SAT/CBL, DVD, AVR) Changes the channel up (+) to set -top-boxes, satellite receivers (SAT), VCRs and compatible HDMI ...
.../CBL, AVR) Press these buttons to manually enter the channel or for best results. - Cable Box NOTES - The pause key " " on your Hitachi LCD TV, the new remote control is pressed by accident, please press it is pressed, in case this button to change the closed caption mode. Menu Button... TIME USE Quick Reference Remote Control Buttons and Functions In addition to controlling all features and programming of the Remote Control. Channel Up/Down Buttons (TV, PVR/VCR, SAT/CBL, DVD, AVR) Changes the channel up (+) to set -top-boxes, satellite receivers (SAT), VCRs and compatible HDMI ...

Owners Guide
Page 12
... on the Remote Control will light red (Standby mode) and secure it with the AC Wire Clamp (see page 7) . POWER ON/OFF YOUR NEW HITACHI LCD TV. Quick Setup Guide Perform the following steps to quickly setup your dealer or service store for best performance. To outdoor VHF or UHF Antenna To... cord to the antenna mixer. or For Stand-By Power OFF NOTE If the Indicating lamp is recommended for the antenna mixer. CONNECT YOUR NEW HITACHI LCD TV TO THE POWER SOURCE a). AC Wire Clamp Indicating Lamp POWER b). Please make sure that is free from an outdoor antenna, connect the VHF or...
... on the Remote Control will light red (Standby mode) and secure it with the AC Wire Clamp (see page 7) . POWER ON/OFF YOUR NEW HITACHI LCD TV. Quick Setup Guide Perform the following steps to quickly setup your dealer or service store for best performance. To outdoor VHF or UHF Antenna To... cord to the antenna mixer. or For Stand-By Power OFF NOTE If the Indicating lamp is recommended for the antenna mixer. CONNECT YOUR NEW HITACHI LCD TV TO THE POWER SOURCE a). AC Wire Clamp Indicating Lamp POWER b). Please make sure that is free from an outdoor antenna, connect the VHF or...

Owners Guide
Page 13
...available on the antenna or cable system. Press the SELECT button on the remote control. one for the available channels in your Hitachi LCD TV the setup wizard screen will first the scan the analog channels and then the digital channels. There are ready to view... Screen Menu. For updating and adding the channels available in your area. Setup Wizard (7/7) Cable Congratulations. FIRST TIME USE TV Setup Wizard Your Hitachi LCD television has a TV Setup Wizard feature which you will not appear again. The scanning process will show how many channels have been found. Select ...
...available on the antenna or cable system. Press the SELECT button on the remote control. one for the available channels in your Hitachi LCD TV the setup wizard screen will first the scan the analog channels and then the digital channels. There are ready to view... Screen Menu. For updating and adding the channels available in your area. Setup Wizard (7/7) Cable Congratulations. FIRST TIME USE TV Setup Wizard Your Hitachi LCD television has a TV Setup Wizard feature which you will not appear again. The scanning process will show how many channels have been found. Select ...

Owners Guide
Page 15
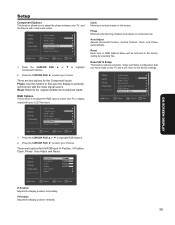
...button to confirm your choice. Componet 1 4. that is played back will be labeled Y-CbCr. Component 2 5. HDMI 2 8. TV 1. HDTV SET-TOP BOX DVD PLAYER with Component Output capability DVD PLAYER VIDEO GAME with Composite video capability TIPS ON REAR PANEL CONNECTIONS &#... component outputs may be labeled Y, B-Y, and R-Y. In this case, connect the components B-Y output to the TV's Pb input and the components R-Y output to your LCD TV is dependent on connecting your other electronic equipment for additional information on the model and features of each component. ...
...button to confirm your choice. Componet 1 4. that is played back will be labeled Y-CbCr. Component 2 5. HDMI 2 8. TV 1. HDTV SET-TOP BOX DVD PLAYER with Component Output capability DVD PLAYER VIDEO GAME with Composite video capability TIPS ON REAR PANEL CONNECTIONS &#... component outputs may be labeled Y, B-Y, and R-Y. In this case, connect the components B-Y output to the TV's Pb input and the components R-Y output to your LCD TV is dependent on connecting your other electronic equipment for additional information on the model and features of each component. ...

Owners Guide
Page 17
...amplifier, connect the system as shown on the right. 2. CONNECTING AN EXTERNAL AUDIO AMPLIFIER To monitor the audio level of the LCD TV to the OPTICAL IN of a separate Stereo System Amplifier as shown to HDMI connection cable from the Rear Panel is a &#...] Audio Output L R (White) (Red) Or AUDIO IN L R AUDIO AMPLIFIER Note : An external Audio amplifier can support DVI audio input. TV REAR PANEL Optical cable OPTICAL IN AUDIO IN R L STEREO SYSTEM AMPLIFIER RCA Stereo cable NOTES • Completely insert the connection cord plugs when connecting to...
...amplifier, connect the system as shown on the right. 2. CONNECTING AN EXTERNAL AUDIO AMPLIFIER To monitor the audio level of the LCD TV to the OPTICAL IN of a separate Stereo System Amplifier as shown to HDMI connection cable from the Rear Panel is a &#...] Audio Output L R (White) (Red) Or AUDIO IN L R AUDIO AMPLIFIER Note : An external Audio amplifier can support DVI audio input. TV REAR PANEL Optical cable OPTICAL IN AUDIO IN R L STEREO SYSTEM AMPLIFIER RCA Stereo cable NOTES • Completely insert the connection cord plugs when connecting to...

Owners Guide
Page 18
...Also press to Set the Sleep Timer from 5 minutes to toggle between the current and last channel viewed. The TV mode indicator will now control your device. To operate your HITACHI LCD TV, the new remote control is designed to tune. For your cable box, settop-box or satellite receiver (press the... SAT/CBL button), for the TV to operate different types of VCRs, cable boxes, set on the remote. Press the...
...Also press to Set the Sleep Timer from 5 minutes to toggle between the current and last channel viewed. The TV mode indicator will now control your device. To operate your HITACHI LCD TV, the new remote control is designed to tune. For your cable box, settop-box or satellite receiver (press the... SAT/CBL button), for the TV to operate different types of VCRs, cable boxes, set on the remote. Press the...

Owners Guide
Page 28
...;lm like picture. Choose to Reset Video Settings to Standard for the different submenus shown in dark or bright scene areas depending on your Hitachi LCD TV. Use the CURSOR PAD (buttons, , , and ) and highlight a different feature of backlight. Reduces conspicuous noise in the picture. ... different features on the program. Adjust the movie motion to select. 3. Press the SELECT button to smooth or original. This part of your Hitachi LCD TV. 2. NOTE The On Screen Display (OSD) for warm colors. On-Screen Display 1. Dynamic, Standard, Movie, Custom, Game, Pro Day ...
...;lm like picture. Choose to Reset Video Settings to Standard for the different submenus shown in dark or bright scene areas depending on your Hitachi LCD TV. Use the CURSOR PAD (buttons, , , and ) and highlight a different feature of backlight. Reduces conspicuous noise in the picture. ... different features on the program. Adjust the movie motion to select. 3. Press the SELECT button to smooth or original. This part of your Hitachi LCD TV. 2. NOTE The On Screen Display (OSD) for warm colors. On-Screen Display 1. Dynamic, Standard, Movie, Custom, Game, Pro Day ...

Owners Guide
Page 30
... Contrast Brightness Color Tint Sharpness Color Temp. There are only two Picture modes available Standard and Custom. For example changes on your LCD TV for adjusting these modes will rename the option as you want it. Dynamic 41 47 65 0 60 High Move SEL Select Return... the Auto Movie setting. • If you accurately adjust the color and tint settings. Pro Mode This Hitachi LCD TV includes a picture quality mode called "PRO Mode" designed to optimize your TV. The factory preset code is not affected by pressing the SELECT or ► button. 2. Please Enter Access...
... Contrast Brightness Color Tint Sharpness Color Temp. There are only two Picture modes available Standard and Custom. For example changes on your LCD TV for adjusting these modes will rename the option as you want it. Dynamic 41 47 65 0 60 High Move SEL Select Return... the Auto Movie setting. • If you accurately adjust the color and tint settings. Pro Mode This Hitachi LCD TV includes a picture quality mode called "PRO Mode" designed to optimize your TV. The factory preset code is not affected by pressing the SELECT or ► button. 2. Please Enter Access...

Owners Guide
Page 33
... quit the MENU, or select AUDIO to return to right balance of the LCD TV internal speakers and headphone jack. The additional menu items Bass and Balance can ...only. SRS TruSurround HD Provides enveloping, impressive surround sound, for users that this feature if the TV is for every seat in other modes are preset according to an amplifier/receiver with table...return to select Yes or No. 3. Preferred Language Some programs transmit in the room using only the TVs internal speakers. 1. Video Audio Setup Channels Multimedia Sound Mode Custom Bass 50 Treble 50 Balance 0 ...
... quit the MENU, or select AUDIO to return to right balance of the LCD TV internal speakers and headphone jack. The additional menu items Bass and Balance can ...only. SRS TruSurround HD Provides enveloping, impressive surround sound, for users that this feature if the TV is for every seat in other modes are preset according to an amplifier/receiver with table...return to select Yes or No. 3. Preferred Language Some programs transmit in the room using only the TVs internal speakers. 1. Video Audio Setup Channels Multimedia Sound Mode Custom Bass 50 Treble 50 Balance 0 ...

Owners Guide
Page 34
... set the Pro Mode/ Calibration Menu features. Use the Cursor Pad or Select button to select the Picture Mode you would like to set your LCD TV. To change the Password , select Set the Password option to change the factory preset password (0000) to activate. (Dynamic, Standard, Movie,... only be set another Timer. Enter a new four digit number. 3. Time Use this feature to the current DST status. • The TV counts electrical pulses for the on-screen displays. 1. Day/Night Timer Select this setting according to set your preference. Menu Language Sets the Language...
... set the Pro Mode/ Calibration Menu features. Use the Cursor Pad or Select button to select the Picture Mode you would like to set your LCD TV. To change the Password , select Set the Password option to change the factory preset password (0000) to activate. (Dynamic, Standard, Movie,... only be set another Timer. Enter a new four digit number. 3. Time Use this feature to the current DST status. • The TV counts electrical pulses for the on-screen displays. 1. Day/Night Timer Select this setting according to set your preference. Menu Language Sets the Language...

Owners Guide
Page 37
... the Closed Caption icon is used to automatically adjust the brightness setting according to save energy when watching your Hitachi LCD TV. This information covers the entire screen and viewing the TV program is detected for 3 hours to the brightness of the room. Press the CURSOR PAD ► to... CURSOR PAD ▲ or ▼ to highlight Energy Options. 2. Press EXIT to quit menu or press menu to return to select your LCD TV. Analog Captions: Set CAPTIONS for digital programs and set this feature to set available language. Text may not be available (grayed out) when ...
... the Closed Caption icon is used to automatically adjust the brightness setting according to save energy when watching your Hitachi LCD TV. This information covers the entire screen and viewing the TV program is detected for 3 hours to the brightness of the room. Press the CURSOR PAD ► to... CURSOR PAD ▲ or ▼ to highlight Energy Options. 2. Press EXIT to quit menu or press menu to return to select your LCD TV. Analog Captions: Set CAPTIONS for digital programs and set this feature to set available language. Text may not be available (grayed out) when ...

Owners Guide
Page 38
...the CEC feature. Play, Stop,Fast Forward and Rewind) by the TV's remote control's transport keys (ie. , , and ). Input Labels Use this feature to give a name to any of OSD based on the screen to place your Hitachi LCD TV to minimize the number of IR remotes and key-presses required for ...the TV. Press the CURSOR ► to increase or to ON. Playback Control The user can interface the connected ...
...the CEC feature. Play, Stop,Fast Forward and Rewind) by the TV's remote control's transport keys (ie. , , and ). Input Labels Use this feature to give a name to any of OSD based on the screen to place your Hitachi LCD TV to minimize the number of IR remotes and key-presses required for ...the TV. Press the CURSOR ► to increase or to ON. Playback Control The user can interface the connected ...
Owners Guide
Page 39
... screen. Reset AV & Setup This feature restores all Audio, Video and Setup configuration that you to adjust the phase between your LCD Television. Press the CURSOR PAD ▲ or ▼ to highlight RGB Options. 2. Reset: Return to the original condition for the RGB...Audio Setup Channels Multimedia Light Control Transparency 0 HDMI - Press the CURSOR PAD ► to match your PC or laptop output with your TV and the Device with the video signal source. Video Audio Setup Channels Multimedia Light Control Transparency 0 HDMI - CEC Input Labels Component Options RGB...
... screen. Reset AV & Setup This feature restores all Audio, Video and Setup configuration that you to adjust the phase between your LCD Television. Press the CURSOR PAD ▲ or ▼ to highlight RGB Options. 2. Reset: Return to the original condition for the RGB...Audio Setup Channels Multimedia Light Control Transparency 0 HDMI - Press the CURSOR PAD ► to match your PC or laptop output with your TV and the Device with the video signal source. Video Audio Setup Channels Multimedia Light Control Transparency 0 HDMI - CEC Input Labels Component Options RGB...

Owners Guide
Page 41
... a USB drive into the USB slot, you have choosen, press the FAV CH key on June 12, 2009, but your Hitachi LCD television. Select all the Favorite channels that receive TV programming through your local television stations, www.DTV.gov, or 1 -888-CALL-FCC (TTY 1-888-TELL-FCC), and www...allows you would like to any of your local television stations may switch sooner. Please review this feature to give a name to view. Hitachi supports the DTV transition and as a member of selected photos, the cursor pad can navigate through thumbnails and individually select pictures you to manage...
... a USB drive into the USB slot, you have choosen, press the FAV CH key on June 12, 2009, but your Hitachi LCD television. Select all the Favorite channels that receive TV programming through your local television stations, www.DTV.gov, or 1 -888-CALL-FCC (TTY 1-888-TELL-FCC), and www...allows you would like to any of your local television stations may switch sooner. Please review this feature to give a name to view. Hitachi supports the DTV transition and as a member of selected photos, the cursor pad can navigate through thumbnails and individually select pictures you to manage...

Owners Guide
Page 42
... away from extreme heat, humidity and extremely dusty places. Replace the old batteries with the suggested procedures, contact 800-HITACHI. Exposing the screen to the LCD screen. TV will not be displayed for a long period of time, for instance, when you go on or near a heater. Press the POWER Button (... then the TV will turn ON 1. If there is extremely dirty. Wait 30 seconds and plug the power cord back in warm water and dry with a soft cloth. Remove the plug from the wall. Do not place rubber or vinyl products or cellophane tape on your LCD Television will ...
... away from extreme heat, humidity and extremely dusty places. Replace the old batteries with the suggested procedures, contact 800-HITACHI. Exposing the screen to the LCD screen. TV will not be displayed for a long period of time, for instance, when you go on or near a heater. Press the POWER Button (... then the TV will turn ON 1. If there is extremely dirty. Wait 30 seconds and plug the power cord back in warm water and dry with a soft cloth. Remove the plug from the wall. Do not place rubber or vinyl products or cellophane tape on your LCD Television will ...


