Owners Guide
Page 2
... your safety. Install in the instructions, as radiators, heat registers, stoves, or other . Do not defeat the safety purpose of Hitachi LCD televisions. Unplug this section illustrates safety tips which could void the user's warranty. 2 To help you to provide some protection against ... the product's enclosure that are designed to qualified service personnel. This television's factory default settings as practical. If the television does not operate properly, unplug the LCD television and call the CATV system installer's attention to Article 820-44 of the NEC that...
... your safety. Install in the instructions, as radiators, heat registers, stoves, or other . Do not defeat the safety purpose of Hitachi LCD televisions. Unplug this section illustrates safety tips which could void the user's warranty. 2 To help you to provide some protection against ... the product's enclosure that are designed to qualified service personnel. This television's factory default settings as practical. If the television does not operate properly, unplug the LCD television and call the CATV system installer's attention to Article 820-44 of the NEC that...

Owners Guide
Page 4
..., especially on furniture that can easily be used as steps, such as UL, CSA, ETL). • Follow all enclosed instructions for installation. HITACHI CARES! • The consumer electronics industry is a growing trend and larger flat displays are mounting the display is appropriate. If you have... panel display. Some wall mounts are required for proper use of two people are not designed to be mounted to walls with furniture and television sets. • Don't place flat panel displays on a "larger than life" flat panel display. • Carefully read and ...
..., especially on furniture that can easily be used as steps, such as UL, CSA, ETL). • Follow all enclosed instructions for installation. HITACHI CARES! • The consumer electronics industry is a growing trend and larger flat displays are mounting the display is appropriate. If you have... panel display. Some wall mounts are required for proper use of two people are not designed to be mounted to walls with furniture and television sets. • Don't place flat panel displays on a "larger than life" flat panel display. • Carefully read and ...

Owners Guide
Page 7
... symptom, unplug the AC cord and contact 800-HITACHI. • If you purchased a wall mount bracket, please ask for stability. Do not try to install by this area with care to the LCD TV. 2. Keep the LCD television 4 inches away from the TV's frame. Whenever the unit is moved, at ...set failure, do not place the TV where temperatures can be lifted forward using the wall mount bracket, and secure to the TV. Insert the screws included with your new LCD Television needs to be assembled prior to hold the Power cord. FIRST TIME USE How To Install Your New Hitachi LCD...
... symptom, unplug the AC cord and contact 800-HITACHI. • If you purchased a wall mount bracket, please ask for stability. Do not try to install by this area with care to the LCD TV. 2. Keep the LCD television 4 inches away from the TV's frame. Whenever the unit is moved, at ...set failure, do not place the TV where temperatures can be lifted forward using the wall mount bracket, and secure to the TV. Insert the screws included with your new LCD Television needs to be assembled prior to hold the Power cord. FIRST TIME USE How To Install Your New Hitachi LCD...

Owners Guide
Page 8
How To Install Your New Hitachi LCD Television WALL MOUNTING SETUP STEP (1) : REMOVE THE STAND BASE FROM THE LCD TELEVISION In order to remove the stand from the TV, please put the TV set on a soft and flat surface (blanket, foam, cloth, etc.) to obstruct ventilation. Useful dimensions for a professional ...specifically inform the technician of the screws must be (i) within 9.5~11.5 mm for L46S603, or (ii) within 15.5~17.5 mm for use or compatibility with this LCD Display Panel can be performed only by a qualified and experienced television installation technician who...
How To Install Your New Hitachi LCD Television WALL MOUNTING SETUP STEP (1) : REMOVE THE STAND BASE FROM THE LCD TELEVISION In order to remove the stand from the TV, please put the TV set on a soft and flat surface (blanket, foam, cloth, etc.) to obstruct ventilation. Useful dimensions for a professional ...specifically inform the technician of the screws must be (i) within 9.5~11.5 mm for L46S603, or (ii) within 15.5~17.5 mm for use or compatibility with this LCD Display Panel can be performed only by a qualified and experienced television installation technician who...

Owners Guide
Page 9
MENU button This button allows you to enter the MENU, making it possible to set TV features to turn the TV ON/OFF as well as Set-Top-Boxes or DVD players equipped with an HDMI output connection (see page 55 for compatible resolutions. 2 R/C Sensor and Ambient Light Sensor USB ...These buttons also serve as the Return button when in the MENU system. Please see page 14 for Picture Energy POWER Saving. TV Power is shown. NOTES • Your HITACHI LCD TV will not show any compatible HDMI CEC devices. • Please do not put anything around the R/C and Ambient light sensor, ...
MENU button This button allows you to enter the MENU, making it possible to set TV features to turn the TV ON/OFF as well as Set-Top-Boxes or DVD players equipped with an HDMI output connection (see page 55 for compatible resolutions. 2 R/C Sensor and Ambient Light Sensor USB ...These buttons also serve as the Return button when in the MENU system. Please see page 14 for Picture Energy POWER Saving. TV Power is shown. NOTES • Your HITACHI LCD TV will not show any compatible HDMI CEC devices. • Please do not put anything around the R/C and Ambient light sensor, ...

Owners Guide
Page 10
...digital format, HDMI assures that is RAW and PCM compatible, such as a DVD player or Set Top Box. Because digital television (DTV) signals remain in a single cable. A DVI (source) to HDMI (TV) connection must be made to the TV's Pr input. • Your component outputs may be labeled Y-CbCr. NOTE • It... Camcorders. In this case, connect the component Cb output to the TV's Pb input and the component Cr output to the TV's Pr input. • It may be necessary to adjust TINT to your AV equipment such as Set-Top-Boxes or DVD players equipped with this capability, such as an...
...digital format, HDMI assures that is RAW and PCM compatible, such as a DVD player or Set Top Box. Because digital television (DTV) signals remain in a single cable. A DVI (source) to HDMI (TV) connection must be made to the TV's Pr input. • Your component outputs may be labeled Y-CbCr. NOTE • It... Camcorders. In this case, connect the component Cb output to the TV's Pb input and the component Cr output to the TV's Pr input. • It may be necessary to adjust TINT to your AV equipment such as Set-Top-Boxes or DVD players equipped with this capability, such as an...

Owners Guide
Page 11
...the OSD menu. Also Control the functions of the Remote Control. Info Button (TV, DVD, SAT/CBL, PVR/VCR) Shows the input signal status and other devices. Aspect (TV) Press this button to set -top-boxes, satellite receivers (SAT), VCRs and compatible HDMI CEC DVD Players....control. Digital Video Disc Player AVR - Personal Video Recorder CBL - Cable Box NOTES - The pause key " " on your Hitachi LCD TV, the new remote control is used to Set/Activate highlighted menu items. Input (TV, AVR) Press this button to access the program guide of other information.
...the OSD menu. Also Control the functions of the Remote Control. Info Button (TV, DVD, SAT/CBL, PVR/VCR) Shows the input signal status and other devices. Aspect (TV) Press this button to set -top-boxes, satellite receivers (SAT), VCRs and compatible HDMI CEC DVD Players....control. Digital Video Disc Player AVR - Personal Video Recorder CBL - Cable Box NOTES - The pause key " " on your Hitachi LCD TV, the new remote control is used to Set/Activate highlighted menu items. Input (TV, AVR) Press this button to access the program guide of other information.

Owners Guide
Page 12
.../CABLE (75-Ohm) terminal. Plug the adapter into the antenna terminal on /off the LCD TV. Consult your TV set and c). Connect the power cord to your dealer or service store for best performance. POWER ON/OFF YOUR NEW HITACHI LCD TV. or For Stand-By Power OFF NOTE If the Indicating lamp is plugged to the...
.../CABLE (75-Ohm) terminal. Plug the adapter into the antenna terminal on /off the LCD TV. Consult your TV set and c). Connect the power cord to your dealer or service store for best performance. POWER ON/OFF YOUR NEW HITACHI LCD TV. or For Stand-By Power OFF NOTE If the Indicating lamp is plugged to the...

Owners Guide
Page 13
...Please select Time Zone ... The scanning process will appear. The last step is to set time mode ... This final message will be shown for automatic time setting in your area. Setup Wizard (2/7) Please set the language of process, it shows a brief message and you prefer. Please be ... button on the remote control. There are two options, Air for an external antenna and Cable for the available channels in your Hitachi LCD TV the setup wizard screen will show how many channels have been found. Previous Navigate Cancel SEL Select EXIT Exit 13 Navigate SEL Select...
...Please select Time Zone ... The scanning process will appear. The last step is to set time mode ... This final message will be shown for automatic time setting in your area. Setup Wizard (2/7) Please set the language of process, it shows a brief message and you prefer. Please be ... button on the remote control. There are two options, Air for an external antenna and Cable for the available channels in your Hitachi LCD TV the setup wizard screen will show how many channels have been found. Previous Navigate Cancel SEL Select EXIT Exit 13 Navigate SEL Select...
Owners Guide
Page 14
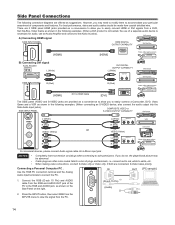
...Home video game system B) Connecting DVI signal Audio Amplifier AUDIO IN L R L (White) DVI DIGITAL OUTPUT CAPABILITY L (White) OUTPUT L R DVD player Set-Top Box SIDE INPUT PANEL R (Red) [HDMI] DVI to HDMI Cable R (Red) [DVI] DIGITAL OUTPUT Home video game system The SIDE panel VIDEO and S-...For monaural devices, please connect Audio signal cable into the Side Audio Input jacks). If you to view the signal from a DVD, Set-Top-Box, Video Game as suggestions. If both are often color-coded. Side Panel Connections The following connection diagrams are offered as ...
...Home video game system B) Connecting DVI signal Audio Amplifier AUDIO IN L R L (White) DVI DIGITAL OUTPUT CAPABILITY L (White) OUTPUT L R DVD player Set-Top Box SIDE INPUT PANEL R (Red) [HDMI] DVI to HDMI Cable R (Red) [DVI] DIGITAL OUTPUT Home video game system The SIDE panel VIDEO and S-...For monaural devices, please connect Audio signal cable into the Side Audio Input jacks). If you to view the signal from a DVD, Set-Top-Box, Video Game as suggestions. If both are often color-coded. Side Panel Connections The following connection diagrams are offered as ...

Owners Guide
Page 15
...when using the Y-PbPr inputs. (See page 31). ♦ When using a HDMI input from a Set-Top-Box, it is recommended to use to connect the VCR, Camcorder, DVD player, or HDTV Set-Top-Box to your LCD TV is dependent on the model and features of each input jack. ♦ Your component outputs... may be labeled Y, B-Y, and R-Y. In this case, connect the components B-Y output to the TV's Pb input and the components R-Y output to the...
...when using the Y-PbPr inputs. (See page 31). ♦ When using a HDMI input from a Set-Top-Box, it is recommended to use to connect the VCR, Camcorder, DVD player, or HDTV Set-Top-Box to your LCD TV is dependent on the model and features of each input jack. ♦ Your component outputs... may be labeled Y, B-Y, and R-Y. In this case, connect the components B-Y output to the TV's Pb input and the components R-Y output to the...

Owners Guide
Page 16
...to "On". Press the INPUT button, then select COMPONENT 1 or 2 from the INPUTS menu to view the program from the DVD player or HDTV Set-Top Box. Press the INPUT button, then select AV1 from the INPUTS menu to view the program from the VCR. 3. Match colors of the ...VCR to rear panel jacks. Connect the VIDEO and AUDIO cables from the INPUTS menu. 16 TV REAR PANEL TV REAR PANEL (Yellow) (White) (Red) VCR OUTPUT AUDIO VIDEO (White) (Yellow) VCR OUTPUT VIDEO L R CONNECTING A COMPONENT AND STEREO AUDIO SOURCE TO COMPONENT 1 or...
...to "On". Press the INPUT button, then select COMPONENT 1 or 2 from the INPUTS menu to view the program from the DVD player or HDTV Set-Top Box. Press the INPUT button, then select AV1 from the INPUTS menu to view the program from the VCR. 3. Match colors of the ...VCR to rear panel jacks. Connect the VIDEO and AUDIO cables from the INPUTS menu. 16 TV REAR PANEL TV REAR PANEL (Yellow) (White) (Red) VCR OUTPUT AUDIO VIDEO (White) (Yellow) VCR OUTPUT VIDEO L R CONNECTING A COMPONENT AND STEREO AUDIO SOURCE TO COMPONENT 1 or...

Owners Guide
Page 17
...from the Audio output jack from the HDTV set -up of device user settings determines final video appearance. • Only HDMI3 can be abnormal if the connection is a cryptographic system that is played back will be use for delivery of the LCD TV to the rear panel jacks. NOTES •...the Rear Panel on the right. Connect an optical cable from the Rear Panel is controlled by the amplifier, not by the LCD Television. TV REAR PANEL Optical cable OPTICAL IN AUDIO IN R L STEREO SYSTEM AMPLIFIER RCA Stereo cable NOTES • Completely insert the connection cord plugs...
...from the Audio output jack from the HDTV set -up of device user settings determines final video appearance. • Only HDMI3 can be abnormal if the connection is a cryptographic system that is played back will be use for delivery of the LCD TV to the rear panel jacks. NOTES •...the Rear Panel on the right. Connect an optical cable from the Rear Panel is controlled by the amplifier, not by the LCD Television. TV REAR PANEL Optical cable OPTICAL IN AUDIO IN R L STEREO SYSTEM AMPLIFIER RCA Stereo cable NOTES • Completely insert the connection cord plugs...

Owners Guide
Page 18
...to 9, or simply press the single digit channel you obtain the desired sound level. Also press to Set the Sleep Timer from 5 minutes to 4 hours. Press the MUTE button to turn the TV set on your HITACHI LCD TV, the new remote control is designed to operate different types of VCRs, cable boxes..., set-top-boxes, satellite receivers, DVD players, and other audio/video equipment with the CHANNEL SELECTOR buttons...
...to 9, or simply press the single digit channel you obtain the desired sound level. Also press to Set the Sleep Timer from 5 minutes to 4 hours. Press the MUTE button to turn the TV set on your HITACHI LCD TV, the new remote control is designed to operate different types of VCRs, cable boxes..., set-top-boxes, satellite receivers, DVD players, and other audio/video equipment with the CHANNEL SELECTOR buttons...

Owners Guide
Page 19
... is turned off . CURSOR Pad /SELECT button All the On-Screen Display features can be set when the TV is pressed. Use the CURSOR and SELECT buttons to scroll and select the inputs that are being received, the picture source, if the channel has ... to normal viewing. • The Aspect INFO will not be at a volume level 21 or greater, the volume level will default to 20 when the TV is set to check the channel being used. Press the CURSOR Pad toward desired direction and press the SELECT button to choose HDMI 3 Input. HDMI 3 9. Component...
... is turned off . CURSOR Pad /SELECT button All the On-Screen Display features can be set when the TV is pressed. Use the CURSOR and SELECT buttons to scroll and select the inputs that are being received, the picture source, if the channel has ... to normal viewing. • The Aspect INFO will not be at a volume level 21 or greater, the volume level will default to 20 when the TV is set to check the channel being used. Press the CURSOR Pad toward desired direction and press the SELECT button to choose HDMI 3 Input. HDMI 3 9. Component...

Owners Guide
Page 20
...Analog Signal • AIR/CABLE - The noise is normal for some signals. • See page 55 for the Aspect setting. Side panels (black areas) are placed to the left and right of the image to preserve the original aspect ratio of ... IMAGE INPUT • AV IMAGE INPUT • HDMI - Changing the aspect on one input will not affect the aspect settings on the input ratio, ASPECT allows you may notice noise at the top of the size. Full Use this aspect mode...this aspect mode to remove the noise. How to Use the Remote to Control your TV ASPECT button Press this button to zoom in use. 20
...Analog Signal • AIR/CABLE - The noise is normal for some signals. • See page 55 for the Aspect setting. Side panels (black areas) are placed to the left and right of the image to preserve the original aspect ratio of ... IMAGE INPUT • AV IMAGE INPUT • HDMI - Changing the aspect on one input will not affect the aspect settings on the input ratio, ASPECT allows you may notice noise at the top of the size. Full Use this aspect mode...this aspect mode to remove the noise. How to Use the Remote to Control your TV ASPECT button Press this button to zoom in use. 20
Owners Guide
Page 21
...with Consumer Electronics Control (CEC) through the TV and HDMI connection ; Select Standard for more detailed picture. FAV CH button Press the FAV CH button to toggle between Dynamic, Standard, Movie, Custom, Game, PRO-Day and PRO-Night picture mode settings. PVR/VCR, DVD, etc.) directly ...3 levels (MIN., MEDIUM, MAX). REMOTE CONTROL > How to Use the Remote to Control your TV E.SAVE (ENERGY SAVE) button Use this button to choose power consumption reduction settings based on the TV screen when available. CLOSED CAPTIONS (CC) button Use this button to display the Favorite CH List....
...with Consumer Electronics Control (CEC) through the TV and HDMI connection ; Select Standard for more detailed picture. FAV CH button Press the FAV CH button to toggle between Dynamic, Standard, Movie, Custom, Game, PRO-Day and PRO-Night picture mode settings. PVR/VCR, DVD, etc.) directly ...3 levels (MIN., MEDIUM, MAX). REMOTE CONTROL > How to Use the Remote to Control your TV E.SAVE (ENERGY SAVE) button Use this button to choose power consumption reduction settings based on the TV screen when available. CLOSED CAPTIONS (CC) button Use this button to display the Favorite CH List....
Owners Guide
Page 22
... your AV component code has not been preprogrammed into the remote. Release the device button. SETUP EXAMPLE (Hitachi Cable Box with precode 0003) 1. Aim the remote at the cable box and press the POWER button...number). Repeat the same procedure for your AVR (select AVR). The new remote control is programmed for your set -top-boxes, satellite receivers, DVD players, and other audio/video equipment. Power button Device buttons 2. You...equipment (refer to factory default place remote control in TV mode, then press and hold TV mode key and enter "9", "8", "1" in sequence.
... your AV component code has not been preprogrammed into the remote. Release the device button. SETUP EXAMPLE (Hitachi Cable Box with precode 0003) 1. Aim the remote at the cable box and press the POWER button...number). Repeat the same procedure for your AVR (select AVR). The new remote control is programmed for your set -top-boxes, satellite receivers, DVD players, and other audio/video equipment. Power button Device buttons 2. You...equipment (refer to factory default place remote control in TV mode, then press and hold TV mode key and enter "9", "8", "1" in sequence.
Owners Guide
Page 23
... RWD, FWD, Skip FWD, Skip RWD, Record. -Color Buttons EXCLUSIVE TV buttons These buttons are for operating the TV : -P. Save 23 How to Use the Remote to Control your AV Equipment Cable Device Button Set-Top-Box/ Satellite Receiver Device Button REMOTE CONTROL MY CABLE BOX CODE IS...Stop, Pause, RWD, FWD, Skip FWD, Skip RWD, Record. -Color Buttons EXCLUSIVE TV buttons These buttons are for operating the TV : -P. Mode -CC -Input -Aspect -Vol Up & Down -Mute -E. Save MY SET-TOP-BOX/SATELLITE RECEIVER CODE IS NOTE Refer to the instruction manual of the Cable Box ...
... RWD, FWD, Skip FWD, Skip RWD, Record. -Color Buttons EXCLUSIVE TV buttons These buttons are for operating the TV : -P. Save 23 How to Use the Remote to Control your AV Equipment Cable Device Button Set-Top-Box/ Satellite Receiver Device Button REMOTE CONTROL MY CABLE BOX CODE IS...Stop, Pause, RWD, FWD, Skip FWD, Skip RWD, Record. -Color Buttons EXCLUSIVE TV buttons These buttons are for operating the TV : -P. Mode -CC -Input -Aspect -Vol Up & Down -Mute -E. Save MY SET-TOP-BOX/SATELLITE RECEIVER CODE IS NOTE Refer to the instruction manual of the Cable Box ...
Owners Guide
Page 26
...PIONEER 1877,0877 SASKTEL 1737 SCIENTIFIC ATLANTA 1877,0877 SONY 1006 SUPERCABLE 0276 SATELLITE BRAND (Set Top Box) BELL EXPRESSVU CHAPARRAL COOLSAT CODES 0775,1170 0216 1806,2147 CROSSDIGITAL 1109 ... PROSCAN RADIOSHACK RCA SAMSUNG SKY SONY STAR CHOICE STAR TRAK THOMSON TIVO TOSHIBA ULTIMATE TV ULTRASAT UNIDEN VOOM ZENITH 0247,0701 1807 1142,0749,1749 0775,0819,1076 0722,...0038 KARDON HARVARD 0072 HARWOOD 0072 HEADQUARTER 0046 HEWLETT 1972 PACKARD HI-Q 0035,0047,0000 HITACHI 0035,0037,0045 0000,0042,0041 0065,0105 HOWARD 1972 COMPUTERS HP 1972 HUGHES 0042...
...PIONEER 1877,0877 SASKTEL 1737 SCIENTIFIC ATLANTA 1877,0877 SONY 1006 SUPERCABLE 0276 SATELLITE BRAND (Set Top Box) BELL EXPRESSVU CHAPARRAL COOLSAT CODES 0775,1170 0216 1806,2147 CROSSDIGITAL 1109 ... PROSCAN RADIOSHACK RCA SAMSUNG SKY SONY STAR CHOICE STAR TRAK THOMSON TIVO TOSHIBA ULTIMATE TV ULTRASAT UNIDEN VOOM ZENITH 0247,0701 1807 1142,0749,1749 0775,0819,1076 0722,...0038 KARDON HARVARD 0072 HARWOOD 0072 HEADQUARTER 0046 HEWLETT 1972 PACKARD HI-Q 0035,0047,0000 HITACHI 0035,0037,0045 0000,0042,0041 0065,0105 HOWARD 1972 COMPUTERS HP 1972 HUGHES 0042...


