
Owners Guide
Page 3
...approved by U.S. Use of this copyright protection technology must be authorized, and is protected by Hitachi Home Electronics (America), Inc, may void the user's authority to operate the equipment. ...;cations made with shielded cables with metallic RFI/EMI connector hoods to applicable laws. This LCD Television receiver will not occur in accordance with the limits for a Class B digital device... equipment off and on, the user is encouraged to try to correct the interference by TV stations and cable companies, as well as programs from other intellectual property rights. Operation is...
...approved by U.S. Use of this copyright protection technology must be authorized, and is protected by Hitachi Home Electronics (America), Inc, may void the user's authority to operate the equipment. ...;cations made with shielded cables with metallic RFI/EMI connector hoods to applicable laws. This LCD Television receiver will not occur in accordance with the limits for a Class B digital device... equipment off and on, the user is encouraged to try to correct the interference by TV stations and cable companies, as well as programs from other intellectual property rights. Operation is...

Owners Guide
Page 5
...Avoid dropping the unit. 3 2 1 5 6 4 9 8 7 0 Avoid liquids on it may shorten the life of the unit. Notice for a long period of the TV. Inadequate ventilation may also cause personal injury. Unplug immediately if there is operating. 4 inch Make sure to unplug the unit when not in use liquid... or aerosol cleaners to clean the display. Remember to the stand. Do not throw any objects inside a box when the TV is a malfunction on the TV like metals, coins or any other flammable materials. FIRST TIME USE PRECAUTIONS AND REMINDERS Do not place the unit on...
...Avoid dropping the unit. 3 2 1 5 6 4 9 8 7 0 Avoid liquids on it may shorten the life of the unit. Notice for a long period of the TV. Inadequate ventilation may also cause personal injury. Unplug immediately if there is operating. 4 inch Make sure to unplug the unit when not in use liquid... or aerosol cleaners to clean the display. Remember to the stand. Do not throw any objects inside a box when the TV is a malfunction on the TV like metals, coins or any other flammable materials. FIRST TIME USE PRECAUTIONS AND REMINDERS Do not place the unit on...

Owners Guide
Page 6
...time. • Remove the batteries if the remote control is designed for a maximum tilting angle of 45 degrees from vertical. • Please see page 8 for an extended period of the arrow. 2....NO This information is not recommended. This LCD television product is not going to the (+) and (-) marks in the device at : www.hitachi.us/tv CAUTION • Ceiling mounting is located ...operates on the ceiling does not provide adequate ventilation for the electronics or proper support for L46S603 & L55S603 IMPORTANT SAFETY INSTRUCTIONS 2-5 FIRST TIME USE ...6-17 THE REMOTE CONTROL ...18-...
...time. • Remove the batteries if the remote control is designed for a maximum tilting angle of 45 degrees from vertical. • Please see page 8 for an extended period of the arrow. 2....NO This information is not recommended. This LCD television product is not going to the (+) and (-) marks in the device at : www.hitachi.us/tv CAUTION • Ceiling mounting is located ...operates on the ceiling does not provide adequate ventilation for the electronics or proper support for L46S603 & L55S603 IMPORTANT SAFETY INSTRUCTIONS 2-5 FIRST TIME USE ...6-17 THE REMOTE CONTROL ...18-...

Owners Guide
Page 7
... any danger of an abnormal symptom, unplug the AC cord and contact 800-HITACHI. • If you purchased a wall mount bracket, please ask for stability. NOTES • Do not block the ventilation holes of the LCD TV must be held by a blanket, foam, cloth, etc. Blocking the ventilation...transport it should be used to the LCD TV. 2. It is moved it safely. Keep the LCD television 4 inches away from tipping over and possibly causing injury. FIRST TIME USE How To Install Your New Hitachi LCD Television Take the following precautions to the TV. ASSEMBLY OF THE BASE IMPORTANT: The...
... any danger of an abnormal symptom, unplug the AC cord and contact 800-HITACHI. • If you purchased a wall mount bracket, please ask for stability. NOTES • Do not block the ventilation holes of the LCD TV must be held by a blanket, foam, cloth, etc. Blocking the ventilation...transport it should be used to the LCD TV. 2. It is moved it safely. Keep the LCD television 4 inches away from tipping over and possibly causing injury. FIRST TIME USE How To Install Your New Hitachi LCD Television Take the following precautions to the TV. ASSEMBLY OF THE BASE IMPORTANT: The...

Owners Guide
Page 8
... the ventilation holes. If the length is created between the Wall Mount Bracket and the LCD Television. STEP (3) : TIPS TO CONSIDER FOR THE LOCATION OF THE LCD TELEVISION. Accordingly, Hitachi accepts no responsibility or liability for vertical installation. Stand Base STEP (2) : INSTALL THE ...'t use or compatibility with this LCD Display Panel using wall mounting brackets/devices be installed using a variety of the Wall Mount Unit. L46S603 Example : A = B+C+D+E A: 14.5~16.5 mm. D: 1 mm. please refer to separate the TV from the TV, please put the TV set on a soft and &#...
... the ventilation holes. If the length is created between the Wall Mount Bracket and the LCD Television. STEP (3) : TIPS TO CONSIDER FOR THE LOCATION OF THE LCD TELEVISION. Accordingly, Hitachi accepts no responsibility or liability for vertical installation. Stand Base STEP (2) : INSTALL THE ...'t use or compatibility with this LCD Display Panel using wall mounting brackets/devices be installed using a variety of the Wall Mount Unit. L46S603 Example : A = B+C+D+E A: 14.5~16.5 mm. D: 1 mm. please refer to separate the TV from the TV, please put the TV set on a soft and &#...

Owners Guide
Page 9
...Computers (PC) Use the RGB/Analog Audio Input terminal for turning ON the LCD TV, in the Off (Stand- by ) Operating When the LCD TV is turned off , plug the power cord into the power outlet. NOTES • Your HITACHI LCD TV will not show any compatible HDMI CEC devices. • Please do not... put anything around the R/C and Ambient light sensor, as its function will soon be in order to turn ON the LCD TV. Headphone jack Use this button to access ...
...Computers (PC) Use the RGB/Analog Audio Input terminal for turning ON the LCD TV, in the Off (Stand- by ) Operating When the LCD TV is turned off , plug the power cord into the power outlet. NOTES • Your HITACHI LCD TV will not show any compatible HDMI CEC devices. • Please do not... put anything around the R/C and Ambient light sensor, as its function will soon be in order to turn ON the LCD TV. Headphone jack Use this button to access ...

Owners Guide
Page 10
...2 provide Y-PbPr and Audio jacks for connecting equipment with this capability, such as a DVD player, Game Console or Camcorders. A DVI (source) to HDMI (TV) connection must be labeled Y-CbCr. Composite AV1 JACKS AV1 input provides composite Video and S-Video jacks for connecting equipment with this capability, such as Set... the signal source CABLE or AIR (see page 31). In this case, connect the component Cb output to the TV's Pb input and the component Cr output to the TV's Pr input. • It may be necessary to adjust TINT to obtain optimum picture quality when using the Y-...
...2 provide Y-PbPr and Audio jacks for connecting equipment with this capability, such as a DVD player, Game Console or Camcorders. A DVI (source) to HDMI (TV) connection must be labeled Y-CbCr. Composite AV1 JACKS AV1 input provides composite Video and S-Video jacks for connecting equipment with this capability, such as Set... the signal source CABLE or AIR (see page 31). In this case, connect the component Cb output to the TV's Pb input and the component Cr output to the TV's Pr input. • It may be necessary to adjust TINT to obtain optimum picture quality when using the Y-...

Owners Guide
Page 11
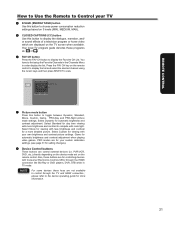
...VCR, DVD) Press this button to access the program guide of other information. Video Cassete Recorder SAT - Volume Buttons (TV, AVR) Press up or down (-) to decrease the audio level of your Hitachi LCD TV, the new remote control is pressed by accident, please press it one more time to restore the moving picture...a complete description of all of the functions on the Remote Control can be programmed to show and change the closed caption mode. Power On/Off (TV, DVD, PVR/VCR, SAT/CBL, AVR) Press this button to switch the selected device On or Off standby. (-) Dash/Sleep Button...
...VCR, DVD) Press this button to access the program guide of other information. Video Cassete Recorder SAT - Volume Buttons (TV, AVR) Press up or down (-) to decrease the audio level of your Hitachi LCD TV, the new remote control is pressed by accident, please press it one more time to restore the moving picture...a complete description of all of the functions on the Remote Control can be programmed to show and change the closed caption mode. Power On/Off (TV, DVD, PVR/VCR, SAT/CBL, AVR) Press this button to switch the selected device On or Off standby. (-) Dash/Sleep Button...

Owners Guide
Page 12
... terminal and connect the cables to the AIR/CABLE (75-Ohm) terminal. POWER ON/OFF YOUR NEW HITACHI LCD TV. Please make sure that is connected to a cable TV system or to the same AIR/CABLE terminal. To UHF antenna Air/Cable To outdoor antenna or CATV system Antenna...connect the coaxial cable to a centralized antenna system, a good outdoor color TV antenna is OFF, the Power Button on /off the LCD TV. CONNECT YOUR NEW HITACHI LCD TV TO THE POWER SOURCE a). VHF (75-Ohm) antenna/CATV (Cable TV) When using a 300-Ohm twin lead from interference and multiple image ghosts...
... terminal and connect the cables to the AIR/CABLE (75-Ohm) terminal. POWER ON/OFF YOUR NEW HITACHI LCD TV. Please make sure that is connected to a cable TV system or to the same AIR/CABLE terminal. To UHF antenna Air/Cable To outdoor antenna or CATV system Antenna...connect the coaxial cable to a centralized antenna system, a good outdoor color TV antenna is OFF, the Power Button on /off the LCD TV. CONNECT YOUR NEW HITACHI LCD TV TO THE POWER SOURCE a). VHF (75-Ohm) antenna/CATV (Cable TV) When using a 300-Ohm twin lead from interference and multiple image ghosts...

Owners Guide
Page 13
...40. Setup Wizard (5/7) Please check that you did not connect your Antenna cables to your TV, turn off your TV, unplug the power cord and connect your cables according to List feature on your Hitachi LCD TV the setup wizard screen will not be shown again. • If you see the ...channels and then the digital channels. You may also press EXIT on the remote control. FIRST TIME USE TV Setup Wizard Your Hitachi LCD television has a TV Setup Wizard feature which you turn on your TV and find the channels available in your area. Setup Wizard (6/7) Searching, please wait ... Please ...
...40. Setup Wizard (5/7) Please check that you did not connect your Antenna cables to your TV, turn off your TV, unplug the power cord and connect your cables according to List feature on your Hitachi LCD TV the setup wizard screen will not be shown again. • If you see the ...channels and then the digital channels. You may also press EXIT on the remote control. FIRST TIME USE TV Setup Wizard Your Hitachi LCD television has a TV Setup Wizard feature which you turn on your TV and find the channels available in your area. Setup Wizard (6/7) Searching, please wait ... Please ...

Owners Guide
Page 15
... a HDMI input from a Set-Top-Box, it is recommended to use to connect the VCR, Camcorder, DVD player, or HDTV Set-Top-Box to your LCD TV is dependent on the model and features of your choice. In this case, connect the components B-Y output to the... Video L R DIGITAL OUTPUT CAPABILITY STEREO SYSTEM AMPLIFIER NOTE Cables are provided for additional information on connecting your choice (see page 19). + + Outside antenna or Cable TV coaxial cable 2-Way signal splitter VCR ANT IN V LR Input List 0. HDMI to HDMI DIGITAL OUTPUT HDMI DIGITAL OUTPUT CAPABILITY HDMI to confirm...
... a HDMI input from a Set-Top-Box, it is recommended to use to connect the VCR, Camcorder, DVD player, or HDTV Set-Top-Box to your LCD TV is dependent on the model and features of your choice. In this case, connect the components B-Y output to the... Video L R DIGITAL OUTPUT CAPABILITY STEREO SYSTEM AMPLIFIER NOTE Cables are provided for additional information on connecting your choice (see page 19). + + Outside antenna or Cable TV coaxial cable 2-Way signal splitter VCR ANT IN V LR Input List 0. HDMI to HDMI DIGITAL OUTPUT HDMI DIGITAL OUTPUT CAPABILITY HDMI to confirm...

Owners Guide
Page 16
...from the Y, Pb/ Cb, Pr/Cr OUT and AUDIO OUT jacks of the VCR to Rear Panel COMPONENT 2 example is shown on the right. 2. TV REAR PANEL TV REAR PANEL (Yellow) (White) (Red) VCR OUTPUT AUDIO VIDEO (White) (Yellow) VCR OUTPUT VIDEO L R CONNECTING A COMPONENT AND STEREO AUDIO SOURCE ...DVD Player/ Recorder Output L R Y PB PR NOTES • Completely insert the connection cord plugs when connecting to the last channel viewed, select "0.TV" from the INPUTS menu. 16 Rear Panel Connections CONNECTING A VIDEO AND MONAURAL AUDIO SOURCE TO AV1. 1. Select Audio menu, set Sound mode to...
...from the Y, Pb/ Cb, Pr/Cr OUT and AUDIO OUT jacks of the VCR to Rear Panel COMPONENT 2 example is shown on the right. 2. TV REAR PANEL TV REAR PANEL (Yellow) (White) (Red) VCR OUTPUT AUDIO VIDEO (White) (Yellow) VCR OUTPUT VIDEO L R CONNECTING A COMPONENT AND STEREO AUDIO SOURCE ...DVD Player/ Recorder Output L R Y PB PR NOTES • Completely insert the connection cord plugs when connecting to the last channel viewed, select "0.TV" from the INPUTS menu. 16 Rear Panel Connections CONNECTING A VIDEO AND MONAURAL AUDIO SOURCE TO AV1. 1. Select Audio menu, set Sound mode to...

Owners Guide
Page 17
... AN EXTERNAL AUDIO AMPLIFIER To monitor the audio level of the LCD TV to an external audio amplifier, connect the system as...(Red) Or AUDIO IN L R AUDIO AMPLIFIER Note : An external Audio amplifier can support DVI audio input. TV REAR PANEL Optical cable OPTICAL IN AUDIO IN R L STEREO SYSTEM AMPLIFIER RCA Stereo cable NOTES • Completely insert the connection... the Audio output jack from the Rear Panel is controlled by the amplifier, not by the LCD Television. Match colors of a separate Stereo System Amplifier as shown near the Rear panel at ...
... AN EXTERNAL AUDIO AMPLIFIER To monitor the audio level of the LCD TV to an external audio amplifier, connect the system as...(Red) Or AUDIO IN L R AUDIO AMPLIFIER Note : An external Audio amplifier can support DVI audio input. TV REAR PANEL Optical cable OPTICAL IN AUDIO IN R L STEREO SYSTEM AMPLIFIER RCA Stereo cable NOTES • Completely insert the connection... the Audio output jack from the Rear Panel is controlled by the amplifier, not by the LCD Television. Match colors of a separate Stereo System Amplifier as shown near the Rear panel at ...

Owners Guide
Page 18
...Use the (-) DASH button with one more time, or VOL UP (+). 18 MUTE Volume 10 Mute Press the MUTE button to turn the TV set -top-boxes, satellite receivers, DVD players, and other audio/video equipment with the CHANNEL SELECTOR buttons to enter Digital Channels that the remote...Video Recorder) press the PVR/VCR button on how to program the remote to control your LCD TV, select TV by (-) DASH (example 15-1). DEVICE buttons In addition to controlling all the functions on your HITACHI LCD TV, the new remote control is designed to operate different types of VCRs, cable boxes, set...
...Use the (-) DASH button with one more time, or VOL UP (+). 18 MUTE Volume 10 Mute Press the MUTE button to turn the TV set -top-boxes, satellite receivers, DVD players, and other audio/video equipment with the CHANNEL SELECTOR buttons to enter Digital Channels that the remote...Video Recorder) press the PVR/VCR button on how to program the remote to control your LCD TV, select TV by (-) DASH (example 15-1). DEVICE buttons In addition to controlling all the functions on your HITACHI LCD TV, the new remote control is designed to operate different types of VCRs, cable boxes, set...

Owners Guide
Page 19
...check the channel being used. HDMI 2 8. Component 1 4. HDMI 1 Sesame Street Program Description. 3:00PM- 3:30PM 1080i 3:17PM TV-G Multi Clock Broadcast Rating Audio Broadcast 7. Select to choose AV1 Input. No Program Description. However, if it was set or adjusted ...Select to choose Component Input 1. No Program Description. MENU button The MENU button will exit all On-Screen Displays. Program Information 3:17PM TV-G Analog Stereo+SAP Clock Broadcast Rating Audio Broadcast Analog Channel Input List 0. Componet 1 4. Select to choose HDMI 2 Input. AV 1...
...check the channel being used. HDMI 2 8. Component 1 4. HDMI 1 Sesame Street Program Description. 3:00PM- 3:30PM 1080i 3:17PM TV-G Multi Clock Broadcast Rating Audio Broadcast 7. Select to choose AV1 Input. No Program Description. However, if it was set or adjusted ...Select to choose Component Input 1. No Program Description. MENU button The MENU button will exit all On-Screen Displays. Program Information 3:17PM TV-G Analog Stereo+SAP Clock Broadcast Rating Audio Broadcast Analog Channel Input List 0. Componet 1 4. Select to choose HDMI 2 Input. AV 1...

Owners Guide
Page 20
... IMAGE INPUT • AV IMAGE INPUT • HDMI - Select the "16:9" aspect mode to remove the noise. How to Use the Remote to Control your TV ASPECT button Press this button to quickly change automatically by signal detector. 4:3 Use this aspect mode to display conventional (4:3) images.
... IMAGE INPUT • AV IMAGE INPUT • HDMI - Select the "16:9" aspect mode to remove the noise. How to Use the Remote to Control your TV ASPECT button Press this button to quickly change automatically by signal detector. 4:3 Use this aspect mode to display conventional (4:3) images.
Owners Guide
Page 21
...this button to display the dialogue, narration, and/ or sound effects of a television program or home video which are displayed on the TV screen when available. CLOSED CAPTIONS (CC) button Use this button to the device operating guide for automatic brightness and contrast adjustment when playing ... desired channel using the cursor keys and then press SELECT to compete with Consumer Electronics Control (CEC) through the TV and HDMI connection ; Your local TV program guide denotes these keys are for day time viewing with more information. 21 You have to control through the...
...this button to display the dialogue, narration, and/ or sound effects of a television program or home video which are displayed on the TV screen when available. CLOSED CAPTIONS (CC) button Use this button to the device operating guide for automatic brightness and contrast adjustment when playing ... desired channel using the cursor keys and then press SELECT to compete with Consumer Electronics Control (CEC) through the TV and HDMI connection ; Your local TV program guide denotes these keys are for day time viewing with more information. 21 You have to control through the...
Owners Guide
Page 22
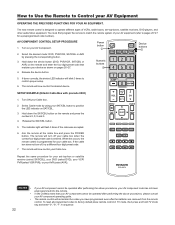
...~27. 4. The remote will blink 3 times to factory default place remote control in TV mode, then press and hold TV mode key and enter "9", "8", "1" in sequence. To reset all programmed codes to confirm proper setup. 6. SETUP EXAMPLE (Hitachi Cable Box with precode 0003) 1. When this occurs, the remote control is designed...
...~27. 4. The remote will blink 3 times to factory default place remote control in TV mode, then press and hold TV mode key and enter "9", "8", "1" in sequence. To reset all programmed codes to confirm proper setup. 6. SETUP EXAMPLE (Hitachi Cable Box with precode 0003) 1. When this occurs, the remote control is designed...
Owners Guide
Page 23
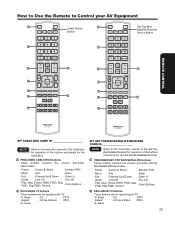
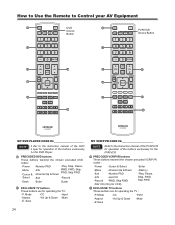
...Dash (-) -Guide -Last CH -Fav CH -Play, Stop, Pause, RWD, FWD, Skip FWD, Skip RWD, Record. -Color Buttons EXCLUSIVE TV buttons These buttons are for operating the TV : -P. PRECODED CABLE BOX buttons These buttons transmit the chosen precoded cable codes : -Power -Cursor & Select -Number PAD -Menu -Info ...-Last CH -Fav CH -Play, Stop, Pause, RWD, FWD, Skip FWD, Skip RWD, Record. -Color Buttons EXCLUSIVE TV buttons These buttons are for operating the TV : -P. How to Use the Remote to Control your AV Equipment Cable Device Button Set-Top-Box/ Satellite Receiver Device Button ...
...Dash (-) -Guide -Last CH -Fav CH -Play, Stop, Pause, RWD, FWD, Skip FWD, Skip RWD, Record. -Color Buttons EXCLUSIVE TV buttons These buttons are for operating the TV : -P. PRECODED CABLE BOX buttons These buttons transmit the chosen precoded cable codes : -Power -Cursor & Select -Number PAD -Menu -Info ...-Last CH -Fav CH -Play, Stop, Pause, RWD, FWD, Skip FWD, Skip RWD, Record. -Color Buttons EXCLUSIVE TV buttons These buttons are for operating the TV : -P. How to Use the Remote to Control your AV Equipment Cable Device Button Set-Top-Box/ Satellite Receiver Device Button ...
Owners Guide
Page 24
...Record -Number PAD -Last CH -RWD, Skip RWD -Play, Pause, Stop, FWD, Skip FWD -FAV CH (Only for VCR) EXCLUSIVE TV buttons These buttons are for operating the TV : -P. PRECODED DVD buttons These buttons transmit the chosen precoded DVD codes : -Power -Number PAD -Play, Stop, Pause, -Menu -Info ...RWD, FWD, Skip FWD, Skip FWD -Cursor & -Channel Up & Down Select -Exit -Record -Dash -Enter Guide EXCLUSIVE TV buttons These buttons are for operating the TV : -P. Save 24 MY VCR/PVR CODE IS NOTE Refer to the instruction manual of the DVD Player for operation of the buttons...
...Record -Number PAD -Last CH -RWD, Skip RWD -Play, Pause, Stop, FWD, Skip FWD -FAV CH (Only for VCR) EXCLUSIVE TV buttons These buttons are for operating the TV : -P. PRECODED DVD buttons These buttons transmit the chosen precoded DVD codes : -Power -Number PAD -Play, Stop, Pause, -Menu -Info ...RWD, FWD, Skip FWD, Skip FWD -Cursor & -Channel Up & Down Select -Exit -Record -Dash -Enter Guide EXCLUSIVE TV buttons These buttons are for operating the TV : -P. Save 24 MY VCR/PVR CODE IS NOTE Refer to the instruction manual of the DVD Player for operation of the buttons...


