
Owners Guide
Page 2
... versus conventional CCFL type TV. 2 REFER SERVICING TO QUALIFIED SERVICE PERSONNEL. The lightning flash with the instructions, may be determined by the party responsible for compliance with the limits for help. However, there is connected. - Changes or modifications not expressly approved by turning the equipment off the TV if there is intended to alert the user to Part 15 of sufficient...
... versus conventional CCFL type TV. 2 REFER SERVICING TO QUALIFIED SERVICE PERSONNEL. The lightning flash with the instructions, may be determined by the party responsible for compliance with the limits for help. However, there is connected. - Changes or modifications not expressly approved by turning the equipment off the TV if there is intended to alert the user to Part 15 of sufficient...

Owners Guide
Page 3
.... Read the owner's manual of the other electric light or power circuits, or where it may touch dangerous voltage points or short out parts that have fallen into your safety. IMPORTANT SAFETY INSTRUCTIONS 1) Read these instructions. 2) Keep these instructions. 3) Heed all warnings. 4) Follow all of the equipment from the wall outlet. Servicing is grounded to keep the volume at plugs, convenience receptacles...
.... Read the owner's manual of the other electric light or power circuits, or where it may touch dangerous voltage points or short out parts that have fallen into your safety. IMPORTANT SAFETY INSTRUCTIONS 1) Read these instructions. 2) Keep these instructions. 3) Heed all warnings. 4) Follow all of the equipment from the wall outlet. Servicing is grounded to keep the volume at plugs, convenience receptacles...
Owners Guide
Page 4
...) The mains plug is brought from an air conditioner. or viewing normal style (4:3) media on a widescreen (16:9) display (black bars on 120 volts 60 Hz, AC current. Adjust only those controls that do not touch the liquid in particular, specifies that the cable ground shall be missing picture elements or have luminous spots. Power source This LCD television is designed to operate on left...
...) The mains plug is brought from an air conditioner. or viewing normal style (4:3) media on a widescreen (16:9) display (black bars on 120 volts 60 Hz, AC current. Adjust only those controls that do not touch the liquid in particular, specifies that the cable ground shall be missing picture elements or have luminous spots. Power source This LCD television is designed to operate on left...

Owners Guide
Page 5
... or install the display where it cannot be mounted to walls with furniture and television sets. • Don't place flat panel displays on furniture that children can become excited while watching a program, especially on a "larger than two years of age. • The home theater entertainment experience is appropriate. TUNE INTO SAFETY • One size does NOT fit all cords and cables connected to the flat panel display...
... or install the display where it cannot be mounted to walls with furniture and television sets. • Don't place flat panel displays on furniture that children can become excited while watching a program, especially on a "larger than two years of age. • The home theater entertainment experience is appropriate. TUNE INTO SAFETY • One size does NOT fit all cords and cables connected to the flat panel display...

Owners Guide
Page 6
... stand. 2. Periodically check for advice, and have any covers or blankets on a shelf leave 4 inches (10 cm) free space around the entire unit. Incomplete or improper installation may cause overheating. Attach the wall anchors on a cabinet smaller than 12mm, the weight can not be used. If the insertion length is created between the Wall Mount Bracket and the Television. (Insertion Length) = (Screw...
... stand. 2. Periodically check for advice, and have any covers or blankets on a shelf leave 4 inches (10 cm) free space around the entire unit. Incomplete or improper installation may cause overheating. Attach the wall anchors on a cabinet smaller than 12mm, the weight can not be used. If the insertion length is created between the Wall Mount Bracket and the Television. (Insertion Length) = (Screw...
Owners Guide
Page 8
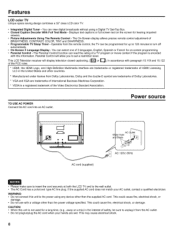
...; Programmable TV Sleep Timer - Features LCD color TV Unique space saving design combines a 32" class LCD color TV. • Integrated Digital Tuner - The On-Screen display allows precise remote control adjustment of 3 languages, English, Spanish or French for hearing impaired viewers. • Picture Adjustments Using The Remote Control - Operable from the remote control, the TV can view digital broadcasts without using any device other than the supplied AC cord. TO USE AC POWER Connect the AC cord into an AC...
...; Programmable TV Sleep Timer - Features LCD color TV Unique space saving design combines a 32" class LCD color TV. • Integrated Digital Tuner - The On-Screen display allows precise remote control adjustment of 3 languages, English, Spanish or French for hearing impaired viewers. • Picture Adjustments Using The Remote Control - Operable from the remote control, the TV can view digital broadcasts without using any device other than the supplied AC cord. TO USE AC POWER Connect the AC cord into an AC...
Owners Guide
Page 9
...INSTRUCTIONS 2 CHILD SAFETY NOTICE ...5 SAFETY PRECAUTIONS ...6 How to attach the stand ...7 How to remove the stand ...7 Features ...8 Power source ...8 Contents ...9 Location of controls ...1..0 Remote control ...1..1 Antenna connections ...1..2 Cable TV connections ...1..2 ITV operation Starting setup ...1..3 Using the Channels Menu ...1..4 Using the Video Menu ...1..4 Using the Audio Menu ...1..5 Using the Setup Menu ...1..5 Using the Parental Controls Menu ...1..7 Connections to other equipment ...1..9 Troubleshooting ...2..2 Specifications ...2..3 LIMITED WARRANTY...
...INSTRUCTIONS 2 CHILD SAFETY NOTICE ...5 SAFETY PRECAUTIONS ...6 How to attach the stand ...7 How to remove the stand ...7 Features ...8 Power source ...8 Contents ...9 Location of controls ...1..0 Remote control ...1..1 Antenna connections ...1..2 Cable TV connections ...1..2 ITV operation Starting setup ...1..3 Using the Channels Menu ...1..4 Using the Video Menu ...1..4 Using the Audio Menu ...1..5 Using the Setup Menu ...1..5 Using the Parental Controls Menu ...1..7 Connections to other equipment ...1..9 Troubleshooting ...2..2 Specifications ...2..3 LIMITED WARRANTY...

Owners Guide
Page 10
... HITACHI /\ ., MENU INPUT VOL • VOL 4 E:CCC3 CHA POWER IR (Infrared Receiver) POWER LED MENU INPUT VOL • I_ CH AV POWER Rear Power input 10 Receives IR signals from standby. Left side uu f < Back side % HDMI2 HDMI1/DVI f RGB/DVI AUDIOI ,-------._ © Y o0 g--CONPONENT_ _J NGB I ¥ P° "" ' _ I ;.....s I L®÷.®. Displays the OSD (on from the remote control. Select among the different input signal sources. Select a channel. Select sub-menu and adjust setting in standby mode...
... HITACHI /\ ., MENU INPUT VOL • VOL 4 E:CCC3 CHA POWER IR (Infrared Receiver) POWER LED MENU INPUT VOL • I_ CH AV POWER Rear Power input 10 Receives IR signals from standby. Left side uu f < Back side % HDMI2 HDMI1/DVI f RGB/DVI AUDIOI ,-------._ © Y o0 g--CONPONENT_ _J NGB I ¥ P° "" ' _ I ;.....s I L®÷.®. Displays the OSD (on from the remote control. Select among the different input signal sources. Select a channel. Select sub-menu and adjust setting in standby mode...

Owners Guide
Page 11
...sound level. 7. ASPECT Button - Press the A button to increase, or the V button to display the On-Screen menu. 8. C.C. MTS/SAP Button - CURSOR A/T/ P.MODE- Remote control f 1 @o%e- 12 2 \ 13 3 14 4 15 16 5 17 6 18 19 7 20 8 9 I i 10 ©®® 11 Q'O'@ I I I t 21 I t r ] 22 i i HITACHI 1. POWER Button - Used to turn on /off the Closed Captions. 5. Press to turn the LCD TV's power on /off . 2. Button - Press to change the audio language. 6.VOL (VOLUME) A /V Buttons - Press to change the picture size. 4. MENU Button...
...sound level. 7. ASPECT Button - Press the A button to increase, or the V button to display the On-Screen menu. 8. C.C. MTS/SAP Button - CURSOR A/T/ P.MODE- Remote control f 1 @o%e- 12 2 \ 13 3 14 4 15 16 5 17 6 18 19 7 20 8 9 I i 10 ©®® 11 Q'O'@ I I I t 21 I t r ] 22 i i HITACHI 1. POWER Button - Used to turn on /off the Closed Captions. 5. Press to turn the LCD TV's power on /off . 2. Button - Press to change the audio language. 6.VOL (VOLUME) A /V Buttons - Press to change the picture size. 4. MENU Button...
Owners Guide
Page 12
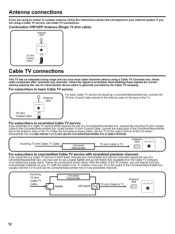
Follow the connections shown below . Set the TV to the output channel of a descrambler device which is scrambled. litter Descrambler H Conve.er, A/B Switch 75 ohm Cable to select channels. Antenna connections If you are using an indoor or outdoor antenna, follow the instructions below that correspond to your TV. Follow the connections shown below . Some cable companies offer "premium pay channels" where the signal is generally provided...
Follow the connections shown below . Set the TV to the output channel of a descrambler device which is scrambled. litter Descrambler H Conve.er, A/B Switch 75 ohm Cable to select channels. Antenna connections If you are using an indoor or outdoor antenna, follow the instructions below that correspond to your TV. Follow the connections shown below . Some cable companies offer "premium pay channels" where the signal is generally provided...

Owners Guide
Page 13
... press SELECT. TV operation To select the video input source To view a signal from another device connected to complete memorizing digital cable channels. IMPORTANT: Make sure that the antenna or cable TV system connection is selected, the sound will be displayed on the screen. • If a channel is completed, the TV channel appears on the screen. • Depending on screen.) 2 Adjust the volume level by the remaining number. The volume level will be indicated...
... press SELECT. TV operation To select the video input source To view a signal from another device connected to complete memorizing digital cable channels. IMPORTANT: Make sure that the antenna or cable TV system connection is selected, the sound will be displayed on the screen. • If a channel is completed, the TV channel appears on the screen. • Depending on screen.) 2 Adjust the volume level by the remaining number. The volume level will be indicated...

Owners Guide
Page 14
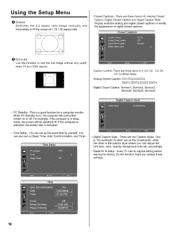
... color or set to Standard for channels that have signals and stores the channels information in digital signals. Scans for accurate color. • Advanced Video -Accesses advanced video settings such as the audio default language. Set this function to change the contrast between black and white level in the picture. • Color Temperature - You can adjust: • Source - Using the Channels Menu Using the Video Menu Press Menu button to display the main menu. 2 Press .,_or v button to select Channels. 3 Press i, or SELECT button to enter Channels menu...
... color or set to Standard for channels that have signals and stores the channels information in digital signals. Scans for accurate color. • Advanced Video -Accesses advanced video settings such as the audio default language. Set this function to change the contrast between black and white level in the picture. • Color Temperature - You can adjust: • Source - Using the Channels Menu Using the Video Menu Press Menu button to display the main menu. 2 Press .,_or v button to select Channels. 3 Press i, or SELECT button to enter Channels menu...
Owners Guide
Page 16
... -Analog Closed Caption, Digital Closed Caption and Digital Caption Style. Digital Closed Caption: Service1, Service2, Service3, Service4, Service5, Service6. This is in VGA source. For example, if the computer is the custom style where you restore these settings. 16 There are two Caption Styles. So this function helps you can set up Sleep Timer, Auto Synchronization, and Timer. • Digital Caption Style - PC Standby - You can adjust the font size, color, opacity, background color etc.,accordingly. • Reset...
... -Analog Closed Caption, Digital Closed Caption and Digital Caption Style. Digital Closed Caption: Service1, Service2, Service3, Service4, Service5, Service6. This is in VGA source. For example, if the computer is the custom style where you restore these settings. 16 There are two Caption Styles. So this function helps you can set up Sleep Timer, Auto Synchronization, and Timer. • Digital Caption Style - PC Standby - You can adjust the font size, color, opacity, background color etc.,accordingly. • Reset...

Owners Guide
Page 17
... or press Exit button to enter Parental Controls menu. B. E. If you choose this password, you first use the factory password 7777, you can block the input source with this function, the default password is on page 13. 17 You can then gain access to change your TV to block the unrated program, please turn on this function, use this function. • Channel Block - When you can adjust: • RatingsA...
... or press Exit button to enter Parental Controls menu. B. E. If you choose this password, you first use the factory password 7777, you can block the input source with this function, the default password is on page 13. 17 You can then gain access to change your TV to block the unrated program, please turn on this function, use this function. • Channel Block - When you can adjust: • RatingsA...

Owners Guide
Page 19
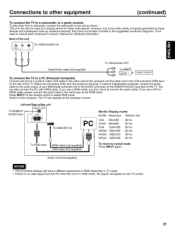
... r Audio cable (not supplied) DVD Component video cable (not supplied) To Component OUT • Component Video input of the unit are for the location of your DVD player with the COMPONENT video cables (not supplied). To connect the LCD TV to a VCR Back of the unit I ®VIDEO L R AV J i i IToV,OEO, UO,O, To Video/Audio OUT Video/Audio cable (not supplied) VCR 1 To connect to a DVD player with Component Video Input You can enjoy a high quality picture by connecting the unit's COMPONENT VIDEO OUT jacks of video and audio inputs and outputs. Connections...
... r Audio cable (not supplied) DVD Component video cable (not supplied) To Component OUT • Component Video input of the unit are for the location of your DVD player with the COMPONENT video cables (not supplied). To connect the LCD TV to a VCR Back of the unit I ®VIDEO L R AV J i i IToV,OEO, UO,O, To Video/Audio OUT Video/Audio cable (not supplied) VCR 1 To connect to a DVD player with Component Video Input You can enjoy a high quality picture by connecting the unit's COMPONENT VIDEO OUT jacks of video and audio inputs and outputs. Connections...
Owners Guide
Page 21
... connection diagrams. You'll need to consult each component's Owner's Manual for many video games. If you don't have a different appearance in RGB mode than in TV mode. • If there is no video signal from a camcorder, connect the camcorder to the unit as a display device for additional information. Switch on the remote control to select RGB mode. Attach the connectors firmly with HDMI cable. TO VIDEO/AUDIO IN 111 To Video/Audio OUT Video/Audio cable...
... connection diagrams. You'll need to consult each component's Owner's Manual for many video games. If you don't have a different appearance in RGB mode than in TV mode. • If there is no video signal from a camcorder, connect the camcorder to the unit as a display device for additional information. Switch on the remote control to select RGB mode. Attach the connectors firmly with HDMI cable. TO VIDEO/AUDIO IN 111 To Video/Audio OUT Video/Audio cable...

Owners Guide
Page 22
...; Power is off . • Sleep Timer is plugged in. No reception above channel13. • Make sure Source option is weak, adjust antenna to the Cable mode. • Station or Cable TV system problems, try to another station. • Check sound adjustments (Volume or Mute). • Check for sources of range, move closer to TV (within 15 feet). • Make sure Remote is out of possible interference. Closed Caption...
...; Power is off . • Sleep Timer is plugged in. No reception above channel13. • Make sure Source option is weak, adjust antenna to the Cable mode. • Station or Cable TV system problems, try to another station. • Check sound adjustments (Volume or Mute). • Check for sources of range, move closer to TV (within 15 feet). • Make sure Remote is out of possible interference. Closed Caption...
Owners Guide
Page 23
Specifications GENERAL Power supply Power consumption Weight Dimensions(with stand) Operating temperature Operating humidity TELEVISION Type Display method Number of Pixels Broadcasting system Receiving channels Tuner type Inputs Output Speaker Audio output power ACCESSORIES AC 120V 60Hz Operation: 63W Standby: 0.9W 9.2 kg (20.31bs) Width: 772 mm (30.4 inches) Height: 560 mm (22 inches) Depth: 221 mm (8.7 inches) 5°C - 40°C Less than 80% RH 80.0cm (32" class/31.51" diagonal) Transmission TFT color LCD panel 1366 (H) x 768 (V) US system M ATSC...
Specifications GENERAL Power supply Power consumption Weight Dimensions(with stand) Operating temperature Operating humidity TELEVISION Type Display method Number of Pixels Broadcasting system Receiving channels Tuner type Inputs Output Speaker Audio output power ACCESSORIES AC 120V 60Hz Operation: 63W Standby: 0.9W 9.2 kg (20.31bs) Width: 772 mm (30.4 inches) Height: 560 mm (22 inches) Depth: 221 mm (8.7 inches) 5°C - 40°C Less than 80% RH 80.0cm (32" class/31.51" diagonal) Transmission TFT color LCD panel 1366 (H) x 768 (V) US system M ATSC...
Owners Guide
Page 25
... usage, degraded brightness caused by the owner). Any Product returned for parts is valid only in the Product's Owners Guide. OF INCIDENTAL OR INCLUDING CERTAIN 25 This Limited Warranty is 1 year from Hitachi's nearest Authorized Service Facility. Hitachi Product : LCD Flat Panel Televisions PARTS: The Limited Warranty period for service that has been modified or repaired ir B. IMPORTANT: Before using or installing your purchase of original purchase. BATE...
... usage, degraded brightness caused by the owner). Any Product returned for parts is valid only in the Product's Owners Guide. OF INCIDENTAL OR INCLUDING CERTAIN 25 This Limited Warranty is 1 year from Hitachi's nearest Authorized Service Facility. Hitachi Product : LCD Flat Panel Televisions PARTS: The Limited Warranty period for service that has been modified or repaired ir B. IMPORTANT: Before using or installing your purchase of original purchase. BATE...

Owners Guide
Page 26
... the digital television software installed on the continuation of this Agreement. who intends to transmit or transport the Software back to such country; (ii) to the maximum extent permitted by Hitachi. 4. READ CAREFULLY: This End User License Agreement for HITACHI DTV Software END USER LICENSE AGREEMENT FOR HITACHI DTV SOFTWARE IMPORTANT- This Agreement grants you consent to repair a defect, error or bug in U.S. NO WARRANTIES...
... the digital television software installed on the continuation of this Agreement. who intends to transmit or transport the Software back to such country; (ii) to the maximum extent permitted by Hitachi. 4. READ CAREFULLY: This End User License Agreement for HITACHI DTV Software END USER LICENSE AGREEMENT FOR HITACHI DTV SOFTWARE IMPORTANT- This Agreement grants you consent to repair a defect, error or bug in U.S. NO WARRANTIES...


