

User Manual
Page 2
... lens cover 6 Putting batteries 7 Using the remote control 8 About the filter cover for machine defects . . . . 50 Freezing the screen 21 Warranty and after-service. . . 52 Temporarily blanking the screen . . . 21 Specifications 52 Multifunctional settings . . . . 22 Using the menu function 22 2 phase, H. size, Auto adjust execute Setting up 10 INPUT menu 32 Arrangement 11 Adjusting the projector's elevator . . . 12 Color space, Video format, Frame lock, Information Connecting your devices 13 SETUP menu 34 Connecting power supply 15 Zoom, Keystone...
... lens cover 6 Putting batteries 7 Using the remote control 8 About the filter cover for machine defects . . . . 50 Freezing the screen 21 Warranty and after-service. . . 52 Temporarily blanking the screen . . . 21 Specifications 52 Multifunctional settings . . . . 22 Using the menu function 22 2 phase, H. size, Auto adjust execute Setting up 10 INPUT menu 32 Arrangement 11 Adjusting the projector's elevator . . . 12 Color space, Video format, Frame lock, Information Connecting your devices 13 SETUP menu 34 Connecting power supply 15 Zoom, Keystone...
User Manual
Page 3
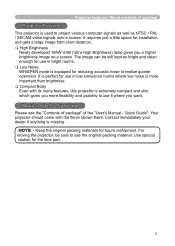
... as NTSC / PAL / SECAM video signals onto a screen. NOTE • Keep the original packing materials for the lens part. 3 Your projector should come with its many features, this projector is missing. Use special caution for future reshipment. It requires just a little space for use in bright rooms. Low Noise WHISPER mode is used to realize quieter operation. Contact immediately your dealer if...
... as NTSC / PAL / SECAM video signals onto a screen. NOTE • Keep the original packing materials for the lens part. 3 Your projector should come with its many features, this projector is missing. Use special caution for future reshipment. It requires just a little space for use in bright rooms. Low Noise WHISPER mode is used to realize quieter operation. Contact immediately your dealer if...
User Manual
Page 9
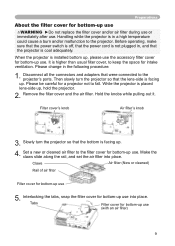
... up . Slowly turn the projector so that the projector is in a high temperature could cause a burn and/or malfunction to keep the space for intake ventilation. Interlocking the tabs, snap the filter cover for bottom-up use. Before operating, make sure that the power switch is off, that the power cord is not plugged in the following procedure. 1. Set a new or cleaned air filter to...
... up . Slowly turn the projector so that the projector is in a high temperature could cause a burn and/or malfunction to keep the space for intake ventilation. Interlocking the tabs, snap the filter cover for bottom-up use. Before operating, make sure that the power switch is off, that the power cord is not plugged in the following procedure. 1. Set a new or cleaned air filter to...

User Manual
Page 13
... not be used with core set the laptop to CRT display or to the projector. Some cables have a core only at one end, connect the core to the instruction manual of the corresponding laptop computer. • Secure the screws on Windows. This projector is a system composed of connection is changed on a computer, depending on an input, automatic adjust function may take some time and may cause a certain picture degradation...
... not be used with core set the laptop to CRT display or to the projector. Some cables have a core only at one end, connect the core to the instruction manual of the corresponding laptop computer. • Secure the screws on Windows. This projector is a system composed of connection is changed on a computer, depending on an input, automatic adjust function may take some time and may cause a certain picture degradation...
User Manual
Page 16
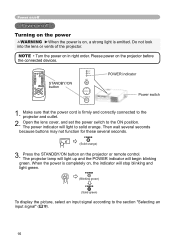
... power indicator will begin blinking green. POWER (Blinking green) POWER (Solid green) To display the picture, select an input signal according to the projector and outlet. 2. POWER (Solid orange) 3. VIDEO RGB SEARCH ASPECT AUTO BLANK MAGNIFY ON OFF FREEZE VOLUME MUTE KEYSTONE POSITION - Press the STANDBY/ON button on the projector before the connected devices. The projector lamp will light up and the POWER indicator will light to the ON position. Open the lens cover, and set the power switch to solid orange. When the power is...
... power indicator will begin blinking green. POWER (Blinking green) POWER (Solid green) To display the picture, select an input signal according to the projector and outlet. 2. POWER (Solid orange) 3. VIDEO RGB SEARCH ASPECT AUTO BLANK MAGNIFY ON OFF FREEZE VOLUME MUTE KEYSTONE POSITION - Press the STANDBY/ON button on the projector before the connected devices. The projector lamp will light up and the POWER indicator will light to the ON position. Open the lens cover, and set the power switch to solid orange. When the power is...
User Manual
Page 17
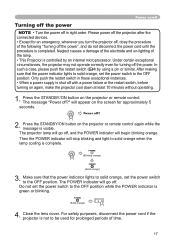
... the STANDBY/ON button on the projector or remote control. The projector lamp will go off the power. Then the POWER indicator will begin blinking orange. Only push the restart switch in right order. The message "Power off ? 2. Do not set the power switch to be used for an emergency, whenever you turn the projector off , and the POWER indicator will stop blinking and light to solid orange when the lamp cooling is visible. Close the lens cover. After...
... the STANDBY/ON button on the projector or remote control. The projector lamp will go off the power. Then the POWER indicator will begin blinking orange. Only push the restart switch in right order. The message "Power off ? 2. Do not set the power switch to be used for an emergency, whenever you turn the projector off , and the POWER indicator will stop blinking and light to solid orange when the lamp cooling is visible. Close the lens cover. After...
User Manual
Page 18
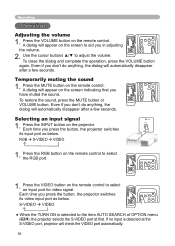
... the remote control to select an input port for video signal. Operating Operating Adjusting the volume 1. Even if you don't do anything , the dialog will appear on the remote control. Press the MUTE button on the screen to adjust the volume. ZOOM + MENU ESC ENTER RESET VIDEO RGB SEARCH ASPECT AUTO BLANK MAGNIFY ON VOLUME MUTE OFF FREEZE KEYSTONE 1. VIDEO RGB SEARCH ASPECT AUTO BLANK MAGNIFY ON OFF FREEZE VOLUME MUTE KEYSTONE POSITION - Use...
... the remote control to select an input port for video signal. Operating Operating Adjusting the volume 1. Even if you don't do anything , the dialog will appear on the remote control. Press the MUTE button on the screen to adjust the volume. ZOOM + MENU ESC ENTER RESET VIDEO RGB SEARCH ASPECT AUTO BLANK MAGNIFY ON VOLUME MUTE OFF FREEZE KEYSTONE 1. VIDEO RGB SEARCH ASPECT AUTO BLANK MAGNIFY ON OFF FREEZE VOLUME MUTE KEYSTONE POSITION - Use...

User Manual
Page 19
... the remote control. Press the ASPECT button on the screen to aid you press the button, the projector switches the modes for a few seconds. A dialog will begin to check its input ports in turn. At a RGB signal NORMAL 4:3 16:9 At a video signal /no signal is found , the projector will stop searching and display the image. To close the dialog and complete this operation, don't perform operation for...
... the remote control. Press the ASPECT button on the screen to aid you press the button, the projector switches the modes for a few seconds. A dialog will begin to check its input ports in turn. At a RGB signal NORMAL 4:3 16:9 At a video signal /no signal is found , the projector will stop searching and display the image. To close the dialog and complete this operation, don't perform operation for...
User Manual
Page 21
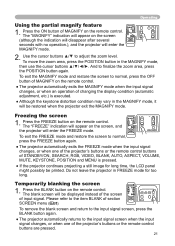
... time, the LCD panel might possibly be displayed instead of the screen of STANDBY/ON, SEARCH, RGB, VIDEO, BLANK, AUTO, ASPECT, VOLUME, MUTE, KEYSTONE, POSITION and MENU is executed. ● Although the keystone distortion condition may vary in the MAGNIFY mode, it will appear on the remote control. ● The projector automatically exits the MAGNIFY mode when the input signal changes, or when an operation of the projector's buttons or the remote control ESC RESET buttons...
... time, the LCD panel might possibly be displayed instead of the screen of STANDBY/ON, SEARCH, RGB, VIDEO, BLANK, AUTO, ASPECT, VOLUME, MUTE, KEYSTONE, POSITION and MENU is executed. ● Although the keystone distortion condition may vary in the MAGNIFY mode, it will appear on the remote control. ● The projector automatically exits the MAGNIFY mode when the input signal changes, or when an operation of the projector's buttons or the remote control ESC RESET buttons...

User Manual
Page 22
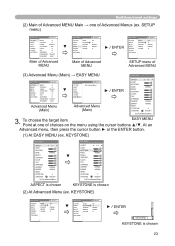
...KEYSTONE MODE BRIGHT CONTRAST COLOR TINT SHRPNESS WHISPER MIRROR RESET FILTER TIME LANGUAGE 4:3 +0 +0 NORMAL +0 +0 +0 +0 +3 NORMAL NORMAL 0 ENGLISH Go To Advance Menu... ► / ENTER MENU [RGB] PICTURE IMAGE INPUT SETUP SCREEN OPTION EASY MENU :SELECT BRIGHT +0 CONTRAST +0 GAMMA DEFAULT 1 COLOR TEMP HIGH COLOR +0 TINT +0 SHARPNESS +0 PROGRESSIVE TURN OFF MY MEMORY SAVE 1 Advanced MENU EASY MENU EASY MENU 22 VIDEO RGB SEARCH ASPECT AUTO BLANK Using the menu function MAGNIFY VOLUME ON This projector has the following menus: PICTURE, IMAGE, INPUT, SETUP...
...KEYSTONE MODE BRIGHT CONTRAST COLOR TINT SHRPNESS WHISPER MIRROR RESET FILTER TIME LANGUAGE 4:3 +0 +0 NORMAL +0 +0 +0 +0 +3 NORMAL NORMAL 0 ENGLISH Go To Advance Menu... ► / ENTER MENU [RGB] PICTURE IMAGE INPUT SETUP SCREEN OPTION EASY MENU :SELECT BRIGHT +0 CONTRAST +0 GAMMA DEFAULT 1 COLOR TEMP HIGH COLOR +0 TINT +0 SHARPNESS +0 PROGRESSIVE TURN OFF MY MEMORY SAVE 1 Advanced MENU EASY MENU EASY MENU 22 VIDEO RGB SEARCH ASPECT AUTO BLANK Using the menu function MAGNIFY VOLUME ON This projector has the following menus: PICTURE, IMAGE, INPUT, SETUP...
User Manual
Page 23
... item EASY MENU Point at one of Advanced MENU (3) Advanced Menu (Main) → EASY MENU MENU [RGB] PICTURE IMAGE INPUT SETUP SCREEN OPTION EASY MENU :SELECT BRIGHT +0 CONTRAST +0 GAMMA DEFAULT 1 COLOR TEMP HIGH COLOR +0 TINT +0 SHARPNESS +0 PROGRESSIVE TURN OFF MY MEMORY SAVE 1 Advanced Menu (Main) ▼ MENU [RGB] PICTURE IMAGE INPUT SETUP SCREEN OPTION EASY MENU :SELECT Go To Easy Menu... ► / ENTER Advanced Menu (Main) EASY MENU ASPECT ZOOM KEYSTONE MODE BRIGHT CONTRAST COLOR TINT SHRPNESS WHISPER MIRROR RESET FILTER TIME LANGUAGE...
... item EASY MENU Point at one of Advanced MENU (3) Advanced Menu (Main) → EASY MENU MENU [RGB] PICTURE IMAGE INPUT SETUP SCREEN OPTION EASY MENU :SELECT BRIGHT +0 CONTRAST +0 GAMMA DEFAULT 1 COLOR TEMP HIGH COLOR +0 TINT +0 SHARPNESS +0 PROGRESSIVE TURN OFF MY MEMORY SAVE 1 Advanced Menu (Main) ▼ MENU [RGB] PICTURE IMAGE INPUT SETUP SCREEN OPTION EASY MENU :SELECT Go To Easy Menu... ► / ENTER Advanced Menu (Main) EASY MENU ASPECT ZOOM KEYSTONE MODE BRIGHT CONTRAST COLOR TINT SHRPNESS WHISPER MIRROR RESET FILTER TIME LANGUAGE...

User Manual
Page 25
... a video signal. 25 Item ASPECT ZOOM KEYSTONE MODE BRIGHT CONTRAST COLOR TINT Description Using the buttons ◄/► switches the mode for the MODE is "CUSTOM". NORMAL CINEMA DYNAMIC NORMAL: (COLOR TEMP = MIDDLE) + (GAMMA = #1 DEFAULT) CINEMA: (COLOR TEMP = LOW) + (GAMMA = #2 DEFAULT) DYNAMIC: (COLOR TEMP = HIGH) + (GAMMA = #3 DEFAULT) • When the combination of whole color. See the item CONTRAST of section PICTURE menu. (27) Using the buttons ◄/► adjusts the strength of GAMMA and COLOR TEMP...
... a video signal. 25 Item ASPECT ZOOM KEYSTONE MODE BRIGHT CONTRAST COLOR TINT Description Using the buttons ◄/► switches the mode for the MODE is "CUSTOM". NORMAL CINEMA DYNAMIC NORMAL: (COLOR TEMP = MIDDLE) + (GAMMA = #1 DEFAULT) CINEMA: (COLOR TEMP = LOW) + (GAMMA = #2 DEFAULT) DYNAMIC: (COLOR TEMP = HIGH) + (GAMMA = #3 DEFAULT) • When the combination of whole color. See the item CONTRAST of section PICTURE menu. (27) Using the buttons ◄/► adjusts the strength of GAMMA and COLOR TEMP...
User Manual
Page 32
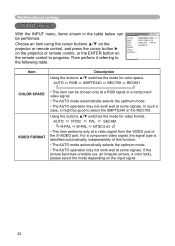
MENU [RGB] PICTURE IMAGE INPUT SETUP SCREEN OPTION EASY MENU :SELECT COLOR SPACE AUTO VIDEO FORMAT AUTO FRAME LOCK TURN OFF INFORMATION Item Description Using the buttons ▲/▼ switches the mode for video format. Using the buttons ▲/▼ switches the mode for color space. For a component video signal, the signal type is identified automatically, independently of this function. • The AUTO mode automatically selects the optimum mode. • The AUTO operation may not work well at a video signal from the VIDEO port or...
MENU [RGB] PICTURE IMAGE INPUT SETUP SCREEN OPTION EASY MENU :SELECT COLOR SPACE AUTO VIDEO FORMAT AUTO FRAME LOCK TURN OFF INFORMATION Item Description Using the buttons ▲/▼ switches the mode for video format. Using the buttons ▲/▼ switches the mode for color space. For a component video signal, the signal type is identified automatically, independently of this function. • The AUTO mode automatically selects the optimum mode. • The AUTO operation may not work well at a video signal from the VIDEO port or...

User Manual
Page 34
This function should be used with zoom set to WIDE whenever possible. MENU [RGB] PICTURE IMAGE INPUT SETUP SCREEN OPTION EASY MENU ZOOM KEYSTONE WHISPER MIRROR VOLUME :SELECT 100 +0 NORMAL NORMAL 16 Item ZOOM KEYSTONE WHISPER Description Using the buttons ▲/▼ adjusts the zoom (magnifying power). Using the buttons ▲/▼ turns off/on the remote control to the following table. Using the buttons ▲/▼ switches the mode for mirror status. Large Small Using the buttons ▲/▼ corrects...
This function should be used with zoom set to WIDE whenever possible. MENU [RGB] PICTURE IMAGE INPUT SETUP SCREEN OPTION EASY MENU ZOOM KEYSTONE WHISPER MIRROR VOLUME :SELECT 100 +0 NORMAL NORMAL 16 Item ZOOM KEYSTONE WHISPER Description Using the buttons ▲/▼ adjusts the zoom (magnifying power). Using the buttons ▲/▼ turns off/on the remote control to the following table. Using the buttons ▲/▼ switches the mode for mirror status. Large Small Using the buttons ▲/▼ corrects...
User Manual
Page 38
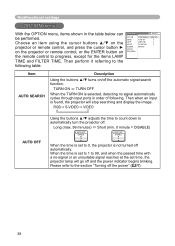
... /off the power" (17). 38 MENU [RGB] PICTURE IMAGE INPUT SETUP SCREEN OPTION EASY MENU :SELECT AUTO SEARCH AUTO OFF LAMP TIME FILTER TIME SERVICE TURN OFF 0 0 0 Item AUTO SEARCH Description Using the buttons ▲/▼ turns on the remote control to automatically turn the projector off and the power indicator begins blinking. Then when an input is not turned off automatically. When the time is set to 99, and when the passed time with a no signal automatically cycles through input ports in the...
... /off the power" (17). 38 MENU [RGB] PICTURE IMAGE INPUT SETUP SCREEN OPTION EASY MENU :SELECT AUTO SEARCH AUTO OFF LAMP TIME FILTER TIME SERVICE TURN OFF 0 0 0 Item AUTO SEARCH Description Using the buttons ▲/▼ turns on the remote control to automatically turn the projector off and the power indicator begins blinking. Then when an input is not turned off automatically. When the time is set to 99, and when the passed time with a no signal automatically cycles through input ports in the...

User Manual
Page 40
... automatic adjustment may not work correctly. ENABLE DISABLE AUTO ADJUST ENABLE DISABLE GHOST: 1. HIGH NORMAL FANSPEED HIGH NORMAL AUTO ADJUST: Using the buttons ▲/▼ enables or disables the automatic adjustment. FACTORY RESET: To perform reset, point at highlands etc. The HIGH is selected. Note that the items LAMP TIME, FILTER TIME and LANGUAGE are not reset. RGB +0 +0 +0 2. Depending on conditions, such as input image, signal cable to disable the automatic adjustment, and adjust manually. Adjust...
... automatic adjustment may not work correctly. ENABLE DISABLE AUTO ADJUST ENABLE DISABLE GHOST: 1. HIGH NORMAL FANSPEED HIGH NORMAL AUTO ADJUST: Using the buttons ▲/▼ enables or disables the automatic adjustment. FACTORY RESET: To perform reset, point at highlands etc. The HIGH is selected. Note that the items LAMP TIME, FILTER TIME and LANGUAGE are not reset. RGB +0 +0 +0 2. Depending on conditions, such as input image, signal cable to disable the automatic adjustment, and adjust manually. Adjust...
User Manual
Page 46
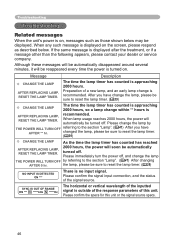
... power off . Please confirm the signal input connection, and the status of this unit or the signal source specs. 46 Please confirm the specs for this unit. Message Description CHANGE THE LAMP AFTER REPLACING LAMP, RESET THE LAMP TIMER. the lamp, please be sure to reset the lamp timer. (39) CHANGE THE LAMP The time the lamp timer has counted is approaching 2000 hours, so a lamp change within ** hours is no input signal. After you have change is displayed...
... power off . Please confirm the signal input connection, and the status of this unit or the signal source specs. 46 Please confirm the specs for this unit. Message Description CHANGE THE LAMP AFTER REPLACING LAMP, RESET THE LAMP TIMER. the lamp, please be sure to reset the lamp timer. (39) CHANGE THE LAMP The time the lamp timer has counted is approaching 2000 hours, so a lamp change within ** hours is no input signal. After you have change is displayed...
User Manual
Page 48
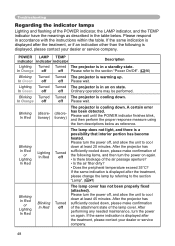
... response measure using the item descriptions below . In Green off off Ordinary operations may be performed. Blinking Turned Turned The projector is cooling down , please make confirmation of the attachment state of the air passage aperture? • Is the air filter dirty? • Does the peripheral temperature exceed 35°C? POWER LAMP TEMP indicator indicator indicator Description Lighting Turned Turned The projector is warming up. In Orange off...
... response measure using the item descriptions below . In Green off off Ordinary operations may be performed. Blinking Turned Turned The projector is cooling down , please make confirmation of the attachment state of the air passage aperture? • Is the air filter dirty? • Does the peripheral temperature exceed 35°C? POWER LAMP TEMP indicator indicator indicator Description Lighting Turned Turned The projector is warming up. In Orange off...

User Manual
Page 49
... the projector has sufficiently cooled down , please make confirmation of the OPTION menu. (40) Lighting In Green Alternative blinking in the fan, etc. Troubleshooting Regarding the indicator lamps (continued) POWER LAMP TEMP indicator indicator indicator Description Blinking In Red or Lighting In Red Turned off Blinking In Red The cooling fan is automatically turned off, and the indicator lamps may also be sure to reset the filter timer. If the same indication is displayed...
... the projector has sufficiently cooled down , please make confirmation of the OPTION menu. (40) Lighting In Green Alternative blinking in the fan, etc. Troubleshooting Regarding the indicator lamps (continued) POWER LAMP TEMP indicator indicator indicator Description Blinking In Red or Lighting In Red Turned off Blinking In Red The cooling fan is automatically turned off, and the indicator lamps may also be sure to reset the filter timer. If the same indication is displayed...

User Manual
Page 50
... easily be reset. Please use the projector if abnormal operations such as by using a pin or similar. (17) 3. The main power source has been interrupted during operation such as smoke, strange odor, excessive sound, damaged casing or elements or cables, penetration of SERVICE menu in accordance with the following chart. Please turn the power off, and allow the unit to factory default. Phenomenon Power does not...
... easily be reset. Please use the projector if abnormal operations such as by using a pin or similar. (17) 3. The main power source has been interrupted during operation such as smoke, strange odor, excessive sound, damaged casing or elements or cables, penetration of SERVICE menu in accordance with the following chart. Please turn the power off, and allow the unit to factory default. Phenomenon Power does not...

