

Owners Guide
Page 2
... 16 WHEN USING WITH THE AC ADAPTER/CHARGER (Provided 16 WHEN USING WITH THE CAR BATTERY (By using optional car battery cord Hitachi VMCC70A)...17 CHECKING THE BATTERY ...18 CHARGING A BATTERY ...19 MAKING A SAMPLE RECORDING 21 IDENTIFICATION AND OPERATION OF CONTROLS 25 DATE/TIME Setting ...30 To correct date/time ...storage 46 Recording titles on a tape in the camera/recorder 46 Recording titles on another VCR while playing a tape back with the camcorder 47 Chart of characters available in the titler 47 VIEWING THE PICTURE PLAYED BACK ON YOUR TV 48 STILL ...50 FORWARD AND REVERSE SEARCH...
... 16 WHEN USING WITH THE AC ADAPTER/CHARGER (Provided 16 WHEN USING WITH THE CAR BATTERY (By using optional car battery cord Hitachi VMCC70A)...17 CHECKING THE BATTERY ...18 CHARGING A BATTERY ...19 MAKING A SAMPLE RECORDING 21 IDENTIFICATION AND OPERATION OF CONTROLS 25 DATE/TIME Setting ...30 To correct date/time ...storage 46 Recording titles on a tape in the camera/recorder 46 Recording titles on another VCR while playing a tape back with the camcorder 47 Chart of characters available in the titler 47 VIEWING THE PICTURE PLAYED BACK ON YOUR TV 48 STILL ...50 FORWARD AND REVERSE SEARCH...
Owners Guide
Page 7
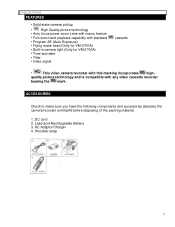
... macro feature • Full record and playback capability with standard • Program AE (Auto Exposure) • Flying erase head (Only for VM-2700A) • Built-in camera light (Only for VM-2700A) • Time and date • Titler • Index signal cassette * This video camera/recorder with any video cassette recorder bearing...
... macro feature • Full record and playback capability with standard • Program AE (Auto Exposure) • Flying erase head (Only for VM-2700A) • Built-in camera light (Only for VM-2700A) • Time and date • Titler • Index signal cassette * This video camera/recorder with any video cassette recorder bearing...

Owners Guide
Page 8
... the video product and in a handy place for future reference. 3 Heed Warnings -- To prevent electric shock do not use this can be operated only from battery power, or other sources, refer to the operating instructions. 6 Overloading -- If you are unable to insert the plug fully into the power outlet only one...
... the video product and in a handy place for future reference. 3 Heed Warnings -- To prevent electric shock do not use this can be operated only from battery power, or other sources, refer to the operating instructions. 6 Overloading -- If you are unable to insert the plug fully into the power outlet only one...

Owners Guide
Page 12
... 11. Make sure cord is located so that provides guidelines for AC Adaptor/Charger Model VM-AC68A (T) 2. That extension cord is required. and C. Do not disassemble charger; Save these instructions - Before using battery. 3. That wire size should not be used unless absolutely necessary. take it has received...the CATV system installer's attention to Article 820-40 of the NEC that it to the grounding system of injury, charge only rechargeable battery, VM-BP64/BP65/ BP66/BP67. Caution--To reduce the risk of the building, 12 Use of extension cord (feet) 18 Equal to ...
... 11. Make sure cord is located so that provides guidelines for AC Adaptor/Charger Model VM-AC68A (T) 2. That extension cord is required. and C. Do not disassemble charger; Save these instructions - Before using battery. 3. That wire size should not be used unless absolutely necessary. take it has received...the CATV system installer's attention to Article 820-40 of the NEC that it to the grounding system of injury, charge only rechargeable battery, VM-BP64/BP65/ BP66/BP67. Caution--To reduce the risk of the building, 12 Use of extension cord (feet) 18 Equal to ...

Owners Guide
Page 16
...and remove. Plug the AC adaptor/charger power cord into the groves, and slide the battery downward, as illustrated. • To remove the battery: Push and hold "Battery" release lever, then slide the battery to the "DC OUTPUT" of the AC adaptor/charger. POWER SOURCES POWER SOURCES WHEN USING... WITH THE BATTERY (Provided) • To attach, align the mark " " of the battery with that of the camera/recorder so that the battery fits into AC electrical outlet. 2. NOTES: • The AC adaptor/charger cannot charge the battery and operate the camera/recorder at ...
...and remove. Plug the AC adaptor/charger power cord into the groves, and slide the battery downward, as illustrated. • To remove the battery: Push and hold "Battery" release lever, then slide the battery to the "DC OUTPUT" of the AC adaptor/charger. POWER SOURCES POWER SOURCES WHEN USING... WITH THE BATTERY (Provided) • To attach, align the mark " " of the battery with that of the camera/recorder so that the battery fits into AC electrical outlet. 2. NOTES: • The AC adaptor/charger cannot charge the battery and operate the camera/recorder at ...

Owners Guide
Page 17
...camera/recorder, please use only the specified car battery cord. 17 Connect the other end of the camera/recorder. 2. POWER SOURCES • When using the AC adaptor/charger to power the camera/recorder. WHEN USING WITH THE CAR BATTERY (By using the AC adaptor/charger to ...power the camera/recorder, the battery level indicator may display " ". This indicator is designed to be used for battery operation and has no meaning when using optional car battery cord Hitachi VM-CC70A) 1. NOTES: • The car battery cord is used only with automobiles having a 12-...
...camera/recorder, please use only the specified car battery cord. 17 Connect the other end of the camera/recorder. 2. POWER SOURCES • When using the AC adaptor/charger to power the camera/recorder. WHEN USING WITH THE CAR BATTERY (By using the AC adaptor/charger to ...power the camera/recorder, the battery level indicator may display " ". This indicator is designed to be used for battery operation and has no meaning when using optional car battery cord Hitachi VM-CC70A) 1. NOTES: • The car battery cord is used only with automobiles having a 12-...

Owners Guide
Page 18
... change to " ". When the battery is very near empty, the symbol will change to use your camera/recorder. 18 CHECKING THE BATTERY CHECKING THE BATTERY When the " " indication appears in the viewfinder indicating the condition of camera/recording battery. NOTE: When the camera/recorder is... turned on, the battery level indicator " " is displayed in the viewfinder and...
... change to " ". When the battery is very near empty, the symbol will change to use your camera/recorder. 18 CHECKING THE BATTERY CHECKING THE BATTERY When the " " indication appears in the viewfinder indicating the condition of camera/recording battery. NOTE: When the camera/recorder is... turned on, the battery level indicator " " is displayed in the viewfinder and...

Owners Guide
Page 19
Plug the AC adaptor/charger power cord into AC electrical outlet. 2. Attach the battery to charge the battery. CHARGING A BATTERY CHARGING A BATTERY 1. Align the mark " " on the battery with that of AC adaptor/charger and push the battery flush with the AC adaptor/charger and slide it in the direction of arrow. If the ...DC cord is connected, "CHARGE" light will go out when the battery is accepting a charge, and will not light. 3. NOTE: You must remove the DC cord from the AC adaptor/charger to the AC adaptor/...
Plug the AC adaptor/charger power cord into AC electrical outlet. 2. Attach the battery to charge the battery. CHARGING A BATTERY CHARGING A BATTERY 1. Align the mark " " on the battery with that of AC adaptor/charger and push the battery flush with the AC adaptor/charger and slide it in the direction of arrow. If the ...DC cord is connected, "CHARGE" light will go out when the battery is accepting a charge, and will not light. 3. NOTE: You must remove the DC cord from the AC adaptor/charger to the AC adaptor/...

Owners Guide
Page 20
...local laws, it may be allowed to disassemble or modify the battery. The battery is recyclable. The battery should be damaged if operated at a temperature of time. Throwing the battery into the municipal waste stream. A battery charged after being attached. 9. Operation time will gradually decrease. Do...end of this means your area for an extended length of operating time (depending on the AC adaptor/charger start flashing, remove the battery and then reattach it at least once every six months. two hours. 2. After repeated chargings and use zoom and pause). 2....
...local laws, it may be allowed to disassemble or modify the battery. The battery is recyclable. The battery should be damaged if operated at a temperature of time. Throwing the battery into the municipal waste stream. A battery charged after being attached. 9. Operation time will gradually decrease. Do...end of this means your area for an extended length of operating time (depending on the AC adaptor/charger start flashing, remove the battery and then reattach it at least once every six months. two hours. 2. After repeated chargings and use zoom and pause). 2....

Owners Guide
Page 28
... this button starts the tape to record a scene. "DC IN 9.6V" Jack When using the AC adaptor/charger (provided) or the car battery cord (optional), connect this tab when you are ready to begin recording. NOTE: Power source must be also used to the normal position. "W":... Picture becomes wider gradually. Lens Cap Tab • Place the lens cap on , turn this control for best picture. "BATTERY" Release Lever Releases the battery attached to best fit your optimum focus adjustment. "REC/PAUSE" Button This button is pressed again, " " appears instead of "REC" ...
... this button starts the tape to record a scene. "DC IN 9.6V" Jack When using the AC adaptor/charger (provided) or the car battery cord (optional), connect this tab when you are ready to begin recording. NOTE: Power source must be also used to the normal position. "W":... Picture becomes wider gradually. Lens Cap Tab • Place the lens cap on , turn this control for best picture. "BATTERY" Release Lever Releases the battery attached to best fit your optimum focus adjustment. "REC/PAUSE" Button This button is pressed again, " " appears instead of "REC" ...

Owners Guide
Page 30
...the correct month appears, press "STOP/EJECT" button. 4. Hold button down to advance rapidly. Charge the backup battery every two months. Set "POWER" switch to "OFF" position and connect a charged battery or AC adaptor/charger to the camera/recorder for the current date and time. If it is rechargeable. Press... Press and hold the small button on your tape to act as a handy reference when viewing them at a later time. The time backup battery is not charged periodically, it will be over-discharged and its life will be shortened. • A cassette cannot be loaded or ejected when...
...the correct month appears, press "STOP/EJECT" button. 4. Hold button down to advance rapidly. Charge the backup battery every two months. Set "POWER" switch to "OFF" position and connect a charged battery or AC adaptor/charger to the camera/recorder for the current date and time. If it is rechargeable. Press... Press and hold the small button on your tape to act as a handy reference when viewing them at a later time. The time backup battery is not charged periodically, it will be over-discharged and its life will be shortened. • A cassette cannot be loaded or ejected when...

Owners Guide
Page 56
... the camera/recorder. Make sure that a fully charged battery pack or AC adaptor/charger is about a half. 1. CAUTION: • Turn the camera light on only when you wish to shoot objects in dark places. USING THE BUILT-IN CAMERA LIGHT (only for VM-2700A) USING THE BUILT-IN CAMERA LIGHT (only for... VM-2700A) Use the built-in camera light it you need it is loaded. When the "LIGHT" switch is set to "AUTO", the camera light does not turn on when a fully charged battery pack is turned on whenever you make a recording. Set the "POWER...
... the camera/recorder. Make sure that a fully charged battery pack or AC adaptor/charger is about a half. 1. CAUTION: • Turn the camera light on only when you wish to shoot objects in dark places. USING THE BUILT-IN CAMERA LIGHT (only for VM-2700A) USING THE BUILT-IN CAMERA LIGHT (only for... VM-2700A) Use the built-in camera light it you need it is loaded. When the "LIGHT" switch is set to "AUTO", the camera light does not turn on when a fully charged battery pack is turned on whenever you make a recording. Set the "POWER...

Owners Guide
Page 61
... Load cassette in direction indicated by cassette compartment. of focus. Set "POWER" switch to "CAM". Auto-focus does not operate. BATTERY CONDITION Symptom Check Point & Correction The " " indication in the Remove the lens cap. when you slide "EJECT" button Cassette...to "CAM" position. CAMERA RECORDING SYMPTOM CHECK POINT & CORRECTION Picture does not appear in the electronic Try another battery or charge the viewfinder battery. It has been carefully checked and adjusted at the factory under the most rigid quality control and inspection systems. ...
... Load cassette in direction indicated by cassette compartment. of focus. Set "POWER" switch to "CAM". Auto-focus does not operate. BATTERY CONDITION Symptom Check Point & Correction The " " indication in the Remove the lens cap. when you slide "EJECT" button Cassette...to "CAM" position. CAMERA RECORDING SYMPTOM CHECK POINT & CORRECTION Picture does not appear in the electronic Try another battery or charge the viewfinder battery. It has been carefully checked and adjusted at the factory under the most rigid quality control and inspection systems. ...


