
Owners Guide
Page 2
... of Angles ...26 Date Recording ...29 Using the Power Zoom ...30 Using the Digital Zoom ...30 Using the I. For Your Safety - 2 - ZOOM (Instant Zoom) Button 31 Using Macro ...31 Using Auto Focus ...31 Using Manual Focus ...32 Camera Menu Features...33 Date Search...35 Using Fade ...35 Using Instant Review ...36 Using Quick Edit ...37 Using the Wireless Remote Control 37 Memory Feature ...37 Creating and Recording A Title ...38 Dubbing from the Camcorder to a VCR 40 Using Synchro Edit...40 Using Audio/Video Dubbing...41 Recording Television Programs ...41...
... of Angles ...26 Date Recording ...29 Using the Power Zoom ...30 Using the Digital Zoom ...30 Using the I. For Your Safety - 2 - ZOOM (Instant Zoom) Button 31 Using Macro ...31 Using Auto Focus ...31 Using Manual Focus ...32 Camera Menu Features...33 Date Search...35 Using Fade ...35 Using Instant Review ...36 Using Quick Edit ...37 Using the Wireless Remote Control 37 Memory Feature ...37 Creating and Recording A Title ...38 Dubbing from the Camcorder to a VCR 40 Using Synchro Edit...40 Using Audio/Video Dubbing...41 Recording Television Programs ...41...
Owners Guide
Page 3
... shock. The camcorder and AC adapter/charger have sufficient magnitude to avoid any inside part of time, turn the camcorder off , leaving the date/time feature unaffected. Therefore, it back correctly. Using the Tiltable Monopod and Camera Mount 42 Attaching the Optional Wide or Tele Converter Lens 43 General Maintenance...44 Cleaning the Camcorder Heads...44 Cleaning the Lens and LCD Screen 44 Periodic Maintenance ...44 Troubleshooting ...45 Specifications ...48 Accessories...
... shock. The camcorder and AC adapter/charger have sufficient magnitude to avoid any inside part of time, turn the camcorder off , leaving the date/time feature unaffected. Therefore, it back correctly. Using the Tiltable Monopod and Camera Mount 42 Attaching the Optional Wide or Tele Converter Lens 43 General Maintenance...44 Cleaning the Camcorder Heads...44 Cleaning the Lens and LCD Screen 44 Periodic Maintenance ...44 Troubleshooting ...45 Specifications ...48 Accessories...
Owners Guide
Page 6
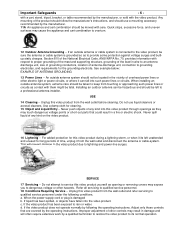
... this video product through openings as opening or removing covers may touch dangerous voltage points or short-out parts that are covered by the operating instructions. When the power-supply cord or plug is grounded so as contact with respect to proper grounding of the mast and supporting structure, grounding of other controls may cause the appliance and cart combination to qualified service...
... this video product through openings as opening or removing covers may touch dangerous voltage points or short-out parts that are covered by the operating instructions. When the power-supply cord or plug is grounded so as contact with respect to proper grounding of the mast and supporting structure, grounding of other controls may cause the appliance and cart combination to qualified service...
Owners Guide
Page 7
... guide you . You can prevent fire, electric shock or other products (including amplifiers) that the replacements he uses have been designed for AC Adapter/Charger Model VM-ACL1A. 2. IMPORTANT SAFETY INSTRUCTIONS FOR AC ADAPTER/CHARGER - 7 - f. When replacement parts are the same number, size, and shape as possible, so it to a qualified serviceman when service or repair is required. IMPORTANT SAFETY INSTRUCTIONS FOR AC ADAPTER/CHARGER 1. This page contains important safety and operating instructions...
... guide you . You can prevent fire, electric shock or other products (including amplifiers) that the replacements he uses have been designed for AC Adapter/Charger Model VM-ACL1A. 2. IMPORTANT SAFETY INSTRUCTIONS FOR AC ADAPTER/CHARGER - 7 - f. When replacement parts are the same number, size, and shape as possible, so it to a qualified serviceman when service or repair is required. IMPORTANT SAFETY INSTRUCTIONS FOR AC ADAPTER/CHARGER 1. This page contains important safety and operating instructions...
Owners Guide
Page 8
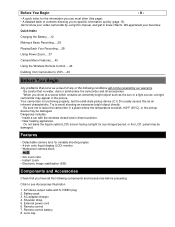
... directly. Shoulder strap 5. Do not leave the liquid crystal (LCD) screen facing sunlight for variable shooting angles • 4-inch color liquid display (LCD) monitor • Waterproof camera block • • 24x zoom ratio • Instant zoom • Electronic Image stabilization (EIS) Components and Accessories Check that you have all accessories. Battery pack 3. External power cord 6. AV stereo output cable with the windows closed and in the picture. Remote control battery 8. Lens cap Remote control 7. When you shoot...
... directly. Shoulder strap 5. Do not leave the liquid crystal (LCD) screen facing sunlight for variable shooting angles • 4-inch color liquid display (LCD) monitor • Waterproof camera block • • 24x zoom ratio • Instant zoom • Electronic Image stabilization (EIS) Components and Accessories Check that you have all accessories. Battery pack 3. External power cord 6. AV stereo output cable with the windows closed and in the picture. Remote control battery 8. Lens cap Remote control 7. When you shoot...

Owners Guide
Page 10
... shown in the camcorder. Set the CAM/OFF/VIDEO switch of the camcorder. It is reduced to a half to replace your Hitachi 8mm camcorder. Refer to "Camcorder Battery" on the LCD screen, use the LCD cleaner provided to wipe it fit into the outlet either contact an electrician to one-third depending on the lens, clear pictures cannot be recorded. Attach the other end of the external power cord to do...
... shown in the camcorder. Set the CAM/OFF/VIDEO switch of the camcorder. It is reduced to a half to replace your Hitachi 8mm camcorder. Refer to "Camcorder Battery" on the LCD screen, use the LCD cleaner provided to wipe it fit into the outlet either contact an electrician to one-third depending on the lens, clear pictures cannot be recorded. Attach the other end of the external power cord to do...
Owners Guide
Page 12
... take a charge and must be useful, replace the battery. When the battery is unable to carry the camcorder. If the CHARGE indicator flashes during charging, remove the battery and then reattach it to "OFF". Do not attach a hot battery to "CAM" or "VIDEO". The light turns off when charging is set the CAM/OFF/VIDEO switch of the camcorder to cool. Note: When the car adapter/charger is ejected from the AC adapter/charger a green color marker will...
... take a charge and must be useful, replace the battery. When the battery is unable to carry the camcorder. If the CHARGE indicator flashes during charging, remove the battery and then reattach it to "OFF". Do not attach a hot battery to "CAM" or "VIDEO". The light turns off when charging is set the CAM/OFF/VIDEO switch of the camcorder to cool. Note: When the car adapter/charger is ejected from the AC adapter/charger a green color marker will...

Owners Guide
Page 18
... the CAM/OFF/VIDEO switch and then set the date and time now. Press the play or stop button to the camcorder for recording and playback, using seven dashes. This feature is not charged periodically, it will be overdischarged and its life will disappear. If it is handy when recording since it to run . Press and hold the red button on the camera/recorder to OFF and connect a charged battery or the AC adapter/charger...
... the CAM/OFF/VIDEO switch and then set the date and time now. Press the play or stop button to the camcorder for recording and playback, using seven dashes. This feature is not charged periodically, it will be overdischarged and its life will disappear. If it is handy when recording since it to run . Press and hold the red button on the camera/recorder to OFF and connect a charged battery or the AC adapter/charger...

Owners Guide
Page 19
... button. Lens Hood 3. EJECT Switch Pressing gives you higher numbers while gives you want to set the month. Use , and to set. Pressing to display the month you lower numbers. 6. Lens F1.6 (4~48mm) 12:1 power zoom lens with auto focus and auto iris functions. Note: After the date is set AM or PM starts the clock. Press the fast forward or rewind button to set , the DATE MODE option changes from the direction in which the microphone...
... button. Lens Hood 3. EJECT Switch Pressing gives you higher numbers while gives you want to set the month. Use , and to set. Pressing to display the month you lower numbers. 6. Lens F1.6 (4~48mm) 12:1 power zoom lens with auto focus and auto iris functions. Note: After the date is set AM or PM starts the clock. Press the fast forward or rewind button to set , the DATE MODE option changes from the direction in which the microphone...
Owners Guide
Page 20
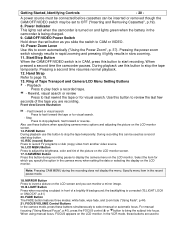
... tape temporarily. Start/Stop Button When the CAM/OFF/VIDEO switch is turned on the LCD monitor. When pressed a second time the camcorder pauses. Ring of the tape you specify the option in the camera menu when setting the date or selecting the display on and lights green when the battery in front of the picture on the LCD monitor screen. 17. Use this button to zoom automatically ("Using the Power Zoom", p. 37). Specify menu item in slow zooming. 11. CAM/OFF/VIDEO Power Switch...
... tape temporarily. Start/Stop Button When the CAM/OFF/VIDEO switch is turned on the LCD monitor. When pressed a second time the camcorder pauses. Ring of the tape you specify the option in the camera menu when setting the date or selecting the display on and lights green when the battery in front of the picture on the LCD monitor screen. 17. Use this button to zoom automatically ("Using the Power Zoom", p. 37). Specify menu item in slow zooming. 11. CAM/OFF/VIDEO Power Switch...

Owners Guide
Page 22
...setting. 5. The LCD picture adjustment screen will appear. When the temperature inside the camcorder rises, the brightness of the picture on the remote control cannot change . 1. R: red G: green 3. Press the LCD MENU button. Getting Started, Identifying Controls - 22 - W: Picture becomes wider gradually. T: Picture becomes telescopic gradually. Note: The zoom switch on the LCD monitor using the menu display. Controlling the Picture on LCD Monitor Screen: • Do not touch the LCD screen with you slide it is pressed. 4. The LCD picture adjustment...
...setting. 5. The LCD picture adjustment screen will appear. When the temperature inside the camcorder rises, the brightness of the picture on the remote control cannot change . 1. R: red G: green 3. Press the LCD MENU button. Getting Started, Identifying Controls - 22 - W: Picture becomes wider gradually. T: Picture becomes telescopic gradually. Note: The zoom switch on the LCD monitor using the menu display. Controlling the Picture on LCD Monitor Screen: • Do not touch the LCD screen with you slide it is pressed. 4. The LCD picture adjustment...

Owners Guide
Page 23
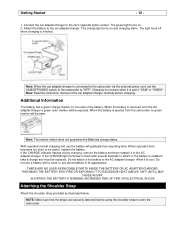
... the cassette is now ready to a power source ("Loading Batteries: Camcorder Battery", p.17, "Using Alternative Power Sources", p.18). 2. Hooking up the camcorder to your backyard. To record press the Start/Stop button. Once familiar with how the machine works you can be seen more sophisticated features with the controls. Press the red button on the LCD monitor and the camcorder records the picture you are correct. This section guides you...
... the cassette is now ready to a power source ("Loading Batteries: Camcorder Battery", p.17, "Using Alternative Power Sources", p.18). 2. Hooking up the camcorder to your backyard. To record press the Start/Stop button. Once familiar with how the machine works you can be seen more sophisticated features with the controls. Press the red button on the LCD monitor and the camcorder records the picture you are correct. This section guides you...

Owners Guide
Page 29
... turning it to record. AUTO - you want to CAM. 2. the recording is replaced. - No Date Recording The camcorder does not record the date. Press the CAM MENU button. Press the play or stop button to specify the date display you select AUTO again. - DATE/TIME - The menu appears on the LCD monitor. Press the fast forward or rewind button to select DATE MODE. 4. Date Recording When the date has been set, the camcorder will enter the automatic date recording mode automatically. Note: The camcorder records the same date...
... turning it to record. AUTO - you want to CAM. 2. the recording is replaced. - No Date Recording The camcorder does not record the date. Press the CAM MENU button. Press the play or stop button to specify the date display you select AUTO again. - DATE/TIME - The menu appears on the LCD monitor. Press the fast forward or rewind button to select DATE MODE. 4. Date Recording When the date has been set, the camcorder will enter the automatic date recording mode automatically. Note: The camcorder records the same date...

Owners Guide
Page 35
... VIDEO. 2. is displayed when you have ejected the cassette, this item to a white screen. White fade: Fades in place of the set the date ("Setting the Date and Time", p.21). Date Search The date search function memorizes the start position from which you press the stop mode and "SEARCH" disappears from a white screen or fades out to select the display mode of the time counter. 4. Note: The battery remaining power level is not displayed. Press the CAM MENU button...
... VIDEO. 2. is displayed when you have ejected the cassette, this item to a white screen. White fade: Fades in place of the set the date ("Setting the Date and Time", p.21). Date Search The date search function memorizes the start position from which you press the stop mode and "SEARCH" disappears from a white screen or fades out to select the display mode of the time counter. 4. Note: The battery remaining power level is not displayed. Press the CAM MENU button...

Owners Guide
Page 38
... beside the time counter and the counter memory function is contained on the LCD monitor. The linear time counter clears to a power source. 2. Connect the camcorder to 0:00:00M. 4. The linear time counter memory stops a rewinding tape at any time. The memory feature returns you wish to set the CAM/OFF/VIDEO switch to 16 characters per line. Press the stop button to stop playback, or press the start/stop button to stop recording and set this...
... beside the time counter and the counter memory function is contained on the LCD monitor. The linear time counter clears to a power source. 2. Connect the camcorder to 0:00:00M. 4. The linear time counter memory stops a rewinding tape at any time. The memory feature returns you wish to set the CAM/OFF/VIDEO switch to 16 characters per line. Press the stop button to stop playback, or press the start/stop button to stop recording and set this...

Owners Guide
Page 39
... displayed, the title is disabled when you record it . 7. Hold down the red button on a Tape in memory. See "Date Recording" on the remote control. 2. Once you can record normally. Use the STOP( ) button to select the character to correct the character. 4. Locate the point of your title, press PLAY ( ) to create a second title as you connect the optional AV input cord to the AV IN/OUT jack to set...
... displayed, the title is disabled when you record it . 7. Hold down the red button on a Tape in memory. See "Date Recording" on the remote control. 2. Once you can record normally. Use the STOP( ) button to select the character to correct the character. 4. Locate the point of your title, press PLAY ( ) to create a second title as you connect the optional AV input cord to the AV IN/OUT jack to set...

Owners Guide
Page 40
... cable to the AUDIO IN, VIDEO IN, and EDIT IN jacks of the yellow VIDEO plug. 3. Press the F.FWD, REW, STOP and Start/Stop buttons to the VCR instead of your camcorder. 2. Rewind to the point where you want to VIDEO. 4. Press the play button on the VCR. Note: Recording the title during tape transfer will erase a portion of the yellow VIDEO plug. 3. Connect the black S-VIDEO plug to pause the VCR. The Hitachi VM-H100LA uses a flying erase head...
... cable to the AUDIO IN, VIDEO IN, and EDIT IN jacks of the yellow VIDEO plug. 3. Press the F.FWD, REW, STOP and Start/Stop buttons to the VCR instead of your camcorder. 2. Rewind to the point where you want to VIDEO. 4. Press the play button on the VCR. Note: Recording the title during tape transfer will erase a portion of the yellow VIDEO plug. 3. Connect the black S-VIDEO plug to pause the VCR. The Hitachi VM-H100LA uses a flying erase head...

Owners Guide
Page 41
... pause mode. 10. Turn on the screen of the dubbed portion. Recording Television Programs If your camcorder. Connect the camcorder to the channel you can record television programs with your television or VCR has AUDIO OUT and VIDEO OUT jacks you wish to stop recording. Note: If the tape is played back while the AV input cable is disabled during audio/video dubbing. Use the wireless remote control and press the PLAY button. Press the PAUSE (START/STOP) button...
... pause mode. 10. Turn on the screen of the dubbed portion. Recording Television Programs If your camcorder. Connect the camcorder to the channel you can record television programs with your television or VCR has AUDIO OUT and VIDEO OUT jacks you wish to stop recording. Note: If the tape is played back while the AV input cable is disabled during audio/video dubbing. Use the wireless remote control and press the PLAY button. Press the PAUSE (START/STOP) button...
Owners Guide
Page 45
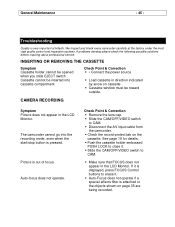
... is displayed, press FOCUS Control buttons to CAM. § Disconnect the AV input cable from the camcorder. § Check the record-protect tab on the cassette. Picture is very important at the factory under the most rigid quality control and inspection systems. If problems develop please check the following possible solutions before inquiring about professional service. Auto-focus does not operate. Check Point & Correction § Remove the lens cap. § Slide the CAM/OFF/VIDEO switch to erase...
... is displayed, press FOCUS Control buttons to CAM. § Disconnect the AV input cable from the camcorder. § Check the record-protect tab on the cassette. Picture is very important at the factory under the most rigid quality control and inspection systems. If problems develop please check the following possible solutions before inquiring about professional service. Auto-focus does not operate. Check Point & Correction § Remove the lens cap. § Slide the CAM/OFF/VIDEO switch to erase...

Owners Guide
Page 46
...-RECORDED CASSETTE Symptom "PLAY" button cannot be modified to be engaged. If recording is done with the power of the external microphone turned off during playback Date search function does not operate § Slide the CAM/OFF VIDEO switch to obtain best picture § When recording with camcorder. § Tape is recorded only on television set to the recording mode, even when the Start/Stop button on the camcorder is of RF output adapter. § When you are not using...
...-RECORDED CASSETTE Symptom "PLAY" button cannot be modified to be engaged. If recording is done with the power of the external microphone turned off during playback Date search function does not operate § Slide the CAM/OFF VIDEO switch to obtain best picture § When recording with camcorder. § Tape is recorded only on television set to the recording mode, even when the Start/Stop button on the camcorder is of RF output adapter. § When you are not using...


